Search the Community
Showing results for tags 'Train'.
-
 There's probably a couple of you who saw just the 1500km round-trip part in the "Shameful Confessions" thread. For those who don't know I'm from Canada. Tariffs are a pain here, and 12V lego is virtually non-existent anywhere in the Americas. If you spend 48 hours, you are permitted $800, so I managed to grab a few outer rails for my blue 12V stuff, a few cross overs and managed to snag a great deal on a pair of monorail points. Ever since seeing pictures on social media from a friend I've had the abandoned turnpike on my bucket-list. The key has been finding a legitimate reason to go there. An auction winning from just inside the Virginia border would finally be the catalyst - stated on E-bay local pickup only. After much back-and-forth between the sellers and myself, along with a friend's house that I stayed at - around the Pittsburgh area. We settled on a date, and then it was just me my car, my friends and 1500km on the road. (For those with a keen eye for violations, my car was in park while taking pictures in juristrictions where there are laws against that kind of thing. I also had some help in the car. It's about an hour an a half to the US border. I selected the "Rainbow Bridge" because it was the long weekend. The picture, and by far the clearest I've ever seen in my lifetime at that location, is the duty free store, just prior to hoping on the bring. It's usually more time efficient to cross at the Peace Bridge, but inbound visiting the US, it's usually the worst or near worst of the three options. In all I spent about 30 minutes in queue awaiting customs. It's a pretty spectacular view. This is the view just prior to entering Grand Island. There's not much on the island, other than a small them park of sorts, which looks very dated. There's a $1 toll to cross into the island. This view, you can see the Skylon Tower, Minolta and the Casino down by the Falls. Obviously the bridge to the island. I look some Panoramas, and eventually I'll get around to processing some of those. I love the blue on these bridges. I was just weirded out by these patterns, it's as if they wanted to prevent walking on grass at all costs. You can't really walk in a straight or perpendicular line at all, this is from the lookout, where the pic of the bridges was taken. Bridges leaving the island are more attractive. But man are they skinny!! Welcome to PA!! This was the 10 minutes of driving on the way out where it rained, not hard, just just got a little rain. PA is the northern border of where we can get this stuff and OMG!! That sweet, sweet nectar. I was so hungry but it was totally worth waiting for Pennsylvania for the Sweet Tea. I can't get this at home and every day without it I die a little inside.
 -
10254 Winter Holiday Train Ages 12+ 734 pieces US $99.99 - CA $129.99 - DE €89.99 - UK £69.99 - DK 799.00 DKK Euro pricing varies by country. Please visit shop.LEGO.com for regional pricing. Climb aboard the magical Winter Holiday Train! Gather the family for some festive LEGO® building fun with this charming model featuring a full circle of track, boarding platform with bench and lamppost, a Power Functions upgradable train engine with brick-built smoke bellowing from its stack, coal tender, flatbed wagon with a rotating holiday tree, toys and gifts, and a red caboose with a detailed interior and table. The train engine also features large and small red-colored locomotive wheels and the train is decorated with green wreathes, string lights and white tree elements. This LEGO® Creator Expert set includes 5 minifigures. Includes 5 minifigures: a locomotive driver, ticket collector, grandmother, boy and a girl. The Winter Holiday Train includes 16 curved pieces of track, engine, coal tender, flatbed wagon with holiday tree, toys and gifts, caboose, boarding platform, bench and a lamppost. Decorate the tree and drive the train to see the tree rotate. Join the ticket collector in the cozy caboose for a delicious cup of cocoa. Includes dual building instructions for a perfect family build. Accessory elements include green wreathes, decorative lights and white tree pieces, plus wrapped gift elements and tiny brick-built toys, including a micro train, wind-up car, fire truck, remote controlled robot, sailboat and a spaceship. Upgrade with LEGO® Power Functions (not included) for a motorized engine. Special elements include small and large red train wheels, dark tan windows, train buffers, cow catcher, white tree elements and roller skates. This set includes over 700 LEGO® pieces, including 16 curved tracks. The Holiday Train in total measures over 4” (12cm) high, 20” (52cm) long and 2” (7cm) wide. Curved rail track diameter measures over 27” (70cm). Available for sale directly through LEGO® beginning October 1, 2016 via shop.LEGO.com, LEGO® Stores or via phone: US Contact Center 1-800-453-4652 CA (English) Contact Center 1-800-453-4652 CA (French) Contact Center 1-877-518-5346 European Contact Center 00-800-5346-1111 LEGO, the LEGO logo and the Minifigure are trademarks of the LEGO Group. ©2016 The LEGO Group. All rights reserved. Media Here are some great pictures for you to enjoy. Click this link to see the hi-res versions.
-
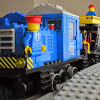
Hi all! I've been a long time guest and always appreciated people's detailed and helpful posts on topics I've researched. I am a long term 12v fan and have a fairly decent collection, which unfortunately stays packed away most of the time. I do hope to set up and will hopefully be able to share some stuff on here. Anyway, I'm on here for some advice regarding the 60051. I've recently decided to get my little boy started on Lego trains and managed to secure 2 sets for him. I thought this would be a really good starter set for him as he is only 4 at the moment and he loves inter-city trains! I was thinking of keeping the tracks from both sets and adding some points to make it a more interesting layout and adding the additional carriage. What I was wondering is what I can make with the two engines? Do they turn into more carriages easily enough/ with not many more additional parts? I was hoping to get as much out of the additional set as possible and maybe selling the PF parts to help fund more sets for him. Thanks in advance!
-
Hello all, It has been a bit silent from my part, but I have built something new: NS 1217 by Erwin, on Flickr The NS (Nederlandse spoorwegen/Dutch Railways) 1217 was part of the 1200 series which was a joint effort of Dutch and American designers as part of the Marshall plan. It was built in the fifties and have been in service until 1998, they were then sold of and repuposed at other transporters, with some still in service today. NS 1217 by Erwin, on Flickr NS 1217 by Erwin, on Flickr I have built a total of four carriages to accompany it, I will take some video's of them all running when I finish tweaking their designs. NS 1217 by Erwin, on Flickr My model has working lights in the front and back and 2 9V train motors. Thank you for reading/watching! As always, more pictures on my Flickr
-
Recently I came across an interesting ad for some 12V odds 'n ends, and decided to travel 85km or so, to make a purchase for $50. The person who sold this appeared to be a student, I was planning on asking how this ended up in Canada, as I cannot find any proof that any of the 12V stuff was ever sold here, but with her being younger I kinda gave up, she seemed eager to have her money and close to door transaction over before I could realize that some of the stuff wasn't in the best of condition. Here's what I got: - 90% of a 721 train (this is the engine only variant, and all of the unique parts) with a working 12V motor, and original instructions to build the train (I was missing much of the black section where the driver would go at the back). - A bunch of other 1969 era original instructions. - 2 transformers (one of the two had broken plugs wedged in it, the other had the european plug end cut off (I think that they were powering this with a car battery or other source) - 7 12V track switches - 8 Remotes for the 12V track switches. - 2 Track power pickup (not sure of the technical name, but they power the tracks and go to the transformer). - Random lego bricks that have nothing to do with this stuff, but are old - One broken 12V motor with a pair of power pickups. - 63 Straight 12V power rails - 63 Curved 12V power rails - 1 level road cross over piece that someone decided should match the track and coloured blue with a crayon or marker - It looks horrible!! Everything (aside from the wires) is in decent shape considering it's about a half century old. Absolutely no blue outer rails, I happened to have some because I have a 182 kicking around that I had purchased mistakenly from a newspaper ad around 1992 or so - not knowing that there was even such a thing as blue-era trains (I was kind of confused and disappointed when I got to the door and saw the set, after being very excited over the phone about it at the time). So I was able to test the track and trains (I only have a full circle of blue curves). My first attempt was using my grey era 12V transformer, and then the Blue era one after using pliers and working the broken plugs out of the switch power area. I'm not sure if anyone else has tried this, but I didn't think that the switches worked as well using the grey era transformer, and the train was most definitely faster at top speed forwards and reverse using the Blue era transformer. I'm assuming that you were intended to put the switch remotes on the top of the Blue era transformer, not sure??? They look good up there & fit perfectly. Definitely a purchase which has me scratching my head. I probably would have paid much more if they were asking it for this. It's very interesting to go back in time and try and work with this stuff, feel blessed to have gotten this lot.
-
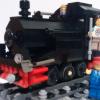
It has been a while, but here is my latest build BR Class 04 by Erwin, on Flickr It is a small shunter locomotive from the british rail. BR Class 04 by Erwin, on Flickr The doors are black because the needed windows would have cost me a fortune in dark green. BR Class 04 and small train by Erwin, on Flickr The reason I used 1X1 tiles instead of 1X2 is pure economical, the were about a third of the price, and available in a bricklink store about 15 minutes away from me. reference image from wikipedia.org Thanks for reading!
-
Good evening, folks. Just to make sure: As of now, 43 replies to this breathtaking train model posted in the Technic forum: http://www.eurobrick...howtopic=120736 As far as I am concerned, this is front page stuff. All the best, Thorsten
-
05th October 2015 I am aware that all Lego Trains are grouped under the collective L gauge. However what real world model railway gauge would best match the old 12.0 V / 4.5 V trains? I am currently considering that the old Hornby Clockwork O Gauge might be the closest match available. I would like to know as this would help influence my future builds. Thanks
-
Hey all, It was time again for a big train crash! This time 13 trains (why? because "13") that crash into a big station all at once. Rebuilding of the station wasn't necessary: I've used it over a year now and it's time for something else. (I don't know what yet). I had to use all of my straight sections of rails (a little over 400). The rails were all interconnected at the station and as power source I've used a modified ATX computer power supply. Mainly because I don't have enough regulators to power all the tracks seperately and the trains run a bit faster at 12V. A train motor can handle that: it's only for a few seconds :) This is also the first crash video with a "story". Enjoy!
-
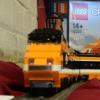
Review - 60052 Cargo Train Lately I've been watching the "Train Tech forum" here on Eurobrick's after I came across the "weirdest/silliest train MOC's or ideas" post in the forum. Since then Iv'e been haunted by the idea of making a TARDIS train, and a CMF series 14 hotdog guy train MOC. To get started, I offcourse had to get the basic stuff needed to make a fully functioning locomotive. I came across the 60052 Cargo train with a 25% discount and found that this would have what I needed to make these MOC's a reality. To begin with i didn't have high expectations from the set itself, as the different builds look blend compared to all the MOC's Iv'e seen in the train forum. It was "just" one of those set's one get to expand ones brick collection with useful parts. Lets se if the set changes my mind during the build. As i couldn't find a review of it here on Eurobricks, I decided to make a review as well. Now, im all new with trains, so please comment on all my mistakes and errors, as the terminology is new to me. Here we go! An overview of the locomotive and all the wagons included in the Cargo Train set. Year: 2014 Theme: City Set name: Cargo Train Set number: 60052 Pieces: 888 Minifigures: 4 Stickers: 39 on one sheet price: 199.99,- US$ / 1699,- DKr LEGO Wikia Brickset LEGOShop LEGO Shop wrote: Front of the Box: Click for larger image. The box is huge for a set containing only 888 pieces. The boxart makes it look very promising with lot's of stuff going on everywhere. The usual minifig representation in one of the lower corners that's almost always present, have been scrapped, and instead wer'e showen that the box contain's the LEGO powerfunction speed controller and all the different tracks included in the set. There is also an overview of the track layout you can put together with all the track pieces included in the set, and it's measurement. Box size comparison: Before moving on to the back of the box I'd like to do a comparison with other sets,that most people are familiar with ( im guessing). A box this size containing "only" 888 pieces might sound like overkill. Here's the Tower of Orthanc (10237 - 2359 pieces), and The Millennium Falcon (7965 - 1254 pieces) lined up together with the Cargo train box. Tower of Orthanc being the same size. The Millinium falcom is somewhat smaller. Back of the Box: Click for larger image. The back of the box shows all kind of different scenarioes. It also reveals that the box will contain 8 bags og LEGO, and the rest of the power function part's included. Also, it presents you with possible set's one might want to get, to expand and upgrade one's train layout, this being the train sets: 60051, 60050 and track set's 7895 and 7499. For a box of this size containing "only" 888 pieces seem's redicioulus, and the box doesn't even weight that much, but opening the box reveales that it's stuffed. And it really is! ( I hadn't expected this as Iv'e read another review. That person claimed that their was lots of extra space in his box. It must have been really compressed, because I had problems packing all the bags, boxes, tracks and the manual pack back into the box after I had first gotten it all out. But here look look look ! The content: Yes, first of all 8 bag's of LEGO for the building instructions. These bags might not look like much, but seriously. Each one of them are barely the size of a baseplate. I first tried to fit everything from the box in my light room. But gave up. It wasn't possible without making it look like a mess. So the box content will take up some four images. More content: Here´s another bag with additional tracks, and parts for the Cargo train station. Also two other boxes and additional tracks. Still doesn't look like much. Lets open the boxes to get more LEGO revealed. They are stuffed ! Opening the boxes: Opening the boxes reveals all the baseplates for the trains as well as wagons, and the baseplates for the Cargo train station as well. The big white box also contains 20 corner tracks, and the brown box holds all the power function parts. 888 part's might not sound like a lot but considering how many big part's this set holds, im already convinced by its value ! This made me extremely excited indeed. It's really overwhelming trying to fit all these parts around ones "work space". (Note: I didn't discover that i had left the Power function battery pack in the box until during the build as it was well hidden. Well, it's sort of visible in the picture however). Bag containing building instructions and sticker sheet: Last of all, the bag containing all the building instruction booklet's (6 books. Yes, there is 6 building instructions included ) , and the sticker sheet. Time to start building ! Everything needed to build the first instruction booklet's content: The pieces in bag 1: Click for larger image. So this will build the Cargo truck. From the boxart, I wasn't to excited about it. Lots of pieces that will come in handy for other builds however. Cargo truck finished: Afterall it was a fun build and it's looking more fantastic and smooth than from the boxart I think. Also the weight and feel of it is marvelous. Im once again surprised by this set already, as this truck is really awesome! Everything needed to build the second instruction booklet's content: So all this will let one build the Cargo Train locomotive. Beside's bag 2 and 3, the power function battery part and the power function IR reciever is needed, as well as the power function train motor, the baseplate for the train, and for some reason the two splitting tracks, though the only instruction given for those, is to put the yellow bricks on them and your'e not able put them together yet. Here's a look at all the pieces in bag 2 and bag 3! Pieces from bag 2: Click for larger image. Lots of usefull parts, to me at least, as this is my first train set. so this whole experience is to me like stepping into a candyshop for the first time ever. But on top of it, the diversity is really nice and I can se all these pieces used in a lot of MOC's in the future. Lets build. Lets Build, lets BUILD !! Bag 2 emptied: Having emptied bag 2 and builded what the instructions suggested, this is what we are left with. Im assuming those are sparepart's. Time will tell. Moving on to Bag 3. Pieces from bag 3: Click for larger image. Once again lot's of usefull pieces. And woohoo. A printed tile. I was almost certain that their weren't any printed bricks in this set, but that everything had to be "sticky arted": Adding the powerfunction battery pack: Now during this build its time to add the power function's IR reciever and Battery pack. It swallows 6 AAA type batterie's ( and just a note, the controller takes up 3 AAA type batterie's as well ). You will need a small screwdriver to acces the battery pack. As train set's are new to me im loving this build so far. Many techniques are offcorse familiar, but a lot is quite different from what im used to. It might just be all these part's that it's the first time Im introduced to. Battery pack and IR reciever addded: Easy task. Though, the instructions make's their wires look as they are lined up very smoothly with the build. Im not to sure mine are ! Lets finish this train. Been awesome so far ! Cargo locomotive finished: Click for larger image. This was an awesome build, and the finished result is to me just stunning ! Looking at pictures and the boxart, they just doesn't do it justice. It looks way smaller than it actually is and the detailing just really dont get justified by the pictures. Besides, the unstickered version to me, looks very very good. Also, this might not in any way be new to all you guys and gal's that already own a power function train set, but I was really astounded by the technique that is used to turn the power on and off for the battery pack. Just two sparepart's left from bag 3, however the finished build justifies it. Now im convinced that the price one have to pay for this set, is really worth it ! Moving on to bag 4, and instruction booklet 3. This let's you build the Cattle transport. Everything needed to build the third instruction booklet's content: This will let you build the cattle transport wagon. From the look of it, the bag doesn't contain a lot of parts. Here's what's in this bag. Pieces from bag 4: Click for larger image. Again surprised. Not that many parts, but most of them usefull for every MOC enthusiast. The bull is a must. I dont own one, and have never seen it in any other set. It's really quite beautifull, and I will be using it a lot in future MOC's, im pretty sure. Cattle transport wagon finished: An easy and not that satisfying build. Nothing unexpected, and no nice new building techniques introduced. Overall a bland build that looks ok, and BEWARE its getting worse from here on, however YOU have to read the conclusion as Iv'e figured TLG out with this set ! Now moving on to the Cable drum wagon. Everything needed to build the fourth instruction booklet's content: Time to build the Cable drum wagon. Not much else to say about this. Seems like Its just a fill in to expand the otherwise lovely set to make it look bigger. Pieces from bag 5: Click for larger image. Again again, lots of useful parts. However once again a way to easy build with no big surprises, and it ( once again ) doesn't really deliver the "building experience" that I love LEGO for. At this point im afraid that all the fun with this set is over ! The Cable drum wagon finished: Do i have to say anything about this ? It look's as it does. Nothing to roll around those cable holders, and "only" one chain included that really doenst have any function as well. Its not even connected to the wagon in any way. Indeed lot's of useful parts but it just looks like a rushed build. Next build, the fuel wagon. Everything needed to build the fifth instruction booklet's content: All these pieces will turn into a fuel wagon, and a cargo truck, along with a wheelbarrow. Pieces from bag 6: Click for larger image. All the pieces. The color of the wheelbarrow is nice and again the parts for the build is usefull for any MOC enthusiast. The Fuel wagon finished: Click for larger image. However the build experience once again doesnt deliver any fun and just feels like a repetition from the Cable drum wagon build. Also the lift look's awefull in my oppinion. Something's wrong with the roof of it. Besides the way everything is organised onto the wagon looks weird, and off. But, the pieces are all usefull and that's what plusses i have to say about this. Moving on to build the Cargo train station, the last instruction book from this set. Everything needed to build the sixth and last instruction booklet: Pieces from bag 7: Click for larger image. First, the content from bag 7. Lateron bag 8 which is the last bag for this whole set. The content of these bags let's one build the Cargo train station. Do I have to say again, more usefull parts, but also some not that interesting for once. However the usefull once, wins the battle as all the pieces Iv'e seen in this set is mostly not to common pieces, and not pieces that I personally would never expect to make use of. Two more printed pieces in this bag ( but these are common pieces ) the keyboard and the computerscreen. So overall the whole set delivers three printed pieces. Lets begin to build the Cargo train station! Build from bag 7 finished: So far so good. It's looking better than expected and was a fun build so far ( much needed from the last three NOT funny and blend looking wagon's). Lets move on to the last bag of LEGO for this set. Pieces from bag 8: Click for larger image. More rather usefull pieces, and rather special one's indeed, but not the diversity that we have seen from the prior bags. Iv'e become curious as to wether it's possible to use the "old school" LEGO track's to make larger train lanes with ? Haven't tried it out, but my instinct is that it's not possible. Surely one of you train expert's will tell me all about it in a comment (please !!). The Cargo train station finished: Click for larger image. I somewhat likes the Cargo train station. It is taking me back to my chilhood where LEGO set's weren't that complex, yet had that feeling of delivering a setup for your mind to play with it, and let your imagination make everything possible. Playing with it surely delivered exactly that feeling. Now the MOC nerd in me see's tons of stuff that can be done with this, and i surely will. But the overall feeling is great. This last build somewhat corrected the experiences from the last two wagon set's. Only negative i have to say about this is that the heavy lift seem's to be a stud of in width, as it will all collaps if you aren't carefull when lifting cargo. However the moving of the whole lift is working gorgeous and it's fun to push it in one end and seeing it speed towards the other hoping it will fall of. But it doesn't, unless you are really putting some strengt into it. So this ended with a good experience after all. Are we finished ? No, there is still all this left: Minifigures and bull, frontview: I have no clue as to how common these minifigures are, but i kind of like all of them. My only issue should be that all wears cap´s. Now, im not supressing womans at all. But find it funny that the only female in the set is the one who get's to wear hearing protection. ( It should be the other way around ). In fact, all personel working close to machinery, shoud wear those. That's personal experience ! I love the bull. Might be cause it's new in my collection. But its a cool animal to have and the horns could be used for lot's of useful organic building techniques. Minifigures and bull, backview: Well, a few backprints. Still some nice ones. Glad to have all these figs in my collection. All the builds lined up: Click for larger image. Last ( not really ) but not least. Lining all the builds up around the Cargo station build. It looks somewhat a mess. But this is not how LEGO intended it to be im sure. In fact, were not quite done yet. Remaining tracks and the Power function controller: Offcourse i dont have a lightroom huge enough to layout the whole of this track. Conclusion: My first thought about this set was that it was a set like most others. Here, build these trains and make them roll around the track endlessly. However there is a lot of hidden bricks in the set that suggest something else. I have always been removing usefull parts from set's that's not visible after the set have been put together. Most of the time LEGO have included these parts ( changes of colors, tiled bricks ) to make it easier for people to read the instructions. Mostly the colored pieces are ordinary ones, and tiled pieces the same. But, with this set its so very different. Dark grey plates that you will never see. Tan bricks hidden away for no reason. Jumpers where plates would have been obvious to use. 3 blend wagons that didnt even deliver the building experience, but however was packed with usefull parts. This set to me, is screaming for AFOL's to mod and MOC it ! Im guessing offcourse, but it seems that LEGO wanted to make a set that would make it possible for everyone to start building train sets, but offcourse couldnt sell it as a creator set. So to make it reach an audience that weren't only FOL's, they decided to do it this way, and at the same time be able to justify the price of it. Follow me. All the tracks, the power function parts. The parts for the wagons, which is much needed to make trains for oneself. In fact, buying two train motors from LEGO( IR recievers and battery pack as well offcourse), and you will be able to make two additional locomotives with this set! At first, the playability value I would have given this set was aimed at kids. LEGO turned the table 180 degrees. This does have playability value for kids as well. That's to me why LEGO decided to make it this way. But the way I look at it, they really aimed for the adult market with this set and they hit point blank ! In case your in doubt, im loving this set despite the blend builds. So many usefull parts, so many things a MOC dude can do with it. Ton's of different large pieces and to top it, all the power function parts needed to start making one's own collection of LEGO trains. Scores are based on my personal experince with the set. Parts: 10/10 So many useful parts, even when considering the price of the set. Cant give it less than max. Design: 7/10 The Locomotive and the Cargo station is awesome. The score is based on my assumption that LEGO had AFOL's in mind putting this set together. Playability: 7/10 It's a train that can run on track's. For kids the score might have to be a 9, but for FOL's it cant be more than 7. But will score it all again having modified everything. Minifigures: 6/10 I have no clue as to how rare these are. They are nice, but thats about it. Price: 8/10 I got it 25% off, so that was a nice price. But honestly. I cant wait to get the funds to buy yet another one of these sets. It's so much worth it. Honestly ! Overall: 9/10 Cant give it less. This sets Screams for all FOL's to get it and start MOCcing it ! .. You should get one too ! I hope you enjoyed the review, and do give me input on where im wrong and why. As said many times already: This is my first train set. So teach the n00b please ! Please do comment and ask questions, or come with suggestions if any. KlodsBrik.
-
Hi all, Here is my contribution to a collaboration we did for our most recent train show. It's supposed to be an occupied French chateau which is under a raid from the Americans. The mountain was a massive pain to build, especially with the train tunnel running underneath. I also have an access point at the back to handle derails. My hat is off to any of you who've built realistic, good looking mountains - it's tough! Enjoy: German occupied French chateau as my part of a WWII collaboration layout at our most recent train show. by Trent, on Flickr More pics in the Sask Lego User's Group Flickr stream (https://www.flickr.com/photos/sasklegousersgroup/25335450303/in/pool-1719412@N23/)
-
Hi all! This is a small idea that I had quite recently as an item that could be found in a set that added playability to a Lego train set. It's less for show displays and more for a child's little Lego City oval of track in their room. There's no electricity, just a mechanism that'll hopefully make it feel like the operator is a signalman! It's not based on any particular signal box, but the signal is very clearly an old British design. The box is cut in half to reveal the interior of the box and to provide access to the lever of the mechanism: It's a very simple set-up, with the mechanism being the most complicated aspect to it. Here's a (VERY) quick diagram of the mechanism: I'd love to hear any comments or suggestions to improve this! I might put it forward to Lego Ideas in the near future, maybe with a little train to go with it! Many thanks, Isaac
-
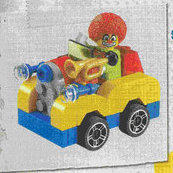
My speculation and interpretation of the LEGO Friends Party Train based on the information posted so far in the 2016 Friends rumor thread. 41111 Party Train-Mia, small train, new animal Price on Amazon.de 9 Euro. I'm guessing it is one of those kids party train on tires or narrow gauge track that you can hire or rent. Maybe Mia is having a party for her animals and there is a ride for them. Friends Party Train by dr_spock_888, on Flickr I think the train tracks might put it over $10...
-
Hello everyone I think my layout is now at a stage that I can present it as a whole to the community. As you will see I have still some space to expand it and there are quite a few buildings that I wish to rebuild/redesign to make them better. My layout has a classic 80/90 inspiration and that's why most of the new sets I have are from the creator/expert line. here it is a video showing the whole layout with the trains and the new ferris wheel motorised: As you can notice from the video, since I love trains, a large parte of the table is covered by rails. There are three stations. 1) Legoland C.le (C.le stands for Centrale in italian, the main station) 2) another smaller station, located on the sea-side and near the vulcano called Lego Ville: and another station that serves the airport: The town centre of Legoland features a square with a Market, a Pizzeria, and a Carrousel, the ruins of ancient abbey, always crowded by visitors, the town-hall (the yellow-brown building) and - of course - a police station: There is a residential area, which is mostly restaurant and country-side with a small beach: The main Harbour of the town, with a bridge for the trains, and a restaurant in an ancient mill: Finally there is the city area, with two main tall buildings: well, there are more ideas to develop my city but I want to hear what do you think so far
-
Hello everyone, a spot has just opened up on my layout for one more lego train. I was wondering what everyone thinks is the best, and i already have the 7939 yellow cargo train, 7938 red passenger train, horizon express, hogwarts express that is motorized with power functions, one extra set of power functions and 2 4.5 volt trains from the blue track era. I was thinking in the maersk or emerald night but they are both expensive so i can only really get 1 with my budget for lego trains. So please give your feedback and thank you in advance:)
-
After 7 months of engineering and building, I'm proud that I can present you my new video! In the video you'll see three coal trains riding around. They can load at two silos and unload at the main terminal. The unloaded coals are delivered by conveyor belts and an excavator to the loading silos, so a continuous loop is possible! The unloading part is the most complicated part of the structure: pneumatic cilinders will push a conductor to the bottom of the wagons, where also a conductor is located. These conductors power motors in the wagon which open a hatch in the bottom of the Lego coal wagon. The coals drop on a conveyor belt and are transported with other conveyor belts and an excavator to the silos. It's all automated by 6 Arduino controllers (including the arduino that controls the passenger trains). I cleared out the living room (GF was away for a few days, as planned) with a friend of mine and after 12 hours of setting the whole thing up we could finally begin with running some trains and commission the whole thing! Obviously the whole thing didn't work at once, so a hilarious fails-video is on the way too. Enjoy, share and let me know what you think of it!
-
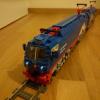
Hello This creation isn't that new anymore, however after publishing pictures on brickshelf and flickr, I think it's time to present this train here in this forum. The prototype was the RAe TEE II 1053 which is today a historic train and was used on the TEE-Network some decades ago. The train consists of 6 cars: two cab cars, two coach cars, a dining car and a motor car. This train only had first class seats and was (or maybe still is) one of the most luxurious trains of the swiss federal railway SBB. The four passenger cars in my model have each 13 seats, in the dining car there is enough place for eight passengers. The passenger cars have gender seperated toilets, the women toilet even featured a make-up table. I tried to make it look like theres a mirror in this toilet room, since there is very limited space on creating something like that. Well, now let's continue with the pictures. Cab car by StefanEris, on Flickr Cab car front by StefanEris, on Flickr Toilet by StefanEris, on Flickr Dining car interior by StefanEris, on Flickr The whole train by StefanEris, on Flickr And here is a picture of the real train: RAe TEE II in Zurich by StefanEris, on Flickr The front of the train was quite a challenge to build and I still want to make some improvements, however the parts I need don't exist (yet) in dark red. There are more pictures on flickr if you are intersted. I also have a video there:https://www.flickr.c...157633185923370 Thanks for looking and reading, critics and comments are welcome! Regards Stefan
-
So . . . by now some of you may have seen me lurking around here. I registered back in 2011, introduced myself and then didn't make an impact. Things have changed a little, especially with the acquisition of lots of late 1980's lego and very early 90's lego and my first new lego sets in an eternity. I got a pair of 60051 trains, I do already enjoy the RC trains . . .minus the batteries that they use. I'm a little unique as I grew up looking at those catalogues that came with the sets and wanting the 12V stuff, even though we didn't have it in Canada . . .where I'm from. So . . . starting around 1999, I just started piling up Ebay transactions from everyone world wide. I once got a feedback of: "Good to dial wet" originally I thought it was something really perverted, and refused feedback. 2 years later I realized that I was "good to deal with." I can't really complain, my German is rather non-existent and I have a good amount of German blood in me. I play a lot of ball hockey (not field hockey, it's basically ice hockey without the ice), that's me, I'm big, strong extremely agile goalie. That's what makes me unique in my eyes rare traits to put together . . . . that and my 5' tall box of Kraft Dinner. I do a lot of hockey photography (ice hockey), I'm no pro, I don't even own an SLR camera, but it's something that I enjoy. I love just about all things from the 1980's: Transformers, Lego, Hair, Music (specifically pop rock and hip hop). I also love my Grand Prix's, I have three in total. In 2013 for my birthday one of my closest friends treated me (at my request, you can request free crap) for a photo shoot of AJAM & AMY (below) later in the shoot we had a hot air balloon land in the background of a shot (I also requested this about 30 minutes prior to happening, but jokingly), I'm active on the car scene on the internet and attend 3 meets a year, all in the US. I'll blame my nephew for sparking my interest in Lego again lately. He loves the stuff, my home is like some kind of theme park to him!! It probably needs some work (lots of work??) but I made 90% of this car 20 years ago and then never put a front end on it. Not sure I'm happy with it the way it is, but much the passenger jet conversion of my 6544 plane, tonight it's a true sign that I'm back in the lego fold. There will be a Youtube channel . . . and it will be epic. This is me about 6 years ago. I had bought a wrench for the house since I didn't have a BFW, but was shocked to find it was no ordindary wrench (rated PG-13): Will have a new Youtube channel for lego related stuffs). Thanks for being so welcoming already, for me the best is yet to come . . .and "ALL OF YOUR IDEAS IS BELONG TO ME." Some sets that I have kicking around: Trains: 182 727 7715 7722 (partial) 7745 60051 X2 Town: 6354 6358 6375 6378 6380 6382 6386 X2 6389 6391 6392 6394 X2 6395 6396 6397 6398 (and wish I had a 6399 . . . . maybe some day)
-
 Just learned about this tiny Intel Compute Stick Wondering if it might be practical for use with LEGO Wedo, Minstorms NXT and EV3 BTW how are LEGO Train configured. Does it need a computer?
 -
Alright, so I first want to explain this project that I have been dreaming about doing. The summer of 2013 I started to build a table to be specifically used for a lego moc. It was to be around 3 feet by five feet and feature an underground section. Well, after tearing it apart and rebuilding it several times, I finally finished in the summer of '14. Now I have moved out and have my own super tiny room and have the ability to devote some time to actually building the moc. The moc is going to be a hybrid. The majority of the buildings and scenery will be made of lego, while all the figures (except maybe a few statues) and 90% of the vehicles use will be mega bloks, specifically the Halo, Assassin's Creed and Call of Duty brands. Now this will be classified as a Halo Moc, while some weapons will be from custom lego weapons shops and painted by me. Now I do realize that some people like to keep mega bloks and lego separate, which I used to believe in. While I prefer the Mega bloks articulated figures, I still massively respect the Lego figure. What I need hep with is actually 100% to do with lego. I ave never built a lego train. Never even held a train track in my hand. Fear, mostly, because there seems to be so much to learn. Well, I ran into a slight dilemma. I wanted to make a new halo vehicle, because halo is limited in it's vehicle, and I wanted to add my own flare to this hybrid moc. Six months of looking at vehicles that looked like pre-existing halo ones and still nothing. Then out of no where, I got inspired. I was watching a review of a train set on youtube, when this piece caught my eye. And thus the idea for a halo train was born. Now the train itself I do not necessarily need help with. It's the tracks. And the engine. You see, I want the train to act as a supply/weapons platform, but I want it to wrap around my room, which has three HUGE problems. My room I live is essentially a bedroom where I share a bathroom with one guy and a kitchen with two others including him. So I have three doors to deal with. So then I thought, I can have the track wrap around the ceiling. Sounds cool, except that I have no idea how to make a train even run on flat surfaces. I don't even know how the darn things work. I have seen train tracks that were used to enable a train to go from ground level to another height, except that those systems tend to be larger than my table. I really only want the track to cross the table once, maybe twice. My idea is to have a train that can run in two direcetions, so that I don't have to create a loop. The wall that I intend to use to get a rail-ramp, for lack of a better word, gives me a good 6-7 feet to go from 3 feet of the ground to about seven feet off the ground. If anyone can help me, I would appreciate it. What I need advice on: 1) I need the smallest engine possible, but with enough power to move uphill and pull one of the previous mentioned pieces 2) What is a good angle to use for the incline that won't let the train shoot back down uncontrollably on its way up OR on it's way back down. 3) How do I make a train go two directions? What kind of engine would allow me to control it? I was thinking Infrared, so I can just stop it at any given time 4) How to stop the train without damaging either it OR any lego pieces Any advice anyone can give me will help. I literally have no idea what I am doing when it comes to lego trains. Thank you!
-
So I've been steadily increasing my collection of steam era 7 wide wagons over the last few months. Most of them came out remarkably well and remarkably quickly and needed little or no modifications to the original design, others (well the brakevan) needed a little work but didn't take too long all the same. Then there's the van conundrum. I just can't get these right, and it continues to bug me that the most simple shape a railway wagon can be is causing me the most issues. The original design took a lot of time to perfect, and in LDD looked pretty good, but it turned out to be less than solid in the bricks, and whilst it basically looks really good, it's also a bit too short compared to the other rolling stock I have and am designing. After a fair bit of faffing, I was still not altogether happy, so I decided to pad around the net for other people's ideas, and I stumbled across H.A.Brick's PF battery van kit. It arrived, and I enjoyed building it (there's an extra instruction book and some extra pieces to build it without the sensor hole), but it only served to highlight the problems with my existing design (too short, not sturdy enough). Never the less, it gave me some ideas, such as using some black Lego to represent the frames the van is sat on to bulk up it's height, so after slightly modifying the (upper part of the) build to closer fit my needs, I set upon one of my existing vans to have a look at the idea with my standard truck chassis design. The height was good, but the bufferbeam was terrible, in order to line up with the rest of my rolling stock, it needed to be lower than the 'frames' which just doesn't look right at all. The current line up, L-R: modified H.A.Bricks van, modified version of my cattlevan MOC (with some random colours and random gaps), my original standard van MOC. The modified H.A.Bricks design. Internally strengthened and black plate/rail removed from between the body and the roof to bring down to my preferred height. (See also the rather ugly bufferbeam of the truck next to it.) Modified version of my cattle van. Although now the correct hight, I really don't like the fact the bufferbeam isn't inline with the 'frames'. Original design. See the less than perfect panel alignment due to less than perfect internal structure plus old and chewed bricks. ----------------------------------------------------------------------------------------------------------------------------------------------------- Still not exactly happy with any of the designs, I went back to LDD. First I married the H.A.Bricks design with my own frames, and it wasn't bad but I was still not sure it was right for my preferred style and level of detail. Another thought I had was to add an extra plank to my existing design (and drastically redesign it internally). I've come up with several variations, none of which feels like a complete winner to me. H.A.Bricks inspired vans, both short and long bodied (whichever style I settle on, I will eventually produce long and short bodied versions). Several variations on the 7 high version of my van and cattle van. At the moment, my preferred normal van is the one with the 1x8 tiles running down the side and preferred cattle van will probably be a long bodied version of the one with the 1x8 tiles hanging down the side (although I can't decide on plain doors (middle version) or slatted doors (other two). ----------------------------------------------------------------------------------------------------------------------------------------------------- Any ideas or suggestions are very welcome, also if anybody wants the LDD files to play with (complete with engine and brakevan), feel free to PM me.
-
Hey guys, I have found a cool way to use the minifigure style head piece to go inside boilers. I just used that and an upside down 1x1 to give it some depth. Lego train Boiler by Railco1, on Flickr Lego train Boiler by Railco1, on Flickr I think it adds a small touch to the boiler and I hope you like it! -Rail Co [How you can use it for cars!]: http://www.eurobrick...howtopic=105602
-
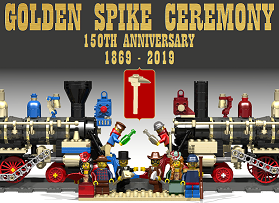
I'd like your input on this set I made recently: https://ideas.lego.com/projects/95531 It's based on a very famous event in US history in 1869, when the rail networks of the East and West coasts were symbolically connected for the first time with the driving of a final golden railroad spike with a silver hammer. To the best of my knowledge, this would be the first non-fictional Wild West Lego train set. The 150th anniversary of this event is only a few years away, so I figure now is as good a time as ever for Lego to release something like this.

-
Good morning, Quick question . . . and I have looked through the forum for answers and come up empty handed thus far, there's lots of DIY stuff, but I'm working on a theory and I've found the parts that I think that I need on bricklink. I have a working theory and just want confirmation. If I have . . . . .the two rails with the missing triangle, a regular remote control like 7863 would I be able to control trains stop & go or no. I've never had a 7860 set, and I still mean to get one. But does the remote work the same way as others do?? Then you add the whole red light/green light thing and that only gives you the visual in terms of if the train can go or not? If I had one of these sets I'd just do all of this experimenting on my own. While I'm asking stupid questions. The 7864 set (the actual Transformer), if you assemble the whole technic top assembly and remove the dial, does that thing actually stay together well or does it disintegrate the second that you try to use it?? Third question. If you disassemble a PF cord at one end and plug it into a 12V track while it's already plugged into the 12V transformer and then bridge the positive and negative sides of the track, is it possible to create a time portal that will take me back to 1985?? Thanks in advance.
-
One of the many companies Aardman Animations (the studio behind Wallace & Gromit and Creature Comforts) have made adverts for is LEGO. What is uploaded on YouTube by the Hall of Advertising channel is one advert done for Train... And one very impressive advert done for Pirates... But also, my Creating 3-D Animation book mentions a spaceman advert Aardman made that was similar to the Pirates one. I looked it up and yes, I found a Space advert with the same construction characters (2:30): But I've also seen listed in an interview a mention of producing advertising for LEGO Star Wars. This interview came out before Chicken Run and LEGO Star Wars came out in 1999 so it must have been in the franchises early years. http://www.telepathy.co.uk/aardman/culture/faqs.html Does anyone know of some early LEGO Star Wars advert with stop-motion in it?