
Mr Jos
-
Posts
515 -
Joined
-
Last visited
Content Type
Profiles
Forums
Gallery
Everything posted by Mr Jos
-
 Here is my improved LEGO Technic automatic warehouse, The racks are modular and more can be added to make it longer/higher. The crane, high speeds are possible when driving/lifting because no gears/gear racks are being used. The input/output chain conveyors. The input/output roller conveyors with corner transferring the boxes. Overview of basic warehouse. The 2 conveyor bricks are programmed with Python, crane still with standard EV3 software EV3-G (might get upgrade as well soon). All 3 bricks communicate with bluetooth. Brick with the HMI 'Human-Machine-Interface' is the masterbrick, sending the commands for the crane in manual/automatic/off mode separately for input/output. And updating/storing the WMS 'Warehouse-management-system' online/offline. Boxes can be manually added/removed from the WMS if needed. Next step will be writing a HMI on the second brick for adjusting live parameters. (Extra racks in height/length, x/y positions for the crane adjusting few mm's). And fixing a few bugs with the "Box info". Feel free to give feedback on things that could be improved.
 -
PF motor cables being fried
Mr Jos replied to SNIPE's topic in LEGO Technic, Mindstorms, Model Team and Scale Modeling
Can you show a photo of where the motor is placed when it happened? -
Lego Technic Scissor lift MOC
Mr Jos replied to Danifill's topic in LEGO Technic, Mindstorms, Model Team and Scale Modeling
I use ones like these many times, the black handle in the middle of the upper railing is a locking pin for the extendable platform, others use a mechanical footpedal locking pin. The wobble on the real ones depends on how old they are and worn bushings/maintenance but overall it's not as much as in the video, but that will be hard to accomplish. -
I cleaned it up today already after some testing and reading/learning. The backwards in the title was actually just for list --> file [104:106] , backwards = file --> list [92:93]. But as you can see on the photo I already managed to get that. Now the program is already running full initialising all 3 brick's motors/sensors, positions of boxes on conveyors are being found. Boxes in the high bay rack are stored offline in the file correctly. Choosing automatically a free spot in the rack is being done good. Next part to program tomorrow is automatically returning boxes if in 'auto' mode. Then the hardest part is left, to make a HMI with the 2 Python bricks. Many more reading/learning wil be done this week.
-
Lego Technic Scissor lift MOC
Mr Jos replied to Danifill's topic in LEGO Technic, Mindstorms, Model Team and Scale Modeling
Nice build, just some points for improvement (as I use these machines often); - The platform seems to small, normally the platform is the same size as undercarriage. - Would be nice to be able to extend the platform even 50% more outside the undercarriage (with HOG) as in the real ones. To reach hard to get places over obstacles. -
Indeed, I prefer the 45544 more then 31313 because it already has the rechargeable battery, else you need to fiddle around with AA battery's. (The rechargeable battery can be bought separately but costs around 100€) Ordering the items directly from the Lego site will take long for delivery, maar Nederland heeft 'Brickshop'. I ordered 3 of my 45544 sets there. Mostly when ordered in early morning I received it the day after in Belgium. They do sell some technic bricks as well, but all in bulk (per 100). To find them there search 'steen met gaten'. I would advise to order atleast the 1x4 ones if you don't have much technic bricks, so you can test and build something. Have fun with whatever you build! (Pictures of the result would be nice to see)
-
To start of, minifigs will move as 1 piece, they wont be able to do small movements like waving arms, walking with legs moving, therefor the parts are to small, and the gears to big. If you go for the [45544], EV3 Education set, you get these usefull items; - EV3 Brick[45500] - EV3 rechargeable battery[45501] (You need to buy the charger extra![45517 !!EU Style!!]) it allows the charger to be plugged in and charge whilst running the program, good for long days of demonstration. - 2 large motors[45502] and 1 medium motor[45503] (EV3 doesn't have small motors) To put these motor in your building you will need a few 'Technic bricks' like [3701] or longer ones, pins to connect should already come in the set. Few axles and gears are in the set as well to start you off. - 1x Color sensor[45506], 1x Gyro sensor[45505], 2x Touch sensor [45505], 1x Ultrasonic sensor [45504]. You can build these Touch sensors under some building or landscape. When you press the piece attached to the sensor you can make it run some part of the program. You can use the Ultrasonic sensor to measure distance, if something comes in front (people walking by) you can make it run some part of the program. (The maximum distance measured is around 250cm, so you can trigger the motion if an object is at <200cm for example) - 7 cables come in the set[45514], should be enough to start. If later you need a longer cable, for like making the touch sensor 2 meter away from the motors, it is possible, but not easy(You need special connectors+crimping tool, the cable itselve is easy to find. I have all of them here). You will need all of the underlined items to start (and a pc to program). I managed to find one Education set+charger for 170€ from someone who had used it a few years at school, and didn't want it anymore, but usually they don't go for that cheap. Try looking for kids that have grown out of LEGO (how's that possible?!) Feel free to ask more questions.
-
Ah! Thank you, didn't know it automatically added a \n in print! After reading in the link you gave me I managed to solve the problem, thank you! It works the same everytime I restart the program, will do some further testing as to how it works and i can make a WMS from it. Full working High Bay Warehouse coming soon :D
-
I only added it in line 93 --> + "\n" line 85 remained the same in all 3 pictures, it just reads value per value from the list, that works good. Somehow the .txt writing puts all on 1 line(second picture), or puts directly an empty line in between the values(third picture). Actually it adds and extra empty line every time I run the program starting from an empty list. (1st time 1empty, 2nd time 3empty, 4th time loads of empty lines)
-
I tried it before, for some odd reason it adds a blank line in between the values. I'll try to replicate again and show it. Edit: Here it is, as you can see it adds the first value correct on 1 line, but then adds and empty line, then 2nd value on 3rd line, empty, etc.
-
Hey, (I have never coded before with Python, but have been learning it last week with online reading a lot, this problem I can not find) I changed my project from 3 bricks running EV3-G to 1 remaining on EV3-G, other 2 changed to Pybricks, micropython. As far as moving the motors it works now perfect, better then 3x EV3-G. Bluetooth is now server(pybrick) with 2 clients(1pybrick, 1ev3-g), another big problem that got solved. But: I used to make a WareHouse Managing File on 1 of the now server Pybrick. I tried to make a .txt file that is stored when the program does not run. Then it should everytime open the file and fill in a list 'online' to access and change the states. The problem I run into is that when I try to save the 'online' list to the 'offline' .txt file, it puts all of the input on 1 line instead of each line 1 state (True or False). Next run of the program it should load in the file, but as it's all in 1 line, there's only 1 element to put in the list, rest is blank. On the first picture it's printed as I want it, every line of print has it's own True/False (later I will use the testlist[position] to see if a position already has a box or not). But I get the last picture after starting the program with an empty testlist. TL,DR: Anyone knows how I can put several "strings" each on 1 line in a .txt file with MicroPython, taking the inputs from a list.
-
Debugging EV3 IR sensor
Mr Jos replied to doughnut's topic in LEGO Technic, Mindstorms, Model Team and Scale Modeling
When I start my crane with clear view it shows around 80 PCT, when I put my hand around 10cm from it, it shows around 30PCT, when I put my hand against the IR it shows 0 PCT. My 2 other IR sensors on the other bricks show around 40-45 PCT when no boxes are in front, but the high bay rack is around 30cm away (thin pillars). When a box is on the chain conveyor it's around 30-40PCT, when the box is moved to the roller conveyors it shows 0-5 PCT. For these 3 IR sensors I don't use a calibration yet as the range is far enough to figure out positions. On this IR I used the calibration, as it measures the position of the crankcase of the press. The value changes fast and very accurate every rotation the yellow liftarms pass close by in front. When the crankcase is down (clear view) this IR shows around 30PCT, as it does kind of detect the items under/low in front of the sensor. Goes to around 10PCT when the liftarm is 0,5cm away. I do have to say I like the IR sensors more then UltraSonic for accurate positioning, US seems to float more. IR is more precisely when running in same conditions and when the distance is not to big! If you want to measure distances around 50cm or more the IR is not a good choice. -
Debugging EV3 IR sensor
Mr Jos replied to doughnut's topic in LEGO Technic, Mindstorms, Model Team and Scale Modeling
The EV3 Ultrasonic measures distance in CM's, giving a distance between 0-2xx CM. It does not care what color the object is. The EV3 IR does give a distance, but it's based on light reflection. So depends on surroundings, colors in front, thicknesss of object etc. Depending on the location where my machines are it gives a different value for nearest position. This is why I programmed a calibration everytime the program is started to find the value for the shortest distance. -
Sbrick Light
Mr Jos replied to Newest_Tech320's topic in LEGO Technic, Mindstorms, Model Team and Scale Modeling
Simply said it's to control LED's. Just a copy from what I found -
1 cylinder unmodified LPE
Mr Jos replied to EDL Bricks's topic in LEGO Technic, Mindstorms, Model Team and Scale Modeling
And there are many more LPE on his YouTube account. -
For my High Bay Warehouse I have now a 3rd brick. The 1st on the crane still will work independent and be controlled by the 2nd brick by bluetooth communication between the 2 of them. The 3rd brick controlling the second corner transfer with Chain/Roller conveyors I want to daisy chain so 1 program controls all the conveyors. I found that Port number 101/102/103 will control the outfeed conveyors (original black cables), 201/202/203 will control the infeed (white cables). It works with wired connection. I want to use this wired connection as it is 2 times the same setup and I will be making myblocks to control the conveyors. However I can not manage to get the sensor reading working with wired connection for the 2nd brick sensors. Port 11 does work for the touch sensor on brick 1, Port 12 does work for the ultrasonic (5.8cm). However when I read Port 21 and 22 I just get the values from the sensors on brick 1, ultrasonic on 22 should be 29cm but it puts outjust the same 5.8cm. same for the touch sensor giving wrong (same as 11) output. Am I doing something wrong, or do I have the wrong port numbers? And extra question: I can change the display of the masterbrick, but is it possible to display something on the slavebrick aswell? Same for the keys, is it possible to use them as inputs. Or is this 2nd daisy chained brick really a dumb slave not being able to give any inputs, only output motors.
-
Woah infinite candy doors. Need those here to fill my boxes! Nice job on making these doors work without pulling/pushing in the middle.
-
General Part Discussion
Mr Jos replied to Polo-Freak's topic in LEGO Technic, Mindstorms, Model Team and Scale Modeling
What about a 16T gear on the servo, 16T on the steering shaft and put a chain around them. -
And last update as the problem is solved, if anyone in the future gets this error here is the answer. Rename your loops. I had 19loops making my arrays all with a different name. Then the main program and some myblocks had 11more loops all different names. Giving the "VM Program Validation Error". I renamed all 19 loops making the arrays to the same name "Arraybuilder" instead of usefull names, added the 'faulty' myblock to the program again and it works, even when adding more loops, just give them the same name if you don't need to close them with a loop end block. Hope this helps someone in the future building a big program.
-
Another update, when adding a new loop, instead of getting name "01" it gets the name from another loop allready in the program. When clicking it, it does show 01, but when I run the program there is the same VM error. So there are to many loops/switches. So it actually isn't that myblock but some memory issue or something. Edit: I counted the loops in the program. The error giving one Loop number 30. So maximum 29 different loops allowed I guess..
-
I tracked down the code part that is giving the error. It appears to be a myblock drawing 24 squares on the screen white/black based on a logic array. That myblock worked well until now.. When I delete that myblock, all the rest works perfect. Allready send a mail to LEGO customer support asking the meaning of the errorcode. Hope it isn't because there are to many variables/arrays, because I need loads more for my program.
-
Thanks for the fast response, I found that but it seems to be a different problem. That link is about "instruction break", it used to occur mid program when running in an error going to the middle of a loop. This is "Validation error" and happens right at launch, no branching done yet in the program. Will try to update the firmware, but it seems to be a different error. Edit: Current firmware is V1.09H Updated firmware to V1.09E. Error stays the same; "VM Program Validation".
-
Hey, While adding some more code to my program I ran into this problem. It pops up directly after launching the program. Even when putting a 100sec wait block at the start of the program. Anyone ever had this error pop up? I can't seem to find anything about this one. Greetings Mr Jos
-
Walking Robot 2.0
Mr Jos replied to Tomas TECHNIC's topic in LEGO Technic, Mindstorms, Model Team and Scale Modeling
Nice design and love the way it hops when walking. Very good radar system to find a gap to walk through! Could be in some horror movie chasing humans! -
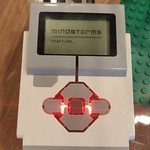
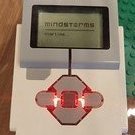
Keypad in EV3-G
Mr Jos replied to Mr Jos's topic in LEGO Technic, Mindstorms, Model Team and Scale Modeling
The 'main' graphics are done for the keypad, Now only the programming in EV3-G, can it do more then just turn on a motor for certain amount of rotations?! Think I will start with the same kind of program as how to select where to put the box in the racks. But now with a 10x4 array instead of 4x6. Still if anyone else has a better way or already done it, feel free to post your opinion.