
evancelt
-
Posts
2,325 -
Joined
-
Last visited
Content Type
Profiles
Forums
Gallery
Everything posted by evancelt
-
[COR Micro artisan] Wullham Cartwright
evancelt replied to Bregir's topic in Brethren of the Brick Seas
Wonderful mini-carts! Great job making them look like full-fledged carts. The stacked lumber also looks good -
What's your favorite Imperial era? 1500s - 1800s?
-
[COR-FB] Sabre Drills, 18th Hussars, Wullham
evancelt replied to evancelt's topic in Brethren of the Brick Seas
Haha if you look closely in the Produce Farm build, you can see these exact melons being grown! Benedict Thorpe had so many extras, he donated a few to the Hussars. -
[ESL-FB] New Settlers Bring Growth to Interlagos
evancelt replied to Capt Wolf's topic in Brethren of the Brick Seas
Agreed! I tried to do something similar in that Horse Farm build in Elisabethville, but didn't have enough reddish brown / dark brown cheese slopes to pull it off. @Capt Wolf's is the real deal! -
[COR-FB] Sabre Drills, 18th Hussars, Wullham
evancelt replied to evancelt's topic in Brethren of the Brick Seas
Idea for build is based on a cavalry drill at West Point featured in the 1985 TV series 'North and South': -
[OL - FB] Vineyard of Light Warehouse
evancelt replied to CapOnBOBS's topic in Brethren of the Brick Seas
Lovely! I especially like the carriage house - it's super fun to see all of the cart/carriage designs -
The Conquering Hero Returns in Triumph
evancelt replied to Kai NRG's topic in Brethren of the Brick Seas
Thanks for sharing! Didn't know you had a blog, fun to look back at your build logs -
Settlement, Wullham, Panarium, Corrington
evancelt replied to evancelt's topic in Brethren of the Brick Seas
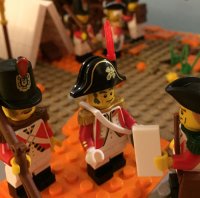
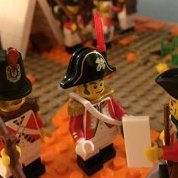
Cavalry Drills in Wullham -
Captain Brickleton and Lieutenant Tennyson enjoy some fresh melon that Trooper Rolston has halved during his solo sabre drill. Captain Brickleton instructs the hussars to drill regularly to stay in tip-top fighting shape, never knowing just when they will be called upon to ship out in the fight against Oleon. OOC: I wanted to try out a new kind of SNOT base. It isn't as sturdy as the one I usually use, but is nice for change of pace.
-
[ESL-FB] New Settlers Bring Growth to Interlagos
evancelt replied to Capt Wolf's topic in Brethren of the Brick Seas
Great scene! I like the little details like the ground landscaping, smoke from the chimney, door pull, etc. Nice contrast between the two buildings -
A Dissertation on the new Tri-Corn with ponytail...maybe
evancelt replied to Blackheart Brit's topic in LEGO Pirates
I like the tricorne/hair piece as well! I try to use it quite often in my MOCs. Here are some recent MOCs with the hat: I've thought about doing something with the Interchangeable Hat Wig method where I cut some hair off a girl hair piece and glue it to a tricorne. Haven't found the right girl hair to do it with yet.... -
[COR-TROOP] Busy day in Mesabi Landing
evancelt replied to Brickwolf's topic in Brethren of the Brick Seas
Cool idea to have the two columns meet in passing! -
I have seen a number of MODs to imperial fort sets recently on social media and they often use the newer LEGO masonry profile bricks to add some color to the plain white walls. Over the past few years I have learned a number of fun wall texture techniques from @Ayrlego and others and I wanted to share more about how to use them! Often combining one or more of these techniques can make the walls look more natural. When using 1x white bricks, I think using small 1x2 and 1x3 bricks looks more natural than larger 1x4, 1x6, or 1x8. Using masonry profile, log profile, or line profile bricks can add surface roughness to the wall. By using 1x2 non-white plates (tans here), you can add some random color shapes to the wall. This is my favorite wall texture technique. Jumper plates positioned halfway into the wall can be used to stick partway out and add some depth. 1x2 rail plates can add larger extrusions. Jumper plates can also be used to inset windows slightly back into the wall. 1x1 round plates and round bricks can break up the monotony of a wall. I especially like 1x1 plates because they add small details. SNOT bricks can be added to the wall and 1x1 and 1x2 tiles can be attached on the outside of the wall. Headlight bricks can be turned on the their side to include a LEGO stud-sized circle protrusion from the wall. In the recent Naval Intelligence Office in Port Woodhouse MOC I made, I combined the techniques described above to try to add some natural textures to the wall. Colored 1x2 plates attached to the top/bottom of masonry bricks help make them blend in more naturally. If you add a whole bunch of tile protrusions from the walls, it can give it a rougher style texture. This cottage is from a recent Produce Farm MOC build. Hopefully some of these techniques can help add new details to your imperial fort walls in your next build!
-
[COR-Micro] Pier and Warehouse in Wullham
evancelt replied to Brickwolf's topic in Brethren of the Brick Seas
Nice work @Brickwolf! Looks like a Wullham build in color, landscape, and theme, with plenty of grassy hills! When the survey was conducted of Panarium, they found that the shallows in Wullham Bay don't extend that far out from shore. This deep-water bay should allow ships to get pretty close in and make it easier for Seawolf Shipping! -
[COR-Micro] Small Residence in Wullham
evancelt replied to evancelt's topic in Brethren of the Brick Seas
That's what 5 years at the Elizabethville School for Thatchery will get you! Good idea re: rain as the support. I tried that briefly and decided that even though the round trans bricks kind of look like a tornado or something I liked the style of having the rain coming down from the low part of the cloud. Kind of like a modern alarm clock weather icon. -
[SR-Class 4] Ketch Treasure of Poseiden
evancelt replied to Count Vroskri's topic in Brethren of the Brick Seas
The hull looks well-armored! I don't know much about sailing ships - can you tell me more about the orientation of the sails? How do the sails parallel to the hull help the ship move forward? -
Name: Wullham Ownership: Corrington Location: New Haven Sea island #4: Panarium Mayor: Jonathan Brickleton (@evancelt) Who can own property in Wullham: Anyone Who can freebuild in Wullham: Anyone
-
Setup is looking great! Agree with @Mister Phes that a solid background or sky backdrop would add to the display - the curtain pattern is distracting!
-
[COR-Micro] Small Residence in Wullham
evancelt replied to evancelt's topic in Brethren of the Brick Seas
Updated original post with link to micro prize competition. Thanks @Brickwolf! Fun to see all of the builds from that competition that pre-date my discovery of BoBs... so many builds to explore from the past few years! Haha artistic license -
Settlement, Wullham, Panarium, Corrington
evancelt replied to evancelt's topic in Brethren of the Brick Seas
A Small Residence in Wullham -
With the whole island to themselves, the new settlers on Panarium could choose the location they wanted to call home. Artemis Granger found a small sheltered hamlet just to the southeast of Wullham that looked good to him. He could see out off the headlands to the New Haven Sea, and if he climbed up the steep hill behind his house, he could see a mysterious interior mountain off in the distance. A rainstorm was headed his way, so he took shelter in his whitewashed cottage. Microbuild prize for 3rd Place Faction in The Battle for El Oleonda - Era II, Challenge III To be licensed as a small residence in Wullham OOC: My first microbuild! Since Wullham is still new, wanted to try to capture some of the landscape here for others to reference: grass coming down to sand at beach, hills and highlands, and some interior mountains! House is again a whitewashed cottage with a thatched roof. Wanted to try a SNOT tile/plate ocean to keep the color variation without it being too chunky. Left the 1x1 plates off the end of the ocean rows to give it a feeling of motion
-
Brethren of the Brick Seas (BoBS) Intro Thread, Era II
evancelt replied to Bregir's topic in Brethren of the Brick Seas
Hey @Capt Wolf - Tried to PM you but the forum said you can't receive messages! Are you perhaps at your message limit? Thanks -
[OL - FB] Marseille Iron Mine, Fatu Hiva
evancelt replied to CapOnBOBS's topic in Brethren of the Brick Seas
Sounds like Fatu Hiva will be in need of a blacksmithy! -
Thanks! The duck pond was a late addition so that I could lighten up the build a bit. As @Khorne noted, it's a bit dark and heavy with all that reddish brown soil! Thanks! I raided my 6yo's droids for their arms. Was fun to think about what a house would be made of if timber wasn't readily available. Thanks! I definitely plan on making other SNOT bases in Wullham green or tan. I made this base the soil colors both as an experiment in using that space as a vertical profile view down into the soil and because I wanted to establish that Panarium has fertile soil for growing stuff as opposed to other sandy islands. Like I mentioned above to @Kai NRG, the duck pond was a little effort to try to lighten up the overall colorspace!
-
Settlement, Wullham, Panarium, Corrington
evancelt replied to evancelt's topic in Brethren of the Brick Seas
A Produce Farm in Wullham, licensed as a medium plantation, Wullham (via evancelt)