
vascolp
-
Posts
338 -
Joined
-
Last visited
Content Type
Profiles
Forums
Gallery
Everything posted by vascolp
-

Efferman's Custom Parts
vascolp replied to efferman's topic in LEGO Technic, Mindstorms, Model Team and Scale Modeling
Cool! Will you put a tooth in the right side of the left part? Maybe one in the right and one in the middle? -
Somehow, I missed your comment... I will probably build some more, the RSR911 B-model was really a pleasure to build. The wheels on the wings should be vertical takeoff thrusters, but the wheels are a bit too big for the size of the ship. In the beginning I felt the Corvette had not enough parts to build something, but it ended up not so bad, I think... The Corvette was also very useful to learn how to make instructions in stud.io, which was my goal. I will try to do instructions for the RSR911 if I find time for it. I still must learn how to manage flex-axles in stud.io, though! Thanks for your comments.
-
Efferman's Custom Parts
vascolp replied to efferman's topic in LEGO Technic, Mindstorms, Model Team and Scale Modeling
Ok, I see what you mean. Looking again to your video I noticed what you said... you only "print holes" never pins. Another picture: in red pin holes to connect to the back, two of them to keep in place. In green pin holes to connect to the sibling... maybe a bit bulky, but probably possible? .Well... lunch time! Nice talk!
-
Efferman's Custom Parts
vascolp replied to efferman's topic in LEGO Technic, Mindstorms, Model Team and Scale Modeling
This is pretty cool! Considering that I don´t kow anything about 3D printing: maybe you could do the parts uneven, each one with one tooth only, say on the left. And the right side would connect to the left side by some sliding mechanism (is this possible in 3D printing?). Then, the right side wall would have a tooth but the left side wall would not. Something like this: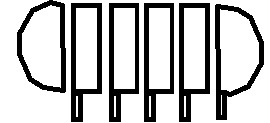
-
I still don't have it, but that's an idea!
-
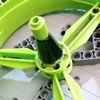
Hi everybody, I thought on creating instructions from my RSR911 Space Cruiser 42096 alternate model. But I never had done instructions before, so I decided to try it in a smaller model. I did this Corvette Space Fighter as a 42093 alternate model, and made instructions for it. It's a simple space ship with retractable feet and openable canopy. It also includes a stand to place it over your desk. The ship has 387 parts and the stand 76, giving a 79% usage of 42093 parts. I modeled it in Stud.io and created instructions from there. Everything available on rebrickable. Any comments about the instructions as well as the building are welcome. Here are some pictures: And a movie: More pictures here. Thanks and Regards!
-
[MOC] Volvo FH
vascolp replied to Sebeus I's topic in LEGO Technic, Mindstorms, Model Team and Scale Modeling
Last sunday I was driving and passed through a truck like that, and immediately thought "that´s where that MOC came from!". I think I had never noticed those trucks before. Good work! -
General Part Discussion
vascolp replied to Polo-Freak's topic in LEGO Technic, Mindstorms, Model Team and Scale Modeling
Maybe not quite technic, check video below. Even size, studs... But it is a nice part and a nice set! -
This is pretty cool! I like it manual too. But it must be a bit boring to turn some of those manual commands, lots of wheel turns.... maybe you could use an external motor, a bit like an electrical screw driver made out of lego, for the longer operations?
-
Flat subtractor [INSTRUCTIONS]
vascolp replied to Sariel's topic in LEGO Technic, Mindstorms, Model Team and Scale Modeling
Very cool design! I have been using the design below but that has a real flatness advantage. -
Check this: Last september, from Lego (Replacement Parts -> Buy Bricks), 0.65€ each. The basket ball ones. I think soccer are not available. KU: 6261264 2020-09-04 Enviada 0.65 Unfortunately haven´t used them yet... I need a contest!
-
Well, there are some nice closed loop small GBCs out there (miniloops,) . You could imagine a line of miniloop GBCs sets, that could connect to each other, forming a bigger one. Maybe some of them manual and one or two with a motor, that could be used to power the union of several. Wow, this would be nice!
-
Thank you!!
-
Thanks! Thanks! The minifig seats that rise where really fun. I wanted to be able to open the canopies both at the same time, then connecting the seats to it came naturally, and then... why not ejection?
-
Thanks! Here.
-
Hi everybody! This is RSR-911 Space Cruiser, an alternate model of set 42096. 42096 lights are canopies. Inspired by that, I did this MOC. It was really fun to build, hope you like it. Features: Retractable Feet with suspension Openable Canopies Retractable Rotating Antenna Ejection Seats Stand Description plate LEGO 42096 C model (87% parts) Ship: 1105 parts (69%) Stand: 261 parts (16.3%) Name Plate: 24 parts (1.5%) Free instructions here. See the video below. More pictures here. Video:
-
20: 10 17: 6 7: 4 5: 3 12: 2 10: 1 Very cool contest, incredible participants, very difficult to choose!
-
General Part Discussion
vascolp replied to Polo-Freak's topic in LEGO Technic, Mindstorms, Model Team and Scale Modeling
Yes... but old: https://www.bricklink.com/v2/catalog/catalogitem.page?P=wheel1a&name=Train Wheel with 2 x 2 Stud Center, Traction Teeth&category=[Wheel]#T=P&C=5 https://www.bricklink.com/v2/catalog/catalogitem.page?P=7039c&name=Wheel with 4 Studs and Axle - Traction Teeth&category=[Wheel]#T=P&C=5 -
[TC19] Katana supersport
vascolp replied to steph77's topic in LEGO Technic, Mindstorms, Model Team and Scale Modeling
I was just thinking on it right now.... 16T and 24T on that position do not mesh... is it for a chain? The chain solution is great! I like it, I might use it! Very cool! -
[TC19] Katana supersport
vascolp replied to steph77's topic in LEGO Technic, Mindstorms, Model Team and Scale Modeling
Your motorbike is really beautiful and I like the way you found to squeze the stepper inside it! But, and please correct me if I am wrong, I have the felling that your gearbox will spin in one direction in 1st and 3rd gears and in the opposite direction in 2nd and 4th gears. That, because the axles with the driving rings should be spinning in the same direction, but you are connecting them through a 16T-24T mesh. Am I corrrect? -
[TC19] The Red Blaze
vascolp replied to MajklSpajkl's topic in LEGO Technic, Mindstorms, Model Team and Scale Modeling
Wow, those pictures from above are really nice! Glad you liked the suggestion ... Fortunately your bike's seat looks really comfy! -
[TC19] The Red Blaze
vascolp replied to MajklSpajkl's topic in LEGO Technic, Mindstorms, Model Team and Scale Modeling
This is really cool, i like it very much! Those curved parts you used on top of the fuel tank and on the botton, wouldn´t they make a nice front wheel mudguard? Also, the seat and the footrest position seem to be not quite compatible with those handlebars, the driver would have to bend a lot! What about long handlebars, allowing the driver to rest its back? How would it look? -
lego technic forum down anyone have same problem?
vascolp replied to amorti's topic in Forum Information and Help
same same... :-( -
[WIP] Straddle Carrier
vascolp replied to Lasse D's topic in LEGO Technic, Mindstorms, Model Team and Scale Modeling
Hi, very cool stuff! You could try wheels without rubber tires.... just the rims or fake tires made with small link chains, for instance. Not that nice but it would probably slip enough to avoid leg spreading? About container decoration, you could make a decoration of 3x3 containers size, so you would have a puzzle that you would build using your machine! -
Yes really cool! And funny how you did a modern version of the old square piston.