
Bart
-
Posts
1,107 -
Joined
-
Last visited
Content Type
Profiles
Forums
Gallery
Everything posted by Bart
-
Amazing how you managed to squeeze the power function in for the main and tail rotor, and still keep a clear loading bay. Bart
-
Impressive light house, and not just a light house the whole scene around it looks so finished and detailed that i don't even know what to comment on :p looking forward to your video with the moving light. Bart
-
Impressive showcase, it gives it a bigger impression, and it looks very professional. on the connecting story, you could try to put some technic bricks (brick with hole) in the underside of the water and make a nail or screw or woodplug erect from the wooden base which lines up with the tecnhic brick, this should prevent the ship from sliding around in the showcase. Don't suggest you keep it upside down though, but it should be enough when you move the whole around or even hold it under an angle. Bart
-
It looks good, the water rising against the rock, makes it a hard place to dock :) Bart
-
I never knew I had a tavern :O It looks funny though :D nice place to visit. Bart
-
wow It looks so good :O. and I truly love your water! Bart
-
Looking good. I don't think they are to thin though I think they are good, especially when you add the horizontal lines and all those others. Dafi is correct though, the shrouds are connected slightly different on the real thing. but it still looks good. and I would understand if you leave it like this. But is it me or does the mast look bend? Keep an I on it when you put all the ropes on for the final model, It's quit easy to bend things when you put all on one side first and then on the other. Bart
-
Looking forward to your new version :) Bart
-
That is some good looking tree, if you'd ask me. The water is blue, I think it is best to judge this when there is more of it. The splashing thing is a good choice though. Isn't the searching for the right part a big part of building with lego experience ? :D Bart
-
QUESTIONS: - How deep should I make the water? The "deeper" it is so to speak, the more flexibility I have with objects such as sharks and the ship "emerging" from the water. But it adds a significant cost considering there are over 18,000 studs on the base level. My current plan was to only have nothing under the water but the base plate to save cost, but thinking I should had one level of plates. I assume you go for an all flat water here? then I would do baseplate-plate-flatpiece. To make a dent if necesary and to make some colour change in the underwaterpart. As you would expect closing up to the shore - Will this scenario be too crowded? Hard to tell before I scan them, but from my drafts, it looks like it will be a tad crowded with the 3 ships and the mid water shipwreck. The beach in the upper corner won't take up more then 1.5x of the 32x32 base plate. The rocky shore on the opposite edge takes up 6x 32x32 base plates, 7x with the shipwreck. The other shipwreck is one 32x32. 9.5 of the 32x32 still leaves 8.5 32x32 for the water and the ships, which seems like it is cutting it close. I could move the shipwreck to share a base plate with the Northeast island. Depends on the sizes off all things, but I think its do-able. Try first if its to small leave something out. move the rock wall a few studs to the edge or something. sometimes just a few studs can make a world of a difference. - With the above in mind, would it be weird to do a cross section of a ship at the edge of the water? Like have only half a ship present in the "scene"? Or maybe on the edge, cut cross wise? My work has a machine shop so I can cut the hulls in half if need be. Worried that will spoil the overall feel or kill that entire angle of view, and one edge will already be cut off from view. However, it would give a detailed view inside the ship and might be cool (I've seen some done this way and I'm mixed). Half a ship on cut down the centerline looks really interesting to me, but I wouldn't cut hull pieces with that. I would brickbuild the hull pieces. I think this gives a better finish to the 'cut'. - Am I going over the top with the trans blue pieces of the ocean, rather then doing SNOT with solid colors? I really like the realism of the trans blue and when done right, it seems cool, but...I'm open to advice. If you really want to do it this way then go for it! its YOUR moc :). I only have slight doubts about the flatness of your sea. - Anything else? Not that I can think of, I'll await your progress first :) Bart
-
"simle" he says :P It looks amazing, so lively, like looking at a picture of the real thing. I absolutely love the grey water. Makes me think the scene is located in the NorthSea. The ammount of details is also stunning, the way you did the rigging, the signalflags. I also think the small boat is done very good. Can you show a close up of it? Bart
-
It indeed looks like they "fixed" all your points :P Bart
-
I think the new one looks better. Like its fully loaded :) Bart
-
I see a challenge !
-
From the side view picture a couple of pages back the curve looks good. but from the frontal view it looks kind of abrupt. I think this is really due to camera angle. I would leave it the way it is, as I think you have done it as smooth as possible with bricks. Bart
-
This really depends on how you build your model, if you build a full hull model you would raise the deck at the bow, so to speak. But when building a waterline model you also have to look at the way this ships lay in the water. Under sail or not. And most of this ships were head heavy. Due to stowage and due to the the positions of the sails. There bows were pushed down. So it appeared the decks at the bow were the lowest and rises going aft. This same principle goes some way for the debate about the waterline too. At the bow the ship met the water almost at a vertical. And this being a model, making it vertical is the best. At the stern the hull would move inward at the waterline, until it meets the rudder. Maybe its due to the angle of the picture but it kind of looks that in you model the hull goes inward quit rapidly after the midships. For the rest great build so far, looking forward to the next update :) Bart
-
I'm really glad to see this ship finished after seeing all the work and discussions in the WIP-thread. It turned out really good, all the details seem to match each other and all in proportion. I know you didn't build the port side, but the video and pictures carefully avoid looking at it, which made me very curios on how it looks. Do you mind posting a pic of it? Bart
-
Wow that looks fantasticly good and realistic. bart
-
The Lothlorien capes were neither grey nor green, they were magical to take the colour and texture of there surroundings. so for Frodo and Same they become grey and rock texture at the gates of moria. Bur for Aragon Legolas and Gimli, they turn green and gras like when running the lands of Rohan. Bart Edit: typo
-
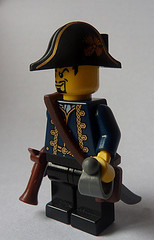
Le Fourageux, French third-rate ship of the line, minifig scale!
Bart replied to Captain Blackmoor's topic in Pirate MOCs
wow great build :D A capstan made out of a ships wheel, brilliant idea. It looks really good, and you can have eight spokes when most have six. I'm definitely following this thread to see where you are going :) Bart -
Great work again Sebeus, I really like what you did, but please give the custom rigging a try. You can always take it off again. Also I tend to agree with Frank, that you longboats are a bit small. I made a barge ones, but I think its to big for your FD. Click We had a discussion about this subject before and it is called the waist. But on a 'normal' ship that would the place to store the boats, but I don't recall them being there on the FD. Although the FD is a movie set, so there is no need for the film makers to be correct, and store the boats somewhere. They can just make them appear when needed. Bart
-
I had an idea about a technic you might be able to use; The left pose is the standard 'neutral' position, the right pose is right before firing. The knob on the barrel is fixated (black) to the base of the ship. The gun carriage is put on slides (yellow). An axle rotating moves an arm to the left pushing the carriage outside (to the left) but the knob stays in the same location (difficult to show in ldd as it cannot move.) As soon as the arm on the axle goes down it slips out of the reach of the block under the carriage and the gun recoils back. This way you can also make the guns slide out and recoil in at different times by placing the arms on different angles on the axle. I only don't know if this way the cannonball flies out of the barrel, you would have to experiment with that. But this system appears easier to me then having two different movements; 1 sliding the cannon out and 2 pulling the knob back and releasing. Bart
-
I hope to pull of the traditional type. so 4 limbs 2 wings and a tail ;) Thanks for the link to the Chronicals of Ikros. they indeed have some very nice dragons in that story. but the story itself is also pretty good. I'm definitely going to read it fully. Bart
-
Designed a new neck; an octagonal ring design, which has a 'spine'. As you can see I also experimented with the colours, nice thing about LDD two clicks and you have a different look. What do you think? I extend the spine back a bit. The spine can hinge alternating up/down and left/right. Ball-joints take up to much space in my opinion. And is a bit difficult transition from Technic rounded parts to plates and bricks Also to have a visualisation about size I added some Technic-beams wings. those Technic parts are not the definite design. But the shape is how I want them. I think they need to scale up even more. But maybe build the body first to judge on that. And another view. Tell me what you think, please. Bart
-
Why didn't I see this before :O its amazing, all the detail you managed to squeeze into the small ship. the cannons and the chain as rigging to name some. good job. Bart