Divitis
-
Posts
185 -
Joined
-
Last visited
Content Type
Profiles
Forums
Gallery
Everything posted by Divitis
-

General Part Discussion
Divitis replied to Polo-Freak's topic in LEGO Technic, Mindstorms, Model Team and Scale Modeling
84772 returns no results. -
General Part Discussion
Divitis replied to Polo-Freak's topic in LEGO Technic, Mindstorms, Model Team and Scale Modeling
This helps, thank you. Honestly, I think Philo's pack was integrated in Studio at some point but nobody bothered to check if the parts loaded properly. In fact, even in a 'vanilla installation' like yours, you will find the Vespa tires, but not the wheels. -
Jurss' Workshop
Divitis replied to Jurss's topic in LEGO Technic, Mindstorms, Model Team and Scale Modeling
Great minds think alike! I just got a bag of these to use as Engine connecting rods in a mid scale (9 studs long) V12. I'll keep you posted on the progress. Meanwhile, if you need me to experiment with the part on your behalf, just let me know what you wosh to know. :) -
General Part Discussion
Divitis replied to Polo-Freak's topic in LEGO Technic, Mindstorms, Model Team and Scale Modeling
All the parts from the pack show up in the tab, only the Vespa wheel is missing. I thought of opening the part in Part Designer but the archive contains hundreds of files and I don't know from where to begin. Help appreciated here :) Btw, does it load on your side? -
General Part Discussion
Divitis replied to Polo-Freak's topic in LEGO Technic, Mindstorms, Model Team and Scale Modeling
@Philo In the part pack 1H 2022, the Vespa wheel doesn't load in Studio, can you please help? As it's the only wheel that fits the tire it makes it kinda hard to use. I hope it's OK dropping you abline here, as I saw you posting updates in this thread. And thank you so much for creating those parts packs! Keep them coming please :) -
Worm and sector steering
Divitis replied to Divitis's topic in LEGO Technic, Mindstorms, Model Team and Scale Modeling
That's a great question @gyenesvi and I couldn't find the answer to that. In my Lego version I noticed that the 'black cube' is less geared down and moves faster on the worm than brick built actuators. This makes the solution better suited for steering. Maybe it's also the case in real life? Also, all Lego solutions that I saw using worm screws also include the 24t clutch to stop the steering instead of relying on the C motor auto calibration. I reckon otherwise the worm gear down ratio would break the model. Happy to be proved otherwise of course:) Meanwhile, I finalized a compact version, properly braced so that the motor calibrates with no issues - it needs a hard stop, if there is play/flex in the mechanism the calibration fails. Unfortunately I cannot record with my phone and use the app.. -
Worm and sector steering
Divitis replied to Divitis's topic in LEGO Technic, Mindstorms, Model Team and Scale Modeling
Hey Jundis, the cube that slides on the new worm gear replicates quite accurately how the actual mechanism goes, so as soon as I saw the schematic as part of the research for my MOC I thought of it and never looked back :) Connecting the worm gear it to an sliding 8t would probably require a lot of bracing to ensure the movement is smooth, and otherwise using a rack would make the mechanism really redundant, something like this: -
[TC26] Arctic Monowheel
Divitis replied to Tobi Wankenobi's topic in LEGO Technic, Mindstorms, Model Team and Scale Modeling
This is impressive work, and big thanks for sharing the code too! -
As I begun working on MOCing an old car, I wanted to go realistic and integrate worm and sector steering just like the original model. Worm and sector on Wikipedia At first glance it feels overdesigned, and it probably is, especially for a Lego model, but ultimately works well and is precise. The new worm gear piece works like a charm but the main drawback - which admittedly negates one of the advantages of the original design - is that the 6L worm can be backdriven. However, I reckon using the 2L worm would require too much bracing to be integrated in the space I have. This is the first working prototipe. The main issue has been bracing the worm securely. The amount of force the 'black cube' exerts on the frame is nothing short of impressive, it must be a 45:1 reduction or something!
-
Thanks @JLiu15, appreciated!
-
EDIT: Faulty motor, my bad. In theory at least it works as it should. Hello, I would like to use the angular motor to steer a vehicle, but I find very annoying that, unlike the L motor, it needs to be pleced perfectly 'zeroed out' in the build. While the L motor 'finds the center' by spinning in both directions until it hits a stop on both sides, and then goes back to the relative middle point, the M Angular always goes back to its 0 mark. Which means, that if your rack and pinion steering 'skipped a tooth' due to a crash or some thinkering, the App calibration doesn't work, and one has to re-align the motor manually, which can be a pain if it's buried inside the model. Is there any way to make the M angular behave as the regular L? Thanks!
-
MOCs versus sets
Divitis replied to PlopiNinetySix's topic in LEGO Technic, Mindstorms, Model Team and Scale Modeling
I I reckon part of the problem is that MOCs are firstly designed digitally, and dealing with angles in Studio is a pain. We should ask for some apt features to be added, like 'orient towards pin' or 'calculate the diagonal'. Any idea how to submit a feature request? -
MOCs versus sets
Divitis replied to PlopiNinetySix's topic in LEGO Technic, Mindstorms, Model Team and Scale Modeling
My 2 cents to the conversation, official sets -and more and morenso in recent yearsbuild at an angle. I've seen this being true in most sets I built both system and technic. MOCs seem content with 90° builds, that then get 'decorated'. Maybe we need a class on trigonometry or something -
Hi @JLiu15, apologies for reopening such an old thread but I wanted to ask you how the steering finally turned out with the M angular motor. Has it proven powerful enough for a large model like yours? Cool truck btw, it's a pity you never posted the finished build.
-
The video is finally out!
-
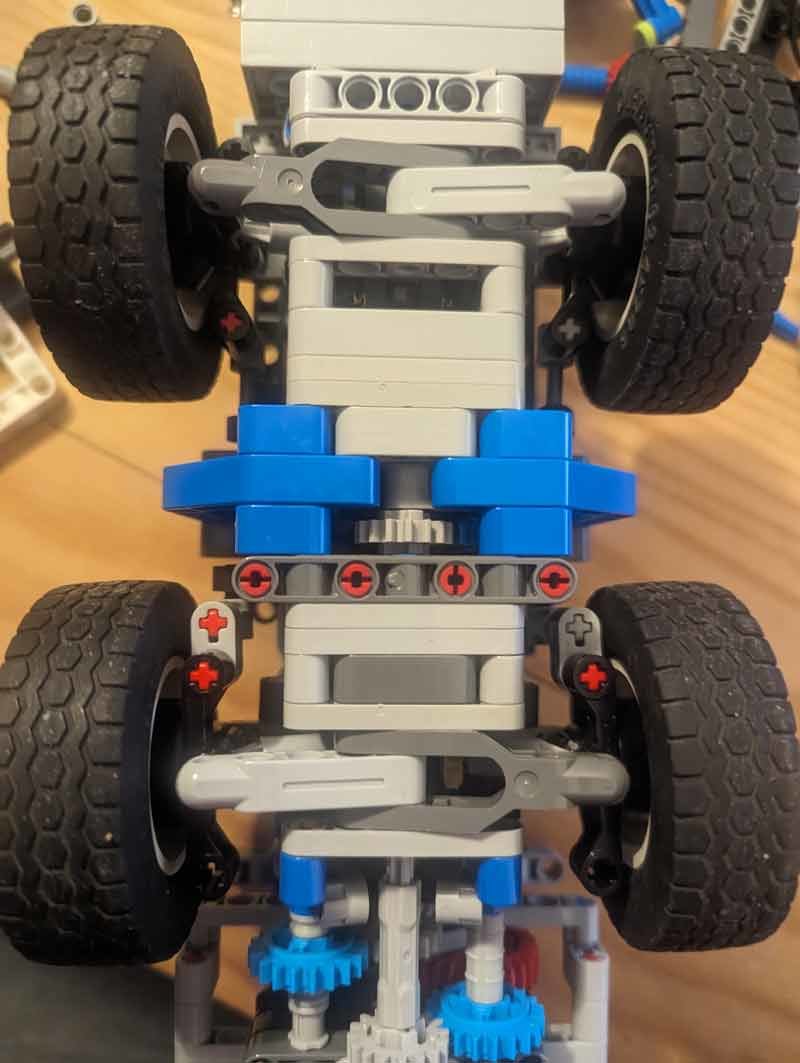
Thanks for the positive feedback :) Pin disconnection has never happened during play. Yes, if I drove hard into an obstacle. With only one L motor slightly geared down I think it's already a little overpowered for the size of the vehicle. I wouldn't give it any more. I'm not sure if I got your question about the size of the wheels, but the limiting factor is how narrow the actual inner frame of the car is - 5 wide. A bigger wheel wouldn't be able to steer much before bumping into a support beam. Vehicle length was a concern, yes. If you extend the driving axles too far out of the wheels then clearance becomes an issue when approaching inclines. Also, the two axles need to rotate opposite of one another. So having the differential above the wheels forces using an extra spur gear to transmit motion all the way down to the lower axle, which solves the problem. (At least this was the configuration before I though of meshing the differential spur 28 gear directly between the16 at diff. output and the 20, instead of going all the way down to the 16 at the bottom. This meant removing one gear instead of adding it, which always makes me happy)
-
@Bluehose Ensuring the bevel gears wouldn't slip was one of the big challenges, and this is the final design. In the end I am satisfied with the result, especially given the small scale of the model. There's no slip (clicking) during normal operations - managing inclines and rough terrain. It happens only when suddenly inverting direction, which makes the car rear up. But it recovers immediately.
-
You are a fine observer @2GodBDGlory, that is pretty much how it's laid down. This is how the actual transmission goes. You'll see there is only one differential. Since both pairs of wheels steer, the two on the left and the two on the right end up having the same turn radius at all times, and can be hard coupled. It's sort of an H-drive, I guess, although that seems to be only ever used on 6 or 8 wheelers. I couldn't find any real life vehicle that employs this idea, so probably it's one of those that looks good in practice only? Even then, it's a smooth ride. (Full video coming) https://bricksafe.com/files/divitis/mini-4x4-full-steering-h-drive/wheeler.mp4.mov
-
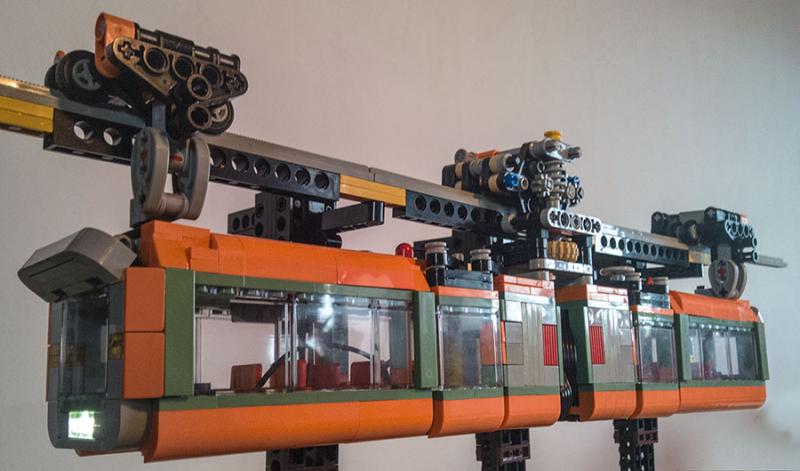
Hey there, long time lurker with finally something to share. After quite a bit of work, I managed to squeeze independent suspension, steering and differential drive in a 9-wide unit (or 11 between wheel hubs). And it works! Tease picture attached, implemented in a 4wd design. I will share better pics and a video soon. Unfortunately I can't record a video with my phone while controlling the model with the Lego app, so I'll have to figure something out. Also stud.io files if anyone is interested :) Cheers

-
Thank you all for the compliments! :) :) Oh I rode that train too, it's really cool! But it's only since I moved to Dusseldorf a few months ago that I decided to build something like this, because the train shuttle that connects the airport terminal to the S-Bahn station is precisely a suspended monorail! And the two minutes ride is the best thing about catching an early flight ;) A new boogie is in the works, it shall make it go at least faster than a walking mining :) If you want to go technical, I attached the new design as building instructions to the mocpages page. Yes it does take turns, and since the attaching point of the boogie is at the very front of each car, I can say it does look fairly elegant too. :) It also manages small inclines, and I hope that by making it faster I won't make it loose this feature. Unfortunately the test track was literally suspended on mine and a friend hands, so there's no video of it. A big update is coming in a few months when I'll be back home. I plan to improve the gearing and of course also extend the tracks.
-
Yes! Here is the video on youtube:
-
Hello again, and thanks for the nice comments! I wish I could post more pictures but unfortunately I work abroad and Lego is back home.. so I won't be able to get hands on for a couple months at least. But I attached the new gearing design in LDD to the mocpages page. It shall make it 1.7 times faster and you will be able to understand which wheels I used too. Oh it does take on curves nicely, but for testing my friend and I were literally holding the rail up, so no video of that lol!
-
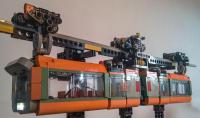
Hello everyone! Here's my version of a suspended monorail train, hope you'll enjoy it I'm introducing it here because this forum has been quite helpful to me while building this, especially for the doors design. To see more of it please head to this page: http://www.moc-pages.com/moc.php/423851 You can see hi-res pictures and a short video here: https://www.flickr.com/photos/23071566@N02/sets/72157663217856521 Cheers!