Srbandrews
-
Posts
157 -
Joined
-
Last visited
Content Type
Profiles
Forums
Gallery
Everything posted by Srbandrews
-
Great thread. I recently bought 'The Train Book' published by DK. It's a big coffee-table style illustrated reference book and has some really fantastic images, including quite a few unusual designs. Including this odd German tank engine: http://bilder.bw-basdorf.de/VB995/dso.08022012/muldenthal-li.sv-_950x600.jpg This amazing snow plow from the 1890s http://www.historicsteam.com/HistoricSteam/cpasnowplow.html And the concept of 'camelback' locomotives that I had never seen before: http://www.machine-history.com/sites/default/files/images/camelback%201853.jpg
-
Thanks for the suggestions. I really like the second one here but am a bit confused about something in spite of the instructions. Your rods Zephyr I assume are the width of a thin liftarm, so does the main rod not have to bend out a bit in order to be ouside the bars that the pin slides between?
-
Thanks guys! Cheers for the reference images jtlan. I must have seen that method used before but never noticed that it featured a sideways tile. I did a similar style of arrangement on my King class but using and axle as piston like the Emerald Night. What I could do with is something that looks a little bit more complicated, like a walschaerts gear, without being too fiddly. I guess I'm asking a lot there...
-
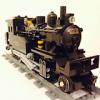
Afternoon everyone. I've been working on a MOC of a Japanese National Railway C12 2-6-2T in LDD: Prototype looks like: I've only coupled the rear two pairs of drivers to make space for gear if needed. I'm really stuck with what to do with the valve gear here. I've seen lots of really intricate ones but generally can't quite work out how they've been put together. On the whole I'm also keen to avoid cutting up buts of tube and bars so a simple solution that captures the rough idea would definitely be preferable to something really accurate but involving much customisation. Any help or suggestions appreciated.
-
Very nice work. It's very accurate but at the same time very clean and 'simple'. Is it parts/colour availability or just personal taste that's had you choose dark green? It certainly looks better generally, I think, for trains (a bit classier perhaps) but the lighter green I would say is probably a closer colour to old GNR/LNER liveries.
-
Really great start. The boiler and tender are particularly good. A possible contributing factor in the derailment may be your centre of gravity. You currently have quite a skeletal chassis, meaning all the mass is up in the boiler, making it easier to tip. Love what you've done so far.
-
I have exactly the same problem with my one and only remote and assumed they were all like that. :(
-
Amazing! Really beautiful design and attention to detail. I love the clock tower especially. While really I think this is too good to criticise, I would say that perhaps a terminus station like this is more likely to have the rails coming in perpendicular to the station facade rather than parallel. I have to say again, though, great work!
-
I can't stop looking at it. I want it to be mine.
-
The welder face is really good, as are his overalls in my opinion (dark blue over dark bluish gray shirt).
-
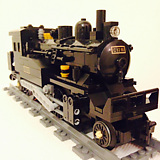
Because of the paint job and details on the prototype being fairly basic, and partly I think just because of the abundance of 'classic' blue, I was thinking the whole thing just looked a bit too simple, so I decided it was high time that I had a go at making some custom stickers - nothing fancy, just something to add a little bit of detail: I decided to name it Attlee after good ole' Clement Attlee, who is a bit of a hero of mine, and because it sounded like a good name for a small engine. They're a bit rough, being made in microsoft word and printed onto normal sticker paper, but I'm pleased with the experiment: I think they make the simplicity of the rest of the engine look intentional.
-
Amazing. The shed is terrific and I love the fowler tank engine. Great work!
-
Hi all, I thought it might be interesting to share pictures of the minifigs that you use on your railways. I've realised that I always want to get a better look at the figures people use as drivers and such, and I'm always keen on finding new minifig parts that I didn't know about that look good on railway figs. I'll start off with a few of mine: That's shunters and goods drivers on the left, inspector and director in the middle, and passenger and express drivers on the right. I particularly like to find good faces like the oil-smudged ones, and this one with the beads of sweat that I think looks ace: http://www.bricklink...p?P=3626bpb0744 So, show off your favourite railway figs here.
-
Thanks guys! I think perhaps fitting in the Power Functions would have been more impressive if it had been a case of me working out a way to fit them to a loco shape that I was working on, but really I just sort of looked for a loco that most closely corroborated what I thought was the best way to cover up the battery pack. That is, the idea of covering the top of the battery pack with a saddle tank and using panels to make it look like there's some space underneath. It struck me that all the PF side tank engines look far too tall and square for anything of british design. Initially I had been working on a Manning-Wardle type with shorter tanks and an exposed smokebox: But the tanks and boiler just looked too big and long for the kind of engines that had that configuration: Henry Ellison just came along at the right time when I was thinking I would never be happy with the design.
-
I think they're only talking about one train there, albeit in a slightly misleading way. Cf "I'm will top up my pot of tea with some hot water."
-
Thank you Duke, I'm a huge fan of your MOCs so I'm very glad you like it.
-
Thanks gareth. They're not all strictly 6-wide as the cabs of the two tank engines are 7-wide. As for fitting in the PF, I think the main thing was getting the 4x4 part of the IR receiver down at foot-plate level. Having it form par of the back wall of the cab doesn't look very elegant from behind but I'm not too worried about that.
-
So nice! Terrific work.
-
Thanks Zblj I forgot to post the inspiration: Andrew Barclay 0-4-0st 'Henry Ellison' I wasn't really trying to make my engine a close representation of the real life loco, so much as I used it to inform the boiler shape and colour scheme.
-
For a while, I've been interested in trying to squeeze PF into a small british style steam locomotive. I'd played around with several ideas in my head but couldn't for some time land on a design that looked good. Eventually, I found an image of an Andrew Barclay 0-4-0ST shunter that had slightly more squared-off tanks than the usual short saddle tank locos. I decided that was the route to go down and set about putting a plan together, and here is the result: There's not really very much to say about it. It's somewhat shorter in appearance than the prototype, party because that seems to have become my style, but practically because, on such a short wheelbase, there is a limit to the overhang you can have at the front and back for cornering purposes. I plan on refining it, of course, so any comments are more than welcome. EDIT: Short video of it working and a self-indulgent snap of my steam locos built so far: Power Functions Steam Shunter by Srbandrews, on Flickr
-
They really do look amazing. Great decals. I want!
-
Good luck!
-
Wow, that's a huge improvement. Terrific work.
-
Not the best pics I'm afraid: As you can see, the two plates-with-holes that sit on the bogie's pin fit in the hole in the tender base and connect directly to the bottom of the battery pack.
-
Great layout and amazing engines. I notice the main bodies of those diesels are 4 wide. Have you managed to hide a battery box in there or do you use powered wagons?