
Captainowie
-
Posts
502 -
Joined
-
Last visited
Content Type
Profiles
Forums
Gallery
Everything posted by Captainowie
-

[GBC] Kicker Module
Captainowie replied to Captainowie's topic in LEGO Technic, Mindstorms, Model Team and Scale Modeling
I certainly hope so! I've still got a couple of months to get it right! That's in the opening post. -
I propose that - Annotations are Enhancements - it's just to bring attention to certain points, which could be done in a paragraph of text instead. - Composite images are Manipulations - if you're not being restricted to one image, this drastically reduces the need to make them in the first place. Owen.
-
[GBC] Kicker Module
Captainowie replied to Captainowie's topic in LEGO Technic, Mindstorms, Model Team and Scale Modeling
Turns out they do work! Well, kind of. I would have preferred to keep the ball in the trap and let it go on the trigger, rather than keep the ball out of the trap and let it in on the trigger. But I couldn't get that to work. Sorry about the ugly colour scheme. Things still to do: Rebuild it from Unimog-only parts (if possible) Build a second copy of the mechanism Work out a drivetrain that rotates the power axle at 30 rpm (or as close to it as I can) Build something to split a stream of balls between each launcher mechanism Build something to get the balls high enough from the input bin (might have to look outside the Unimog for this Build the catcher module Fun times! -
A good point. I bought two Unimogs in the same weekend (one from a vendor at a LEGO show and another from ebay) a few years ago, and I've just discovered that one of them has the old triangles and one has the new. I would also suggest that the two different types of 16t gears should be interchangable. Owen.
-
Anybody? I'll start on 8146. Unfortunately, the principal part (http://www.peeron.com/inv/parts/46453) doesn't seem to have been modeled yet. What would you like in its place? Owen. Edit: I haven't actually started yet, and I've got something else on for the next little while. If anyone else wants to step in, go right ahead. Alternatively, if these files are holding up other work, let me know and I'll give them higher priority.
-
But then you're giving the advantage to people with access to good quality cameras and studio lighting setups etc. All of which costs serious money. At least the digital manipulation can be done on hardware you already have (you're reading this, right? [and don't tell me you have a smart phone but no access at all to a desktop]) and at no cost (The Gimp, paint.net, etc).
-
I've pretty much only ever bought flagship (or near enough) models. Never thought it'd come back to bite me on the bum! Nevertheless, a great competition. Owen.
-
Towball fits into an engine piston. That is not quite as useful as the other way around, which is the connecting rod fitting into any of the socket parts. Owen.
-
[GBC] Kicker Module
Captainowie replied to Captainowie's topic in LEGO Technic, Mindstorms, Model Team and Scale Modeling
Well, I decided to take a closer look at Akiyuki's mechanism, and decided to have a go at scaling it up. I've hacked together a temporary power source, and this fella can launch the balls approximately a meter and a half, with quite good precision. I think I'll put two of them side-by-side, running 180 degrees out of phase with each other. Biggest problem is that now I can't really use the name "kicker"! Now I need to work on how I'm going to feed the balls to the launcher cup (best use for portal axle frame that's not in a portal axle?) one at a time at the right point in the cycle. I have some ideas for this, it remains to be seen whether those ideas will actually work! Owen. -
General Part Discussion
Captainowie replied to Polo-Freak's topic in LEGO Technic, Mindstorms, Model Team and Scale Modeling
Ditto. Is that half-stud offset in the light bley one? That could come in rather handy. -
[GBC] Kicker Module
Captainowie replied to Captainowie's topic in LEGO Technic, Mindstorms, Model Team and Scale Modeling
I've seen that one, but the distance involved is much smaller - I'm not sure the same technique can scale to propel a ball a meter. -
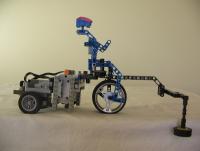
Hi guys. I have begun construction of my newest GBC module, and I've decided to try sharing my journey with you. I am aiming to make a projectile launcher, that will get the balls across the gap between two tables, a distance of about one meter. I have considered two approaches: contra-rotating wheels as in a bowling machine; or impact from a moving lever, like someone taking a golf shot. After an afternoon playing around with contra-rotating wheels, I decided that the moving lever had more chance of success. As most of my structural elements are currently tied up in display models and other GBC modules, I decided to use the one set I have that isn't either built or assimilated into my collection - a 8110 Unimog (no longer MISB because I had already raided it for the pneumatic pump). As a result, I would like to see if I can make this from only the parts in this set - because this wasn't going to be hard enough already! Here's a very quick rendition of what I've got so far: The part on the end of the arm is the rubber 2-length liftarm, because I thought it would make for a gentler impact on the balls. I plan to raise the balls vertically into the path of the arm just like they do at some driving ranges. In order to get a rate of ~one ball/sec I'm probably going to have to build two or maybe even four of these things side by side. I do have a couple of questions I'd like to ask the forum: When using shocks like this, should I stop the movement of the arm before the shock expands fully? Or will the shock handle the sudden stop by itself? Has anyone built a reliable projectile module that shoots over such a large distance? I don't remember seeing one online anywhere, though I've seen plenty that cover smaller distances. I fear that at this range precision is going to become an issue. How should I prime the arm? I need to allow for quick release, and automatic re-arming. Is there any other mechanism I should consider? Like perhaps a centrifugal gun? I'll keep you all updated on how I progress. Owen.
-
There is a LDD/other digital tools forum that might be better placed to help you. I've never made instructions either in photo form or digitally, but I've used MLCad a lot, and I would suspect that it would be vastly quicker to do the photos. I understand that there is a way to convert LDD to LDraw, but the process is not perfect. If you "want to make some professional looking instructions", it's going to take a lot of work whether you do it digitally or photographically. If you're set on using LDraw, I'd suggest that the first step would be to have another look at those tutorials (there are some good ones here http://www.holly-wood.it/mlcad-en.html) and ask some more specific question if there's anything in particular you're struggling with. Owen.
-
8457 is finally finished. What great teamwork; ~50 models done in the space of a month. Owen.
-
Ah, I was afraid you had done that. In fact, I don't know why I didn't try it myself. I had wondered how people got around that lumpiness. I might end up redoing some of the synth work for certain models I've already sent in.
-
Philo. How did you do that bungee cord? The .mpd file (http://www.brickshelf.com/gallery/Philo/SetModels/Set8245/8245_-_robots_revenge_-_main_model.mpd) has the line 0 SYNTH BEGIN FIBER_OPTICS_CABLE 15 just before the only white synth'd element, but the fiber optics cable has vastly different stiffness properties than an elastic cord, and couldn't possibly make the corners so tight. I've also tried replacing my 'string' synthesis elements with a different part, but the string element has a different orientation to the ones I've tried, so I end up with a bunch of rings next to each other, rather than a long tube. Owen.
-
Generic Contest Discussion
Captainowie replied to Jim's topic in LEGO Technic, Mindstorms, Model Team and Scale Modeling
A walker with an odd number of legs! Or a vehicle with an odd number of wheels. -
So, I was thinking about this (dangerous, I know!), and it occurs to me that you might want to look into LDCad (http://www.melkert.net/LDCad - the newest version seems to have come out just a few days ago). It claims (or at least, it used to - I can't find any reference to it on the product's webpage) to be able to handle the whole of Datsville without breaking a sweat. That said, it is another editor that requires a bit of getting used to. I also thought that if you're using LDView to make the image, you're probably not going to be doing too much in the way of interacting with the scene - you'll have your camera at your standard lat/long, and you won't need to make changes. You might be able to get some form of command line program that reads the LDraw file(s) and outputs the image, bypassing the graphically intensive LDView window. Sure your current setup might be coping - just. But that group is only going to get larger with time... Owen.
-
Generic Contest Discussion
Captainowie replied to Jim's topic in LEGO Technic, Mindstorms, Model Team and Scale Modeling
As long as we're suggesting contest themes... I would like to see a contest whereby an unusual mechanism or part combination is presented, and folks have to build something that incorporates that. For example, I noticed a while ago that the engine piston rods have the same ball as many other parts with a ball joint, so I'd like to see what creations people can come up with that connect a piston rod with a link (or a steering arm, or anything that you normally use in a ball joint). Or make something that uses wheels for something other than rolling on the ground supporting the weight of the model. Or make something that uses a Geneva mechanism, or a planetary gear, or ... or ... or lots of things. -
I'll see how much work it is doing the V4s before I commit to doing the V6s or V8s! If someone else has done all the work except the engines, I'm guessing it's the engines that are the tricky bit. One of things I learned doing the chassis (if only I'd known I could have filched it from someone else!) was that the axle 5.5 with stop was in use a LOT earlier than I had thought. There are 5 of them in this set from 2000, and according to Peeron they've been in use since 1998. I imagined them to be a lot newer than that. Those three remaining models are all very large, and ought to lend themselves to being worked on by multiple people simultaneously.
-
8305 is done, and I should have 8307 by day's end. Next up, 8457 Power Pullers - though I can't believe nobody's made this one before. Owen.
-
[HELP] Storage for Technic
Captainowie replied to Nalyd997's topic in LEGO Technic, Mindstorms, Model Team and Scale Modeling
I'm not sure anyone could really be of too much help here. A good storage solution will strongly depend on a number of factors, including size and variety of your LEGO collection, amount of space you have, portability requirements, and budget considerations. You seem to have some idea of what you want, so I suggest you just go into a shop and have a look at what they've got. Just remember, you generally get what you pay for. -
I'm impressed - that's a lot of work for a "proof-of-concept"!
-
I'm getting there. I've got a long weekend this weekend, so I expect I'll finish it in the next couple of days. If you can't wait that long, I'll send you what I've got, but I'm keen to finish it myself - for completeness. Oh good, I was afraid I'd have to start that next. Not that I wouldn't enjoy it (it's one of the few of my sets that I haven't built the B model of - the Shuttle was just too cool to take apart), just that I have other projects I need to get started on! Edit: And it's done (quicker than I had anticipated). I guess 8305 is next on the list, I'll start it tomorrow.
-
I love this picture - it looks like minimalist concept art. I'm still working on 8462 - I've got the brickwork in place, "just" need to synthesise the flexible elements. Owen.