CrispyBassist
-
Posts
199 -
Joined
-
Last visited
Content Type
Profiles
Forums
Gallery
Everything posted by CrispyBassist
-

SBrick for PF trains- a first impression review
CrispyBassist replied to zephyr1934's topic in LEGO Train Tech
As Vinnie said, thanks for the great review! Based on what was said here I'll be getting one soon for my RDC since I haven't figured a way to let the IR receiver peek out the washboard roof. Keep us posted of any other revelations you come across while using it! -
My first things, I want to show you
CrispyBassist replied to Meisterschnorrer's topic in LEGO Train Tech
That's called a Schnabel car, used for carrying extremely heavy loads while not exceeding design wheel loads for the track. Very rare, and awesome to see in brick! Got any pics of in in the brick? -
CSX GE EMD AC4400CW 7 wide, now in dark blue! WIP
CrispyBassist replied to legoman666's topic in LEGO Train Tech
Looks awesome! I've been looking for low-cost custom decal sheets but haven't had any luch yet. Mind sharing who your guy is? I'd like to give him a couple times $20 for some good decals. -
The whole thing looks fantastic! I think the redesigned mechanism is an improvement, especially for automating. Many hand-thrown siding switches operate the same way on the real railroad too. I'm excited to see the finished product as well!
-
For some designs (typically black lettering is best) you could even use clear sticker paper to avoid having to match colors. When you start doing logos with lighter colors it doesn't work as well, the brick color fades through more.
-
Loos like a pretty sweet job of ballasting those. Before you fight with the switches and ME models track you may want to check out this link with ballast instructions compiled by Michael Gale.
-
Help with identifying parts/sets!
CrispyBassist replied to WhiteFang's topic in General LEGO Discussion
Thanks. I have a few of those Crusaders torsos, hadn't thought the logo was that faded! -
Help with identifying parts/sets!
CrispyBassist replied to WhiteFang's topic in General LEGO Discussion
Hi all, I'm trying to figure out what this torso is from: I'm guessing Castle, but can't seem to find it on BrickLink. Note the arms may not be the correct color. Any help would be appreciated! -
I've actually been quite successful with train motors. My GP9 has two of them and can run happily with 8 cars (see here), and move a line of even more short distances. I haven't tried the motors with larger wheels than the normal ones though, but I have been considering it for future projects. Is that where the power issue comes in?
-
This took some thinking! Two ideas: 1) use 1x1 tile w/clips and and 8 long bars or flex tube to mimic the ribs 2) figure out a way to SNOT minifig neck brackets (these) under the tile you want to be the rib, to raise it ever so slightly from the rest of the roof. I wouldn't worry about getting on peoples nerves, this is part of what the forum is here for right?
-
Lego Turning Radius compared to Real Life or G-Scale Models
CrispyBassist replied to edsmith0075's topic in LEGO Train Tech
Based on the scale I use for my trains (1 stud = 1.3 feet) and a bit of railroad knowledge picked up through my grad school classes I can give you the following: R40 (standard LEGO curves) = 52' radius R104 (largest ME Models) = 134.5' radius 23° curve (sharpest that a standard diesel locomotive can operate through) = 250' radius 6° curve (generally sharpest mainline curve) = 955' radius Judging from your Flickr I'm guessing you're going for mainline North American freight? -
Train Bridge - for that canal or something...
CrispyBassist replied to marook's topic in LEGO Train Tech
With all that space in there you could probably hide an IR receiver and make the bridge operable remotely. I've seen a few turntables done that way, and use the red dial on the remote (or whichever you don't use to control trains) to operate them. Either way it looks pretty sweet! -
There would probably be a good amount of us (myself included) who are interested in larger radius curves (R120+) even without the metal rails for 9v, and especially larger switches. My 65 stud passenger car looks very wrong going through an R40 switch, as do the rest of the long cars and locomotives. When you start a Kickstarter for the project you could probably offer options for 9v- and PF-compatible track and perhaps make fabrication a bit easier, compared to all 9v. I would certainly be interested.
-
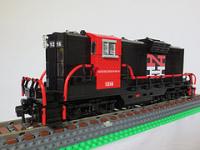
Switching completely to ME Models will reduce problems with curves, but not with switches. When I did my GP9 I attached the stairs to the trucks to negotiate curves, but (in my opinion) designed them so that they still look right. NYNH&H GP-9 by Matt Csenge, on Flickr
-
I think your trucks just need some more "beefiness" than the standard lego side pieces give. This design by Bricknerd is what I based my GP-9 truck design on: (Flickr won't let me link it any other way). Mine is ~8 bricks from the bogies to the roof. That's the rough height I use for my trains, and it seems to fit with everyone else that I've run them with.
-
I'm wondering if the PF IR receiver can "see" signals through transparent pieces, particularly trans-clear. I presume it does, but I want to make sure. I'd check on my own, but all my PF parts are at school in Illinois and I'm home in New York for the holidays. I'm hoping it works, otherwise I've got some major design changes to make on an upcoming project. Anyways, has anyone tried this or can someone test it quickly? I'd greatly appreciate it! Apologies if this is a repeat thread, I searched for the topic prior to posting. -Matt
-
If you can only find side-view photos you can find the length if you know the type of locomotive. That info is pretty readily available online, and will definitely help with the scaler tool -Matt.
-
Thanks guys! I'm still trying to get up the Eurobricks learning curve here. I've been following you too, Dr. Spock. I've started noticing some familiar names around here!
-
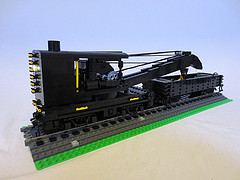
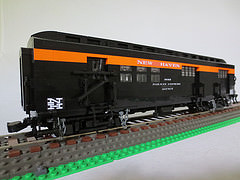
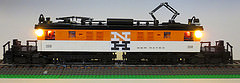
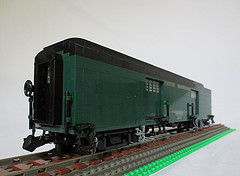
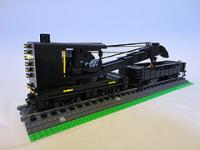
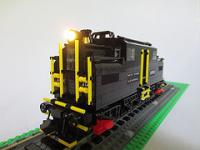
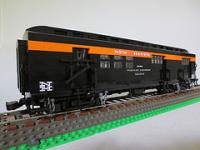
Hello all! In an effort to become more active on here I'd like to share some of my MOCs! I don't want to spam the forum with multiple topics, so here's one photo of a few of my trains (as many as will fit in the 100kb upload limit at least...). I have more pictures on my Flickr if you're interested: https://www.flickr.c...s/91993389@N08/ All are 8-wide, scale length, and are Power Functions (at least the locomotives are). Central Railroad of New Jersey wrecker #5: Fully functional, the boom raises, both hooks raise and lower, and the body spins, also has Brickstuff lights. New York Central S-Motor #100: Powered by 1 XL motor, has Brickstuff lights. New York, New Haven and Hartford EP-3 #358: Powered by 2 XL motors, has Brickstuff lights. NYNH&H baggage car (for the EP-3): 52 studs long. NYNH&H baggage/RPO (for the EP-3): 52 studs long. NYNH&H GP-9 #1216: Powered by 2 PF train motors. Hope you enjoy! -Matt


-
I've got only a couple TLG sets; I way prefer building MOCs. Almost all of my MOCs are 8-wide scale, to scale length. See them all here: https://www.flickr.c...93389@N08/sets/ TLG sets: Metroliner Super Chief Emerald Night MOC locomotives: GP-9 - PF EP-3 - 2-C+C-2 electric, PF, Brickstuff lights S-Motor - 2-D-2 electric, PF, Brickstuff lights Other MOCs: 1 baggage car - for the EP-3, 52 studs long 1 baggage/RPO - for the EP-3, 52 studs long 1 steam wrecker 2 gondolas (one 8 wide, one 6 wide) 3 flat cars 1 box car 1 test weight car WIPs: 1 double-ended electric wrecker 1 EMU 1 passenger coach - for the EP-3, 65 studs long 1 test weight car (they're so quick to build!) -Matt
-
Hi all, I'm Matt. I've liked railroads for a very long time; I'm currently pursuing a Master's degree in railroad engineering. My first full Lego train set was the Metroliner when it was re-released. Since getting out of my dark ages last year I've started building 8-wide locomotives and cars, taking much inspiration from Cale Leiphart and Nate Brill's creations. My first creation, and the one which I'm most proud of so far, is my CNJ steam wrecker. I like to build old, off-beat rail equipment, especially heavy electrics like the New Haven Railroad and the New York Central operated. I also like to model civil engineering structures from the New York area, especially bridges, carfloat bridges, and movable bridges. My Flickr can be found here: http://www.flickr.co...s/91993389@N08/ I'm constantly updating it with finished models and works-in-progress. Thanks!