Search the Community
Showing results for tags 'editing'.
Found 6 results
-
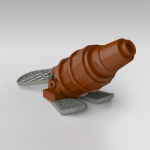
Sometimes the pictures of your creation don’t quite convey the feeling you’re aiming at. That’s when your picture editor becomes your best friend. You can use it to enhance the colors of your picture, get rid of hard shadows, install a new background, or add some special effect. It can be too much, but if you do it right, your picture will be more vivid, it well tell a story. One special effect that is particularly handy for Star Wars fans is placing a hologram in your picture, and that’s what I’ll be trying to teach you today. 1. Taking a picture Picture editing already starts when you take the picture. You have to take it so that it is fit for what you’ll try to edit in. In this case, you might consider shooting the backdrop and the minifig (or whatever object you want to make a hologram of) separately. This is because you’ll want to select the minifig quite easily later on. This will be more easy if you have a monochrome background with high contrast with the minifig. These separate pictures also have the advantage that you have the area of the background that will be behind the minifig as well, so that you can play with transparency later on. If it’s impossible to separate the shots (because the minifig is interacting with the environment), you can always shoot the background with and without the minifig, from exactly the same camera angle, or just leave it at one picture if you don’t want the extra effects and are willing to spend some more time on it all. 2. Importing the picture in GIMP Apart from a picture, you’ll need a picture editor. The professional software is known to be insanely expensive, but luckily there are some great free, open source editors out there. I recommend using GIMP, as it is widely supported. You can download it here for free. Once you’ve got the software up and running, you have to import the picture in GIMP. You can do this by going to File -> Open, or if you found a picture on the internet you want to experiment on, to Edit -> Paste As -> New Image. I’ll be using a picture of a Darth Vader minifig I found on the internet. 3. Preparing the picture You’ll need to work on the minifig alone, without disturbing the background if you have one. If you don’t have one, you’ll want a transparent background to paste the hologram seamlessly in some environment. Anyway, you’ll need to delete the background (if you’re working on a picture with a background you want to keep, duplicate the layer first). You can do this right clicking on the layer of your image (in the box on the right), and selecting “Add Alpha Channel”. Then you can use a combination of the magic wand tool and the free select tool. There are a lot of tips on background removal on the internet if you’re not quite confident. When you have the picture of the minifig without anything else (the checkered background indicates that it is transparent), duplicate the layer once. You can do this by clicking on the icon with the two windows at the bottom of the layers box. 4. Coloring the image The first real step in the making of the hologram, is giving it its typical blue color. You can use the colorise tool for this. The disadvantage is that it every color will have the same hue. So everything will be blue, while you can see there are some slight color variations in the ‘real’ Star Wars holograms. To fix this, you can set the transparency of the topmost layer to about 75 percent first. This will allow the colors to shimer through a bit. Then, go to Colours -> Colorise. You will get a dialog box that lets you play around with the hue, lightness and contrast of the picture. You can play around with it to get the best colors. Hit the OK button when you’re finished. 5. Adding the stripes Probably one of the most iconic features of the hologram are its horizontal stripes. There are several ways to accomplish them with filters or patterns, but I find gradients the easiest to use as they allow for total control of the size. To apply them, you first have to indicate the area they need to fill. To go to the topmost layer, right click and select “Alpha to selection”. This will select everything that is opaque in the picture, so that you certainly won’t miss any spots. Then, create a new layer by clicking on the white page icon at the bottom left of the layers dialog. Next, double click on your gradient tool. A tool options menu should pop up. Your colors are by default set to black and white, and this is exactly what we want. Leave all the setting unchanged, apart from the one that says “Repeat:”. Set it to “Triangular Wave”, so that the gradient will keep repeating itself in exactly the pattern we want. With your selection still active, hold control/command and drag your mouse straight up for a short distance (the ctrl will make sure the line is perfectly vertical, as we don’t want tilted stripes). The length of your stroke will determine the width of the stripes. Experiment until you’re happy with your stripes. Now your image should look like some bar code. To convey this texture to the underlying image, return to your layer dialog and set the mode (in the box at the very top) to overlay. You can also adjust the opacity to your liking. 6. Giving it the glow To add to the feeling of projected light, your hologram still needs a glow. Repeat the first few steps of the previous section to create a new layer and a selection of the minifig. The layer should go at the bottom of your minifig layers. Next, go to Select -> Grow. Here you can fill in the amount of pixels you want the selection to grow in every direction. This amount is different for every image size, but you don’t want to go too big. Here, I went with an expansion of 20 px in both directions. With this selection active on the new layer, click on the black rectangle that is probably your foreground color. Set it to a color close to the hologram. You can do this by using the color bars, or clicking on the color picker icon at the right hand side. Choose one of the lighter colors in your image. (excuse me for the stretched picture, I don't know what's going on here) Then select the bucket tool and fill in the selected area. You will see a crisp colored outline around your figure. To make it glow more, go to Filters -> Blur -> Gaussian Blur. Select the amount you want to blur, and hit OK. 7. Finishing the picture You can end here and put the picture against your background. If you want to make it a bit transparent, select the topmost layer, right click and select “Merge Down”. This will unify it with the layer below. Continue the process until you’ve had all the minifig layers. Then you can just play with the opacity of the unified layer to make it work with the background. You can also delve deeper into the filters and add some more noise to the picture etc, but I don’t find that necessary. When you’re satisfied with your hologram, you can export it as an image, and you’re done. The final result could look something like this (but hopefully better) That’s it! I hope you enjoyed it and learnt something to make your creations even better. If there are any questions, I will be very happy to answer them!
-
Hi guys I’m interested in finding 2-3 AFOLs who are also professional translators from EN > DE. Are you one? Or do you know any other AFOL who is? I may have a very interesting project in the works and need some professional input and participation. If you are interested, please contact me here on the forum - I'm sure you won't be disapointed :)
-
One of the integral parts of comics is character dialogue, which is as valuable as the images themselves in conveying the story of the comics (of course with the obvious exception of “speech-less”/”silent-type” comic strips). Adding the character dialogue is usually done in conjunction with the post-editing of the images after the principal photography. At this particular stage of comic-making, one is expected to already have a general idea (or even better - a working script) on how the exchange of dialogue would be. This lesson will teach you how to add character dialogue in your comics – with emphasis to the proper usage of speech balloons and comic-book grammar. Lesson Sections Section 1: Types of Speech Balloons Section 2: Adding Speech Balloons to Comics Using Adobe Photoshop Using speech balloon custom shapes Manual drawing of speech balloons [*]Using Microsoft Office Word Speech Balloon Positioning Section 3: Traditional Comic Book Lettering and Grammar Deviating from the Norm & Exercising Creative Freedom Section 1: Types of Speech Balloons The visual tool used to represent speech/dialogue/conversation of characters in comics is Speech Balloons (also referred to as Speech Bubbles, Dialogue Balloons, Word Balloons). There are different types of speech balloons depending on the emotion of the dialogue, the nature/manner of delivery, and the source of the speech/sound. This lesson will tackle the various types of speech balloons used in comic books and its conventional proper usage in comic-making. Examples: (Click on images for higher resolution.) Left: LOTR Funnies by Sextant Images Middle: Tabloit by Oky - Space Ranger Right: Wolverine's Worshipers by Oky - Space Ranger Examples: (Click on images for higher resolution.) Left: Forever Alone by The Penguin Middle: No Wiener? by Kiel.Da.Man Right: Princess Quest by Sandy Examples: (Click on images for higher resolution.) Left: Raging Plankton by Kiel.Da.Man Middle: Unlimited Powah by Oky - Space Ranger Right: To Infinity and Beyond? by TinyPiesRUs Examples: (Click on images for higher resolution.) Left: Hey I just met you by Kiel.Da.Man Middle: Lego Bin Laden Watching TV by Here Be Zombies Right: Do the Robot by pong0814 Examples: (Click on images for higher resolution.) Left: Shhh by Kiel.Da.Man Middle: Day 346 by Dan (LEGO365) Right: Day 270 by pasukaru76 Examples: (Click on images for higher resolution.) Left: Must save Friends by Kiel.Da.Man Middle: Day 271 by Dan (LEGO365) Right: supercutstext by TheLegoJoker Examples: (Click on images for higher resolution.) Left: Pay Attention by darkdragon Middle: Puny God by Oky - Space Ranger Right: My Precious by Kiel.Da.Man Examples: (Click on images for higher resolution.) Left: Triceratops Dewback by J.V.D. Middle: Civilian Marvel Heroes by Hobbestimus Right: Forgot to blow dry by Clone O'Patra Sources: 1. Speech Balloon , Wikipedia 2. Comic Book Grammar & Tradition , by Nate Piekos (www.blambot.com)
-
LEGO is a medium with which virtually anything can be built - oceans, landscapes, ships, castles, spacecraft and more. But now that you've created that great set for your brick flick or comic, you might be thinking, "What about the sky?". Yes, you could build a big blue wall and various clouds and celestial bodies to attach to it, but maybe you don't have enough bricks, or maybe you just don't like the way that looks, and you would prefer the simpler look of a sky and its atmospheric effects created in photo-editing. This will be done in this lesson using Adobe's Photoshop. Prerequisites: You'll need to know how to use your camera and how to take a crisp and well-composed photo with it. Photoshop is a terrific piece of software, but it can't completely fix an image that's out of focus, blurry, significantly grainy, poorly composed, or otherwise lacking. If you want to know, I shot my photos for this lesson with an entry-level DSLR, the Nikon D-3100, with a basic 18-55mm lens and an exposure time between two and six seconds and an aperture of f13. You will of course need Photoshop. This lesson was written using Photoshop CS5 Extended, but the techniques should work with other versions, though I have no experience with them. (I do know that the only features that CS5 Extended has and CS5 does not are 3D tools and image data analysis tools - you won't need them for the editing described in this lesson, so if regular CS5 is what you have, you're fine) Contents: Preparation: Setting up to take the Photo Daytime Effects Adding a Daytime Sky Adding a Sun Adding Daytime Clouds Nighttime Effects Adding a Nighttime Sky Adding Moon and Stars Adding a Starfield Adding Nighttime Clouds Adding a Sky to a White Background Assignment
-
Tutorial: Basic Editing using Windows Live Movie Maker
XimenaPaulina posted a topic in Brick Flicks & Comics
After you've completed the principal photography (taking the necessary photographs and/or videos), and doing some initial post-editing work (image enhancements, addition of graphic effects), it's now time for the last phase of your brickfilm/movie project - the post-production process of compiling and putting together all the movie elements to come up with the final movie/video product. To do this you will be needing a video-editing program, there are several dedicated high-end video-editing software around but these are usually costly since they are primarily catered to professionals. Good thing for aspiring beginner film-makers there are some free video-editing programs like Windows Live Movie Maker - which can be found in almost all Microsoft-based computers as part of Microsoft's Windows Essentials software suite (You can download Movie Maker here for free). Windows Live Movie Maker may not be as sophisticated as other professional programs like Adobe Media Pro or Avid Media Composer, but it is a good tool to learn the basics of video-editing in film-making. This tutorial will introduce you to the different features of this program with respect to the various aspects of post-production video-editing. Hopefully, by the end of this tutorial you'll be able to apply these to complete your movie project. Pre-organizing Files Before proceeding with the main post-editing work it is considered best practice to organize all the necessary files you'll be using for your movie project. It is recommended that you do the following: Identify, sort, and save all the files you'll be using in a single file folder, preferably with separate sub-folders for images, videos, sound effects, music, etc. If possible, re-name the individual files according to the order of their use in the project (eg. Scene 1-A, Scene 1-B, ...Scene 2-A, etc.) When the files have already been imported to a Movie Maker Project file (*.wlmp), DO NOT move these files to other locations. DO NOT move the main file folder (and sub-folders) of the imported files in the project. Avoid re-naming imported files. Doing these will not only make searching/locating of files faster and easier, but these will also be especially crucial in properly maintaining all the imported files in the project files. Movie Maker 'remembers' the last known location of all the imported files - so any changes with the file locations, or even file names would lead to missing files in a project. Importing Files After all the necessary project files have been properly organized, it is now time to import them into the Windows Live Movie Maker. The pictures and video clips can be imported by clicking either of the two Add videos and photos button (one at the Home tab and the other at the storyboard) > locate the file folder(s) > select all the files to be used for the project > click Open > the files will be imported in the storyboard/timeline. Below is the view of the imported images in the storyboard. Note that you have the option to change the sizes of the images in the timeline depending on your liking. To do this, just click on View and choose the size you want (I personally prefer the Extra-small icons thumbnail size since I could view the overall storyboard better). If you are making a music video-type project, you should import the music file this early since the music will dictate how the images/videos will be edited in the timeline. To import the music file just click the Add Music icon (you have the option to add your music at the start of the project or at specific parts of the timeline) > locate the file folder > select the music file > click Open. The imported music file will appear as a bar above the images, with its duration visually depicted by the length of the bar: As a good practice, it is recommended to save the project file this early: click the File Menu icon at the top-left corner > select Save Project As > choose the folder location to be saved (the same folder for the project files is recommended) > type in the File Name > click Save. Moving/Editing the Files Moving Files in the Timeline Move the image and movie files according to the order of appearance in the movie by manually dragging the thumbnails left/right/up/down. You could also use the Cut-and-Paste shortcut command by selecting and cutting (Ctrl+X) an image or a video and pasting it (Ctrl+V) to the desired point in the timeline. Note that this is where the pre-organization of files will prove to be beneficial - if you re-named your files in chronological order then they will be imported and placed in the timeline in the same order - so no need to move and arrange them one-by-one. Editing Photos There is only one editing option for images in Movie Maker (but a very important one) - adjusting the time duration of the image in the timeline - which will dictate how long would a certain image appear in the movie. To edit the time duration of images: select a particular image, click Edit below Video Tools (highlighted in yellow) in the Function Menu above and set the desired time duration (in seconds) either by: a) choosing one of the pre-set time durations in the drop-down list; or b) type in the exact time duration (allowable time duration can be as low as 0.03 sec. up to 84,000.00 sec. = 1,400 mins. = 23.33 hours = almost a whole day! ) Editing Videos Considering Movie Maker is a video-editing program, video files have understandably more editing options. These can be found in Video Tools > Edit (same as in editing images). The video-editing features include: Audio Settings Adjustments: includes Video volume adjustment (no sound to full sound) and Fade in and Fade out speed selection (none, slow, medium, fast) Video Speed Adjustment: create dramatic "slow-mo" effects as slow as 0.125x or create "high-speed, fast-paced" action scenes with playback speeds as high as 64x Split Tool: enables you to split your video into two or more segments by moving the vertical bar to the specific point/time you'd like the video to be split and clicking the Split icon. Trim Tool: allows you to remove certain parts of the video and/or to specify the starting and end points of the video. You could do this by following either of these two methods: Manually move/drag the vertical bar to the specific point/time you'd like the video to start, then click on Set start point to trim the video at the specified point. Do the same to set the end point, clicking Set end point this time; or Click on the Trim Tool icon > a new sub-toolbar will appear > set the Start point and End point by typing in the exact times or clicking the up and down arrows > click Save Trim. Editing Music Music files have editing options similar with those of videos. These can be found on Music Tools (highlighted in green) beside the Video Tools. The music-editing options include: Audio Settings Adjustments: includes Music volume adjustment (no sound to full sound) and Fade in and Fade out speed selection (none, slow, medium, fast) Split Tool: enables you to split your music file into two or more segments by moving the vertical bar to the specific point/time you'd like the music file to be split and clicking the Split icon. Set start time: allows you to set the point in the timeline when you'd like the music to start playing. You could do this by either typing in the exact start time or clicking the up and down arrows. Another alternative method is to manually drag the music bar to the point in the timeline you'd like the music to start playing. Set start/end point: an exact equivalent of the Video Tools Trim Tool, this enables trimming of the selected music so it starts/ends at the specified point in the timeline, which could also be done in two ways: Manually move/drag the vertical bar to the specific point int the timeline where you'd like the music to start, then click on Set start point to trim the music at the specified point. Do the same to set the end point, clicking Set end point this time; or Set the Start point and End point by typing in the exact times or clicking the up and down arrows. Miscellaneous File Tools There are other tools and commands that you may find useful when moving/editing files in your project: Duplicating Files: you may copy images/videos/music files by simply selecting the thumbnail/item > click the Copy icon or press Ctrl+C > paste it on the specified point in the timeline. Note that the copied file will have the same added effects (transitions, pan & zoom, etc.) as the original file. Removing Files: just select the file(s) you'd like to remove and click the Remove icon or simply press the Delete key. Selecting Files: you may select a single file (clicking on a thumbnail/item), multiple files (batch selection using Ctrl+mouse click or Shift+arrow keys), or all files (clicking the Select all icon or pressing Ctrl+A. Rotating Images/Videos: click on the Rotate Left or Rotate Right icon to change the orientation of your images or videos (useful if proper re-orientation of images was overlooked prior to post-editing in Movie Maker). Adding Animations & Visual Effects Movie Maker comes with several sets of special animation and visual effects that you could use to add more 'spice/flavor' to your movie. These include transition effects, pan and zoom effects, visual effects, and pre-set AutoMovie themes. Transition Effects Transition effects allow you to give a distinctive special effect on how your movie plays from one video clip or picture to the next. You can add a transition between two pictures or video clips in any combination on the storyboard/timeline. To do this: Transitions are added at the start of images/videos, so click on the particular item where you'd like the transition to start (i.e. the second of two images should be selected to add a transition between them) Click on the Animations tab > click the drop-down button > hover the cursor over the thumbnails to see the preview of each transition in the preview screen > select your chosen transition effect. Set the time duration of the transition either by typing in the exact time or choosing from the pre-set time durations (from as fast as 0.25 seconds to as slow as 2.00 seconds). An opaque triangle will appear on the side of the item thumbnail indicating the transition effect has been successfully applied Playback and review the transition effect in the preview screen. Adjust the time duration as needed. If you intend to use the exact same transition for all your pictures and video clips, just click the Apply to all icon to apply the selected transition to all images and videos in the timeline. If you want to only apply a certain transition effect to a select number of pictures and video clips, you can use the Ctrl+arrow key or Ctrl+Shift to batch select the items and then click the transition you'd like to use and set the time duration. The transition effect will be applied to all selected items in the timeline. To change or remove transitions, simply click on the image or video and choose No Transition or choose other transitions. REMINDERS: While adding transitions can be exciting in giving your movie a distinct professional look, bear in mind that these effects should be used wisely so as not to risk overdoing it. Use transition effects only when the change in scenes calls for it. For stop-motion films, obviously it does not make sense to apply transitions between small changes in action poses. The number and type of transitions to be used would depend on the type of project you're doing. For example, romantic music slide shows may require slow dramatic transitions (like Fade, Overlap, Blur) between images while an intense action-packed video with fast and abrupt changes in scenes might not require transitions at all. Timing is very important so transitions would have to be in-sync with the background music or sound effect (a slow 2 second transition would not go well with a fast-paced change in music). Complete set of transition effects: Pan & Zoom Effects Pan and zoom effects refer to the movement of the image or video within the viewing screen. Pan effects include movement in the horizontal (left/right), vertical (up/down), diagonal or even rotational directions, while Zoom effects are zooming in or zooming out of the screen (in combination with pan effects). To add these effects to your project: Select the picture or video clip you'd like to add an effect on. Click on the Animations tab > click the drop-down button > hover the cursor over the thumbnails to see the preview of each effect in the preview screen > select your chosen pan & zoom effect. A four-square icon will appear on the upper-left corner of the item thumbnail indicating the pan and zoom effect has been successfully applied Playback and review the zoom effect in the preview screen. Change or removeeffects if needed (click on the image or video and choose No pan and zoom or choose other effects). If you intend to use the exact same pan and zoom effect for all your pictures and video clips, just click the Apply to all icon to apply the selected effect to all images and videos in the timeline. If you want to only apply a certain pan and zoom effect to a select number of pictures and video clips, you can use the Ctrl+arrow key or Ctrl+Shift to batch select the items and then click the effect you'd like to use. The particular pan and zoom effect will be applied to all selected items in the timeline. REMINDERS: Much like with adding transitions, pan and zoom effects should also be used appropriately to yield good results for your project. Use pan and zoom effects only when they're applicable to the scene(s). Since the pre-set pan and zoom effects is not customizable (directions, speed cannot be changed), its use can be limited to music slide-shows or select portions within a movie project. In cases where pan and zoom effects are applicable to use, the number and type of effect to be chosen would depend on the type of project, but generally for music slide show videos it is recommended to use a 'good number' of pan and zoom effects - not sticking to one type to avoid visual redundancy nor too many effects to prevent an overdone look. Like transition effects, timing is also important and the pan and zoom effect should be in-sync with the background music or any accompanying sound effect. Complete set of pan & zoom effects: Visual Effects Movie Maker also has a host of visual effects that you could apply to your pictures and images to give them a distinct feel or atmospheric look - from a classic grey-scale monotone to artistic touches like posterize and threshold. Take a look and explore the various visual effects available and test what effect will they give your images and videos. While these are not commonly utilized, these can be extremely useful for special scenes where their effects are tailor-fitted for, like black and white for vintage scenes/flashbacks or spectrum colors for disco-type scenes. To use these effects: Select the image/video you'd like to give a visual effect > click the Visual Effects tab > choose your desired effect. There is also a brightness adjustment setting you could use for your images/videos. Like with the transitions and pan and zoom effects, you have the option to apply a certain visual effect to all of your images/videos by clicking the Apply to all button. There is also a special option where you could combine two or more visual effects together. You could access this by clicking the drop-down list > go to the bottom of the list > click on Multiple effects > select the visual effects you'd like to combine from the list of Available effects on the left to the list of Displayed effects on the right > click Add > click Apply. The resulting combined effects will depend on the chosen effects - some may work well together, some will result in one effect overpowering the other(s), etc. It would be up to you to explore and decide what's best for your movie. Much like the other animation effects, visual effects should only be used when they're deemed appropriate or depending on the artistic taste of the film-maker. Complete set of visual effects: AutoMovie Themes Movie Maker also offers AutoMovie themes which you could use to instantly give your project the necessary movie elements in just one-click of a button! Each AutoMovie theme comes with its own pre-defined set of animations and visual effects that serves as a guide/suggestion on what you could do with your set of images and video clips in your timeline. The AutoMovie themes can be accessed under the Home tab, and by clicking on a selected theme, its pre-defined animations and visual effects will automatically be applied to your images and video clips in your storyboard. You have the option to adjust your images and videos to fit the theme or adjust the theme settings to fit your set of images and videos. The AutoMovie themes are perfect for quick 'fun movie projects', but for more serious projects it is recommended to take the more tedious but more customizable route of post-editing individual movie elements. Adding Titles, Captions, Credits Text can also be added in your movie project in the form of titles, captions, and credits. These three differ in their locations within the timeline: titles are added at the start of the movie, captions added in the middle, while credits are added in the end. These can be added by clicking either the Title, Caption, or Credit icons in the Home tab > a text box will appear in the particular slide or image/video > type in the text > re-size the text box dimensions as needed > move by dragging the text box to the desired area in the screen. Texts appear as peach-colored bars at the bottom of the pictures and video clips in the timeline (see example below of the three text files within the timeline). Text-editing options are available via Text Tools (highlighted in peach). You can access these by simply clicking on a text bar in the timeline to open the Text Tools sub-menu. The text-formatting options include: Font Settings: enables you to change the font type, font size, font color, bold, italicize. Paragraph Settings: change the text alignment (left, center, right) and the transparency of the text. Edit Text: allows you change the text. Background Color: enables you to change the background color (whole screen) of titles and credits, but not of captions (since they are positioned over images and videos). Start Time: set the time when you want the text to start showing in the timeline by typing in the exact time (in seconds) or using the up/down buttons. Text Duration: like with images and video clips, you could set the length of time you'd like the text to appear in the movie (by typing in the exact time or selecting one of the pre-set time durations). Effects: text also have animation options like images and video clips. Simply hover into the thumbnails in the grid (more in the drop-down menu), choose and select the text animation you like. Adding Sound Effects and Voice Audio Sound Effects and Voice Recordings(voice-overs/narrations) can also be added to your project. As long as the files are in the acceptable formats (*.wma, *.mp3, *.wav, *.aif, *.aiff, *.m4a, *.ogg), they can be added to the timeline like normal music files (click the Add Music icon > locate the file folder > select the file > click Open). However, there is a significant limitation in this particular aspect in Movie Maker: music/audio files cannot be added over existing music/audio files in the timeline (no overlapping is allowed). So if there is already a music file in the timeline (like in music video type projects), sound effects or voice-overs cannot be added over the music file, doing so will instead abruptly cut the music file at the point where you added the new music/audio file. In short, there is only one room for a music/audio file at a specified time. Though fret not, as there is an alternative solution for adding another layer of sound effects in Movie Maker: For projects with existing music in the timeline: finish first your movie project without the sound effects/voice-overs and save your movie. Then open your movie file in Movie Maker > identify the exact point/time in the video where you'd like to add a sound effect or voice-over > add the sound effect/voice-over file via the Add music button > edit the sound settings in the Music Tools (start time, start/end points, fade in/out). You may also adjust the volume of the added audio file relative to the video music by clicking on Project > Audio Mix > adjust the volume to your liking (higher volume for the video music or the sound effect/voice-over). Other Project Options Under the Project tab are a few more options you could set for your project: Audio Options: Audio Mix - enables you to set the music and video to play at the same volume, or play one louder than the other. Fit to music - automatically adjusts the duration of photos so the movie and music end at the same time; this is primarily used for quick fun projects but not advisable for projects requiring proper timing of photos and music. [*]Aspect Ratio Options: use either the Standard (4:3) or the Widescreen (16:9) aspect ratio for your movie project. Reviewing & Finishing the Movie So you've arranged, compiled and edited the images and videos for your project and added the necessary animation, visual and sound effects, text captions and titles - now you're ready to complete your movie! But wait - there's more! Every film-maker, especially the perfectionist ones, always make it a point to review their work several times before 'calling it a wrap'. So here are a few key reminders for the final review of your project: TIMING IS EVERYTHING: Make one initial viewing of the whole movie and keenly observe for the timing of the minifig movements, scene transitions, visual effects, sound effects, and background music with respect to each other. Ideally, all the movie elements should be in-sync together overall. Record any off-timed elements and the exact times of occurrence so these could be corrected accordingly. Visual Quality: Check for any inconsistency in the quality of the images/videos in terms of brightness, contrast, lighting and correct these if possible. If animations were used, observe for any image/video which might've missed an important transition or visual effect. Do the same for text captions if they were used (check for proper spelling, visibility of text style, size, and color, etc.) Sound Quality: Listen for any issues in sound quality (abrupt changes in volume, presence of background noise, incompatible fade in/out, imbalanced sound of music/sound effect/voice-over, etc.) Correcting Issues: After gathering all the findings in the initial viewing, correct all issues observed (if any). Final Review: Make one last final viewing of the revised movie. If everything is ok, you can now save your movie. Otherwise, revise again until you're completely satisfied with the final product. Saving the Movie: In the Home tab, click on the down arrow in the Save movie icon > select the quality of the movie to be saved (either the recommended setting for the project, for high-definition display, burn for CD, for computer, email, mobile devices, or even set your own custom quality settings) > type in the file name > click Save. The movie will be saved in the default Windows Media Video File (*.wmv). You may need other video converter programs if you want to have your movie in other video file formats. Sharing your Movie: Movie Maker allows you to share your movie directly from your project file to online video-hosting sites like YouTube, flickr, Facebook, SkyDrive, and Windows Live Groups. Simply click the icon of the site you'd like to upload your movie to > choose the quality settings of the movie > Movie Maker will save it (again) and upload it to the specified site (you may need to log-in to the site and continue the uploading process online). Finished Product: Even if it was not originally part of the plan in making this tutorial, I went ahead and completed an impromptu comic-video out of the various movie elements I imported and compiled for the examples above, to show you how Movie Maker really works: Borrowing the wise words of Dr. Emmett Brown, "please excuse the crudity of this video, I didn't have time to come up with a brand new brickfilm material". I just used the images from my Superman vs. Power-Armour Lex Comic, and fortunately I found a suitable music that goes well with the flow of story of the comic. The features in Movie Maker that I prominently used in this project are: Transitions: No transitions were used for most of the images for them to be in-sync with the sudden changes in the beat of the background music. "Blur-through black" transition were specifically used for the scenes where Superman got struck by Lex's Kryptonite Blaster (at 1:29) to give the scenes a dramatic effect. [*]Pan & Zoom Transitions: I used several pan & zoom effects to depict the movement in the images (notable ones include Superman flying at 0:48 and Superman falling at 1:32) [*]Timing with the Music: Note how the transition of images are in-sync with the sudden changes in beat of the music. I used the beat of the music to define where I'd set the starting time of an image and how long will its duration be (it took a few trial and errors to get the timing right) [*]Use of Text: I used a Credits to add the text caption in the end to ask a hanging question. Other Examples Here are a couple of examples to illustrate how the various features of Movie Maker can be used effectively in a movie project. Even if there are a lot of great brickfilms around, I specifically chose these two videos as examples for their simple yet effective and noticeable use of video-editing elements. Example #1 This is a video slide show I made for my wife, again using Movie Maker. The subject might not be LEGO but I'd just like to highlight the various Movie Maker effects I used (so pls. excuse if you have to bear seeing my unsightly mug throughout the video ) Transitions: I prominently used a combination of "Overlapping" and "Blur-through black" transitions for almost all the slide transitions to produce a dramatic (and hopefully romantic) reminiscing effect. Pan & Zoom Transitions: I used mostly "Zoom In" and "Zoom Out" effects, with several pan & zoom effects (the ones that I liked the most are at 1:10 and 3:14) Use of Text Captions: I highlighted some lyrics of the song (with some slightly tweaked) in the form of Captions (mostly using the "Zoom In-small" effect plus the snazzy "Cinematic Burst" effect in the end). Timing with the Music: As always, I made it a point to time the transitions and text captions to be in-sync not only with the beat of the music but the exact lyrics of the song for the text captions. Example #2 by hinckley39 (YouTube) This is a stop-motion video made by fellow BFC Academy Teacher Hinckley for his Forest II mafia game. Note that this was not made by Movie Maker but its iOS counterpart, iMovie. Nonetheless, the video depicts features that can be done using Movie Maker, and some of the effects used in this video are good examples which we could learn from. The things that I really liked about this video are: Minimalistic Movement: The movements may be minimal but they fit well with the simplicity of classic 70s/80s music videos, particularly the music in this video, Queen's Bohemian Rhapsody. Moreover, the subtle movements are perfectly timed with the music and visualizes the lyrics accurately. Timing with the Music: Here are some examples of very good timing of the images with the music: Piano at 0:49 - Nice! "Scaramouch, scaramouch will you do the fandango" scene at 2:04 - Very nice! "I'm just a poor boy..." at 2:24 - then the group singing at 2:24 - then back being alone at 2:32 - Wow! The "Let him go" scene at 2:41 with the "appearing-disappearing act" the trio of Pancho Parrot, Gilda Goat, and Edgar Elephant - EPIC!!! [*]Visual Effects: The negative polaroid effect for the "Thunderbolt and lightning" scene at 2:14 is just spot-on! Now that you know the basics of video-editing using Windows Movie Maker, you can now start embarking on this exciting and rewarding task of completing your movie project! As always, this tutorial serves as a general guide but ultimately the choice of the visual effects, animation, etc. would depend on the type of project and of course, the personal creative taste of the film-maker. For any questions, clarifications, comments, and suggestions feel free to post in the Questions & Answers Thread. Sources: 1. Windows Movie Maker, (http://windows.micro...ker-get-started) -
Tutorial: Adding Comic Book Elements to Images using Photoshop
XimenaPaulina posted a topic in Brick Flicks & Comics
So you've taken the photographs for your comics, made the necessary photo-adjustments/enhancements, and did the initial panel layouting, now it's time to put some elements in your images to give them a distinct "comic-book look/effect". This tutorial will teach you how to put various elements popularly found in comic book pages - "hand-drawn" panel borders, text boxes, comic fonts and sound texts - using Adobe Photoshop. For this tutorial, I'll be using the image below as the subject (640 x 732 pixels) and a plain white background for the comic layout. Click for higher resolution image Part I: Adding a "Hand-drawn" Border on the Image 1. Open both the image file and the background file in Adobe Photoshop. 2. Go to the image file > select all (CTRL+A) > copy (CTRL+C). Then go to the background file and paste (CTRL+V) the image. The image file will become a new layer (Layer 1) in the Background file. Rename it as Main Layer (renaming is optional, it's used only in this tutorial for easier reference). 3. Add another layer above the Main Layer by clicking on the Add Layer Icon at the bottom of the LAYERS pane. Name the Layer as Border. 4. Select the Rectangular Marquee Tool (M) on the Tools Palette at the left. Make a rectangle selection by dragging the cursor from the top-left corner to the bottom right corner of the image. 5. Select Edit on the Function Menu at the top > choose Stroke > and set the following parameters: Width: 5 px / Color: Black / Position: Center > Click OK. The border will now be added on top of the image. 6. Deselect the current selection > go to Filter > Blur > Blur More. 7. Go to Filter > Distort > Ripple > set Amount: 20% and Size: Medium. 8. Go to Filter > Sharpen > Sharpen More. This will be the resulting image with a border resembling a hand-drawn border characteristic of comic books: Part II: Adding Text Boxes to the Image 1. Create another layer below the Border layer. Re-name it as Text Box 1. 2. Select the Rectangle Tool (U) on the Tools Palette. Make a rectangle on the top left corner of the image. a. To set the text box border: Right-click on the Text Box 1 layer > choose Blending Options > tick Stroke > set the following parameters: Size: 4 px / Position: Center / Color: Black > Click OK. b. To set the text box color: In the Tools Palette , set the foreground color to orange (#fdd515 in this example) and the background color to white. Right-click on the Text Box 1 layer > choose Blending Options > tick Gradient Overlay > set the following parameters: Blending Mode: Normal / Opacity: 100% / Gradient: Foreground to Background / Angle: 90 degrees > Click OK. TIP: Save these settings for faster and easier use the next time around. To do this, just double-click on text box layer > click New Style > Rename it (eg. Comic Book Text Box) > tick both Include Layer Effects and Include Blending Options > click OK. Next time you'll be creating a text box, just click on the particular icon in the STYLES pane and you'll instantly get the desired text box settings. 3. If the story narrative of the comics requires it, a second text box may be added to an image - with a different look to avoid visual redundancy. To create the second text box, add another layer above Text Box 1 and name it as Text Box 2. 4. In the Tools Palette, set the foreground color to white. Select the Rectangular Tool (U) and make a rectangle on the bottom of the image. Right-click on the Text Box 2 layer > choose Blending Options > tick Stroke > set the following parameters: Size: 4 px / Position: Center / Color: Black (NOTE: If the resulting text box still has the previous gradient overlay settings, just un-tick the Gradient Overlay box in the Blending Options and the text box will be filled with the white foreground color). This will be the resulting image with the two text boxes added: Part III: Adding Text Captions using Comic Book Fonts 1. To give your text captions the desired comic book effect, there are text fonts specially designed for comic books. Download the free font Digital Strip and install it in your computer. 2. Using the Horizontal Type Tool (T) in the Tools Palette, create a text caption over the orange text box. For this example I set the following settings in the Text Toolbar: Font: Digital Strip (Regular) / Color: Black / Text Size: 22 pt / Anti-aliasing: Strong / Left-align text. You may also emphasize certain words in the caption, in this example I made the "Lasso of Truth" Bold for emphasis. 3. Re-size the text box as needed by dragging the edges of the text box to the appropriate size. If the text caption goes over the orange text box, re-size the text box by: Single-click the Text Box 1 layer in the LAYERS pane > Go to Edit in the top function menu > choose Free Transform > drag the edges of the text box to the appropriate size > click the icon. 4. You could also highlight the first letter of the text caption to further give it a comic book look (which is usually done only at the start of the comics or certain parts/chapters). To do this: a. First go to the text caption layer, click and delete the first letter. You may need to put additional spaces in place of the deleted first letter and to provide space for the highlighted letter. b. Click on tool in the Tools Palette > type in the first letter > and set the following settings in the Text Toolbar: Font: Digital Strip (Regular) / Color: Red (#fd030f) / Text Size: 48 pt / Anti-aliasing: Strong c. To add effects on the first letter, right-click on the First Letter layer > tick Stroke > set the following settings: Size: 4 px / Position: Outside / Blend Mode: Normal / Opacity: 100% / Color: Black > Click OK. To give the letter a shadow effect: tick Drop Shadow > set the following settings: Blend Mode: Normal / Opacity: 100% / Angle: 120 degrees / Distance: 5 px / Spread: 75 px / Size: 5 px > Click OK. TIP: Save these settings for faster and easier use the next time around. To do this, just double-click on text box layer > click New Style > Rename it (eg. Comic Book First Letter) > tick both Include Layer Effects and Include Blending Options > click OK. 5. For the second text caption on the white text box, repeat step #2-3. The image with the text captions should look like this: Part IV: Adding Sound Texts Some images/panels may require the use of sound texts (like the classic KABOOM!, KA-POW!, etc.) or even exp<b></b>ressions of rage (screams), distress calls (HELP!, SAVE ME!), etc. These special text captions require more emphasis to stand-out inside the image panel. Here is an example on how to do this: 1. There are a lot of good comic book fonts for this particular use, but my personal preference is this BadaBoom BB font (by Nate Piekos, Blambot fonts). Download this free font and install in your computer. 2. Type in the sound text using in the Tools Palette. For this example I set the following settings for the text: Font: BadaBoom BB (Regular) / Color: Red (#fe0000) / Text Size: 100 pt / Anti-aliasing: Strong 3. To add stroke to the text: right-click on the layer > choose Blending Options > tick Stroke > set the following settings: Size: 4 px / Position: Outside / Blend Mode: Normal / Opacity: 100% / Color: Yellow (#f1f414) > Click OK. TIP: Save these settings for faster and easier use the next time around. To do this, just double-click on text box layer > click New Style > Rename it (eg. Comic Book Sound Tex) > tick both Include Layer Effects and Include Blending Options > click OK. 4. To add text warp, right-click on the layer > choose Warp Text > set the following settings: Style: Arc / Horizontal / Bend: +60% / Horizontal Distortion: +60% / Vertical Distortion: 0% > Click OK. 5. Re-size or re-orient the text caption to your liking by using the Free Transform (CTRL+T) function: Select the layer > Go to Edit in the top function menu > choose Free Transform > re-size, rotate, re-orient the text > click the icon. The finished image should look like this: Notice how I intentionally left the sound text caption slightly extend outside the border. This is just one form of 'creative leeway' that I exercised based on my personal preference (WW's aggressive personality and strong vindictive emotion 'breaking the barriers' of the image border). The same goes for the highlighted letter A in the top text box. You too could also exercise artistic freedom when adding these comic book elements in your images, based on your personal taste and liking (choice of font type, font color, text box color/design, border type, etc.). This tutorial just gives a basic background on how to add these comic book elements to your comic layout, but ultimately the specific choices would all depend on the comic material and the artistic taste of the comic maker. Other Examples Example 1: Pay Attention by darkdragon In this particular example, I played around using a lime-colored "hand-drawn" border in combination with a special "Slimy" font visualizing the zombie's brain appetite. Sources: 1. Give your Photos a Retro Comic Book Effect, by Enrique Flouret (www.photoshoproadmap.com) - majority of this tutorial is based on this. I just removed/added some elements/topics to make it fit for this particular use in BFCA. 2. www.dafont.com online source of useful fonts (the Digital Strip and BadaBoom BB comic book fonts downloaded from this site).