

johncarpenter
-
Content Count
55 -
Joined
-
Last visited
About johncarpenter

Recent Profile Visitors


-
[MOC] - Peel P50 - smallest production car in the world
johncarpenter replied to johncarpenter's topic in LEGO Technic, Mindstorms, Model Team and Scale Modeling
Nice pictures of the Isetta! Pictures of the whole thing you can find everywhere, these are much more interesting As you probably guessed, this is on my list of projects to build. I haven't had time lately, but perhaps it is time start again -
[MOC] Toyota Supra MK4 -42154 B Model
johncarpenter replied to Alex Ilea's topic in LEGO Technic, Mindstorms, Model Team and Scale Modeling
Thanks, it starts to get the cogs turning. I enjoy building a lot, but trying to build with limited set of parts often has the "writers block" effect on me. I think the Ford has a great set of parts though, I'll see what I can come up with. -
[MOC] - Peel P50 - smallest production car in the world
johncarpenter replied to johncarpenter's topic in LEGO Technic, Mindstorms, Model Team and Scale Modeling
Thanks to Stign's kind help, I was able to finish the instructions. If you would like to build this, the instructions are now available for free on Rebrickable. -
[MOC] Toyota Supra MK4 -42154 B Model
johncarpenter replied to Alex Ilea's topic in LEGO Technic, Mindstorms, Model Team and Scale Modeling
Great, great B model, congrats! Can you share any details on your process? I would be really curious to know how you approach building a B model from the limited set of parts. -
[MOC] - Peel P50 - smallest production car in the world
johncarpenter replied to johncarpenter's topic in LEGO Technic, Mindstorms, Model Team and Scale Modeling
Hello everyone, After a long, long while, I have gotten around to doing instructions of this model which I'm planning to share on rebrickable. However, as this is the first building instruction I have ever done, it would be helpful if anyone was willing to look it over before I put it out there. If anyone is interested, please get in touch via direct message. Many thanks! -
[Instructions now available !] [TC20] 2020's 8880 supercar
johncarpenter replied to sebulba56's topic in LEGO Technic, Mindstorms, Model Team and Scale Modeling
Very nice! I really like the "re-imagining" approach, rather than just "rebuilding studless", while still staying instantly recognizable. -
[MOC] REXX Truck 1:15
johncarpenter replied to KirTech LAB's topic in LEGO Technic, Mindstorms, Model Team and Scale Modeling
Wow, it's really fast for such a huge model! Also looks great and works well, congrats! It would be interesting to learn more about your process: how much time did it take? What were the most challenging parts? -
[MOC][WIP] Smart Fortwo
johncarpenter replied to johncarpenter's topic in LEGO Technic, Mindstorms, Model Team and Scale Modeling
Yeah, it looks like a pretty similar scale, so those panels are pretty obvious solutions. What is interesting is that this one does have power functions, even using the big battery box. It looks like it is a bit taller than mine, so a bit more space available. Even so, this gives me some hope that I could fit some motors in there. -
[MOC][WIP] Smart Fortwo
johncarpenter replied to johncarpenter's topic in LEGO Technic, Mindstorms, Model Team and Scale Modeling
Thanks for the feedback. I'll report back once I figure out which direction to go. Yeah, the front needs some work as well, I'll see if I can find that part. -
[MOC][WIP] Smart Fortwo
johncarpenter posted a topic in LEGO Technic, Mindstorms, Model Team and Scale Modeling
Hello everyone! This is a work-in-progress, or maybe work-on-hold project. I wanted to do a simple, all manual Smart Fortwo, kind of matching the scale of the 42098 auto transporter. I started off with the bodywork, and initally, it went quite well. After some iteration, I was really happy with where it was going. The back end is done, the front needs a little work, but I think the bodywork so far really captures the look of the Smart with the general shape and the minimal overhangs. Next, I switched to the powertrain. My original plan was to have the 3 cylinder engine and a gearbox that would fit (maybe a 2 speed). While looking for compact gearbox designs, I stumbled across this CVT design on youtube: https://www.youtube.com/watch?v=XmefDOFzLuY&t=3s This looked very compact, and a CVT would be cooler than a 2 speed, so I went on with that. My first draft of the powertrain was messy and fragile: I redesigned this to a cleaner, still compact solution... ... and started to transplant the existing body to this new chassis. At this point, I noticed that the CVT in this configuration did not really work. Most of the time, the motion is not transmitted enough to drive the 3 cylinder engine, so this solution doesn't really work. The build is now on hold as I try to figure out how to move forward from here. I don't see any obvious way to make the CVT work better, so the options I'm thinking about are: remove the CVT, no gears at all (very doable, but lacks ambition) remove the CVT, make a 2 speed gearbox (difficult and 2 speed is "too litte") put a Buwizz and some motors in it (not sure if everything will fit) Looking forward to hearing feedback and suggestions... -
[MOC] Power tools for the workshop. Now you can drill, cut, and spin all the wood!
johncarpenter replied to weavil's topic in LEGO Technic, Mindstorms, Model Team and Scale Modeling
Wow, these are really nice and original. My favorite is the drill press, great looks and also functions! -
[MOC] - Peel P50 - smallest production car in the world
johncarpenter replied to johncarpenter's topic in LEGO Technic, Mindstorms, Model Team and Scale Modeling
Thanks everyone for the great feedback! As I wrote at the beginning, I kind of started this project because I was stuck on other, larger builds. I just wanted to build something manageable and call a project done. Somehow, it turned out way nicer than I could have hoped for when starting out. Does anyone else do the same? Take a break from larger / longer builds to build something small? -
[MOC] - Peel P50 - smallest production car in the world
johncarpenter replied to johncarpenter's topic in LEGO Technic, Mindstorms, Model Team and Scale Modeling
Wow, thanks for the compliments, I was not expecting this :) For the door latch, I was trying to use one of the smallest rubber bands to move the catch back, but I had a hard time attaching it anywhere on the door. When I was playing around with that, I noticed that the catch already moved back partly due to its own weight. Initially it was not quite moving back to vertical, so I added two more think red liftarms on the other side, to help it move back a bit more. This worked well, and it stays vertical now. The rubber band was not necessary after all. Sometimes, things just come together. My favorite part is the handbrake, just for the fact that I could incorporate it, in this scale, in this tiny car. I did this at the very end, after I thought I was finished. There was not much space left in the car, but the possibility of having a handbrake was just too cool, and kept nagging me. I decided that I had to at least try to add it. I had to take pretty much the whole thing apart twice, but I was able to add the simple mechanism under the seat and it works reliably. The car came out pretty nice, and adding the handbrake at the very end was the cherry on top for me. -
johncarpenter changed their profile photo
-
[MOC] - Peel P50 - smallest production car in the world
johncarpenter replied to johncarpenter's topic in LEGO Technic, Mindstorms, Model Team and Scale Modeling
Thanks everyone for the feedback! The front suspension was a bit of a coincidence, to be honest. Initially, I was not planning to have front suspension. However, I could not find a good way of attaching the front wheels with enough ground clearance. That's why I finally went to those small suspension arms. After that, having the rubber connectors as springs seemed pretty obvious. They are pretty stiff, with not a lot of travel, but still pretty cool. I'm happy that it evolved to such a nice solution. I have to give credit where it is due: my better half had the idea to use the thin string to pull the car. I must say, it makes all the difference for the video. -
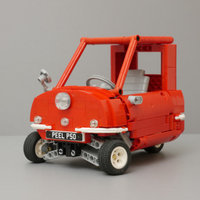
[MOC] - Peel P50 - smallest production car in the world
johncarpenter posted a topic in LEGO Technic, Mindstorms, Model Team and Scale Modeling
Having several larger builds stuck in various stages of building kind of pushed me towards smaller projects. This is one of those, the Peel P50. The Peel P50 is a three-wheeled microcar originally made from 1962 to 1965. It was listed in the 2010 Guinness World Records as the smallest production car ever made. The model has the following functions: Front and rear suspension Opening door with locking latch Steering Single cylinder engine, driven by rear wheel Handbrake Here are some more pictures: Finally, here is a video of the car in action: I'm really happy with how this project turned out. At the beginning, I was quite doubtful whether I would be able to replicate the curved shapes reasonably well. The end result came out much much better than I expected. This build now has me thinking about more microcars. Technical details: Length: 20 studs Width: 15 studs Height: 16 studs Weight: 333 grams