
fresko
-
Posts
90 -
Joined
-
Last visited
Content Type
Profiles
Forums
Gallery
Everything posted by fresko
-
 Just received a great e-mail: Your LEGO® Order has Shipped :wub: :wub:
 -
My order status is changed from 'customer service' into 'in progress', so I think my order is placed well an I'll eceive my set within a week or so. Altought, I still don't have received a confirmation e-mail, so I'm not sure.
-
I have ordered mine about 0h05 GMT, or 1h05 GMT+1. I have my ordernumber (included in the checkout), but I haven't got an e-mail yet. Does I have to worry and contact the customer service?
-
Looks great, effe! Is it finished or will you build the pneumatic kingpin lock? Greets, Fresko
-
Looks very well indeeed! Maybe you can build a square tank, like in peterbilds. Greets, Fresko
-
This is for the auxiliary plug (the gray) on the RC receiver. You can attach an additional motor on it
-
With RC Unit I mean the receiver. The RC remote has indeed no power switch. EDIT: - Is the 9V battery in the remote on the right makrs: + on +, - on -? - Does the auxiliary plug work? - This is a complete gamble, so forgive if this won't work: Do you have an old RC toy, with a frequention of 27,145 MHz? According to the manual is the frequention 27,145 MHz. Maybe you can try with that remote.
-
Maybe it sound stupid, but: did you turned on the RC Unit on? Is the remote his battery also new? If I understand it right, the steering doesn't work too?
-
Is this correct? Greets, Fresko
-
Doc's Mocs WIP
fresko replied to Doc_Brown's topic in LEGO Technic, Mindstorms, Model Team and Scale Modeling
It does, you just have to place an empty BatteryBox between the output and the Servomotor (If I understand it good ) (Credits to 'reslickade') Greets, Fresko -
Red Mini Excavator (Pneumatic)
fresko replied to fresko's topic in LEGO Technic, Mindstorms, Model Team and Scale Modeling
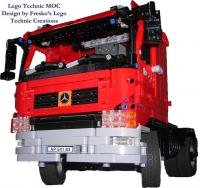
You name it cool if I sqeeuze a motorized compressor in it, but how would you name it if I tell you I motorized the whole model with 4 motors, controlled via IR? The motors are used for 1+2 Drive and Steer, 3 Turning and 4 Little pneumatic pumps (2). The pneumatic functions are still manual, with the valves on the back of the cabine. Here you see 3 of 4 motors, The 2 drive motors and the turning motor. Note it can't turn continiously, trough the turntable are the electrical wires of the motors and 2 pneumatic tubes. As you can see on the 2nd photo, I tried to hide all the wires much as possible. And of course, a little video: http://www.youtube.com/watch?v=vAcOYk2z1TI If I reach before 30 June 2013 100 Facebookpage likes (44 more on 14 June 2013) , I'll make instructions. Tell me what you think! https://www.facebook.com/pages/Freskos-Lego-Technic-creations/161905693917724?ref=hl Greets, Fresko -
Red Mini Excavator (Pneumatic)
fresko replied to fresko's topic in LEGO Technic, Mindstorms, Model Team and Scale Modeling
Thanks for the nice comments! Adding a cabine is a very good idea, but I'm not sure what kind of cabine I should make. The model is a compact excavator-style, so theoretical I have to make cabine over the whole structure. In that case I have to replace the valves. But because I think the valves are at well placed, is it maybe a better idea to build a regular excavator cab (a little cab on side of the boom). What should you do? I'm not sure if you sentence is a joke or not. In what way do you think the model isn't good? Instead of giving impolite comments, you can simply say how I can improve the model. Greets, Fresko -
Hello again! I made a small moc some time ago, but I didn't had time to publish it (due the buzy weeks at school). It's al little pneumatic creation (my first fully pneumatic), with 4 functions: A 3-section boom and a little backfill blade. Naturally it works with 4 valves. For the air pressure, I used 1 external big, manual pneumatic pump, because I didn't want that the model included batteries or other electric parts. Off course you can make an external electric pump. It was a challenge to hide all the tubes in a small space. And to end, a video: http://www.youtube.com/watch?v=iSIAocu7w2g Please tell me what you think and how I can improve it! If there should be enough interest in instructions, I can make them. Greets, Fresko
-
http://www.freskoltc.blogspot.com
-
Effe's MOC Corner
fresko replied to efferman's topic in LEGO Technic, Mindstorms, Model Team and Scale Modeling
I saw it on Flickr: "This photo also appears in: 10178 with turning circle" I'm looking forward to this project! -
Effe's MOC Corner
fresko replied to efferman's topic in LEGO Technic, Mindstorms, Model Team and Scale Modeling
For the '10178-walker'? -
SeTechnic becomes TechLUG
fresko replied to Anio's topic in LEGO Technic, Mindstorms, Model Team and Scale Modeling
I always wondered what the different is between 'Setechnic (and now TechLUG)' and 'Brictechnic'? Greets, Fresko -
PF Switch - recommended uses?
fresko replied to SteveNesta's topic in LEGO Technic, Mindstorms, Model Team and Scale Modeling
Here you go: and: Hope you understand it... Greets, Fresko -
PF Switch - recommended uses?
fresko replied to SteveNesta's topic in LEGO Technic, Mindstorms, Model Team and Scale Modeling
To switch PF-lights on. Normal lights (example headlights), flashing lights or traffic lights. Greets, Fresko -
No problem: http://www.brickshelf.com/gallery/fresko/UltimatePFChassis/4wdlongsmall3.ldr Note that the instructions aren't finished yet. There are already a few steps added. And if you use it, please give me credits. Thanks, Fresko
-
Because I think it is one of the smallest chassis that inclused 4WD and independent suspension. I know it sound a bit selfish, but I was so pride on my creation
-
Take a look to my Ultimate PowerFunctions Chassis. I didn't finished the instructions yet, but I can give you the .Ldr - file. http://www.brickshel...ry.cgi?f=525454
-
Here is my first MOC, note its wasn't build with Technic bricks. I made it when I was a kid, so forgive me that not all blocks are Lego. Now I'm older, and I'm a serious builder, I use only official Lego-parts.
-
I also motorized the 9395. Mine is ugly too, but I motorized all the functions (driving, steering, robe and towing fork). I replaced the seats by a Batterybox, I did some MOD's as well, like a V6 (with sound) and double tyres in the back. A nice thing when you motorized the 9395, is the short turn radius. It is very nice to drive with it! There are also instructions available; check Rebrickable. More in this topic ; or at my blog: http://www.freskoltc.blogspot.com Greets, Fresko
-
Yet another 9395 RC MOD
fresko replied to fresko's topic in LEGO Technic, Mindstorms, Model Team and Scale Modeling
I mean that I made instructions for the engine and for my 9395 MOD. And yes, it is both pending to approval on Rebrickable.... Greets, Fresko