
L-Gauger
-
Posts
94 -
Joined
-
Last visited
Content Type
Profiles
Forums
Gallery
Everything posted by L-Gauger
-
Good test results! Sorry my ideas didn't quite work as I thought they would. Although I do have more thoughts based on your test results... Is it possible for you to move the pivot point of your truck forward (or back) by 1/2 stud? This would allow you to connect the two 1x4 Technic bricks via a 2x6 Technic plate and offer a bit more resistance to warping. Another way might be to use 1x10 or 1x12 plates to take the place of the 1x8 plates. The longer plates have more clutch power. Finally, just to verify: are you using all four of the studs on the 1x4 Technic Bricks to attach the bricks to the rest of the bogie frame? If not, find a way to do so in order that you might take advantage of all the clutch power you can. You are most welcome! I like the mechanics of engineering drive trains with Lego. I haven't done tests with PUP motors, but my PF motors continue to surprise me. One motor might work, but I'd do two if I could afford it, at the very least to reduce stress on all parts.
-
That's a really novel idea that I never considered! If you have any other ideas like this, I'd love to see them on the Brick-Built Lego Railroad Track thread. The only thing that might need testing in real life is whether the train might tilt inward a little. I've noticed that when on the old 4.5V rails most Lego trains ride on the flange with the wheel tread suspended just the tiniest bit over the rail. Might not be an issue at all, and it might even create a cool "superelevated track" look, but worth building a test track for. Also, speaking of consistency @FGMatt it wouldn't be hard to convert the track you've built in your diorama to use pony-eared tiles instead of 4.5V rails. Just substitute 1x4 plates as the sleepers in place of the jumper plates. The pony-eared tile track would keep the exact same clearance for the station platform, but would raise the tops of the rails by 1/2 plate, hopefully only a minor matter.
-
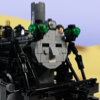
So, looks like you're seeking to make an Ln2 curve like I wanted to do for my model of Railway Series "Rusty." My suggestion would be to attach tiles to 1x4 plates with the "pony-ear" technique, like in this photo: To make curves, you can make a roadbed of 1x2 plates and 1x4 plates and use the brick-bending technique to make the curve, atop which you lay your track. Using pony-eared 1x2 tiles for rails, I have successfully created smooth R38 curves with the technique described. Using 1x4 tiles might require the minimum radius be increased a bit, and 1x8 tiles are only suited to very broad curves or straight track. Also, just a suggestion, but there is a way I've found to substitute the Tiny Train Wheel for the wheels you're using. You can use a 3- or 4-stud long bar element as an axle for the Tiny Wheels if you use robot claws or Technic half bushes to keep the wheels from falling off the ends of the axles. Then you can use this element: to hold the axle (use the cross-axle hole, and attach the whole assembly to the rest of your model with Technic half-pins.) Does that makes sense, or do I need to offer clarification on anything? (The things I'm saying are kinda hard to describe and I don't have photos currently...)
-
As long as the plates you use in the upper part of the bogie are long enough, this should be fine. But I think the best solution is your idea of combining both techniques. I'd use the 4x4 Technic Brick technique on the end nearer to the coupler/pilot for the best stability, and the 1x4 Technic Brick on the end farther from the coupler/pilot to keep the same overall length as your previous design. For extra safety, I'd also rebuild the gearing so that it is a mirror image of what you have now. That way, the greatest stress will be on the side with the 4x4 Technic brick.
-
A disadvantage to be sure, but the model railroaders I've seen get a battery life of 2-3 hours on a charge, and they incorporate the re-charging as a "re-fueling" procure in operation. The most creative solution I've seen is a steam-era modeler, can't remember if he modeled in On30, HO, or HOn3, but he put the charging port in the water tank of his steam engines, and then disguised his battery charger as the water tower at the engine terminal of his layout.
-
I have encountered this problem before, and there are two potential solutions I know of that minimize re-design. One is to substitute the 1x2 Technic bricks for 1x4 Technic bricks. This will require some creative redesign of the inside structure of the bogies, but the increased clutch power of the 1x4 bricks makes a huge difference. The other (stronger) solution is to use two 4x4 Technic bricks: This would be an even more extensive re-design than the previous suggestion, but would guarantee a strong drivetrain. Hopefully this helps!
-
I can understand that. The traditional model railroaders I've seen embrace battery power have either A) used a section of powered track on the layout as a "charging pad" for locomotives, or B) hidden a little charging plug on the model and leave it plugged in to charge between operating sessions. The whole AAA battery paradigm of Lego trains is a huge disadvantage compared to that. On that note, I think a great product for a 3rd party manufacturer to make would be a 9V or PF compatible battery box, external dimensions 2x4x3 bricks tall, that holds one 9-volt battery. Bonus points if they figured out how to mold the housing to permit no-tools-required battery changes. My DCC system is from Bachmann, but was developed in partnership with Lenz, so I have a bit of experience with their products. Theirs (and Bachmann's) E-Z Command system is really easy to use and doesn't break the bank. I don't own any locomotive with keep-alive capacitors, but those are crazy cool! Definitely a good compromise to mix the advantages of battery and track power. With all this talk of DCC, did you ever see the video where one of the guys at Model Railroader replaced the IR receiver on his Lego Maersk locomotive with a Bluetooth DCC sound decoder? https://www.trains.com/vid/toytrains/series/lego-trains/install-a-blunami-decoder-in-a-lego-locomotive/ True, that's the most popular scale for battery power. I've also seen some modelers in the O and HO scales embrace battery power too. In my experience, finding the space for the batteries in a Lego locomotive does depend heavily on the scale you choose. My 1:38 scale (10-wide) 2-6-0, though a small locomotive by U.S. standards, has plenty of room for the big Technic AA battery box. On the other hand, building the same locomotive in 1:48 (8-wide) or 1:64 (6-wide) makes track power a much more compelling proposition. I think you've summed it up pretty well here @zephyr1934. That's a very good and fair comparison of track vs. battery power as it pertains to Lego trains.
-
@Modeltrainman, you make an interesting point regarding conventional model railroad power sources compared to Lego train power sources. As someone who is active with both conventional (HO and N scale) trains and Lego trains, I've never fully (notice I did say fully) understood why the battery-powered solutions offered by Lego are disliked by so many in the Lego train hobby. It's true that conventional model railroads usually use track power, but for the last eight years or so battery-powered, remote-controlled trains have been heralded by conventional model railroaders as the wave of the future. Meanwhile, us Lego train fans have had battery power since the mid-2000s, but many complain and wish for the days of track power. I can't deny the advantages of track power, but I also know what a pain it is to keep the track clean on my N and HO scale layouts. I relish my L gauge trains because, even though they do require battery changes, spotty electrical pickup is never an issue. That's not to say battery power is the only way (obviously it isn't, and Lego makes their battery boxes way too big to fit in little switchers/shunters,) but I do think that we Lego model railroaders should count our blessings in that we have both battery power (from Lego and 3rd party) and track power (from old 12v, 9v, and Fx Track/Fx Power.) Traditional model railroaders have to build their battery systems from scratch, and I'm grateful we don't have to.
-

[MOC] RENFE AVE S-102 (Talgo 350) WIPish...
L-Gauger replied to Ferro-Friki's topic in LEGO Train Tech
Gotcha, that makes perfect sense... you know, I don't know the going price of PF extender cables, but maybe you could run an extension cable from one hub all the way down the train to the other locomotive or something like that. Could be cheaper. To me it looks like you might have room for the shaft above the BuWizz hub, up in the roof. Obviously that might not be the ideal location ergonomically speaking, but everything in engineering is a compromise... Another option would be to put the battery box in the second car, and just have the motor plus some extra weight in the locomotive, be that train weight bricks from the 80s or a compartment full of something like fishing weights or coins. True. My theory, though, is that two motors in one locomotive might not pull as much as two locomotives, each with one motor. This hunch comes from experience regarding a 6-wide Super Chief MOC of mine. I'll have to share photos at some point, but it's pulled by two EMD F-7 locomotives, each equipped with one Power Functions train motor and that setup has been flawless. I take it you're switching to 8-wide trains, then? Sounds interesting. I look forward to seeing your S-106 model! -
[MOC] RENFE AVE S-102 (Talgo 350) WIPish...
L-Gauger replied to Ferro-Friki's topic in LEGO Train Tech
@Ferro-Friki from the tests I've seen the PF L motor is the strongest of all PF motors. If you used wheels with traction bands and ran on R104 track, I'm pretty sure one L motor would be enough for your whole EMU set. However, one thing which might up your chances of successfully navigating R40 curves would be to power both of the locomotives instead of having one powered and one unpowered. Even having one L motor in each locomotive would likely offer less stress on the overall train than two L motors in one locomotive. Maybe you could try setting things up so that one PF L motor powers both bogies in one locomotive... I think that would be the most efficient design, especially if you choose to power both locomotives instead of one. -
@XG BC Your saying this made me double-check some retailers for decoders in the U.S.... I'm beginning to think that either I confused DCC sound decoder prices with those of DCC non-sound decoders, or that the supply of basic decoders has become more abundant in the last few years. I've gone shopping a few times for DCC decoders to equip my HO scale Direct-Current trains, and never found anything less than $100, usually closer to $160 or (at the very top of the line) $300 USD. But I just checked one hobby retailer today, and they have an entry-level TCS brand decoder on sale for $19.99 USD (normal price is $35.99 USD...) So retail prices here aren't quite as low as they are for you, but the difference is not as drastic as I thought it was. Also, it's neat that your dad is an HO scale modeler! I got my start in model railroading with that scale, but switched to L scale so I could combine my two childhood interests of trains and Lego.
-
@XG BC How interesting... in the retail channels available to me a DCC decoder, even a bargain one, rarely sells for less than USD $100. In contrast the BrickLink price guide says the average price for a "New" PF infrared receiver is about $20 USD, and I see a few used IR receivers selling for less than 5$ USD on BrickLink. Hopefully your different experience comes from DCC decoders being cheaper and not from PF IR receivers being more expensive!
-
Reddish Orange trains? And a Blue Lightning...
L-Gauger replied to Brickstone_City's topic in LEGO Train Tech
Incredible work, @Brickstone_City! I like the fact that your build doesn't make the constraints of the reddish orange color obvious, rather your part choices all look as though they'd be a natural first choice regardless of color. This is definitely a masterpiece of a build! -
@XG BC I don't own any 9V trains and so haven't yet been able to try it, but I wonder if you could connect a power pickup (either sliders like you are using for the kof II or custom pickups like the ones Fx Bricks is planning to make) to a Power Functions IR receiver. That might be cheaper than buying a DCC decoder, and allow you to control track-powered trains with the Power Functions remote.
-
@XG BC Thank you. I must have confused the third and forth rails as being brick-built track. My bad there. @Hod Carrier you disguised the official Lego track very well! I really did think you'd engineered a custom brick-built track.
-
TRAIN TECH Help, General Questions & Talk to the Staff
L-Gauger replied to WesternOutlaw's topic in LEGO Train Tech
@domik Okay, that's perfect! Glad I could be of help! -
Wow, @Hod Carrier! That is one amazing model, even if it can't be motorized with current parts. Hang onto the design because who knows, maybe someone else will be able to figure it out... What grabbed my interest almost as much as the trainset, though, is your brick-built track. If you are able and/or willing, would you consider sharing your techniques on the Brick-Built Lego Railroad Track thread?
-
Most interesting! I wonder if ultimately this will be a positive development for the BrickTracks brand. Product availability there seems to have been spotty over the last few years, so maybe BrickForge's ownership will help make availability more consistent.
-
TRAIN TECH Help, General Questions & Talk to the Staff
L-Gauger replied to WesternOutlaw's topic in LEGO Train Tech
That's definitely a really hard shape to model in Lego, especially without gaps. My first thought, though, was that the Optimus Prime faceplate would be a good part for modeling the very front tip of the cab roof: Thanks to the Orient Express, the part exists in the right color. That said, building the cab consists of at least two distinct challenges: First, modeling the angled front walls of the cab, and Second modeling the cab roof. There might also be some challenges smoothly integrating the firebox into the whole model. Regarding the front wall of the cab, it could be built vertically (either with ordinary bricks on hinge plates or wedge bricks) or with SNOT. You might find it takes a combination of techniques to model the angle, the corner where the two front walls join over the boiler, and the cab windows each convincingly. Because of this complexity, I'd design the front cab walls first, then make the roof to fit what you come up with. As for the roof, modeling both the angle of the front edge and the curve of the roof slope will be difficult. You could compromise by building the back two-thirds of the roof with curve slope bricks, then mount wedge plates to model the angle of the front edge... that means the curved slope of the roof wouldn't extend all the way to the front of the cab, but at least modeling the back part correctly would give that suggestion. Hopefully these thoughts help and aren't too confusing. @domik Let me know if I need to clarify anything. I'm exited to see how you approach modeling this fine Ten-Wheeler! (in case you don't already know that's what this engine's wheel arrangement is called, at least in the U.S. ) -
Here you go @zephyr1934! This version shows what it would look like with 1x2 tiles between the double jumper plates, with the double jumper plates appearing on every other tie. This would likely be cheaper than using double jumper plates on every tie, but would require brick-built ballast: That does look really good. I think this is the exact same tie design used by @FGMatt on his ties with cheese slopes here:
-
After assembling my copy of set 75257, it was immediately apparent to my eyes at least that a few of the proportions and details in this set were off compared to the starship seen in the Star Wars films, but it was some time before I ever got around to seeing if the model could be improved. But now, after reviewing a few stills from the original movie trilogy and using them to get the proper proportions for the Millennium Falcon, my 72527 now looks like this: The most glaring issue with set 72527 as originally designed, in my opinion, was the proportions of the nose. The nose tips of Millennium Falcon are slightly wider than they are tall, while the nose tips of most Lego models of this ship are taller than they are wide. I found that by shortening the nose by two studs (making the nose tips 3 studs wide instead of 2) had a major improvement on the overall look of the ship. While I was at it, I also moved some of the details on the nose around a bit to get them as close as possible to their positions on-screen. Underneath the ship, I wasn't happy with the fixed landing gear, so I designed a set of retractable feet that also allow the ship to sit higher off the ground, almost enough for a minifigure to walk underneath. I couldn't figure out a way to make the screen-accurate number of seven landing feet without completely redesigning the technic-brick built frame, which would have required disassembly of the entire ship. The blaster turret up top received some more minor changes to make posing easier: The biggest modification, however, is that the passageway from the cockpit to the rest of the ship is now present. Granted, the space was too small to make it screen-accurate, but since the rest of the ship interior is only marginally accurate it fits in and makes much more visual sense. The outside modifications that made the passageway possible: And the inside modifications (not all are visible, as the proper angle for a photo was hard to obtain. However, in the photo you can see about half of the floor space gained by the modifications.)
-
You know, that might be the best track shown yet. I did a small test on the technique in real life, and even though technically it's 1/2 plate under gauge the trains roll just fine. There doesn't appear to be enough outward force on the panel bricks to push them off the studs, but your reenforcement technique looks a lot like the sleeper chairs used on British railway tracks so it's a great added detail. Interestingly, a similar technique for building the crossties allows the use of 1-stud wide tiles for rails, while keeping the 8-stud long crossties of conventional Lego track: This would probably be more expensive than using 1x7 crossties like I've used in my prototype tracks, but maybe using the 1x3 jumper plates on every other tie instead of every tie could reduce the cost?
-
@zephyr1934That's a good idea regarding the weight brick. If I were using Powered UP, I probably would have found a way to put the PUP hub inside the boiler, again to increase weight. That said, the only real troubles I've encountered during testing are with the increased friction of R40 curves. R56 and broader don't appear to be much of an issue for a traction-tire equipped Sapphire Star despite its relatively light weight. But, time and more testing will tell.
-
@FGMatt, that's a good thought! The track looks great, is simple, uses only common parts and legal connections. I just prototyped the design in real life though, and there was one slight issue: the gauge is 1/2 plate too wide for L gauge, just wide enough that the trains fall between the rails. However, I figured out a very simple fix to this problem, shown below: I have to say, this looks like it might be a really good idea. And while we're on the subject of panel elements, the 1/2 plate width of the top part of the 30143 panel makes it a great element for building switch points. That's what I've used on both my prototype brick-built switches with excellent results.
-
@XG BC That makes perfect sense as a building philosophy. I'm exited to see both your model as it appears in real life and how you will go about motorizing it. I've made one similar model to a 2-stud gauge (you can see a photo in the initial post of the "Brick-Built Lego Railroad Track" thread) and fitting the motor was the biggest challenge in the design process.