Imanol
-
Posts
93 -
Joined
-
Last visited
Content Type
Profiles
Forums
Gallery
Everything posted by Imanol
-
You can´t imagine the relief of having a valid bogie prototype, I haven´t checked thoroughly the space for the battery but at least I know it can fit in the allocated area with some small changes to the inside. About the front I´ve using for some time an "scale" that was made using my class 269 as reference and it´s that 13 m equals 60 studs. When you said that the front was longer I checked and it was exactly 1 stud off the scale so for now this scale works perfectly.
-
Well, I have a very promising prototype. After countless hours tweaking the design I have one that can connect train plates with conventional plates: Conexion bogie motor by Imanol, en Flickr The next step is to make space for the battery box and cable connections
-
Okay, @Ferro-Friki you were right, I have removed 1 stud from the front and I think it has improved a lot: motriz S-130 Bogies mejorados y Frontal reducido by Imanol, en Flickr I´m still trying to solve the bogie height misaligned bogie. I´ve come to the conclusion that I can only touch the power car bogie. The reason is that the end car bogie can´t be moved up or down. But I´m (of course) not giving up and I may look again at the possibility of using a normal motor and transferring the movement with gears. Thanks, Imanol
-
Thanks, as I already say it was the only way I have to build it now. I hope you can catch another investor Maybe, I may try it. It has already been scaled down several times before. There is a bigger problem, is not only the power car bogie, the bogies of the rest of the train are at the same height that my first bogie design (the one in the photo below) and they are connected by plates so they can´t be moved up or down. Unión bogie motriz S-130 by Imanol, en Flickr Looking a little bit more I discover that when I first try your bogie design there was the same gap. In this photo there is two bogies, your design and the first prototype that I made which lies at the same height as the one made by @Hod Carrier, You can appreciate the difference between both. Diferencia altura rodales by Imanol, en Flickr
-
Thanks, after using ligftarms I got to the same problem. This is a comparison between the normal bogie and the motor bogie, maybe it can be ignored? Ignore the 9V motor as Stud.io doesn´t have Power Functions or Powered Up motors. Diferencia altura bogie by Imanol, en Flickr
-
Thanks, but the problem is that the bogies of the cars need another connection that is sligthly different. The difference is less than half a stud (aprox), so maybe it can be ignored
-
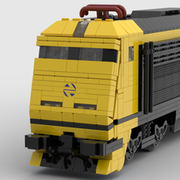
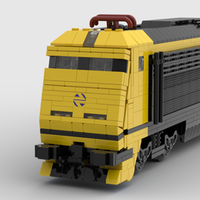
Okay, I finally have the perfect design for the front of the power car, thanks to @Nikonissen for pushing me to redesign it, I think now is more rounder and has less gaps. What do you think? motriz S-130 Nuevo diseño by Imanol, en Flickr I´m still having problems with the motor bogie attachment as is slightly higher than the normal pin plate attachment but I´m completely out of ideas to solve it. Does anyone know of a solution. This is the current attachment of the bogie: Unión bogie motriz S-130 by Imanol, en Flickr Thanks, Imanol
-
Hello, I´ve been doing several changes to the front of the S-130 Power car. LEGO Renfe S-130 Motriz Frontal Nuevo [MOC] by Imanol, en Flickr I´m not sure if I prefer it like this, is rounder but there is several gaps and overlaps that doesn´t convince me. What do you think, should I change or keep it like that?. Thanks, Imanol
-
Thanks, I completely understand your jealousness. The problem with the other magnet holder (2920) is the height and the point of attachment as the one that I currently use is lined with the technic bricks. If @dtomsen knows a better alternative it would be great. My idea with the power system is to use Powered Up as is the most recent. About redesigning the model, I know the front looks a bit weird but is the best I can do with the limited shapes of LEGO pieces. Nevertheless if you know of a specific improvement feel free to say it. I've also thought about making the bogie look better but I'd rather have a working model first.
-
Okay, after fighting with Stud.io 2.0 to try and implement the power functions or powered up elements I haven´t find a way to do it so I´m doing all the test with the 9V motor bogie. If someone knows how to implement this pieces it will help a lot. I´ve already tried LDdraw.org and isn´t working as the pieces are incomplete or missing Thanks, but I think that it will create a bigger problem. After looking at it I discovered that the main problem is not the length but the height as the powered boggie connects with a piece very similar to the 4025 plate with pin. This plate and bogie have the same problem of having a shorter pin and as I´ve been using normal plate with pins such as the 2460 the powered bogie is slightly shorter and cannot connect. This is a very big problem as there is no alternative for the rest of the bogies to have a similar connection. Thanks, but I´ve looked it up and is a little bit complicated as you need a special brick to connect it to the rest of the bogie. If I encountered any problem when I build it I may looked it up as an alternative. I have another question, does anyone know of an alternative to the lego magnet and magnet holders, they are extremely expensive and fragile so there isn´t a guarantee that it would work once bought. Is the only pieces that I may change for aftermarket or third party replicas but I haven´t found anything yet.
-
Thanks, I will try it.
-
Thanks, the problem is that the powered bogie is one stud shorter than the current design so I will need to make some adjustments. The main problem is not the speed but the power as 7 cars is a lot and I don´t know how to distribute the traction between the two powercars.
-
Okay, I have very good news, I´m now able to talk about it. This is only possible thanks to the help of the Talgo Group. This is very important as I´m not able to finance this project on my own and they gave me this amazing opportunity after I posted this train on Twitter. But there is also several users like @Hod Carrier, @Nikonissen and @Ferro-Friki that have helped as much. This also means that the funds for the construction of the train are already secured but there is still some problems that I would want to fix before building it. I´ve been working on the power car and now is able to take curves as you can see: Renfe S-130 motriz Bogies mejorados by Imanol, en Flickr But the motorization part is not ready, I´m trying to decide whether is better to use a powered boggie or a axles and gears mechanism like the lego crocodile locomotive. Thanks, Imanol.
-
Thanks
-
Thanks, for now I think the only option is to build it and test it. I don´t know if the difference between the length of your cars compared to the Talgo cars will help or worsen the problem. For now I´m finishing several details in the cars and making them ready to be bought. The only thing that I haven´t decide is how many cars to built. I´ve seen that you posted a picture of how to align the axle mechanism, will this be needed in real life or is only for stud.io? Thanks, Imanol
-
Thanks, I agree with you, I think is the moment to start building the prototype. I´m trying to decide what to do as the ideal option would be to build 5 cars (2 end cars, 2 regular cars and the cafe car with 2 bogies) as this would allow to test my theory of the guiding wheels. But this is very expensive an also a problem if the mechanism doesn´t work. The other idea would be to build 3 cars (end car, regular car and cafe car with 2 bogies) but it will be more difficult to test. I also finished the visual part of the coupling with the addition of the "gangway" which makes use of the mechanism painted in black and only needs a brick built roof extension as you can see: Remolque Turista Renfe S-130 Detalle unión final by Imanol, en Flickr I´m hoping to have the order of parts this next week and to start with the final design of the power car and it´s coupling with the rest of the train. Thanks, Imanol
-
Okay, I ´ve been making some modifications to the cars and the attachment of the bogie assembly and I´ve reduced the space 1 stud and I think this is the perfect distance between them. Remolque Turista Renfe S-130 Union Def 2_2 by Imanol, en Flickr As you can see in the picture is now tidier and more compact and I think the joint will be strong enough
-
I have made the first prototype with the new coupling design but it looks like I will need to make a lot of space inside as it can´t fit right now. But the problem is that it invades the interior, so I will need to probably use the gangway as an extension of the car. This is how it looks right now Remolque Turista Renfe S-130 Union Def 2 by Imanol, en Flickr My idea is to have one stud left of free space between the cars.
-
I´ve been thinking about it and the solution may be in the train itself as the real life Talgos need to be guided by the first axle to take curves. I don´t know if this will help in this case. Another solution will be to reduce the turning radius to the bare minimum to be able to take the curves but I don´t know if this is possible. Thanks, Imanol
-
Wow, thanks a lot, you can´t even imagine how it helps to have a proof of concept of your design. You have earned a seat in "Preferente" in my Alvia I´m now trying to connect it with the current structure of the car but I think it will fit without issue and if not I trick of the car gangway to extend one stud the mechanism but the gangway itself needs to be 7 studs wide or be made up of tiles, I haven´t yet decided about it. Thanks, I hope I can tell you more soon and that it will be good news
-
Thanks, I´m still discovering how this type of mechanisms work. I now see that the bar can pivot sideways. With this information I will try to integrate it in my Talgo and see if it works. It appears that it only needs 5 studs of space to swivel freely so this will be very compact. Yeah, I know but I´m talking about making a technic axle holder to connect it to the current structure or adapting in some way the actual bogie assembly that I used for the other design but firmly secured in place to avoid rotation. For now I can´t say more because I don´t know if it will occur but we will see. The only thing that I can say is that You, @Ferro-Friki and @Nikonissen have been instrumental to the project
-
Thanks, I tried to center the red axle but stud.io doesn´t make it easy so I will use the angles you provided, I will tweak it when I have a real prototype. Okay, I now see it, I will try to decide between attaching a bogie assembly or only an axle depending on the clearance with the roof and the space it takes in the cars. I have another question, is the design in the photos complete or is missing another axle as I can´t understand where is the turning point, as it looks like the only moving part is the black liftarms and if they are connected to the car so I suppose I´m missing something. I can only say that you may not be right I won´t hide that I would like to have the locomotive build as soon as possible but I also know that this will delay the prototype build so I´m still deciding
-
Thanks, I´m trying to make a prototype of your design to test if it´s able to fit in the cars, but I don´t know the angles of the upper bar and with stud.io is very difficult trying to guess it. Also I´m doubting, Is the third hole in the technic half liftarm the mounting point of the train axle?, and will it be posible to use a normal bogie assembly (with obvious tweaks) as it may be easier. I´m still busy with exams but I´m hoping to finish in a week and have full time to make the final details to the design and order pieces to make a full prototype. And talking about the prototype I´m wondering if is worth to make one locomotive to pull it or if pushing it by hand will be enough to test if it works. Thanks, Imanol
-
After finishing with the end car design I´m making the final touches to the coupling between the cars and I have a question for @Ferro-Friki, the upper diagonal bar that joins the two sides of the bogie is connected by brick 43857 or 60843? It appears that it´s connected with the second one (60843) but this liftarm don´t allow (apparently) the sideways movement of the joint and the turning of the cars but as I´m still trying to understand the mechanism of the bogie I can´t say that for sure. Thanks for helping
-
Good news, after many tries I have finally made a working prototype for the bogie assembly of the end car, the trick was the thin liftarm that when is connected to a technic brick makes the perfect offset. This is the design with the internal structure visible: Bajo Extremo S-130 Bogie independiente 4 by Imanol, en Flickr And this is the bogie turned 20 degrees proving the concept: Bajo Extremo S-130 Bogie independiente 3 by Imanol, en Flickr So now the only problem is finishing the coupling between cars. But there is also one other problem, I don´t have any LEGO trains so if I make a prototype I would need to push it by hand so my question is, should I make one of the power cars or wait until the car designed is proved and tested? I´m not going to lie, I would love to have at least half of the train for testing but I don´t now if it´s a good idea.