Imanol
-
Posts
96 -
Joined
-
Last visited
Content Type
Profiles
Forums
Gallery
Everything posted by Imanol
-
Thank you very much Oh, that´s for sure. I already mentioned that I´m waiting for the 1x3 or 1x4 chesse slopes to redo the door area, but who knows what else I will do. Imanol
-
Thanks, the trouble with the bogies is documented almost in it´s entirety on this thread, feel free to look at it, I can confirm it was one of the biggest headaches I had with the project. The roof of the engine and the doors were some of the latter additions to the train and I also think that they improved the look of the entire power car. Right now I´m waiting for LEGO to release the 1x3 or 1x4 cheese slope in white as that will allow me to redo the top of the door and make it sturdier.
-
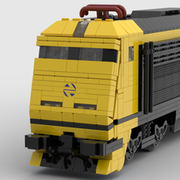
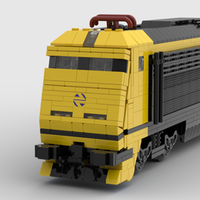
Well, after almost 3 years since I started this project and more than 2 since I finish the first section, I can finally say that this project is complete (or almost). It has more than 5300 pieces, weights 4 kg and has a length of 2 m. I´m not going to lie, this was not the best project to choose as my first one but I think it has helped me learn quite a lot from all of the mistakes I have made during it. Since the last update in September I decided to ditch the transparent home printed stickers and go for something more professional ordering custom stickers, at the same time I decided to invest on rechargeable batteries as I went through two entire sets of AAA batteries just doing testing. Right now the train is able to move completely on it´s own on R40 tracks (I´m severely limited on the room available for the circuit) as it´s show on this video: The trainset is made up of 2 power cars (both of them motorized), an End Business Car, a PRM Business Car, a Cafe Car, an Economy Car and finally an End Economy Car. This was the only way of taking a picture of the entire train: The power car has suffered quite a lot of changes since I started the project, the main ones are the new bogie design (which is quite fragile) and the roof detailing: I also redesigned the end of the trailers as in real life they have a more rounded shape: The cafe car has some special characteristics, the most important one is that is the only trailer with two axles, which makes it possible to run the train. The second one is that the windows are much higher, in this case the are just below the roof assembly so the roof has less clutch power: The two new cars that were added since the last update are the Economy Cars. The End Economy Car is identical structurally to the End Business Car but the regular Economy Car has another set of windows on each side which makes it less strong (at least according to studio): All of the train has an interior, there is even a cab in the power cars. Below is the interior of the Cafe Car and the Economy Car, notice that in the second one the last row of seats camouflages the bracket assembly that acts as the interior structure of the car. I want to thank anyone that helped with this project, specially @Hod Carrier which is responsible (at least) for: the close coupling articulation, the entire internal structure of the cars and the design for the powered bogie. Right now there is only one other update planned for this project that is to include lighting as I think is a missed opportunity having a fully detailed interior that can only be seen through the darkness. I´ve looking at Light My Bricks as the design seems perfect to integrate without much thought but I will need to look further into the different offered components to see which might fit better into this design. At the same time I´m already planning a new build which is going to be the Shunting Tractor Renfe Class 309 that I also want to motorize. This is going to be another challenge due to the limited room available and the fact that is a rigid design with three axles so it´s going to require a swivel mechanism. I´m already thinking of making a small piece order to start testing on real life but I will leave more details for when (eventually) I made another thread for it. This is all for now, I´m hoping to make new updates sooner although I can´t promise anything. Imanol
-
Exactly More than I imagined, I first did a test with only the PF metal axles and the train was constantly suffering from wheelslip issues even with only the locomotive. After changing the axles on the locomotive the train runs perfectly with no adherence problems
-
Thank you Thanks, the trailers have the 2878 RC wheels with the metal axles that are currently being produced by LEGO. On the powercars I used the bearing wheelsets from BrickTrainDepot
-
Hi everyone, for the first time in almost two years I can say that the S-130 is finished and is working as expected. Yesterday I finally received the bearing wheelsets and after fitting them to the train (and changing the hub batteries) everything worked as expected. Right now the only thing that is left is to finish cutting the axles for the close coupling articulation (right now there is a problem when taking curves) and reapplying the stickers. For now I want to thank all of you who have helped this project giving me ideas to solve small issues or in other cases redoing part of the cars @Hod Carrier. I hope that next week I will have the train ready for a photoshoot and I will post the official presentation of the train. Right now I will leave here a video of the train running (apologies for the camera quality): Thanks for all of the help, Imanol
-
Well, I´ve finally made the piece order and apart from almost forgetting all of the metal axles (thanks to the seller for allowing me to modify the order after being placed) everything should be fine and I´m expecting to receive it over the next weeks. I will update it when I receive everything and hopefully everything will work fine. Thanks for all the help, Imanol
-
Okay, right now my idea is to buy one set of wheels with bearings for the front bogie of the powercars which were already designed for it and the change the wheels in the train cars for the 2878. I might look at some lube oil but I might need to be more careful applying as I´m still having issues with wheelslip as I accidentally covered the wheel flanges with oil and it´s not very easy to clean. For now, I haven´t been able to move the train without the wheels slipping although I don´t know if this is caused only by the oil or it might be something else so I will continue testing and see if I can solve it. The price might be similar but right now my main concern is if the bearings are available in Europe as all of the ones that I have found come from the US so I don´t know if right now they can be shipped. Also the use of bearings relies entirely on the possibility of being able to take apart the assembly as there isn´t any other way of incorporating it to my design. The part about the train suddenly moving concerns me the most as right now the train is located at 1.5 m over the floor on top of a drawer chest with no barriers on either side so I might need to make some type of buffer. I hope I can solve any issues on the design today and maybe even make the piece order tomorrow Thanks, Imanol
-
Okay, I think I have found a "solution" to the issue which is much simpler (and stupid) that anything else. After all of the issues that were raised about the 38339 wheels I decided to try and reduce their friction with the only thing I could get a hold off at home, which is olive oil. So after applying a bit of oil on both the wheels and their holders I have been able to move the train past a switch with the powercar pulling 3 other cars. Of course this was only a temporary solution and I will order bearing wheelsets but for now I know that with that might be enough. At the same time (and due to the applying method) I have experienced wheelslip although I hope that will only be temporary. So right now I´m going to change the main focus to redesigning the wheels on the cars to be able to use bearings and replace all of the wheels in the train with them. Apart from that I will also order the required pieces to fix the bogie gear issues but for now I will keep the motors as it looks that right now they might be able to work just fine. Also I´m wondering if changing the 38339 for the 2878 (with metal axles) will be enough or if it´s better to use bearings on all of the axles. I will keep you updated as I´m going to wait a few hours to see if the oil on the flanges disappears and the wheelslip stops. Thanks for all the help, Imanol
-
I have continued with the testing and have some new and partially good information. First, I have tried making the scrapiest possible "locomotive" to test the motor and it was suffering from the same issue when reaching a switch pulling the 3 cars. Then I decided to try and pull the other locomotive (without the gearing) as it weighed the same to test if the problem was on the cars or in the power car itself. The result was the same as with previous tests with the motor struggling to pull on the straight track and failing to traverse the switch. At the same time I also tried pulling ony two cars and the results was the same. This leaves me with the conclusion that the motor looks to be underpowered and it doesn´t look like they are faulty as part of the tests have been carried out with the other motor and hub. I haven´t tried using the motor itself on the rear bogie as the only designs that I tested were with the motor in the front bogie (with the previous power car frame) and now with the geared bogie connected to the motor on the rear axle Right now, it looks very likely that the next step might be to order a bigger motor and see if it can work although it will require a redesign of the inside as I don´t see how I can make it fit right now. Fortunately the money is not the bigger issue, it´s the fact that it might not work and then find myself with multiple "useless" motors and back to square one. This is something which I might need more data about as right now I don´t have any way of knowing how much difference there is in friction in each case although i doubt this will be the key of the problem Looks like at some point I might need to take my time and understand the app. That was the way I used to make the first tests and it wasn´t much difficult although if I keep the gears I might invert one of the bogies to avoid needing to do that Well, that´s the problem, both locomotives are already powered. As I said right now I don´t have enough pieces to "fix" both locomotives but I have been doing tests with one of them and half the load and I´m still suffering the same issues. Right now, it looks like the key might be looking for new axles (maybe order the one with bearings) for the unpowered bogie and then try and fit a PU L motor which might not require much modifications to be done. I still need to check if there is a simple way of attaching the motor but it looks easy enough. At the same time I want to inform that even though the problem hasn´t been solved there has been major advances. For example, I tried moving the other power car (without any modifications) and the gearing mechanism failed instantly even without applying power. Unfortunately I don´t have enough pieces to make the necessary changes on both powercars so I won´t be able to test it. Thanks, Imanol
-
Thank you for the words. I have had previous "light bulb" moments that have made possible other trains and even cases of delaying so much the solution that the right piece was produced. I know at some point I will find the issue like when I previously discovered why the bricks were cracking but the main trouble is that I don´t know how much time I will have starting on september so that´s definetely not helping
-
I would like to do something like that but the fact is that right now I have very limited quantities of pieces available, specially technic components, so is very difficult to make something simple. When I only had one power car built I was able to take the other motor bogie and making some kind of contraption put the motor on top but it wasn´t very stable and I only used it to control the rear of the train when testing the main locomotive. I have already tried adding weight on top of the motor but there hasn´t been any improvements with an added 120 g. This is something that can be used but I don´t know how much will improve as the passenger train cars are built with the 38339 wheel holder instead which in theory doesn´t have as much friction. This unfortunately won´t never work with this design. This train is based on a real train made by Talgo, the main thing about this trains are that there is only one axle per car with the other side of the car resting on the following car. This is completely different from conventional train cars which have two bogies which could be motorized in this situation. Here is a picture of how it looks (the final axle should be part of the next car): At the same time this design is supposed to be lighter than any other type of train but that doesn´t translate well into LEGO as the cars required a complete technic frame on the inside to prevent them from buckling. There is also the wheel guidance issue which I suppose is the problem that is experiencing when reaching the switch but after doing tests pushing the cars by hand they can go through the switch with no trouble. RIght now I need to find a way of attaching the pin from the motor bogie on the front of the power car but this doesn´t look to be easy as there is 5 1x16 technic beams used as reinforcement which need to be partially removed and then I need to see how to add another technic contraption to connect the bogie. Apart from that the only thing I can try is to look for a way of building a one bogie "shunter" to try and pull the cars but I won´t be able to make anything close to the size of the current power car. Thanks for all of the help, Imanol
-
Well, yesterday I continued doing testing and I was able to rig my phone to move with the train and film the gear on the bogie axle. After reviewing the videos I noticed that the gear was moving constantly and that there wasn´t any wheelslip. But at the same time, I was able to see on the hub that the low voltage indicator was coming on constantly (even though the batteries are new) and when reaching a switch the train was stuck and not moving at all. I also tried putting the other hub with batteries on top of the rear axle (adding like 120 grams) but it didn´t change anything. The only time I experienced the wheelslip was when trying to reverse the train after getting stuck on the switch although the motor stopped turning almost immediately. When I first received the motors I did a bit of testing with the previous setup which included using the train motor in the front bogie and even though the problem wasn´t as big I already noticed that it was struggling to pull the 3 cars although there wasn´t much issue traversing the switch apart from the rear of the train derailing due to the low weight and lack of guidance. Right now it will take some work to rearrange everything on the power car to test again this setup and it might require some pieces as the bogie attachment components have been reused in other parts. Looking at the data I think the difference in performance between both motors is negligible and I don´t know if I want to take the risk and end up having the same trouble. Looking at the stats for the motors on here: https://motors.sariel.pl/ it looks like the 88013 has much more torque but very low rpm so it might be quite slower. The fact that it can only be controlled by the app will make this impossible to control so I think this option might need to the discarded entirely The issue of trying to connect two hubs either with Pybricks software or with the LEGO app will create a lot of trouble as the only way I found to do that is to connect both hubs directly to the remote so I need them in different channels to make them go in opposite directions. If anyone has any idea how to solve this, it will be greatly appreciated. For now I will try to make modify the studio model to see if I can add the train motor on the front without requiring a new piece order and if possible test with this setup in both powercars and see if it´s enough. Right now the hard line will be with replacing the rear bogie as is not only the side detail that needs to be removed as the entire rear connection that will need to be changed to make way for another motor changing the appearance of the train quite a lot. Thanks for all the help, Imanol
-
When I received the motors and hubs I tried using Pybricks or the LEGO app but neither option allowed for two hubs. The LEGO app was not able to detect the second hub and I was only able to use both hubs with only the remote with the LEGO software as with Pybricks it didn't let me connect the other hub
-
I supposed there was some kind of issue with using the 88013. The problem with removing the bottom of the hub is that is where is connected to the train, the top is connected only to the roof so it´s not very secure and the roof needs to be removed to turn on or off the hub. I´ve continue doing testing and tried using a front axle without friction rings but the result it´s still the same. I have also tried searching what is the maximum load that the 88011 motor can pull but I wasn´t successful apart from finding the torque value and AI data which is not very clear. Looking at "testing" I´ve seen trains carrying up to 10 carriages of the 60197 with 1 motor with minor wheel slipping so it doesn´t make any sense that a combined weight of 2,5 kg is causing any trouble. I tried at some point to run two hubs at the same time and I wasn´t able to use it so that might become an issue with the setup of this train as the train has two powercars Right now I´m in a difficult situation as I will need to make a major redesign whatever the final solution chosen is but at the same time the two main ideas are quite different so I want to have the certainty that it works before making any piece order. Thanks for all of the help, Imanol
-
There is also another issue which I completely forgot about it but took quite a lot of time to solve which is how to attach the train plate pin to the 7 stud wide train at the correct height. This required a very complex technic contraption which unfortunately I reused the pieces in other parts of the build so I will require to make a piece order only to test this. Right now my main doubt is knowing if it´s possible to use the 88013 motors like in the crocodile as I think there is enough room if I lower the battery box. If this is too difficult I may go back to using the two 88011 motors as proposed. Thanks, Imanol
-
It's definetely possible, in fact the train was first built with that in mind and before modifying the design I tested it like with one motor bogie, although other issues prevented a more thorough test with the full load and it was suffering from a lack of power The train right now is powered by a sideways train motor located inside the frame. The main issue of using the motor directly is that is not very detailed and it's less customizable (I can't change it's direction by mirrroring a gear) and I don't if it's possible to fit two at the same time.
-
Well, today I was able to resume testing with the train and my worst fears have come true. To summarize everything, the train is lacking power to move all of the cars. This is something that I had thought before but I didn´t have enough proof of it. Looking at the available material on the internet there is no indication that this can be a problem but the testing says otherwise. I have replaced the front axle assembly with the 4x6 technic brick and immediately I experienced wheel slipping and what I suppose is the anti-slipping feature of the motor which is to stop turning. When the train was able to move it was quite slow and it never was able to completely traverse through a switch as the wheel friction was enough to stop it. The tests have been done with a powercar with has a weight of 1 kg approximately pulling three train cars with a combined weight of 1.5 kg. This train has the particularity of being a Talgo and like it´s real counterpart, there is only one set of wheels per train car so that might also cause problems. Although hand pushing the cars show no issue at all. Due to the design of the powercar and the option chosen, there is only enough space for one motor powering the rear bogie. Here it can be seen the interior distribution of the power car: This looks like a major issue as right now there is not enough space for another motor and as I mentioned in a previous post it will require a complete redesign of the powercar. At this point the only other solution might be to look for aftermarket motors but I don´t know if it could be enough. For now all of the test have been carried out with only one power car and 3 of the 5 cars. In theory each power car should only need to pull 2,5 cars but I feel that the difference is too small to be the issue and unfortunately I only have the required pieces to fix the center axle problem on one of the two bogies. Thanks for all of the previous help, Imanol.
-
I can try that, it´s the easiest modification possible and it might just work. Unfortunately there isn´t anything like that near me. Right now with all of the pieces ordered for this project I have quite a large bin of leftovers but with every new expansion I have taken pieces out. And I only have pieces that I already thought I needed for the project. The only good thing is that I suppose this won´t be a large order so I might try to look for interesting pieces which might be useful in the future and order them. Currently both power cars have only the rear bogie powered and with the battery on the middle is very difficult to connect the front bogie to the motor. For now the front bogie is completely unpowered and has it´s own modifications to strengthen it which are uncompatible with all of the gear linkage. In this picture you can see how it looks (although there is minor changes with the built model) At this time there is a major heatwave in the south of Europe (where I live) so i´m not going to make much progress on this project until Monday when hopefully the heat will recede. For now the plan is to try and change the 1x8 plates with 1x10 or 1x12 and try testing the 4x6 technic brick on the front axle of the bogie to see if the 4x4 could work. Thanks for all the help, Imanol
-
You don´t need to apologize as I haven´t been able to properly test everything due to lack of parts on my collection. In this case i´m missing the 4x4 technic brick, so I cannot know if that option might work. I was about to try and do that when I realized that it will require to move the whole motor assembly inside and unfortunately there is not enough space (due to the motor clips) and to fit it I would need to make a big redesign. Using a longer plate might be possible as yesterday I realized that the connection of the rear section can be offsetted without all of the supports that I have in place. Both 1x4 are supported by a 1x2 plate on the center studs and the longitudinal 1x8 on the outer study so in they are well connected. Right now, my main limiting factor is that my lego parts come from city sets from my childhood and whatever remnants I have from the piece orders of this project. I would like to have enough pieces to be able to test different solutions but the only way is buying more pieces and wait for them to arrive. Due to the slanted front of the train I discovered that there is not enough space available for another motor in the front bogie so the only other way would be to a complete redesign and use non-train PUP motors using a design similar to the one used by @Ferro-Friki on his S-102 and that will require building the powercars from scratch. For now I will try to make the necessary modifications to the power car to test with the 4x6 technic brick on the front axle and see if there is another failure point before deciding on a final design and making a piece order. Thanks for all the ideas, Imanol
-
Today I have been able to test some of the ideas on the train itself. Due my "small" piece collection I haven´t been able to test everything I would have like. The first idea tested was the one I mentioned before with the two 1x4 technic bricks in place of the 1x2 bricks. After the first failed test I modified the side details to be 1x2 instead of 1x4 rounded plates as I was noticing that they might be causing more friction. Unfortunately the test failed when the power car was coupled to 3 of the cars that had a weight of 1.5 kg aprox. My feeling is that as right now the only pieces which bridges the gap between the two axles are two 1x8 plates, I think they don´t apply enough force and in fact, I appreciate a slight bending. This I think is pulling apart the two 1x4 bricks and causing them to drop (although this is only my theory). Taking inspiration on this idea I did my own version but changing the 4x4 with a 4x6 as I don´t have any of the 4x4. The result is promising although the front is still experiencing the same issue as before. The power car was able to pull the other 3 cars although going very slowly but when trying to traverse a switch, the same issue as before occurred. Right know I don´t want to make a piece order as I´m still not sure of what is exactly the issue, although I think trying a 4x4 brick in the front could work. I will try to make some temporary modifications to the power car in order to be able to use a 4x6 in the front and see if that solves the issue. Currently I´m running out of batteries so I can´t continue testing until tomorrow. Finally I would like to know if someone has carried out some test with the powered up motor and has the maximum load it can pull, I know that my train is quite heavy as it has a complete interior but I don´t know if that is really the issue. Thanks for all the ideas, Imanol
-
During the testing phase on the real model I had several Technic bushings of both types but I haven´t added them to the renders. The problem with the way of connecting the axles is that both of the pieces are in the way of the only piece which guides (as is not even really attached) the motor axle with the bogie. In this picture it can be seen, is the 3709b plate and 15535 tile on top: When I tried to remove them and test any of the connectors I found that they are slightly taller so they cannot fit on the current footprint. There is a 3x3 hole in the chassis of the power car for the bogie to connect to the motor but right now I have an idea to make it smaller in order to keep the axle straight (in case this is part of the issue). I think I have enough pieces to test the prototype with the 1x4 technic bricks so in the coming days I will try to build it and test if there is any issue remaining. If this fails I will start thinking of a major redesign (again) that is focused on a technic structure and could be able to incorporate one of those connectors on a similar foot print. The other issue right now is deciding if it´s worth it to try and order bearing wheels for the non-powered axles on the power car, in case there is a excessive friction problem on top of the design mistakes on the bogie. Thanks for all the help, Imanol Thank you very much. This project has been a tremendous undertaking and looking at the photos on the first post is easy to see how much it has improved. If everything goes okay, and I solve the current issues, I will try finishing the decals and posting the complete project in September
-
Right now I don't have the program open but when I was testing the stability I found that when using the 4x4 in the rear, the coupler was not supported enough as there is only one stud of support. I did try attaching a 1x4 to it but the improvement was not very noticeable. I will try tomorrow to make the opposite design and look if it's better
-
With this design I can keep the 1x2 technic bricks with no issue, the problem is that the technic brick itself is the lower part of the bogie as the first idea I had to solve the problem was to put 1x4 plates underneath. This looked like it could work but then I started to notice that the train was struggling on switches and then I found that due to the switch design didn´t have enough clearance and it was bottoming out. Right now I have tried securing in place the motor axle but due to the motor vibrations (up and down) it was able to loosen the technic bush (4265) that were put in place. I tried using a longer axle to be able to attach it over the motor but it didn´t work. Another is that in order to place the technic connector it was necessary to remove the 1x4 technic plate that was keeping the axle straight so I will need to think on another way if I want to keep using the issue. First of all, hearing that this has happened before and could be solved only by better securing the axle is a relief. One of my main concerns was that this was caused by a lack of power or adherence that was affecting the weakest link on all the mechanism but I´m glad to hear that (it might) not be the case. I have adapted both ideas to the design but each of them has it´s own issues although they can be overcame. The 1x4 crossed technic bricks allows the bogie to have the same length as before but I´m not so sure about it´s stability (although Studio says it´s more stable) With the 32324 Brick the bogie is one stud longer which can cause issues but due to the slanted design of the train undercarriage, the bogie can be one stud longer on the frame part. There is also the possibility of combining both of the proposed solutions, using a stronger frame and at the same time securing the motor axle but right now I don´t know if it´s going to be better. For now I will try to work with the technic frames and at the same time look for a way of securing it to the frame of the train as right now the only attachment point is the motor itself. Thanks for all of the help, Imanol
-
First, thanks for the suggestions, I haven´t thought of any of them before. Right now I don´t have access to the real train (or any of the suggested pieces) but I can test if it fits on the Studio model. The bracket looks almost perfect but the hole is slightly misaligned so that won´t work. Talking about the Technic option, with the piece proposed (87408) I have two ideas. The first one is to the central axle to the wheel axle using two of them. This in theory should keep the axle fixed, but the main issue is that the piece is too wide to enter inside the current frame so the bogie will need to be entirely redesigned as the Technic 1x4 and 1x6 bricks are the main structure of the bogie so removing them requires a new way of connecting everything. The other idea that occurred to me was to connect the main axle with the one which comes from the motor. This is right now the easier solution to implement although I have serious doubts about its usefulness as the motor axle is not very well attached on it´s own but it can be used as a way of fixing both axles. For now I´m going to make a working solution using the technic pieces and see if I can try an implement everything with little disruption to the rest of the design. Thanks a lot for the ideas, Imanol