vergogneless
-
Posts
129 -
Joined
-
Last visited
Content Type
Profiles
Forums
Gallery
Everything posted by vergogneless
-
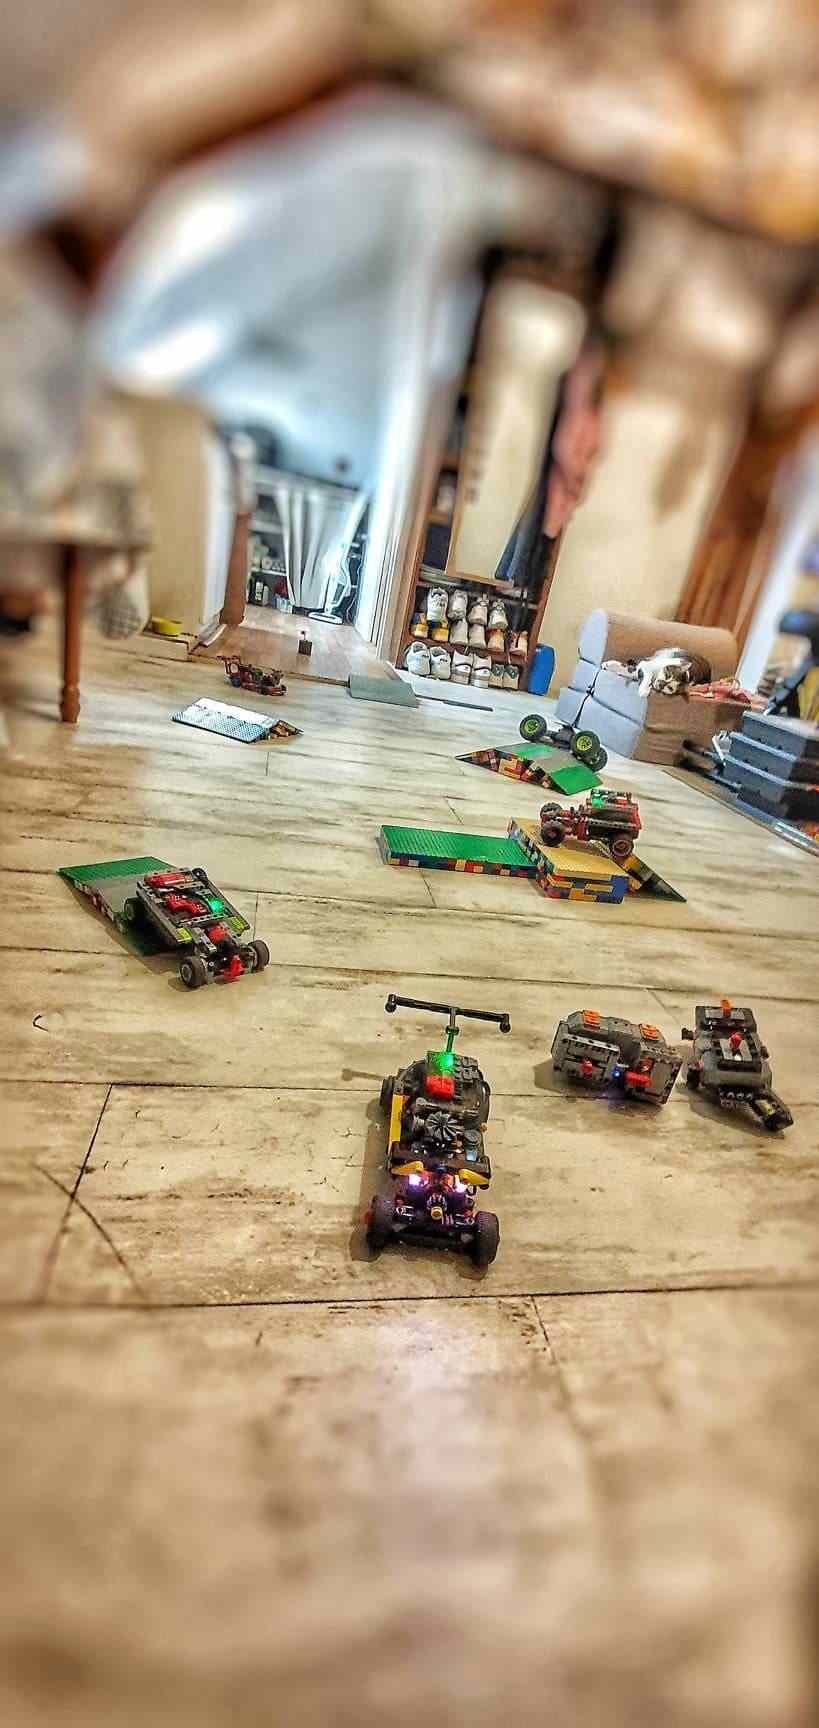
 Heyy everyone ! Allow me to introduce to you this tiny off-road-oriented hot rod. It is an evolution of my previous model: My primary focus was addressing the main issue of front ground clearance. On the trophy truck, it measured a mere 1 stud, resulting in rather evident problems when encountering slightly uneven surfaces. With this new model, I have managed to attain a ground clearance of at least 2 studs throughout, and even 3 studs at the center, thanks to the negative caster angle. It is also more compact. The suspension system offers improved travel as well + an amazing articulation. All of these refinements make it significantly more versatile and capable. Additionally, jumps will be more comfortable. Regarding its dimensions: Length: 15cm Width: 7cm without wheels (11cm with wheels) Height: approximately 8cm Weight: 398g (including the battery) Now, let us delve into the specifications: A2212 1000kv Brushless Motor Surpass Hobby KK 35A Gray Geek Servo 360 Dumbo RC X6FG + mini X6FG receiver (with an integrated gyro!) 2S 400mAh battery Carbon fiber rear axle Gear ratio: 1:1.66 Please take note that I am employing a brand-new ESC, slightly pricier at 20€ instead of 10€, but it comes with numerous advantages: Fully ready-to-run, no need for soldering connectors. Smoother operation (no jerking, etc.). And above all, a genuine brake! It is no longer just forward or reverse; there is now a brake positioned in between. We are steadily approaching a hobby-grade RC experience. And the final little plus: It is fully programmable using the 7€ programming card. I will test it later and provide feedback accordingly. And the ULTIMATE final little plus: It is perfectly fitted for the Lego system. As for the design, I believe it is subject to change; this is merely a preliminary version, as they say. I must admit, I am not particularly skilled in this realm, in general. There may be further adjustments based on real-world testing as well. I have designed an entirely new mount for the motor to better protect the gears. I can cover it entirely from the underside with a small piece of tape. The steering system has also undergone engineering revisions. It is the best I have ever created or seen in my current configuration. It involves cutting a steering rack to obtain a component typically only available through 3D printing. Flexible rubber 2x1 pieces (45590) are used to continuously push it toward the gear while allowing ample clearance to avoid putting strain on any part. The steering exhibits near-perfect precision, absolutely no play. The cap is literally locked. That should cover the presentation for the most part, I believe. A series of videos is, of course, planned, as usual! Please do not hesitate to reach out if you have any questions or require specific clarifications.
 -
@aFrInaTi0n Interesting! I hadn't imagined so many possible "collateral damages" :D It's always good to take note of such considerations. One must use it in moderation and think about maintenance to retain only the benefits. In my case, with such high speed requirements, it is indispensable. However, it is indeed important to remember that it should not be automatic or used without genuine necessity.
-
Thank you for your feedback It's true that smaller scales are completely overlooked. But that's because it's unfortunately impossible to produce these scales with Lego/Buwizz materials. Too heavy, too bulky, requiring numerous sacrifices, and ultimately offering power and precision that are more or less relative. And still, too few people are using brushless systems, but I believe it will gradually become more popular. That's what I hope, at least! I will do everything possible to make this solution accessible to as many people as possible. I'm planning a comprehensive tutorial, among other things, without any tinkering involved. If it took me so long to make the leap to brushless, it's simply because I didn't have the right information (or it was too scattered, too outdated, etc.), and I felt that it was beyond my reach. And I know that's the case for a number of people. The fear of having to tinker, the fear that it won't work, spending money for nothing, melting their Legos... Thank you for your message as well I believe you're referring to the dirt accumulating faster?
-
Heyyy, I wanted to share with you my latest video of this little monster. I switched to a 1:1.66 gear ratio from 1:3 before. Why didn't I do this earlier ? I drive it a lot, at least one battery charge per day (which amounts to over an hour of playtime), and I had no idea that simply changing the gears would give me a completely new car! It's like going from single to double! I don't have a way to measure the speed yet, but I'm thinking of investing in a GPS soon. But regardless, I can't believe what this tiny motor can accomplish. And I remind you that I'm still running on 2S... And I want to point out the condition of the tires, they're absolutely not made for speed! Regarding the title of the video, I don't think I've ever seen such a small/compact Lego model that is powerful, reliable, sturdy, etc. If there is one, I'd love to see it! It would be an extra boost for me! Because I still have a lot more ideas in mind, including a new project that improves upon everything you just saw, while being even more compact. PS: No damage to the Lego, not even the gears, thanks to silicone lubricant, a real hack
-
As expected: fun What is the next project?
-
It appears so fun, well played on the concept! I am eager to witness the video :D
-
I had the opportunity to seize the only sunny day in the past 10 days to embark on an extensive outdoor test. It was an absolute delight, and there is nothing more to add! I also had the chance to test the top speed, and it is quite satisfying for a 1:3 ratio. We're reaching around 25 km/h. A few weeks ago, I purchased a Wltoys 284161 for portability. Sadly, it will remain on the shelf for now! What I am trying to convey is that I have attained a level of satisfaction higher than with a real RC vehicle, something I never thought possible. I am eagerly looking forward to diving into other projects! I cannot hide the fact that I have already placed orders for five more... for the time being! Numerous special parts are also on their way, some equipped with ball bearings, others custom 3D-printed. Once I have a clearer understanding of my gear requirements, I will upgrade all my RC vehicles to full metal (ordering multiple shipments incurs excessive shipping costs). And the best part of it all is the joy of knowing that it is possible to achieve even greater feats. Always striving for improvement!
-
I've worked quite a bit on the bodywork and overall aesthetics. It's not easy on a small scale. But I think it's a little better now. Meanwhile, I'm waiting to have four identical tires and four matching rims!
-
Merci :)
-
Hi everyone! (Video at the bottom of the presentation!) Following my previous topic: I have embarked on a new project! Once again, I desired a smaller scale, something compact that I could carry with me wherever I go. My primary focus was to create an efficient suspension system that would allow for off-road driving despite the small size and wheels. Here's what I've come up with: As you can see, it is truly compact: -Length: 17cm -Width: 9cm without wheels (12cm with wheels) -Height: 10cm (at the highest point) -Weight: 420g (including the battery) I would classify it as a 1:24 scale, based on a comparison with real RC models in that scale. Now, let's delve into the specifications: -A2212 1000kv Brushless Motor -Bidirectional 30A ESC (which turned out to be more than sufficient, resulting in space and weight savings) -Gray Geek Servo 360 -Dumbo RC X6FG + X6FG receiver (with an integrated gyro!) -2S 400mAh battery I have focused on creating a robust design, with reinforced elements to handle rough conditions (as showcased in the first sequence of my video). The rear axle is in carbon fiber. At the moment, the wheels are not matching, but I have ordered a second pair similar to the ones at the rear of the vehicle (with yellow rims). The tires are quite soft, even more so than the ones currently at the front. This further enhances the suspension and adds to the enjoyable driving experience. As expected, it is highly responsive and agile, effortlessly gliding over surfaces. It truly is a pleasure to drive. And by the way, I have finally figured out how the gyro works. It required changing the direction directly on the receiver. Now, it is constantly active on all my RC vehicles, set at around 45%, and I must say, it has become indispensable. It compensates for a lot of things, especially since my transmission is direct, which tends to cause some drifting issues. Feel free to ask any questions you may have! Next project: Transitioning to a 1:28 scale for an entirely new endeavor!
-
Great, thanks for the short video! It already allows me to see and it seems pretty good, definitely much better than the Lego solution lol.
-
Hi aFrInaTi0n! You have probably not yet tested these products, and I apologize for coming back to you again on this subject lol. But I believe you are the only one on the internet who owns them, I have searched everywhere and cannot find any user feedback. I am about to place a large order with them but I still have a small doubt. I simply want to know if this solution completely eliminates the lack between the wheelhub and the driveflange? In other words, does it eliminate the wobble effect when the wheels are connected? Because I see that a Lego driveflange must be connected and that's what worries me! And by the way, the same question seems to apply to the flangebearing! Ultimately, I am afraid of being disappointed because of the high shipping costs, I am almost obliged to place a large order to make it profitable. And even if I am convinced that the frictions will be significantly reduced, I have this big doubt regarding the lack :(
-
What a hassle, my glue tube was clogged, so I had to make a cut with scissors, and it was a mess to apply ! The white substance you see is baking soda, I just need to scrape it off. I don't think there's any other way, you have to resort to gluing when you reach a certain power level. Otherwise, there are ways to attach real RC wheels, but it seems to be only for hex sizes of 12mm or 17mm, which is not suitable for my scale.
-
I have completed the work on this 4th version. I have done everything that was planned. In addition, I have added more steering angle. I was set at 50% on the remote, but I could go up to 80... Just for that, it's like night and day! Furthermore, I completely redid the servo motor support, which is now perfectly held in all directions! I also added a bar under the front axle to eliminate some of the remaining movement. By the way, I fixed the gyro, which works well when the car is stationary and I shake it. But I have the impression that it behaves somewhat erratically during driving, not fulfilling its role (I tried to adjust its sensitivity, but that doesn't seem to be the problem). So I wonder if there is a specific way to position it? I tested it briefly at home and I am very satisfied. I have almost nothing to say, I am impressed by the result, which is well above my expectations. Now that the tires are glued and I have my full steering range, it has much more precise and responsive reactions. I can take turns in a slide, I can drift, etc. Very pleasant to drive, very smooth, keeps its trajectory. With so little friction, it doesn't brake by itself during decelerations and naturally continues in free-wheeling. And the acceleration is so lightning-fast that you can't even hear the gears straining (by the way, they have remained intact since I started using them - Thanks to the silicone lubricant and the strong motor mount)! I can place it alongside conventional RC cars without any problem. And at this scale, it would beat a couple of them :D If the next outdoor driving test is entirely conclusive, I think I will have explored all possible modifications and improvements for stage 1. I will only have to wait for the arrival of the 3S battery to begin stage 2. The vehicle will have between 40% and 60% more power, and certain things will probably need to be adapted. The metal gears and carbon axle will become essential at that point! I will be making a video in the next few days!
-
Thank you! The modification was relatively straightforward in my case due to the overall design of the vehicle. I can even adjust the angle if needed. Let me show you some photos for more details. Regarding the progress of the V4, it will be completed today. I just need to glue the tires and design a wheelie bar. Also, I completely forgot, but in a few days, I'll receive my carbon axles. So, I'll install a single solid axle on the rear. Currently, I haven't had any issues with my two Lego axles connected together, but it's better to be safe than sorry. At the beginning of next month, I'll order a metal gear kit with 8T+12T+20T+24T+40T gears. To try out different gear ratios. And, most importantly, to prepare for the arrival of a small 3S 450mAh battery that will push the car to its limits!
-
The sun had come out, and I was able to take my driving test! I noticed many things that need to be improved for the V4. Firstly, with the positive caster angle, the handling is better. That's a good thing. However, on this rather rough terrain, I noticed that the vehicle tends to flip over. I believe this is due to the front suspension being too loose in its left-to-right movements (thanks to the rubber bands). -So, I will make it stiffer. I also noted that the tires are not held onto the rims at all and completely lose grip on the rim, which spins freely on strong accelerations. -So, I will glue them to the rims. During the rollovers, the servo motor sometimes scrapes the ground. -So, I will protect it. I wanted to try the gyroscope, but the receiver is not securely attached, making it unusable. -So, I will securely attach the gyro. I noticed a weakness in the front suspension at the point where it connects to the chassis. -So, I will address that. And finally, the vehicle wheelies very easily, which inevitably leads to an accident. -So, I will install a wheelie bar.
-
I do not entirely agree. Many successful projects would prove you wrong. It is possible to minimize frictions or movement with improved parts, which may not necessarily be more expensive than spare parts for a real RC. Moreover, they are reusable. Certainly, if we are talking about heavy or very heavy models without improved parts, it can become quite troublesome. However, users who design such models generally make efforts to overcome these issues, just as in any hobby where investing can lead to better outcomes. Finally, in the case of light models like mine, frictions and movement have little impact and can be resolved even more easily :)
-
The day is rainy and I cannot really test the new handling. Nevertheless, I have done a few laps around my place and I can feel an improvement. I am eager to push the test to the limit! I will also test with the gyro to be able to make the comparison! Furthermore, I am now introducing the V3 with a lot of modifications: -Positive caster angle -Some additions to the bodywork, notably a reinforcement of the rear wing which tended to come apart. -Sanding of the 2 ball heads underneath the chassis (which hold the elastics). What remains is more than enough to hold the elastics. For the 3rd central ball head underneath the chassis, I decided to move it, by cutting the axis to keep only the head, and gluing it higher with super glue. All of these modifications give me half a centimeter of ground clearance. I noticed that they had already scraped quite a bit. So, I gain in suspension travel and stability in case of road irregularities. -Light sanding of the servo motor connector heads to avoid any parasitic friction. That being said, I am not really fond of the front of the vehicle, aesthetically speaking, but I don't know what else to do or how to do it differently. Any suggestions?
-
I didn't think of that! Thanks for the idea, I just implemented it :D Test drive tomorrow...
-
Little uptade, for the V2. I have further solidified the motor mount. I also installed a body with my limited skills, but the main thing is that all the cables and components are now protected. As the vehicle has grown a bit, I decided to change the battery. I am switching from a 2S 25C 1050mah to a much lighter one, still 2S 25C but this time with 400mah. It's actually sufficient, providing about 25 minutes of autonomy and avoiding any excess weight. And the battery is finally easily replaceable!
-
Thanks :D
-
D'accord :) Nice concept ! On my part, I present to you my very first brushless project! With the A2212 :D
-
Hi all ! It's my turn to share my experience with Lego RCs powered by a brushless system! I've been building Lego RCs for about 8 months, desperately seeking power on a small scale. I only work with 1/20 to 1/24-26 scales. I obviously started with Lego motors. I tried everything, and after a few weeks, I came to the same conclusion as everyone else: it's awfully slow and imprecise. I even bought a Buwizz 3.0. And honestly, I thought it would be THE solution, the key to everything. What a disappointment, this thing is just WORST. It's a shame to sell such an expensive product and make so many promises... The reality? -The buwizz goes into safety mode as soon as you really want to have fun (and you have to plug it in to reset it!!!!) -The proportional steering (with an L motor) is laughable, it's not even at the level of the worst proportional steering on the worst classic RC! -The touch control is awful, no possible driving -There is an application to use a controller, it's true that it's better (thanks to its only developer, Buwizz should take note!), but it's still finicky, and still doesn't measure up to a classic RC. All of this has definitively pushed me towards conventional RC components. And that's where the ordeal began. Nobody, I mean absolutely nobody, was able to provide a list of all the necessary components for noobs. That's what I thought for many weeks. In reality, I think I was searching incorrectly. But it's also fair to say that the Youtube algorithm wasn't much help either. I spent dozens of hours on it before it finally showed me current videos about brushless systems for Lego. Mainly Russian. Because they are the pioneers in this field. Unfortunately, before being really enlightened, I spent too much money on classic RCs that I was trying to make compatible with Lego, a bit randomly. There was some good and some bad! I started with a WLToys 284131 1/28. I built this: Luckily, the motor is Lego-compatible, it easily fits into a 7x5 frame. To be completely honest: it's not bad! The whole thing is compact! It already works better than a buggy motor! The steering is precise and very enjoyable! But it's still brushed, it heats up like crazy, and I can feel that the tiny motor is struggling. And it's not really possible to make a bigger model. I've reached the limits! Plus, there's no suspension and it's a bit heavy for the motor. That being said, at the time, it seemed more than honorable to me and pushed me to continue in this direction. I looked for something bigger. So I bought a WLToys A959. But it was a mistake. The motor is absolutely not Lego-compatible, too complicated. Big disappointment and wanting to give up everything. Which I did for a little week. Thinking that there is no solution. Or that they are jealously guarded by a very small number of people. As if nobody wanted to disclose the secret. Then Youtube suddenly sided with me, I came across a first video by a Russian, then finally the algorithm unlocked, and it was almost a flow of examples, creators, functional systems, etc. Then little by little, I noticed that there was a consensus on the A2212 1000kv motor. Wait, is it really sold for less than €6? Bingo! And it all started from there. I gathered informm here and there to make a list of compatible components, and this time it was certain, other people use them and it works! To summarize, here is the list of what you need: -A2212 1000kv Motor = 6€ -Bidirectional 50A ESC = 13€ -Gray Geek Servo 360 or SG90 = 10€ -Dumbo RC X6FG + Classic or Mini X6FG receiver (with integrated gyro!) = 34€ -2S battery = 10€ But you will need to buy 2-3 other small things and equip yourself with some materials to prepare everything. I'll even give you a secret at the end of my story! I particularly bought: -A wire stripper -A soldering iron + tin -3.5mm banana plugs to solder to the ends of the ESC -A male Dean T connector (or other, depending on the female connector present on your battery) -Extra strong glue -Baking soda to make the glue stronger than concrete -M3-8 screws to attach a piece to the motor and thus make it compatible with Lego architecture *You will need to solder the banana plugs to connect all the components. That's about it. And so, here is my very first full brushless Lego RC prototype! Weight: 408g Length: 16.5cm Width: 13cm Height: 5.5cm Autonomy: between 1 hour and 1 hour 30 minutes, without power restriction, and without holding back! Efficient suspension system that takes up literally no space and doesn't weigh a single gram thanks to the elastics and the 45590 piece to connect the axles to the chassis. The car absorbs absolutely all the bumps and does not suffer from the rebound effect. No room for a differential, so the motor is connected directly with a 1:3 ratio (I am primarily looking for acceleration). It is mounted directly on the rear axle. The chassis is somewhat tiered, as the ESC is attached underneath and the battery is on top (with the receiver). The servo motor is directly attached to the front axle. It is a Geek servo, already compatible with Lego by default. I used quite a few special parts, including beams with alternating holes. A true game-changer. The weight is fairly well distributed, and the cross construction is solid. Everything is locked in X, Y, and Z. The gears never jump, not even once, even after jumps, rapid accelerations, etc! The secret is at the end... The vehicle is as enjoyable to drive as a conventional RC. Ultra-precise and fast steering. It has such acceleration that it flips over if I accelerate at full throttle. Pure pleasure, it goes anywhere, jumps everything, absorbs everything, without flinching, without holding back on the throttle, ever, like a conventional RC... I didn't activate the gyro because it wasn't really necessary, and I like the somewhat technical driving! Although I consider this achievement a success, I still note some flaws: -The gears are exposed -The components are exposed -No protection at the front, if it hits, the steering can jump a few notches -A little more friction and movement due to the plastic What I'm going to do/improve on future versions: -Switch to 3S -Activate the gyro, otherwise, it will be too complicated to drive -Switch to a 1:2 ratio for more top speed -Add a wheelie bar -Better cable management -Protect the gears as best as possible -Make a simile body to protect the components as best as possible -Add LEDs -Introduce metal parts (especially gears and wheel hubs) And what is the secret that I promised you? It may seem trivial, but it is actually the essential and indispensable element. It will solve most common problems related to the fragility of plastic and overheating due to friction. This secret is... silicone lubricant! Simply use it liberally, spray the gears and moving parts before each use, and you will never again burn your parts, and you will reduce friction almost to nothing! Personally, I use WD40 in an aerosol can. If you have any questions or would like to react, I would be honored to hear from you!

-
Hi ! So you could test? I am interested in this solution
-
[APP] BrickController2
vergogneless replied to imurvai's topic in LEGO Technic, Mindstorms, Model Team and Scale Modeling
Sorry guys but BW3 sucks whenever you want to "play" with it. Personally I am extremely disappointed with the BW3, and fortunately BC2 exists for control with a physical controller, otherwise I would have sold it on the first day.