
Ferro-Friki
-
Posts
81 -
Joined
-
Last visited
Content Type
Profiles
Forums
Gallery
Everything posted by Ferro-Friki
-
Hoarding is concerningly widespread in the AFOL community, even encouraged. And I think the hobby suffers for it. When Lego sets/MOCs are fighting each other in order not to get suffocated on a packed shelve, to a point that they all blend together into an incomprehensible mass of multi-colored plastic, you know you’re too far gone. Lego cities are a great way to display sets and MOCs, however they’re very easy to mess up. Often, AFOLs miss the forest for the trees and cram as many sets together as possible not considering any general composition rules, harmony or breathing space. Needless to say, there’s a lot of personal opinion here.
-
If anyone still cares about the whole engine debacle, I would like to add my two cents if you don’t mind. For those of you arguing that those who are unsatisfied with TLG’s OE engine should either modify it or build a MOC altogether: This is a 300€ set we’re talking about, and I don’t now about you, but that’s a hefty price tag in my opinion. Buying a 300€ set and then having to modify it to achieve the intended result is beyond my comprehension. Besides, if we’re going to have to buy separate bricks, we’re better off building a MOC, which brings me to the next point: I think the argument that those of us unsatisfied with the engine should build our own version entirely from scratch is very much right. Here’s the thing though, I don’t want to. Building a MOC, in my experience, is a very extensive process which involves research, measurements, sketches and a lot of trial and error. Of course, someone more experienced than me might be able to create MOCs with a lot more ease, however, you can’t deny that building a MOC is very different from purchasing a set from LEGO. Sometimes I just want to get excited about an upcoming set, buy it, and build it in a cozy winter afternoon during the holidays. All the bricks come in the same box along with a neat instruction booklet guiding me comfortably through an entirely new and full of surprises building experience. Basically, what I’m saying is that us MOCers would like to have the same privilege to enjoy LEGO sets. Maybe I’ve become too much of a “train expert” and I’ve reached a point of no return, in such a way that no train set will ever be able to scratch my itch. After seeing all the steam engines LEGO had to offer since 2009 I’m inclined to believe that is very much the case. However, you can’t blame me for thinking otherwise… Just this year we got the 10318 Concorde set, and in 2021 the 10294 Titanic. A couple of mind-blowing accurate models of two renowned luxury vehicles, packed to the brim with intricate details. Forgive me for being too naïve, but I expected just as much from The Orient Express. I guess you could argue that the Concord and Titanic sets were never intended to fly or sail respectively, whereas the Orient Express is (most likely) meant to run on track. Cue in the ever-popular argument that TLG’s train track is too restrictive, and only the existing train wheels in a very precise configuration are able to pass LEGO’s strict quality control. Which, okay, I don’t have the energy to argue against this statement. Let’s take that 4-6-0 Hogwarts Express/Lone Ranger configuration that everyone is talking about and use it as our OE base. We could have still received a more realistic steam engine smokebox, boiler, firebox and cab combination on top, that both “train experts” and LEGO fans who aren’t so keen on trains alike could have enjoyed. Again, if you yourself like this set and are excited to get it, I’m genuinely happy for you. I’m just sad I’m not one of you. Sincerely, A tired LEGO train fan who never learns.
-
I was wondering if they would reference the Agatha Christie novel. I was not expecting them to switch things up and have the engine be the victim instead! I guess you could call this set Murder OF the Orient Express…
-
Yet another stunning engine! The green and red color combination makes such lively locomotives. All the details in such a small space make it even livelier! The flatbed wagon is great as well.
-

[MOC] 0-10-0T Coal shunting steam engine "La Gorda"
Ferro-Friki replied to Ferro-Friki's topic in LEGO Train Tech
Thank you!! And again, thanks for the tip! I have good news everyone! I’ve finally been able to build this engine out of bricks, and as my first digital to brick built MOC I couldn’t be happier about it. Although in order to run properly I had to swap one of the flanged axles to the rearmost position, other than that I was pleasantly surprised by how well it runs. The engine can navigate R40 curves and switches without any issue, which in addition to its great traction power would be a great thing when it comes to pulling or pushing a consist if it wasn’t for the fact that this locomotive does not have working couplers! I prioritized building an accurate hook instead of using a working magnet, and given the fact that I don’t have any rolling stock that matches, I’m not too bothered. Besides, I’m sure fitting an old 9V train magnet underneath the chassis wouldn’t be too hard. However, in order to do that, I would need to get one first… It’s not 100% accurate, but as it is right now, I think it captures the real thing rather well. There are two things that stick out the most. First, the nameplates. They should say “Pozo Norte” but I haven’t printed stickers yet. Unfortunately printing them will have to wait until I need more stickers in order to make the most out of it. The other noticeable difference is the color of the side rods, just like the wheels, I got them from Breckland Bricks, and they don’t produce rods in black. Originally, I intended to paint them, although the more I look at them the more they grow on me. When in motion, the side rods in grey are much more noticeable and give a greater impression of movement, one of the most characteristic traits of steam engines in my opinion. -
That’s a great looking tram! It has so much character, all captured masterfully. And Sintra looks gorgeous, I have to visit it sometime! Is there a video in which we can see the pantograph rod inversion in action? I love motorized features like that.
-
[MOC] 0-10-0T Coal shunting steam engine "La Gorda"
Ferro-Friki replied to Ferro-Friki's topic in LEGO Train Tech
Thanks! :) I always thought the current 1668 mm gauge was the same since the beginning of our railways, but after looking it up you were totally right! There were slightly different gauges in the Iberian Peninsula before being standardized. After a bit of research, it appears that the engines used by the SMMP were built to run on 1674 mm gauge, and since their tracks were connected to the MZA railway, my guess is they shared the same gauge. Well it turns out my model was accurate all along! :) -
[MOC] 0-10-0T Coal shunting steam engine "La Gorda"
Ferro-Friki replied to Ferro-Friki's topic in LEGO Train Tech
I’m really fond of this engine, so I had to eventually. Unfortunately, it will probably be a while until I design another steam locomotive. It’s time to dust off my Avlo s-112! That’s right, it run on Iberian gauge, 1668mm to be precise. If we take Lego’s train track as the international standard gauge, then Iberian gauge would be almost exactly one stud wider, so I guess that makes my model not accurate. -
Then you'll probably know that we're all about gauge changing here in Spain! Although, as far as I know, there isn't any interoperability with our narrow gauge.
-
Gorgeous engine! All those details are stunning. It's also very interesting seeing how other places achieved interoperability between gauges. Great truck too!
-
I could spend hours looking at your models! And here I was thinking that your original engine was already perfect, it's great to see a new and improved (and running!) version.
-
[MOC] 0-10-0T Coal shunting steam engine "La Gorda"
Ferro-Friki replied to Ferro-Friki's topic in LEGO Train Tech
Thank you all! :) I tried to fit in as many as I could! Unfortunately, some of it had to be left out, like brake shoes for every wheel. It was quite a challenge… Building the boiler over the motor and ensuring the cables reached the hub took way longer than expected. I had to do her justice or I wouldn't rest easy! Soon I'll be able to build a prototype to make sure that everything stays strongly toghether. -
After some time in the making I can finally share a little something I’ve been working on. This right here is one of the engines built by the Société de Saint-Léonard, and employed by the SMMP (Sociedad Minera y Metalúrgica de Peñarroya) in the mining complex of Puertollano, Spain. It hauled coal and other goods between the different facilities until the mid-70s. By the time the mineshafts closed, they had no use for these engines and most of them were scrapped. Luckily a couple of them survived, one of them being this very same engine. Although officially named “Pozo Norte” after one of the main mineshafts in Puertollano, to this day everyone referres to her as “La Gorda” (The Fat One) no doubt in part because of her imposing girth. Nowadays you can find her sitting (in a rather disheveled state…) on a few meters of track in the gardens of the Mining Museum of the same town it used to work at. I’ve been to this museum many times, and seeing this locomotive was always the highlight of my visit. It was only a matter of time until I finally built it out of Lego. Building this engine was a refreshing change of pace from the high-speed modern trains I’m more used to. Trying to replicate as many shapes and details as possible was a fun challenge. Also, shoutout to @Redrado for suggesting the use of the 4625 hinge 1x4 tile to represent the riveting on the side of the water tanks, it looks great and the engine wouldn’t feel complete without it. The models for the wheels (ML), connecting rods and side rods are from Breckland Bricks. The model is designed to be motorized with a Powered Up L motor, the power is transmitted to the middle axel and through the connecting rods to the rest of the wheels. I’ve used this type of transmission before and I trust it will be strong and durable, however, I’m not so sure about the placement of the battery box, I’m concerned it’s hanging off too much and will cause balancing issues. Hopefully the weight at the front will shift the center of gravity forwards, but that’s something I won’t know for sure until I start messing with real bricks. Here’s a bonus picture of what these engines used to look like in their heyday.
-
Glad to see everything is going smoothly! The battery box should fit in nicely. Also, just that small change to the front already makes it feel much more accurate.
-
Those are extremely good news! I’m very happy for you, after all your dedication to Lego trains it’s nice seeing it rewarded. I’m glad I could help. I won’t deny that I’m equally jealous, hopefully Talgo will still be hungry for more Lego trains after your S-130. For now, let’s just say that you’ve inspired me to go out there and expose my own trains to a wider audience ;) The new shaping of the front is a great improvement; however, I can’t shake the feeling that it’s a bit too long. Maybe that’s just how I see it. The difference in height between the bogies is caused by the different attachments you’ve built for each one. The 9V motor sits 2 plates lower, whereas the bogie to the right sits 2.5 plates lower. As you can see, if you use the same connection for both bogies there is no height difference. Placing the even-numbered-wide bogies in 7-wide trains can be tricky. The one on the left is the method I used for my own S-130 y did way back, it's unnecessarily bulky. Now for my Avlo 112 I’m using the build on the right, which is simpler, although I'm sure it can be made even simpler and stronger.
-
It may be small, but it packs a punch! All those details at such a small scale are stunning. How did you manage to make those curved handrails?
-
I’m very excited to see how things have developed. This looks exactly like what I need for my Avlo, it works on R40 curves AND it even has that fabled close-coupling I’ve been looking for! IRL Talgo coaches are remarkably short, no doubt in part because of the rodal mechanism, so the fact that you managed to make it work with a more conventional length of coaches is very impressive. I’ll be testing your design for my own train as soon as I can, thank you for your help! I’m sure the rest of the Talgo-loving community that has recently sprouted appreciates it just as much.
-
I hadn’t thought of it that way, I guess you’re right, although I was referring to the shortest distance between the coaches, which (at least in my train) is 3 studs above the rodal. The series 102/112 is the exception in the Talgo family, since it’s the only one of its kind that can’t change gauge. I find the disc-brake indicators amusing since they look exactly like the indicators on public toilets that show if they’re occupied or not. I tried to represent them in my own 130 Alvia, although they didn’t make the jump to the 112 Avlo because they could cause trouble when applying the decals for the brushstrokes.
-
That’s indeed the issue with the rodales of my Avlo. Due to their length, a 3-stud gap between coaches isn’t enough to allow it to navigate R40 curves. If I want to keep the same rodal design I need to make the gap even wider. The thing is a 3-stud gap (as common as it is for Lego trains) is already too wide for what I’m trying to represent. Talgo coaches have a remarkably short distance between them, to stay accurate to the source material it should be at most a 1 stud gap! Although a 1 stud gap isn’t impossible to achieve. @Nikonissen managed to make it (to great looking effect) with the use of rubber bands, although as he pointed out in his Talgo 350 thread, it isn’t infallible. I know there are working close-coupling designs for conventional coaches, however, I don’t think anyone has ever combined them with any Talgo rodal. I might look into it. For now, I’ve decided that instead of the rodales, the R40 curves have to go. They are too limiting and no well-proportioned train looks good on them. Besides, I’m pretty sure my Avlo would have no problems traversing R56 and higher curves. I’ll need to get at least a full circle eventually since I don’t have any. Well that’s unfortunate :/ I had the hope a small turning radius might work, although in hindsight I guess it wouldn’t be enough for tight curves anyway. For the end car rodal, If I were you I would try to align the connection point on the same vertical axis as the wheel holder, otherwise, in my experience it would cause the entire coach to slightly shift to the side when turning, causing unnecessary effort when pulling. It likely isn’t necessary, and trying to implement this might create more problems than it fixes, it’s just something that I would watch out for. That sound great! :) Although my Avlo would probably not arrive on time (Classic Renfe…) It’s looking great! I see you’ve placed the rodal closer to one of the coaches, just like the real thing, that would be the coach the rodal “belongs” to. If I had to guess I’d say that misalignment is caused by the gauge changing technology forcing the rodal turning mechanism to the side. In comparison, the series 112 rodales (which can’t change gauge) are perfectly centered between each coach. If you get the chance to see one of these 130/730 units from up close you should see a small circle above wheel with a fan-shaped peephole. That’s the disc brake indicator, if it shows red, the brakes are applied, if it’s green then they’re loose. That’s one of the many particularities of the Talgo coaches (a couple of little fun-facts). Also, make sure that the technic axle connector (32039) has some room to turn, otherwise it could collide with the adjacent bricks. From the render it looks like it wouldn’t have this issue, but keep it in mind.
-
That’s a really useful website, I’ll make sure to check it out from now on! I’m not sure what you mean, here’s a couple of renders of the rodal I’m currently using for my Avlo, it works exactly like the 130. Hope it helps!
-
Cool 130, I like it! I have some issues with the shaping of the front, but overall, it’s pretty good. Nice details between the head and the coaches. It’s very hard to find reference pictures. The use of the 1x4 panels on their sides is a pretty accurate touch. The interior is amazing, you did well in ditching minifigure scale. It allows you to capture so many more details. All my trains have no interior, so I didn’t face this issue, and I admit that the rodal design I used for my 130 is a bit bulky and very likely overengineered. I haven’t tested it without the upper connection, my guess is that it should work but it might be a bit wobbly. I also recommend that you space out the coaches by at least 3 studs in order to have enough room to navigate curves. Recently I found out that my rodales aren’t as versatile as I thought! I’ve been meaning to use them in my Avlo 112 as well, but the coaches turned out to be too long and the rodales can’t keep up on R40 curves. But the series 130 has shorter coaches, so they might still work on all track elements. The lone rodal at the end coaches (the one that isn’t shared) could be a bit troublesome as well. I’m still figuring out how to make my own. You might get away with making it swivel freely, specially if you make part of the lower body go with it, like you pointed out some locomotives or power cars do. This whole rodal thing has a lot of testing to do before it can see the light of day. I’ll try to share any advancement I make, specially the end lone rodales. If you can, try testing the design as soon as you can, like I said, I’m pretty sure the upper link isn’t 100% necessary. Good luck with this wonderful train!
-
Some questions about LEGO's online Pick a Brick store
Ferro-Friki replied to Ferro-Friki's topic in General LEGO Discussion
Thanks for the tips everyone! That spreadsheet has stuff I didn’t even know I needed! Those RGB numbers will be very useful for making custom decals that match the color of the bricks. Just as I suspected... The render color on the website is no help either. My current inventory is made up of scrapped sets, so there is plenty of variety but no quantity. My bricks will only be useful to build the internal unseen structure (rainbow style). Unfortunately, I need very specific bricks in great quantity and rare colors so I’ll have to get most of my pieces from Lego’s PAB and Bricklink. Those other sources for bricks might be useful in the future, I’ll keep them in mind. -
[MOC] Renfe Class 447 Commuter Train Cercanias Livery
Ferro-Friki replied to javi31415's topic in LEGO Train Tech
Welcome! I always love seeing familiar trains over here. That’s a great 447 for someone so new! I like the use of the triangle pieces for the stripes, the ones on the sides of the windscreen look particularly good. The buffers with the rounded edge that extends to the side are a great detail as well. You should build in the width you feel the most comfortable with. If you think you can fit all the details you want to add in a particular width without constraints, then go for it! If it starts to feel cramped, consider upscaling. -
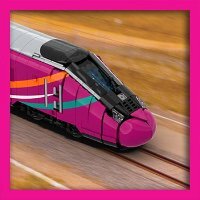
[MOC] Lego Renfe AVE Talgo 102/112 high speed train
Ferro-Friki replied to Redrado's topic in LEGO Train Tech
The Spaniard conquista is going full steam ahead! >:) I have my eyes set on some places, and I’d love to be part of an exhibition someday. But right now, I don’t even have anything physical to show. Although that should change relatively soon, I really want to build my Avlo, another S-112 to add to the family ;) But it’ll take some time. -
[MOC] Lego Renfe AVE Talgo 102/112 high speed train
Ferro-Friki replied to Redrado's topic in LEGO Train Tech
It's even better irl! I love the section built diagonally. Now that I get a closer look, what’s going on exactly with that 1x2 tile with rounded edges? I can’t tell how it is connected with the rest of the body. Too bad the hinges aren’t in the correct color, dark bluish grey will look even better. It was great seeing this project evolve, I loved keeping up with every update. We need even more Spanish trains in this forum!