
johncarpenter
-
Posts
55 -
Joined
-
Last visited
Content Type
Profiles
Forums
Gallery
Everything posted by johncarpenter
-
 Nice pictures of the Isetta! Pictures of the whole thing you can find everywhere, these are much more interesting As you probably guessed, this is on my list of projects to build. I haven't had time lately, but perhaps it is time start again
 -
Thanks, it starts to get the cogs turning. I enjoy building a lot, but trying to build with limited set of parts often has the "writers block" effect on me. I think the Ford has a great set of parts though, I'll see what I can come up with.
-
Thanks to Stign's kind help, I was able to finish the instructions. If you would like to build this, the instructions are now available for free on Rebrickable.
-
Great, great B model, congrats! Can you share any details on your process? I would be really curious to know how you approach building a B model from the limited set of parts.
-
Hello everyone, After a long, long while, I have gotten around to doing instructions of this model which I'm planning to share on rebrickable. However, as this is the first building instruction I have ever done, it would be helpful if anyone was willing to look it over before I put it out there. If anyone is interested, please get in touch via direct message. Many thanks!
-
Very nice! I really like the "re-imagining" approach, rather than just "rebuilding studless", while still staying instantly recognizable.
-
[MOC] REXX Truck 1:15
johncarpenter replied to KirTech LAB's topic in LEGO Technic, Mindstorms, Model Team and Scale Modeling
Wow, it's really fast for such a huge model! Also looks great and works well, congrats! It would be interesting to learn more about your process: how much time did it take? What were the most challenging parts? -
Yeah, it looks like a pretty similar scale, so those panels are pretty obvious solutions. What is interesting is that this one does have power functions, even using the big battery box. It looks like it is a bit taller than mine, so a bit more space available. Even so, this gives me some hope that I could fit some motors in there.
-
Thanks for the feedback. I'll report back once I figure out which direction to go. Yeah, the front needs some work as well, I'll see if I can find that part.
-
Hello everyone! This is a work-in-progress, or maybe work-on-hold project. I wanted to do a simple, all manual Smart Fortwo, kind of matching the scale of the 42098 auto transporter. I started off with the bodywork, and initally, it went quite well. After some iteration, I was really happy with where it was going. The back end is done, the front needs a little work, but I think the bodywork so far really captures the look of the Smart with the general shape and the minimal overhangs. Next, I switched to the powertrain. My original plan was to have the 3 cylinder engine and a gearbox that would fit (maybe a 2 speed). While looking for compact gearbox designs, I stumbled across this CVT design on youtube: https://www.youtube.com/watch?v=XmefDOFzLuY&t=3s This looked very compact, and a CVT would be cooler than a 2 speed, so I went on with that. My first draft of the powertrain was messy and fragile: I redesigned this to a cleaner, still compact solution... ... and started to transplant the existing body to this new chassis. At this point, I noticed that the CVT in this configuration did not really work. Most of the time, the motion is not transmitted enough to drive the 3 cylinder engine, so this solution doesn't really work. The build is now on hold as I try to figure out how to move forward from here. I don't see any obvious way to make the CVT work better, so the options I'm thinking about are: remove the CVT, no gears at all (very doable, but lacks ambition) remove the CVT, make a 2 speed gearbox (difficult and 2 speed is "too litte") put a Buwizz and some motors in it (not sure if everything will fit) Looking forward to hearing feedback and suggestions...
-
Wow, these are really nice and original. My favorite is the drill press, great looks and also functions!
-
Thanks everyone for the great feedback! As I wrote at the beginning, I kind of started this project because I was stuck on other, larger builds. I just wanted to build something manageable and call a project done. Somehow, it turned out way nicer than I could have hoped for when starting out. Does anyone else do the same? Take a break from larger / longer builds to build something small?
-
Wow, thanks for the compliments, I was not expecting this :) For the door latch, I was trying to use one of the smallest rubber bands to move the catch back, but I had a hard time attaching it anywhere on the door. When I was playing around with that, I noticed that the catch already moved back partly due to its own weight. Initially it was not quite moving back to vertical, so I added two more think red liftarms on the other side, to help it move back a bit more. This worked well, and it stays vertical now. The rubber band was not necessary after all. Sometimes, things just come together. My favorite part is the handbrake, just for the fact that I could incorporate it, in this scale, in this tiny car. I did this at the very end, after I thought I was finished. There was not much space left in the car, but the possibility of having a handbrake was just too cool, and kept nagging me. I decided that I had to at least try to add it. I had to take pretty much the whole thing apart twice, but I was able to add the simple mechanism under the seat and it works reliably. The car came out pretty nice, and adding the handbrake at the very end was the cherry on top for me.
-
Thanks everyone for the feedback! The front suspension was a bit of a coincidence, to be honest. Initially, I was not planning to have front suspension. However, I could not find a good way of attaching the front wheels with enough ground clearance. That's why I finally went to those small suspension arms. After that, having the rubber connectors as springs seemed pretty obvious. They are pretty stiff, with not a lot of travel, but still pretty cool. I'm happy that it evolved to such a nice solution. I have to give credit where it is due: my better half had the idea to use the thin string to pull the car. I must say, it makes all the difference for the video.
-
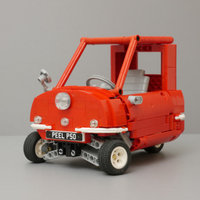
Having several larger builds stuck in various stages of building kind of pushed me towards smaller projects. This is one of those, the Peel P50. The Peel P50 is a three-wheeled microcar originally made from 1962 to 1965. It was listed in the 2010 Guinness World Records as the smallest production car ever made. The model has the following functions: Front and rear suspension Opening door with locking latch Steering Single cylinder engine, driven by rear wheel Handbrake Here are some more pictures: Finally, here is a video of the car in action: I'm really happy with how this project turned out. At the beginning, I was quite doubtful whether I would be able to replicate the curved shapes reasonably well. The end result came out much much better than I expected. This build now has me thinking about more microcars. Technical details: Length: 20 studs Width: 15 studs Height: 16 studs Weight: 333 grams
-
Looking good so far. Can you show the detail of the door mechanism?
-
Thanks! Yes, driving around with two trailers was fun :) It required an enormous amount of space, though, especially for driving completely out of the frame on some shots. I had a couple of stressful moments where the whole ensemble almost fell completely off the surface. Luckily though, no bricks were harmed in the making of this video :)
-
Thank you both for the feedback. Yeah, I forgot about that when I was making the video. If I build something else related to luggage handling, I'll definitely keep that in mind :)
-
After a long long pause, I was finally able to finish this project. Since the last update, I built two luggage carts for this guy to pull. I was not so sure about making luggage pieces. I tried out some of the existing Lego ones, but none of it really seemed to suit this project. Then, with a nudge from my significant other, I started to make a couple of suitcases. She then joined me, and we made many, many suitcases. At this point, I wanted to take some pictures, make a video and call this one done. However... I saw the new Lego Technic Jeep Wrangler, and a new part: the 3x7 panel, in yellow. This triggered an idea I had had at the beginning of the project: The Linde P250 has a short wheelbase or long wheelbase option. At the beginning of the project, I had chosen to go with the long wheelbase option, as it would mean more space for internals. Another reason for that choice was that the 3x11 panel fit very well as the bodywork on the side. Now, with the 3x7 panel, doing a good looking short wheelbase version would also be possible. Knowing how tightly packed the long wheelbase version was, I knew that I could not fit all the same features into a shorter package. The obvious thing to drop was the button driving feature, which would save a lot of space and complexity. Also, I decided to do the lower half of the body in black instead of dark bluish grey, due to better part availability. Here are some final pictures: Finally, here is a video of them in action, hope you like it :) I'm really happy with how this project came out. The tow tractors look good, work well, and the bigger one has the extra button driving feature, which is quite original. To be honest though, the most fun part of this was building the suitcases. There was something addictive about making one suitcase after another, adding this or that detail to each new one. It was so much fun, I'm thinking about what other projects I could do, that would utilize such a small repetitive element. Perhaps some other airport equipment might be in my future. Thanks for reading, hope you enjoyed it!
-
Very nice build. The amount of functions you were able to fit in is really good for this scale, and it looks fantastic as well. Can you share any details on how the build process went? Did you start with the functions, or the looks, or a mix?
-
Thanks to everyone! This was my first contest and it was super fun, both my own build as well as checking out all the other builds. I cannot wait for the next contest :)
-
This is a nice set of questions, so here goes: 1. Yes, but it takes a while to get in the zone. Also, I feel like I make a huge amount of progress if I can work in a big block of time vs spending the same amount of time in smaller chunks. 2. Depends mostly on the available time, probably 10 hours a week spread over few evenings and weekends. 3. Yes. This is both good and bad for me. I tend to do two things: First, if I get stuck on a certain aspect of a moc and cannot progress further without a new idea or solution or ordered parts, I usually switch to another one where I can make progress. I do this because I hate being blocked, and this way I always have some project that I can work on. Secondly, I like to try out tricky parts of future builds early, so that I can figure some things out before committing to build a complex project as a whole. However, both these things mean that I have too many mocs in parallel in various stages of building, which makes it hard to focus sometimes. I'm trying to reduce the amount of WIP mocs at the moment, and also not start any big builds until others are done. 4. Not so far. I have some mocs that are "paused", but I will definitely restart and finish them eventually. 5. Leonardo has a point :) I would say that my focus shifts during a build. In the beginning, I'm really focused on making the model very nice, coming up with a nice design etc... Gradually, over time, I lose interest / patience and start to work more pragmatically towards the end to just finish the damn thing and move on. Sometimes, the details at the end suffer due to this. 6. I'm not a fast builder, so I don't set time limits for myself. Some of the more complicated projects would simply not be possible, or would not come out the way I want if I were to set time limits. In the end, it doesn't matter for me how long they take, because I just enjoy the process. 7. MOC's for now. I have only tried my hand at a C model using the Corvette, and it was much more difficult than I expected. I might try again in the future using a set which is a bit larger and has more generic parts. I'm thinking the 42108 crane might be good for this. 8. For me this depends on how much I like them and how many parts they tie up. If I like them I'll keep them around longer, and if they tie up many parts, I'll have to disassemble them sooner. Also depends on if I want to do a complementary build that goes with it. 9. Very well. I consider myself very lucky on this point, and I do get that it is not something that could be taken for granted. Recently, I got her to assist on a fun part of a project (coming soon) and she told me after that "I get now why you keep buying new parts". 10. Depends mostly on the video, I have had up to 2 GB per project up to now. 11. I keep all the WIP pictures, as I like the progress and story of the build as much as the finished model. I haven't really done video of WIP models, as I don't know how they could be integrated into a finished video or if anybody else would like to see it.
-
Nice build, in a slightly bigger scale. I would likely use this scale for my next skid steer build, enough space for batteries and motors without being giant. Your layout is definitely better for the center of gravity, having the BB under the seat is good. It's interesting that we came to almost exactly the same solution for the bucket mechanism. I also had the issues with clearance of the bucket drive and the linear actuator. Initially, the linear actuator was attached one stud higher on the chassis. This both looks better in the lower position because it ends up horizontal and allows more lift height at the top. However, with this geometry, the linear actuator tended to run into the gears at the top of the range, so I had to lower the linear actuator attachment down by 1 stud. I think I built the arm / bucket mechanism there about 7 or 8 times before I got to this geometry and got everything working reliably without gears skipping etc...
-
@pdw, any pictures of your 216B? I would be interested to see how you tackled it. Thanks for the hint on driving the M motors. @jorgeopesi I'm quite sure the batman front tires will foul both the rear wheelarch and the linear actuators at the front. The initial tires barely cleared both. However, those tires do look quite nice. I'm thinking about doing another skid steer in a slightly larger scale, and this seems like the perfect tire for it.
-
Thanks everyone for your comments, I appreciate the feedback! At the time I built this, those tires were not yet available. But hey, I've not yet disassembled it, and I have 4 of those tires now, so why not try them out: And here is one with some of the internals exposed. To be honest, I really like these wheels on the skid steer, thank you for the suggestion. Even though they are a tad small, they look really fitting. The smaller diameter might make the job of the M motors easier as well. This has got me thinking about making a new video now, with these wheels :)