

DataNinja
-
Posts
21 -
Joined
-
Last visited
Content Type
Profiles
Forums
Gallery
Everything posted by DataNinja
-
Consider sometimes Lego has to work with the car company as part of licensing a vehicle and doesn't get 100% of the decision...
-
MOC Lotus Emira 1:8
DataNinja replied to Combustible ice's topic in LEGO Technic, Mindstorms, Model Team and Scale Modeling
Insane! Extremely well done body lines. Thanks for your efforts here! -
So excited the experts are rolling in upgrades for this set -- many thanks in advance! @jb70 you thinking about any structural changes to the nose to make it more P1-ish, or leaving that? I'm completely guessing, but suspect the current nose in this model closer to an upcoming McLaren that was delayed so they reverted the branding to P1... we'll see.
-
Cannot tell you how excited I am for V1, thanks @jb70 for all your hard work on the instructions and mods, kudos to @Didumos69 and @stevenhalim for their contributions as well! Rebrickable to the rescue, parts on order but not letting that slow down my partial build already in progress with mismatched colors and substitutions. I guess when parts arrive I'll just have unbuild and start all over! I know you take pride in offering high quality instructions for your Pimp Up series at no cost, have you considered a paypal donations page? I would gladly contribute
-
jb70 and team, thanks for continued work on this! Spent all weekend taking apart my Sian to start over with these. Disassembled my pimped up Land Rover chassis for some donor parts as well... Quick question, step 19 on page 22 requires a special part I did not have, you see any problems with this as an alternate?
-
JB70, any chance you have a good list of additional parts used here that are not in Box 1&2? Or should I just be patient for this to appear in Rebrickable to use Compare Sets feature?
-
Hmmm, anyone notice there's a lot of room in the engine compartment just behind the suspension group when the fuel tank is removed? I'm thinking that's an ideal possibility for 4 wheel steering. This link indicates the real-world Sian has this feature, so would be accurate to the vehicle. Rear wheels would turn much less than the front wheels (smaller rotation angle), so would need to be geared down significantly. Maybe not even need a steering rack at all. Could be tight, but I plan to connect up to the front steering group on the passenger side of the vehicle, above the transmission gears and probably weave through the headers. Too much going on in the cockpit with the paddle shifters on the drivers side. Just ideas at this point, but working on it...
-
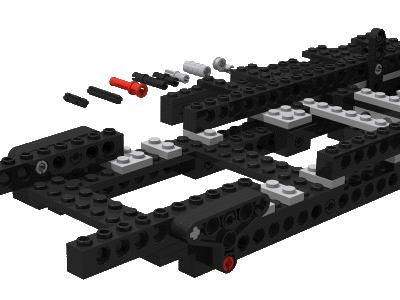
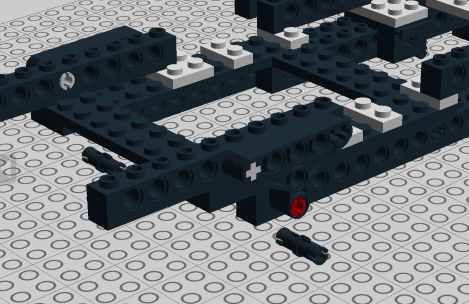
Trivial Mod, but maybe be helpful to someone. I present to you...Removable cylinder head cover! Your lovely V12 is no longer hidden. 1. Simply remove 3L liftarm and 2L black pins holding down the cylinder head cover in the cockpit. Also remove the 1x2 brick with pinhole at the front of the cover, replace the 1x2 graphite printed tile back onto the cylinder head cover even with the rest. 2. Replace 2 black pins at rear of chassis stiffener beams with 2 blue axle pins Done! Studs hold the cover in place, pull the stiffener beams out of the way and tug off the cylinder head cover to see the beauty of the V12 underneath.
-
I agree with vectormatic, def worth looking at jb70's pimp my defender MOC. Makes the complicated gearbox even more interesting!
-
Nice tranny rebuild! Looks like you resolved problem I was having with a gear clicking, looked to me like it was the big gear on the red diff rubbing into the red bush right next to it. Was never a fan of the universal joints throughout the drivetrain, so very excited about trying yours out. When I get pieces in I'm going to try to combine my liftoff body mod with your PDF. Thanks for your efforts!
-
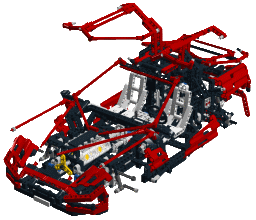
My 2nd favorite(*) community-developed feature on 42056 Porsche 911 GT3 RS was the lift-off body mod (Credit to @Jetro but later modified by @Didumos69 and @jb70). Made the innards much more fun to see! So in their honor I had to make an attempt here. I present an early version of a lift-off body mod for the Defender: https://bricksafe.com/pages/dataninja/42110-liftoff-body-mod My goal was to keep the looks and functions of the vehicle identical, so I ended up sacrificing a little structural support. I don't think this holds together yet as well as the original model, so could use some additional reinforcement. This 1st version doesn't use many additional parts, only a few black 2L friction pins and a dozen red 3L pin+bush. In the .io file I grouped the pieces into 2 steps, hoping to make it easy to hide the top and see the bottom, or other way around. Still to work on/improve: - Not happy with the way the seats attach to the lower body, front or back... - Create a PDF showing specific steps - Add structural reinforcement to make it as sturdy as the original Thanks for @BrickWild for the Stud.io file I tweaked with necessary mods. (*) You didn't ask, but my absolute favorite feature was Didumos69 's 90-degree limiter / shift block. Such an elegant solution, and made the model much more fun than the original. Lego must agree, Milan put a similar function in the Defender!
-
42110 - Land Rover Defender
DataNinja replied to 1gor's topic in LEGO Technic, Mindstorms, Model Team and Scale Modeling
Nevermind...FunkStyleGio throwing me off with 42077 B-model in 42110 colors! Looks good in those colors though -
42110 - Land Rover Defender
DataNinja replied to 1gor's topic in LEGO Technic, Mindstorms, Model Team and Scale Modeling
Def looks interesting, I'm excited about the gearbox and mod opportunities to improve it. Any hope for a lift-off body mod for this kit??? -
10265 - Ford Mustang Creator Expert: MODS
DataNinja replied to Dragunov2's topic in Special LEGO Themes
Love this model! I've tried adding HOG steering, but stuck in a few places. My concept was to mirror the drivers side steering axle on the passenger side with same gear and long straight axle axle to the front passenger side floor. Then add 90 degree gears to continue out the roof, or continue back under the passenger seat to the trunk and out the back, preferably into the piece with the GT sticker. Stuck so far right near the beginning, turns out the passenger door hinge interferes with this axle. Likely will have to tear down one of the rear seats to continue the axle path to the trunk, haven't even tried how to get to the round GT piece yet. Instead of out the back, going to the roof will likely interfere with removable roof panel. These are just some ideas to get this feature started, anyone tried to add HOG steering? -
Got it! Excellent work, thank you for sharing your efforts
-
Anyone consider adding a transmission into this? Even a 4-speed (with PDK!) would enhance the technical aspects greatly...
-
Efferman, I'm very excited about the fantastic mod you did to add full flight controls to the Air race jet! Unfortunately the site you posted the lxf seems to be down for maintenance, any chance you have it posted somewhere else? Thanks in advance, can't wait to try building this myself.
-
8448 - Superstreet Sensation - Theme: Technic Primary model -- Gull Wing Doors [Image] LDD 4.3.11, Extended brickset used Download model here (my first model!) Retired parts not included in model: 32196 Tires 32197 Wheels 32185 Technic Gear Rack 14L 32186 Technic Steering Gear with 3 Ball Joints 32195 Technic Steering Arm 78c16, 78c03 ribbed hoses 76320 pneumatic pistons 6631 Technic Changeover Plate Sticker Sheet Retired parts substituted in model: 9244 4L universal joint replaced by 61903 3L Universal Joint 2825 4L technic beam replaced by 32006 technic lever 4M 76138 Technic Shock Absorber (soft) replaced by 76537 Shock Absorber (Extra Hard) 8448 - Superstreet Sensation - Theme: Technic Alternate model -- Convertible Top [Image] LDD 4.3.11, Extended brickset used Download model here (my second model!) Retired parts not included in model: 32196 Tires 32197 Wheels 32185 Technic Gear Rack 14L 32186 Technic Steering Gear with 3 Ball Joints 32195 Technic Steering Arm 78c16, 78c03 ribbed hoses 76320 pneumatic pistons 6631 Technic Changeover Plate Sticker Sheet Retired parts substituted in model: 9244 4L universal joint replaced by 61903 3L Universal Joint 2825 4L technic beam replaced by 32006 technic lever 4M 76138 Technic Shock Absorber (soft) replaced by 76537 Shock Absorber (Extra Hard)

-
I'm new to digital design with Lego, and started with LDD. After 1 marathon session I got extremely frustrated with trying to make it properly align technic pieces that I know fit together IRL. Imported my model to Stud.io and the troublesome bits fit right in...my vote is Stud.io for technic models. Check out the pin in the triangle liftarm plate won't go in on the left with LDD, but fits fine with Stud.io (pic on the right). Crap like that is frustrating... Bonus points if you can figure out which Technic set this is! Sounds like some interesting discussion in this post about LDCad and MecaBricks that I'm sure I will have to look at once I need to incorporate flex axles into my model. EDIT: OK a few more hours with each and maybe I need to clarify my position. I was able to get those pins in with LDD...turns out somehow I had rotated the entire model ~1 degree which was starting to cause many alignment issues. Things really were starting to go haywire with that LDD imported model into Stud.io, so really was easier to just start over. "Snap to grid" feature in Stud.io prevents this problem that I have to carefully manage in LDD. Now I'm discovering a new criticism of Stud.io for technic models: it gets really picky about joining pieces based on the viewing angle and also which side of the piece I'm trying to connect. For example it won't let an axle into a slot, but when I turn the axle around I have no issue...crazy. LDD seems maybe a little more forgiving to allow these connections at any angle or orientation.
-
jb70. fantastic compilation of the tweaks so far. Would you consider this essential upgrades from the base instructions? If you continue working this, Please include the improvements to the lower doors that continue the "C arc" as LegoHoops and ttoobbyy have done...looks much nicer than the sticker currently there!
-
@Didumos69 1st post to thank you so very much for the time you put into these model improvements. Bugatti Chiron set was tempting, especially after reading about so many problems with the stock GT3RS set, but digging a little more and found your threads tipped the scale more me. Just completed 1st build with community-developed errata, and I must say your 90-degree limiter was simply brilliant. Thanks to all those who contributed, but very nice to have your easy to follow steps to implement. Working through the additional parts I need to get the Ultimate version! Do you recommend any sets that have many of this unique parts? I'd rather buy a set for a little more $$ than the parts individually. Thanks again!