
Tarix819
-
Posts
75 -
Joined
-
Last visited
Content Type
Profiles
Forums
Gallery
Everything posted by Tarix819
-
[MOC] T.13B3 Tank Destroyer
Tarix819 replied to Tarix819's topic in LEGO Technic, Mindstorms, Model Team and Scale Modeling
Indeed, the firing mechanism is a culmination of about a year's worth of designing and improving, this version is more reliable, and smaller/lighter than on my previous shooting Tank (Vickers M1937). I intend to make a video demonstrating it in more detail at some point. -
[MOC] T.13B3 Tank Destroyer
Tarix819 replied to Tarix819's topic in LEGO Technic, Mindstorms, Model Team and Scale Modeling
Thank you! I love the tag! They do, I have been using the tiles in this way for about 8 months (On my Vickers Mk. E, Matilda, and now this T.13B3) and have had no signs of damage so far, I think as long you stack them to an amount which effectively supports the weight of the vehicle, it doesn't risk damaging them. This 6.3kg vehicle is supported by 24 1x8 tiles that make up the suspension on the bogies. O Thank you! -
[MOC] T.13B3 Tank Destroyer
Tarix819 replied to Tarix819's topic in LEGO Technic, Mindstorms, Model Team and Scale Modeling
Thank you! -
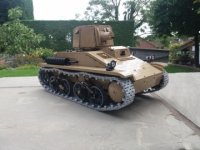
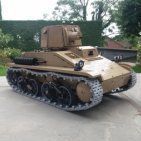
History Here is my latest model, which is of the T.13B3, a Tank Destroyer used by the Belgian Chasseurs Ardennais from 1936 to 1940. The T.13B3 was to be the third model of the Belgian T.13 series of Tank Destroyers, all based upon the British Vickers model 1931 Artillery Tractor, which were purchased by Belgium in 1934. The T.13B3 of 1936 attempted to improve upon the previous T.13B2 in many regards; the hull was greatly redesigned, with a raised rear idler fitted to improve stability. It recieved a new 360-degree rotating turret to house the 47mm Mle. 1931 Anti-Tank gun, as well an additional crew member to serve as the dedicated loader. These vehicles saw service in 1940 during the Battle for Belgium. The Model This was my first foreign vehicle I have built, but given its British origins it shared many components with some of my previous vehicles I have built before, namely the Vickers M1937 and M1936. The suspension and chassis design were all quite similar, but I still refined and improved it quite a lot - for example I have used the full motorcycle and tyres for the road wheels instead of just the motorcycle wheels. I had only three weeks to build this vehicle after preparing and scaling the design, so this similarity came in handy, and i'm thankful I never ran into any major problems when building it, as I have done on some earlier tanks, as I would not have been able to finish it in such a short amount of time otherwise. I am still finishing off the instructions which will go up on Rebrickable and Mocsmarket within a week with any luck. Features -1:8 scale -6.3kg in weight -Controlled by three SBricks. -Hull is powered by two AA Battery Boxes each containing three 3.7v Li-Ion 14500 batteries and three dummy batteries, giving a total output of 22.2v or 11.1v per track. -Turret is powered by one PF Li-Po 7.4v Battery Box. -Full RC driving - each track powered by two PF-XL motors. -Functional leaf-spring suspension (Horstmann). -Functional track tensioners. -Functional headlights. -360-degree rotating turret. -Elevating and depressing main gun. -Firing main gun with high power and recoil effect - the spent shell casings are ejected after each shot. -Four-shot magazine with short reload time. -High detail, including tools, exhaust, tow-hook and siren. Photos
-
Thank you, it's roughly 70cm x 30cm x 30cm Thanks! I tried to capture the details of the vehicle as best as I could!
-
Thank you, I shall post these here from now on :)
-
Try and spot him! https://imgur.com/a/MrWVKhm Thank you! They are supposed to be Smoke dischargers, and needed to have a diameter of 3 studs, so I couldn't use 2x2 round bricks or 4x round plates, I thought these black pulleys would be the best option.
-
Hi, I wanted to show my latest model, which is of the A11 Matilda I, a British Infantry Tank that was in production from 1937 until 1939. It saw brief service at the beginning of the Second World War with the British Expeditionary Force during the Battle for France in 1940, probably the most famous battle it participated in was the Battle of Arras, where it was found the Matilda I was almost inpenetrable to most German anti-tank guns, having 60mm of frontal armour protection. After the withdrawal of the British Army from Dunkirk, the Matilda I was seen as obsolete and withdrawn from service. Features: -1:8 Scale. -6.4kg Weight. -Powered by four PF-XL Motors for the tracks. -The Hull is powered by two SBricks and two battery boxes fitted with 14500 Li-Ion batteries, providing 22.2v of power for the hull. -There is an SBrick and 7.4v Li-Po battery box in the turret which powers only the Commander's Periscope. -Nine motors in total, 4x PF-XL, 5x PF-M. -The Engine is a Ford V8 Model 79, accurately represented in the hull. -Functioning headlights. -The turret can be traversed 360 degrees, and the main .303 Vickers Gun can be elevated and depressed. -The Commander's Periscope can be traversed 360 degrees, the Driver's Persicope can be rotated with limited traverse. -Functional track tensioners. -Functional and accurate leaf spring bogie (Horstmann) suspension. More images:
-
Hello, Here is my latest model, which unfortunately I didn't manage to finish filming before the New Year: The model is of the Vickers M1937 Light Tank, a vehicle designed and produced by British arms manufacturer Vickers-Armstrongs in 1937. This was to be the fourth member of Vickers' line of commercial light tanks, coming after the successes which were the M1933, M1934 and M1936 (the latter which I have already built). The turret was to be enlarged, and a Vickers 40mm Anti-Tank gun fitted, providing the anti-armour firepower that the M1936 lacked. It had a crew of two men (Commander and Driver), and 9mm of armour protection. The vehicle only entered service for a short time in Latvia, before it was quickly outclassed by more modern designs. The only surviving vehicle remains at Kubinka Tank Museum in Russia. I decided to build this Tank because it shared most of the components with the Vickers M1936, and I didn't have much time over Christmas to build, so I thought this would be perfect. I intend to also make building instructions for it, although this takes time, I decided to get the video out and then finish the building instructions afterwards. Features: -1:8 Scale, the vehicle weighs 5.6kg. -High mobility - the vehicle is powered by four PF-XL motors for the tracks. -The hull is powered by two SBricks and two battery boxes fitted with 14500 Li-Ion Batteries - this is unchanged from my previous two models (Vickers M1936 and Vickers Mk. E (B)) and provides a total of 22.2v for the hull. -The turret is powered by one SBrick and one 7.4v Li-Po battery box. -There are nine motors in total; three for the turret and six for the hull. -The firing mechanism is powerful and features a recoil effect that functions even more smoothly than on my Vickers Mk. E (B) and A34 Comet. The spent shell casings are ejected into a collection tray inside the turret, and the magazine can hold up to four shots. This firing mechanism is a smaller, more reliable version of the one I fitted in the Vickers Mk. E (B). -The engine is a Meadows ESTE Six-Cylinder, which I have accurately represented in the hull from the few pictures of this particular engine online. -The headlights and rearlights are functional. -The turret can be traversed 360 degrees and the main gun elevated and depressed a few degrees each way. The turret bustle at the rear is slightly raised as it was in real life, so that it does not hit the driver's compartment at the front of the Tank. -Track tension can be adjusted using the track tensioners, which there is one for each track. This makes it easier to remove the tracks if need be. -The suspension is a type of Horstmann suspension, with there being four bogies each with two roadwheels, fitted with coil-spring shock absorbers. The shocks are the extra-hard type, to support the heavy weight of the vehicle, though I have replaced the yellow part with the equivalent black part of each shock absober for aesthetic purposes. -The two battery boxes can be removed through a hatch in the rear of the vehicle, and can be switched on/off through two hatches to the right of the turret. I didn't demonstrate this in the video, however I did demonstrate largely the same process in my Vickers M1936 video. -The vehicle also has other details, such as a fire extinguisher, exhaust, vision slits, vents and hatches. Pictures:
-
Thank you for your kind words! I have a new Tank model which I should be releasing in the next week or two, so stay tuned!
-
Powered Up is overpriced trash imo, it doesn't seem to have any decent advantage over PF with Sbrick/BuWizz, PF is better than PU in almost every way, and cheaper. Fans may not be able to stop Lego replacing PF but I am sure most Technic builders will never 'switch' to the new PU system.
-
Thanks man! Check out my others too :)
-
For photos, see the Imgur gallery: https://imgur.com/gallery/rBwm0Pi Hello, My newest Tank is a model of the British Vickers M1936, a member of a line commercial light Tanks developed by British arms manufacturer Vickers-Armstrongs from 1933-1938, designed for the export market. The Vickers M1936 was sold to the Netherlands, and as such earned its nickname 'Dutchman'. The vehicle also saw service as a training platform for the British Army during the Second World War. Building Instructions can be found on Rebrickable: https://rebrickable.com/mocs/MOC-51517/Tarix819/vickers-m1936-light-tank/#admin Now, usually, I include a firing mechanism in my Tanks, as I had done with my A34 Comet back in April and my Vickers Mk. E (B) in August, however this was the first vehicle I intended on designing building instructions for, so I wanted to keep it simple. Whilst the Tank was far easier to build than the Vickers Mk. E (B), the instructions were somewhat challenging to make on Studio 2.0. This one took less than a month to build, compared to the almost four months it took me to complete the Vickers Mk. E (B). This is probably due to the greater simplicity. Features: -Weight: 4.9kg -Scale: 1:8 -Pieces: 4855 -Suspension: Coil-spring bogies, or, the less specific name, Horstmann. The 9.5L soft shock-absorbers give the vehicle a sort of 'hop-along' impression when travelling at full speed, however they are almost at the limit of their strength. -Two AA battery boxes each with three 3.7v Li-Ions and three dummy batteries, giving an output of 11.1v per track, and ultimately making the vehicle incredibly fast. This is also because the drive wheels have 10-stud diameters. -Seven motors in total: Two PF XL for each track, and three PF M for turret traverse, gun elevation and the engine. -The engine is a realistic model of the Meadows ESTE 6-Cylinder engine used on the real Vickers M1936 and many of the interwar British Light Tanks. -The vehicle has functional Headlights and Rearlights. -The turret can traverse 360 degrees, although rather slowly, as it is a one-man crank-operated turret. -The main .303 Vickers Machine Gun can be elevated and depressed. -On each side of the Tank there are track tensioners for tensing each track. -Detailing; exhaust, fire extinguisher, periscopes, vision slits and covers, handles, doors, vents, etc.
-
Don't think so since it's below 12v, which is the maximum safe voltage for Lego PF Motors. BuWizz Ludicrous runs at 12v for example.
-
I use rechargeable 3.7v Li-Ions 3 x 3.7v Li-Ions = 11.1v Plus 3 dummy batteries to complete the circuit.
-
Yep. One battery box and one SBrick per track.
-
Thanks, I would too, but sadly I never designed it with instructions in mind, maybe on my next model. So usually, an AA Battery Box takes six AA batteries - if they are alkaline they are 1.5v each, totalling 9v and if they are rechargeable, they are 1.2v each, totalling 7.2v. Unfortunately, alkaline batteries voltage drops pretty quickly and you have to replace the batteries with others when they finally run out. Instead, I use three 3.7v Lithium Ion (Li-Ion) rechargeable batteries of size 14500 (Which is the equivalent size of AA batteries), giving a total of 11.1v, pretty close to the BuWizz, yet three of these batteries may cost £12 in total - far more cost-effective. Now to prevent frying your SBrick, which you are not supposed to use above 12v, I use three dummy batteries to complete the circuit inside the battery box. This gives me a battery box that outputs 11.1v without any sort of modification or non-lego elements, though the batteries need recharging somewhat more often than with six 1.2v rechargeables. The batteries I use are 14500 Ampsplus Li-Ions, however I have also used 10440 (AAA) Trustfire Li-Ions, which can go inside a AAA battery box with the same effect. I also believe these batteries are very popular among people interested in Nerf Guns, because they improve rate of fire and such, however with Lego, you can use all the features of the SBrick whilst having BuWizz - level voltage. All at a cheaper price and without the need for modifications or using non-lego elements; essentialy purist-friendly.
-
Thank you! Driving front and rear wheels greatly improved mobility compared to my previous models. Thanks, if lockdown was good for one thing this was it!
-
Thanks man! The more Lego Tanks, the better in my book!
-
Hello, Here is my latest model, which is of a Light Infantry Tank known as the Vickers Mk. E or Vickers 6-Ton, originally designed as a private project by the British arms manufacturer, Vickers-Armstrongs back in 1928. The design was rejected by the British Army, however was bought and built under licence in great quantities by the Soviet Union, Finland, Poland, China, Bolivia and others. The vehicle was used as the basis for the famous Soviet T-26 and Polish 7TP tanks. The model I have built is the production Type B version. Whereas the Vickers Mk. E (A) had twin turrets with machine guns mounted in each one, the Vickers Mk. E (B) had a single two-man turret with a 3-pounder (47mm) short gun and a coaxial .303 Vickers Gun. Images of the model can be found at my Imgur post: https://imgur.com/gallery/va9A4IT YouTube Video: Here is a list of features: -Scale: 1:8. -Weight: 6.8kg. -Motors: 9, four PF-XL for driving, two PF-M for the firing mechanism, one PF-M each for the engine, turret traverse and gun control. -The hull is powered by twin AA battery boxes each fitted with three 3.7v Li-Ion 14500 batteries and three dummy batteries, giving a total output of 22.2v for the hull, which is how such a heavy vehicle drives around without many issues. The turret is powered by a single 7.4v Li-Po. -Unlike my A34 Comet, which was driven only from the rear, the Vickers is driven from the front and rear, vastly improving mobility. On smooth ground it can neutral steer, on rough ground it can turn in a large radius. -There are two SBricks fitted in the hull, and one fitted in the turret. -Track tensioners are mounted on the side to increase or reduce track tension. This makes removing the tracks rather easy. -The removable engine deck allows access to the AA battery boxes and the straight-six Armstrong-Siddeley Puma engine, which looks and functions like the real one. -The turret can traverse 360 degrees without any snags. -Six different hatches can be opened on the turret for maintenance. -The gun can be elevated and depressed to a limited extent, the coaxial Vickers Gun follows suite. -The main gun can fire and is rather powerful (More than my A34 Comet). The projectiles fire through the actual barrel and look like real shells rather than just regular technic liftarms. -The firing mechanism automatically reloads each shot, the spent shell casing is ejected into a collecting tray at the rear of the turret for retrieval. -When firing, the gun recoils in a realistic manner. -The magazine can be removed for resupplying, and can hold up to four shots (four shells and four shell casings). -The suspension system is Leaf-Spring Bogies and is quite unique - I used lego 1x8 tiles to function exactly as leaf-springs do in real life and it works a treat. -The model features white headlights and red rearlights for a nice effect. -Other decorative features include a fire extinguisher, shovel, spare roadwheel, rearview mirror, exhaust pipe, radiator and vents. Building Experience: This model was quite challenging to build, with most of the initial problems caused by the suspension and the turret. Firstly, on the real Vickers, two bars run width-ways along the chassis to keep each bogie securely attached, however at this scale in Lego it is not possible due to the flexibility of Lego pieces. It took about thirty revisions of the suspension system to stop it from collapsing when driving at full-speed, and oddly enough the actual leaf-spring part was to begin with the most reliable part of each bogey. Thankfully, the final revision fixed this problem completely, though I now understand why the British army rejected such a design . . . The turret also gave me issues, mostly because of how small it is, with the firing mechanism barely being able to fit inside, with room to elevate, depress and recoil about two-studs' length. On top of this I needed room for the elevation/depression mechanism, the battery box, SBrick, motors and finally room to remove and insert the magazine. I fixed all of these problems to a certain degree, with the only issue being inserting and removing the magazine is a bit fiddly, however I am willing to accept this minor inconvenience for what is otherwise a very functional and decently reliable turret. Thanks for reading.
-
I love this, wish there were more Steam locomotive MOCs around.
-
I built a tank which weighs 6 kilograms and is only driven by two XL motors. Not sure if your vehicle will be smaller or larger but using differentials, especially old 28-tooth differentials is a no-no for heavy Lego tanks because they slip under high torque. The effect of a subtractor can be achieved by using a Lego Train remote control or an SBrick/BuWizz.
-
Yes this is the problem I ran into. The front sprockets give off a very authentic look which I don't really want to sacrifice. In the case of your Lego Maus Tank the front sprockets are hidden so it works better. I'm sure i'll eventually find a way around it.
-
I added the link to the Imgur album, so hopefully that's public? Unfortunately the heavy weight of the vehicle means it only turns on smooth surfaces, which is why in the video I only demonstrate turning on smooth ground. If I try to turn the vehicle at any significant degree on rough ground the rear drive wheels lose grip. It's an issue I haven't solved yet, but hopefully will in future models.
-
I hopefully fixed the photos issue, i've linked an Imgur gallery for those who can't see them. Yeah unfortunately the way the turret ring is arranged meant an L-Motor sticks out a bit underneath, reducing ground clearance significantly. With a bit of intuition this could be fixed but I was rather lazy here admittedly, I never went back to fix it. Ground clearance is something I will take into account more so next time. I don't think it makes much difference honestly, as they are the tracks are extremely sturdy, on previous vehicles I did interleave them, and for this one I was only testing having one link to connect them, though in future I will probably interleave them again as it gives a more tank-track-like effect. Thanks very much! :)