shadow_elenter
-
Posts
299 -
Joined
-
Last visited
Content Type
Profiles
Forums
Gallery
Everything posted by shadow_elenter
-
.thumb.jpg.050f28ccd893f68d8416233f594d9f3d.jpg) Hey builders! Recently I made a LEGO power functions laser (topic can be found here), and it got me thinking... what els can I build? That's how I came to the idea of making a LEGO electromagnet! Making it was actually a whole lot easier than making the LEGO laser. The LEGO laser required a 9 volt to 5 volt converter and reversed -polarity protection. The electromagnet was already made for 9 volt and it does not care about polarity. I just got the motor out and unhooked the 2 wires, then connected those 2 wires to the electromagnet and... it worked! I'm amazed by the strength of this small thing, under good conditions (unpainted, flat metal) it can lift up to 6 kilo's! I have no specific idea of how to use it in MOC but I'm sure I'll think of a good application for it. All suggestions are welcome by the way Tell me what you think ------------------------------------------------------------------------------------------------------------------------------------------------------------ BUILDING LOG weight: 78 gramscapacity: 6 kilo+ To make one yourself you need: PARTS: - a 9 volt electromagnet (ebay is a good source, I bought mine for 5.46$). - some glue (I used hot glue) - soldering tin & shrink tube TOOLS: - flathead screwdriver or prying tool - soldering iron -lighter (for shrink tube) First you need to open up the PF XL motor housing, this is quite hard. I found the best way is to squeeze it just a bit in a vice so the outer shell becomes oval and you can stick a small thin screwdriver in the gap to open it(mind the position in the vice!). This is what you will find on the inside: Disconnect the 2 wires attached to the motor, put the top half of the casing is a vice and dremel out the center rougly to the size of you electromagnet: Then make everything perfectly round with a small file untill the electromagnet fit's snug in the housing: After pressing it in the housing, get 2 lego beams and attach them to the 2 forward facing holes. this way you can make the magnet perfectly flush when mounted in a MOC: Then seal the electromagnet firmly in place using glue (I used hot glue). Next you solder the 2 wires coming from your electromagnet to the 2 wires that were attached to the motor (the inner 2 strands of the 4 strand LEGO wire, polarity does not matter). Make sure you use shrink tube to isolate both wires! Then glue the motor plate (holding the LEGO wire) in place and test the magnet! If it works close it up and you're done!! I hope you enjoined this build log, if you have any questions just let me know!
Hey builders! Recently I made a LEGO power functions laser (topic can be found here), and it got me thinking... what els can I build? That's how I came to the idea of making a LEGO electromagnet! Making it was actually a whole lot easier than making the LEGO laser. The LEGO laser required a 9 volt to 5 volt converter and reversed -polarity protection. The electromagnet was already made for 9 volt and it does not care about polarity. I just got the motor out and unhooked the 2 wires, then connected those 2 wires to the electromagnet and... it worked! I'm amazed by the strength of this small thing, under good conditions (unpainted, flat metal) it can lift up to 6 kilo's! I have no specific idea of how to use it in MOC but I'm sure I'll think of a good application for it. All suggestions are welcome by the way Tell me what you think ------------------------------------------------------------------------------------------------------------------------------------------------------------ BUILDING LOG weight: 78 gramscapacity: 6 kilo+ To make one yourself you need: PARTS: - a 9 volt electromagnet (ebay is a good source, I bought mine for 5.46$). - some glue (I used hot glue) - soldering tin & shrink tube TOOLS: - flathead screwdriver or prying tool - soldering iron -lighter (for shrink tube) First you need to open up the PF XL motor housing, this is quite hard. I found the best way is to squeeze it just a bit in a vice so the outer shell becomes oval and you can stick a small thin screwdriver in the gap to open it(mind the position in the vice!). This is what you will find on the inside: Disconnect the 2 wires attached to the motor, put the top half of the casing is a vice and dremel out the center rougly to the size of you electromagnet: Then make everything perfectly round with a small file untill the electromagnet fit's snug in the housing: After pressing it in the housing, get 2 lego beams and attach them to the 2 forward facing holes. this way you can make the magnet perfectly flush when mounted in a MOC: Then seal the electromagnet firmly in place using glue (I used hot glue). Next you solder the 2 wires coming from your electromagnet to the 2 wires that were attached to the motor (the inner 2 strands of the 4 strand LEGO wire, polarity does not matter). Make sure you use shrink tube to isolate both wires! Then glue the motor plate (holding the LEGO wire) in place and test the magnet! If it works close it up and you're done!! I hope you enjoined this build log, if you have any questions just let me know! -
I cant, it's way to big and it was build before the start of the competition Actually... I finished it this afternoon and I'm pleasantly surprised with its strength. I will make a video of it shortly.
-
yes, most of it is sped up 150% just to keep the video interesting. It has so many functions that showing them all at normal speed would result in a long and boring video. I have no way of knowing... or even guestimating that. That's a nice challenge, I might just do that at some point . I received 2 sbrick-plus units and sensors just after this MOC was done so I'm building focused on utilizing those right now. I'm in the middle of making the diy LEGO PF electromagnet and I'm also renovating my house and backyard at the moment so there's not a lot of building time right now.
-
whahaha, would be a bible of a building instruction and a price tag like a car not to mention a collaboration with SBrick...
-
Wahahaha my thoughts exactly!!! you might be kidding but I'm not!! yesterday I received a 9V electromagnet in the mail for a LEGO electromagnet project!!!
-
Hey builders! I made my first MOC with the laser so I thought I'd post a few pictures:: to see the full topic about the MOC and to see the laser in a video check out this topic
-
I was always inspired by the multi-functionality of backhoe's, and I always imagined ways to improve upon it and now I finally did. In this MOC I challenged myself to make the most multi-functional vehicle I could, using all the motors and sbricks I had, naturally I ended up buying more motors XD The final build includes 17 LEGO power functions motors (5XL motors, 6L motors and 6M motors), 4 LEGO power functions lights and 1 DIY LEGO laser! It's powered by 4 LEGO PF battery boxes, controlled by 5 SBricks and operated by a 20 channel SBrick profile. The drill/laser arm is operated by 5 channels 1 channel for rotating the arm (PF XL motor) 1 channel for tilting the arm out (PF L motor) 1 channel for extending the forearm (PF M motor) 1 channel for spinning the drill head (PF M motor) 1 channel for activating the DIY LEGO laser (TOPIC HERE) The excavator arm is operated by 4 channels 1 channel for rotating the arm (PF XL motor) 1 channel for tilting the arm out (PF L motor) 1 channel for extending the forearm (PF M motor) 1 channel for moving the bucket (PF M motor) the bulldozer scoop is operated by 2 chanels 1 channel for raising and lowering the scoop (PF M motor) 1 channel for tilting the scoop (PF M motor) The crane is operated by 3 channels 1 channel for rotating (PF M motor) 1 channel for extending the crane (PF L motor) 1 channel for operating the winch (PF L motor) The plow/ trailer hook is operated by 1 channel 1 channel for lowering and raising the plow (PF M motor) The drivetrain is operated by 3 channels 2 channel for driving forwards and backwards (2x PF XL motor) 1 channel for steering (PF XL motor) The lighting is operated by 2 channels 1 channel for headlights 1 channel for rearlights Weight: 4.6KG Length: 62cm With: 32cm Height: 31cm building time: 4 weeks A special thanks goes out to my friend Bas for helping me edit and my amazing girlfriend for her everlasting support.
-
That's funny, out of all the techniques that was the least interesting to build In fact, that was the last module I made to complete the loop. My plans were way bigger, but I ran out of motors and the hopper was my "1-motor to close the loop" solution. I Most enjoyed big arm with the locking gate & ejector pin. It was the first time I ever used the huge yellow arches, really interesting to play around with Luckily, I got my hands on some more PF motors since then and I'm currently 50% done with a MOC utilizing 20 channels, most likely even more (waiting for the sensors and 2x SBrick+ pakkage to be delivered). teaserrrrr...
-
Hello, Yep... its done... reduced to one huge pile of parts For me, lego is for building...I like building better than having shelves filled with MOC's This way, I can afford to build models like the red cube factory. There's over 700€ worth of lego and sbricks in this one build you see So, if I feel like building I'll photograph and film the MOC and get my girlfriend to help me deconstruct and re-sort everything in sorter boxes(took 4 hours on this MOC !!!) Currently I'm building the next multi-sbrick-MOC so stay tuned Thank You for all the support builders!!
-
Hello builders!, It has been finished weeks ago but now I finally got down to editing the video and posting it The red cube factory Some years ago I wanted a motorcycle and I sold my LEGO thinking I should grow up, sell all of it and put the money in my new passion... BIG MISTAKE! After years without LEGO, I still really missed it, so I bought a few sets and a load of PF motors and sbricks! This has been my first build in years so I came up with this project to reacquire my LEGO building skills and get a feel fot all the (to me) new parts. The idea was to transport a 6x6x6 studs cube trough a conveyor system using as many different techniques in the most compact space possible and make it as big as I had parts and motors for. It wasn't long before I realized the gopro session 5 I recently bought has almost the same dimensions as a 5x5x5 studs cube! So I rebuild the (then 25% finished) factory to transport that instead because of awesomeness of course! Later I Realized that this is way more convenient since the (for me) new stud-less style LEGO uses mostly uneven sized parts, lesson learned. I know some of you like to run complex MOC's with one motor, but then you can only watch... Don't get me wrong, I love the timing aspect and I see it as a true art, I just prefer to control MOC's with sliders and switches (so called "playing") That's why I used 4 SBricks and 13 motors to get everything to work. SPECS: 4x SBrick 2x battery box 2x PF lights 4x PF M motor 4x PF L motor 4x PF XL motor 1x PF servo motor dimentions: 530mm x 370mm x 295mm weight: 5.1KG build time: 3 weeks I apologize for the poor video quality After filming I took apart the MOC only to realize when I wanted to edit that the quality was so poor. What do you guys think? Any tips, tricks & techniques to improve my upcoming builds are more than welcome.
-
I found that one too, but Foam, Plastic Mirror Front and White Paper Backing ... Does not really sound like a Good enough quality mirror... I'd rather not use non-lego parts but this leaves me with little choice...
-
I came up with an idea for a type of puzzle, the goal would be to bounce the laser thru a maze type puzzle using mirrors and objects blocking the light or something... Are there genuine lego mirrors other than sticker type ones? I only found sticker-ed panels, and they would probably diffuse the beam to much after 2 or 3 mirrors. Gr Onno
-
Hey you! So I had this 5mw green laser lying around and I had the idea to build it into a lego module so I could use it with the lego PF system & an Sbrick in MOC's. A few days of figuring out how to do this... and then I just did it It works perfectly, and it's super cool to see! the beam is just visible in daylight (hard to take a picture of unfortunately) and pretty well in the dark. However, now it's done... I don't know what to use it for I didn't have any special project in mind you see, I just thought YEAH! build it, I'll figure out what to use it for on the way... but still haven't come up with anything interesting other than obvious things like a tank gun or a pointing tool. So I thought I'd post it, see what you guys think, hopefully Inspire some people to think outside the brick and maybe get some sweat inspirational ideas what to use it for TECHNICAL PART: The first part from the PF lead is a brige rectifier salvaged from an xbox 360 charging station (this makes it so the polarity is always the same since the polarity switches when a motor is put in reverse and these circuit have no reverse polarity protection). Next is a stepdown regulator from ebay to turn 9v into 3v for the laser module Then the driver circuit for the laser, and finally the laser diode this was the test setup to align the laser, later I shortened all the wires to make it fit, but this illustrates everything better Since a PF wire costs 5€ and A PF M motor costs 9,50€ I picked the last one,so I'd have an Ideal place to hide the circuits in with great mounting possibility's and perfect lego looks. So tell me... what do you think ,and what should I use it for?
-
Hi there, I decided (meaning my guinea pig picked the left carrot first) on the sbrick solution. there are 4 inbound and 2 more will be purchased when the + version becomes easily available. as for what the machine does... Captainowie got it right! well... close enough... The idea was that a machine would transport a camera thru the factory. The gopro session 5 that has remarkably similar dimensions to a 5x5x5 cube so I made a "testing brick" and well... yes, I guess it does do that too when the sbrick's arrive I can finish up the last bits I'll make a video and pix for you guys Gr Onno
-
Hello, brickers ! the struggle: on my current build and most likely most that will follow this is the case, a lot of PF motors that need controlling. I love the PF-motor's and I currently own 14 of them (1x servo, 4x M-motor, 5x L-motor, 4x XL-motor) The form factor, price and the fact that I already had a lot that came with set's I bought makes it the motor of choice for me. The downside of these is the limited options to control them. After a lot of research I came down to 2 realistic options: Buy a mindstorms EV3 set and 2x the Hitechnic IR-link to control 8 lego IR-receivers (4 of them + 1 IR-link in a closed box and 4 of them + 1 IR-link out in the open) This way I can control 4 EV3 motors + 16 PF-motors and still use 2 sensor ports for whatever (with potentially 4 touch sensors per port using Hitechnic touch sensor multipliers) PROS: -can make complex sequences -4 hi-precision motors -good sensor options CONS: -can not control PF-motors speed, just on/off and spin direction -always have to program -Needs bulky smart brick+ 8 IR-receivers 4 of them in a bulky box -poor remote control options -price OR: Buy 5x S-brickplus Allowing the control of 20 PF-motors in 15 speed steps (or less motors and more sensors) PROS: -price -speed control -small form factor and no need for a bulky brick and IR-receiver box -programming is simple and minimal -good remote control options CONS: -very limited programming options -having to wait for the EV3 sensor adapter(expected in march) I just can not decide... I mostly build stationary-factory-devices like GBC's and almost never vehicles I like building but am not a big fan of programming... What would you guys do? and am I going to run in to problems with any of the above setups or are there more options I should consider????? HELP! --------------------------------------------------------------------------------------------------------------------------------------------------------------------------------- Now... for the challenge: who can tell what it does? HINT: it's not very useful, more of a technical challenge ;) To be fair: It's not done yet(I still have 2 motors left and that's a mortal sin ofcourse) but the components that you see are all done and preform there function perfectly.
-
Hello there!, really interesting to se we came to (almost) identical designs on 6/10 designs! (great minds...). I also experimented with the possibility's I just posted and animated the one because I think this piece will be most useful in low-load, minimum-space applications
-
BOOM!!! there she is... lego part number: 6170153 I just came across this new part in a set review on brickset.com (this one) and I'm so exited! I have been wanting this part for ages now and here it is! in combination wit 2, L-shape 2x4 liftarms, a perpendiculair axle&pin connector and a 20t gear you could make a tiny but very strong gear reduction what do you guys think?
-
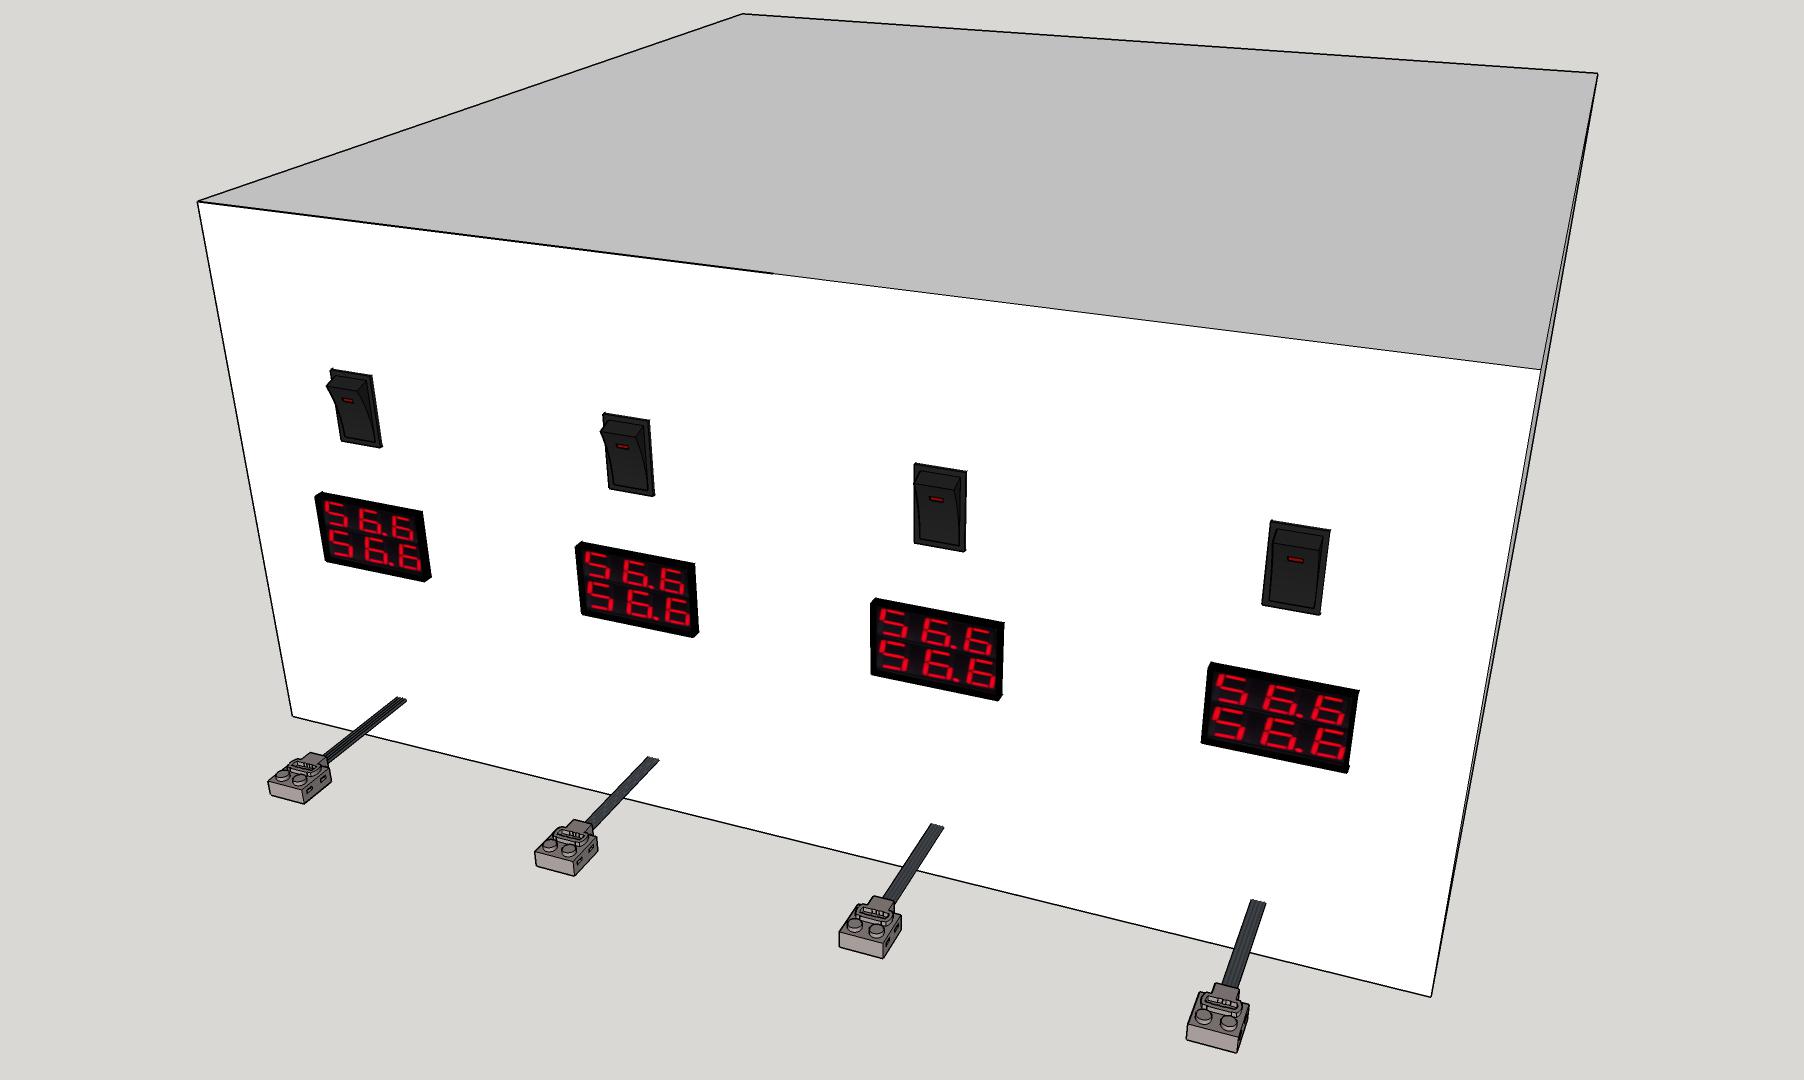
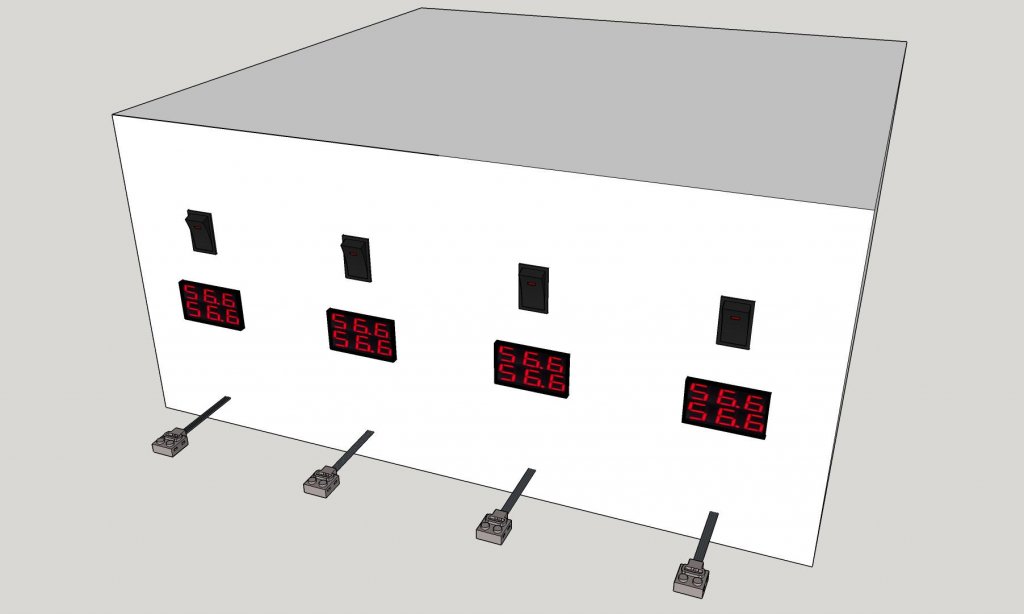
Thank you Captainowie, that is exactly what I mean! VERY helpfu info! It inspired the following idea: I'll buy a power supply(possibly a computer one) 4 on/off switches 4 voltage regulators 4 amp limiters 4 AC voltage& amp meters 4 PF connectors (from 2 cut up extension leads) I'll split the supplied power into 4 leads each with it's voltage reduced to 9V and it's current limited to 3A then put in a AC volt& meter and then connect the PF connectors. the Idea is that I can just click on a Sbricks & motors and when the amp peaks go near the 3A under full motor stress I'll know to start using the next output channel Is this a plan that could work or am I bound to run into problems here?
-
I know there cheap, but there just as expensive as an adapter so why would I want the bulky thing?
-
Thank you for your reply's everyone! I think a 9V AC adapter wit a 3A output connected to a modified extension is the way to go for me. I don't se any reason to use bulky train controllers since the speed regulation will be up to the Sbrick. My electrical skills are minimal, but as I understand it I can only hook up a limited amount of motors to a 9v 3A AC power supply. what is a good rule of thumb here ? 4 XL-motors,6 L-motors ,8 if there M-motors?
-
Hello, I'm new her so I'll intro myself a bit first. I'm from holland, 27 years and a lego technic veteran. lego technic was my favorite toy when I was a kid and I build endlessly... but never from the books. at some point I sold all my lego because I thought I was to old for it and I wanted a motorcycle, regretted that from the moment i did. So recently I bought 3 sets (bulldozer 8275, wheel loader 42030 and logging truck 9397) and the new bucket-wheel excavator is on the way because I already ran out of parts. enough about me;) I'm currently working on a factory type build and i've used 7 PF motors so far and I"m far from done. currently running everything off 3 PF battery boxes but since I'm planning to buy at least 3 sbrick's and a bunch more PF motors( 5 probably to start with) i'd like an alternative power supply. Almost all my projects will be stationary so a plug in the wall socket solution would be best for me. Now I've seen the GBC guys use the old style train controller but... It's really hard to find anything on that subject! like how many PF motors I can power with that? Can anyone tell me what the options are to power this many(and growing) PF motors or where I can find this info? PS: the build is quite interesting and I'll post it here when I have made a few pix ;)