
Sven J
-
Posts
789 -
Joined
-
Last visited
Content Type
Profiles
Forums
Gallery
Everything posted by Sven J
-
 Dear LEGO train lovers, finally, here’s a video of my 0-8-0T on track. It is made in the style of old newsreel films; the title translates as "Flensburger Kreisbahnen present: Test run of steam locomotive No. 1 after the major overhaul in 1935“. Be sure to turn on your speakers! A longer video, with the smoke generator in action and an LGB train behind the locomotive, will follow as soon as I have finished equipping all my passenger waggons with battery-powered interior and tail lights. Thanks for stopping by again! Sven
 -
Hi yannick, First of all, thank you for your appreciation! Unfortunately, my knowledge of the French language is very poor; so please let us continue this conversation in English. If I understand it correctly, you are not able to receive personal messages until you have reached ten posts. So you'll have to let me know your email address or (better choice ) commit yourself here on EB a bit before I can send you the file.
-
Dear all, Finally I found a comparison picture of the sister locomotive, No. 2, which I should be able to show without getting into trouble (works photo AEG, 1926). The lamp holder on the smokebox was later removed, and the sanding equipment altered. My model shows the No. 1 locomotive after these modifications (both carried out in the 1930s), thus it differs slightly from the photo. Best regards, Sven
-
Ooops, nearly forgot this thread, sorry... In the meantime, the engine is finished (see here); the requested video is on Youtube: https://www.youtube.com/watch?v=ac6lm0-XT_g (Sorry, but somehow, embedding the video doesn't work.)
-
Lovely rendition of this awesome veteran! What a brilliantly conceived SNOT-work for the locomotive body! The pantographs are also very clever.
-
Oh yes, I forgot that. The side that is facing downwards during the printing process is much smoother than the opposite one.
-
Thank you very much, Yann FOURE, Roadmonkeytj and rahziel! @Roadmonkeytj: Well, it might look good in blue, but dark green was the actual colour of the real engine. The rods weren't too hard to do, though in fact these were my first 3D designs. First I googled for the exact dimensions of a Technic pin hole, then played around with Tinkercad for one afternoon/evening, and the basic design was ready. As for Shapeways, first thing to say is that I had the rods printed in "professional plastic", as it was announced to be strong, and it is available in grey. Delivery was very quick, five or six days after the order had been placed, even though the package came from the Netherlands. The fitting accuracy of the parts was good, only two or three pin holes had to be sanded a little bit. BUT: Colour consistency of the "professional plastic" is... ehm... how should I express it... moderate... Especially the long side rods can be nearly white at one end and almost black at the other (well, that's a bit exaggerated, but you know what I mean). I ordered three sets of rods in total, then chose the best pieces. Honestly, the colour consistency, and also the match with LEGO's own light grey, is MUCH better with zephyr1934's rods and valve gear elements, which I'll continue to use for models that don't require as delicate parts as this loco does.
-
Should be this one: https://www.flickr.com/photos/95098254@N04/27649207438/ While being quite impressive, it's definitely not G-gauge, but about three times as big (G-gauge, 45 mm, means 1:32 scale for standard gauge prototypes).
-
It's indeed quite sturdy, the upside-down mounted "plates with door rails" clutch to the Technic bricks very firmly. As for your suggestion: I already tried jumper plates (and actually used them in a few places where oddnumbers of studs had to be covered, for the plates with rails only come in 2 and 8 studs length), but in fact I didn't like this solution. The jumper plates form a smooth, flat surface on the side of the boiler, which looked too angular for me. Of course, it's something different for your ingenious solution: As the total diameter is much larger, that flat surface doesn't strike the eye. I seems like a great design for a tank car in large scale! Thanks!
-
Thank you for your appreciation, Bricked1980 and Hod Carrier! Of course the term "humble" refers to the prototype being a small, unspectacular workhorse, not a flashy express train locomotive. I have a soft spot for these "underdogs"... And as you said, @LEGO Train 12 Volts, there's really research to be done. A locomotive MOC typically takes me 4-8 months from project start to the finished model. About one month is needed to find and analyse sources, diagrams, photos etc.; then the collected information has to be transformed into the MOC design, always starting with those sub-assemblies which I expect to be the most difficult ones. As it might be interesting for other builders, here's an example: Close examination and measurement of the few photos and the only drawing I could get of this loco led to the conclusion that the boiler had to be 54 mm in diameter. Well, that was easy regarding the height - 17 plates. But the width was difficult - 7 studs (56 mm) would have resulted in an odd-looking oval shape. It then took me at least a week before I could come up with the following solution (well, maybe just because I was a bit dim-witted): If anyone has a better solution (one without all those "plates with door rails"), please show it - I'd be glad to use it!
-
Thanks a lot for your appreciation, yanwilma, Asper, Toastie and monai! @Toastie Thorsten, your words mean a lot to me, especially considering what you said about your personal background. I know today's remnants of the Schleswiger Kreisbahn fairly well, as I am a regular visitor of the "Angelner Dampfeisenbahn" museum railway on the Kappeln-Süderbrarup line, which of course formerly was part of Kappeln-Schleswig. Slightly off-topic, but do you know that there's an excellent new book about the Schleswiger Kreisbahn? Highly recommended! @monai Sergio, my friend, thanks for your words. I hope you know that our correspondence is a permanent source of inspiration for me. Regarding your technical question, it's actually very simple: The side rod is attached to the wheels by no. 3673 Technic pins; so with the rod being just under half a stud thick, it can "float" on the free end of the pin (1 stud wide) while the axle shifts.
-
Thanks again for your feedback! The goldern stickers are printed on golden, self-adhesive polyester foil with my inkjet printer, then sealed with clear adhesive tape (the print is not 100% smear-proof), cut out with a scalpel and applied. For the transparent ones, I used a Dymo label printer with white-on-transparent label tapes. @JarJarBonks: Tires are the only parts with the right diameter. Of course it would be better to use a "slick" version, but it doesn't exist.
-
Many, many thanks to all of you for that enthusiastic feedback - and special thanks to @JopieK for being frontpaged! You're always so kind! I also like the dark green livery very much, it looks kind of noble. But the limited parts availability in that colour made the design process quite difficult sometimes... and the building more expensive than any other of my models... Now I'm waiting to see your dark green wagons!
-
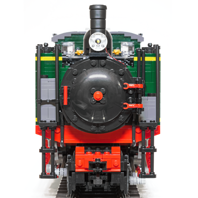
Dear train lovers, It's time for another locomotive MOC! As a tribute to my favourite holiday region (where in fact I am right now, writing this), I chose the Flensburger Kreisbahn's No. 1, a 0-8-0T narrow gauge locomotive, as a prototype. The Flensburger Kreisbahn ("Flensburg county railway") was a 1000 mm gauge railway in Germany's extreme North, with two lines (94 km in total) running through the hills of Anglia close to the Danish border. When the railway's older, saturated-steam locomotives became too weak to handle increased train loads, two new superheated-steam engines were ordered from AEG in Berlin - yes, there was a time when AEG, famous for its electrical devices, also built steam locomotives! Delivered in 1926, these 0-8-0T engines, numbered 1 and 2, were an immediate success. With approx. 300 hp and a permitted speed of 40 km/h, they were suited for both freight and heavy passenger trains and remained in service until the railway's closure in 1953. Sadly, both locomotives were scrapped. A substantial problem while designing the model was the almost complete lack of reliable sources. All technical information had to be derived from a short description, some b/w photos and a single small drawing in just one book (Schöning/Kupfer: Die Flensburger Kreisbahnen. Verlag Kenning, Nordhorn, 2004; the drawing is reproduced below with kind permission by Mr Kenning). Nevertheless, I'm confident that my model comes as close as possible to the real engines. The MOC consists of approx. 2,200 parts and weighs just under 1.5 kg. It is held in accurate 1:22.5 scale, therefore compatible with conventional garden railway equipment (45 mm G-scale track), and can be coupled to rolling stock fitted out with LGB link-and-pin couplers. My layout uses the LGB R3 radius (1195 mm), so the locomotive has to be able to negotiate these curves. However, as I wanted to avoid the use of blind drivers for aesthetical reasons, this required two little tricks: The last axle is slidable sideways by +/- 1/2 stud, and the second axle's wheels are slightly set inwards, resulting in an increased lateral track play. Although this arrangement causes some drag while negotiating curves, it nevertheless works. The locomotive is driven by two L-motors. A BuWizz functions as both a battery pack and remote control receiver. The lighting equipment was bought from Brickstuff, while the wheels are BBB XL drivers, as usual. Purists may kindly ignore the two following scenes... Of course, the engine crew was proud to pose for a souvenir photo. Even the local grocer came to have a look at the new locomotive. The engine frame: While my previous BDZ 606.76 had its focus on exploring the possible level of detailing for a LEGO model, this time the goal was to design a simple locomotive for uncomplicated operation. Above all, the new model had to overcome the 606.76's proneness to tipping over. Thus, the frame houses two weight bricks for improved traction and a lower centre of gravity (highlighted in blue): Some views of the brake rigging and the two large vacuum-brake cylinders: All drivetrain components, including the BuWizz, are tightly packed and positioned as low and as close to the engine's centre as possible, again with the aim of optimizing the COG: The power button and the charging socket are accessible by removing part of the boiler top: The cylinders, closed-type feedwater heater (system "Knorr"), and generator: The upper part of the cab. While looking quite simple, the task to model the roof's half-stud offset and the vent hole in the cab front almost drove me nuts... But I think I found a satisfying solution: Cab interior and lights: This time there was no space for magnetic switches to control the headlights; so the coal bunker contains two small separate battery packs (with built-in switches) for front and rear lights. The cab is illuminated, too, when any of the two circuits is turned on. Realistic Winterthur valve gear. The basic dimensions are the same as on my BDZ 606.76: Originally, I had used zephyr1934's rods and valve gear parts again. But then I found them to be looking too massive , considering the rather delicate rods of the prototype. Besides, during the first functional testing sessions of the near-completed model, the flex elements which I originally used for the side rods proved too large by just a fraction of a millimetre - the cable connectors collided with the rear mounting of the crosshead guide, something which could not be foreseen in LDD. So I knuckled down to get used to Tinkercad and designed my own rods, including thinner, slightly tapezoidal main rods as well (both subsequently made by Shapeways). And for the first time - SMOKE (using a Seuthe No. 99 smoke generator, powered by the BuWizz via a modified PF cable): I finished the model just in time before going on holiday, so I had no time to shoot a video on track. Of course, I'll do this when I'm back home again. In the meantime, your feedback, comments and criticism are most welcome! As usual, high-resolution images can be found in my Bricksafe folder. If someone should be interested in the LDD file, please contact me by PM. Thanks for stopping by! Best regards, Sven Edit: Now with on-track video - see here!
-
MOC: Osterfeld comprehensive school - Architecture style
Sven J replied to Sven J's topic in Special LEGO Themes
Thanks a lot for your kind words and your appreciation, Littleworlds and Xon67! -
Dear AFOLs, for once I have left my usual train theme and tried something different – I designed and built a model of my working place, the largest school in my home town. In fact, the model is intended as a farewell gift for a dear colleague, for she leaves to face new tasks. It is in approximate 1:625 scale, consists of ca. 1.500 parts and is built on a 48x48 base plate. Here are the pictures: Higher resolution images are available on my Bricksafe account. Thanks for stopping by! Sven
-
Stunning, absolutely stunning. Looks like real. Great work!
-
I think it would be great to have @Shupp's XXL drivers in an injection-molded version. And dark grey wheels would also be fine, as they could be used for models of the German WW II Kriegslokomotiven Class 42 and 52 in their original form.
-
Yes, that's exactly what I was thinking of. Or you build a second one and couple the two engines back-to-back, like the German Heeresfeldbahn (military field railway) Zwilling...
-
Hi Davide! Lovely, as expected! Like Capparezza, I'm very interested to see (and hear) the sound generator. For my own models, I've been a bit reluctant with sound as I feared that the noise from motors and gears would still be too dominant. Hopefully this will not be the case with your steamer! The shovel seems a bit small IMHO. Did you consider using the Fabuland part? Anyway, I think she needs a tender now... Ciao, Sven
-
Beautiful, like all of your models. And indeed, your sticker solution is really skillful! Absolutely! Oh, wow! The history of the steel and coal industry is one of my major interests, so I'm very keen to see that project!
-
A magnificent model! Lots of stunning details. The electrical equipment on the roof is outstanding, and so are the bogies. The only objection that crossed my mind: Shouldn't the buffers protrude beyond the headlights? Otherwise, shunting might result in a lot of broken glass...
-
Indeed! Seems as if you also added (at least parts of) the body?
-
Uh-oh...
-
When I tried it, I thought that it produced almost too much smoke. Do you use rechargeable batteries? In this case the total voltage might be too low. Connected to my BuWizz, in "normal" mode with its 7.2 V the Seuthe emits a very thin stream of smoke, but in "fast" mode (9.2 V) and with the slider at 100%, it's fogging the whole room... And as you said, the smell is a bit special - for connoisseurs only...