
Hod Carrier
-
Posts
1,007 -
Joined
-
Last visited
Content Type
Profiles
Forums
Gallery
Everything posted by Hod Carrier
-
@raised Forgive my ignorance, but did any of those sets come through Ideas?
-
The moon landings may now be part of our history, but it was a global event. As such, the Saturn V has a global reach in the way that any specific train does not and I will not be surprised in the slightest if it turns out to be the most successful Ideas set for quite some time to come. My own feelings about trains on Ideas have already been expounded in the past but basically reflect the views expressed by the other contributors so far. That's not to say that no train will ever succeed on Ideas, but the bar is set very high indeed. For me, part of the problem is that Ideas is set up to uncover new original ideas not derivative designs, and sadly a lot of trains-related ideas are going to be derivative. We've already had official sets covering steam, diesel, electric, high-speed trains, trams and monorails covering both US-esque and Euro-esque designs. There really isn't much left to cover and any train will inevitably be a derivation of something we've seen before. That said, I'd like someone to be able to break through and come up with a really decent train model in the style of the Saturn V. I think there's room for one; something like a large model of something iconic and internationally recognised, like Stephenson's Rocket, an American 4-4-0 or an early Shinkansen car; but I fear that the appeal of any such model will be limited by the factors already outlined and that it's reach will be too small to justify the outlay.
-
[ MOD ] Apollo 11 Lunar Lander 10266
Hod Carrier replied to LemFliggity's topic in Special LEGO Themes
Congratulations for an excellent start. I think your model is shaping up to be an excellent MOD indeed. I do like the chrome gold helmet visors you've used on your Armstrong and Aldrin minifigs, although unless you're going to pose them with visors open or off the colour of the heads is probably immaterial. You are clearly either far more knowledgeable about the design features of the Apollo Lander or have been able to gain access to far better source material, as I had not been able to uncover much of the fine detail regarding the descent stage. I'd discovered that the EASEP door was hinged the wrong way around, but I wasn't aware of the difference in the shape of the door itself. The retracting landing gear is very cool. All you need now is a correctly scaled CSM so that you can pose your lander in docked flight configuration in order to take full advantage of this feature. -
[ MOD ] Apollo 11 Lunar Lander 10266
Hod Carrier replied to LemFliggity's topic in Special LEGO Themes
That's an exciting looking bag of goodies. I can see a few parts in there that were on my shopping list too. I've still got one or two orders to come in from BL before I can achieve liftoff, but I'm getting close. I'm very much looking forward to seeing where our builds are similar and where they diverge. -
[ MOD ] Apollo 11 Lunar Lander 10266
Hod Carrier replied to LemFliggity's topic in Special LEGO Themes
Thanks for the positive feedback, which is good to receive from someone with a passion for the subject. Thank you too for allowing me to reverse-engineer your design. Even if I wasn't able to fathom the precise techniques you've used I'm glad to be at least somewhere in the ball-park. I'm not sure that I would have classed myself as an Apollo nerd before, but I got very enthused because of the 50th anniversary of the Apollo 11 landing. I watched an excellent series screened on BBC entitled "Chasing the Moon" which brought the Apollo programme to life for me in a whole new way. After that I just had to have the LEGO version of the LEM (although my Saturn V is still on back-order). It's a good base model with plenty of scope for improvement without much effort, as I believe all LEGO sets should be. I suspect that our versions will turn out to be broadly similar in their final appearance, but I think it's good not to have identical interpretations. For that reason I respect your decision not to show too much of your model until it's finished and will honour that by also not revealing any more of my design just yet. I'm sure that we will both find aspects of each other's designs that we like and wish to incorporate and together come up with two outstanding models. -
[ MOD ] Apollo 11 Lunar Lander 10266
Hod Carrier replied to LemFliggity's topic in Special LEGO Themes
Seems like we're both heading in a similar direction. I'm certainly very interested to see what direction you take and what surprises you still have in store for us. I've got an unbuilt 10266 set waiting my attention, but I was also feeling a little unsatisfied with the standard design and felt it could be greatly improved upon. The first thing that I've done is to ditch the awful minifigs and replace them with the Armstrong/Aldrin pairing available from Minifigs.me which have better helmets and environmental packs. Since then I have been tinkering with the lunar module itself in an attempt to make it look better. Most of what I've done so far is on the ascent module, as I think that section could benefit from the greatest improvements. So far it's been just minor things like correcting the position of the various antennae and manoeuvring thrusters, tweaking the overall shape and adding a few more colour contrast patches. I knew that eventually I would have to address the front of the ascent module, but I'd got stuck initially trying to preserve the windscreen and door from the standard kit. Most of what I'd tried either looked wrong or the construction would not have been strong enough. This is when I found this thread and the renders of your design so far. I have to say that I am very impressed with your version and I think you've done a far better job at capturing the look and shape of the ascent module front. Your design really should have been the one adopted for the official set. I hope you don't mind, but I thought I'd have a go at reverse engineering it in LDD. I appreciate that you have tested some of the construction methods, but I have been unable to replicate some of the parts usage and techniques you've used, especially around the windows. It's entirely possible that I have missed some clever trick, but I was finding a lot of parts clashing which suggested to me that some of the design might not be possible to build in real life. As a consequence, although it's clearly still based heavily on your design, I've had to take a slightly different route and come up with a variation on the theme. Let me know what you think. I've got a little more work to do on the descent module, but I feel that this part of the set looks reasonably good out of the box. I will be making the thrust deflectors a little larger and upgrading the ladders and will explore whether or not it's possible to improve the landing gear, but apart from that I shall probably leave it largely stock. -
Sadly I think you’ll need the good hard tug that the train motor provides to break the magnetic couplers, but I agree that a Technic-based solution would give better slow-speed control and precision of operation. Just idly wondering about whether a weaker coupling connection might help. After all, the maximum train length is always going to be modest so the couplings don’t need to be super-strong. Might there be some mileage in swapping out the couplers at one end of each car for something ferrous but non-magnetic? Would this still be strong enough to permit your maximum train length but weak enough to make uncoupling a bit easier?
-
Brickworld 2019 retrospective and some of my MOCs
Hod Carrier replied to zephyr1934's topic in LEGO Train Tech
They say that the devil is in the detail, and that’s certainly true here. Few things say “neglected yard track” better than poorly maintained ties, and that shows here. Great techniques + Great details = Amazing results!! Chapeau, monsieur. -
Building Techniques for European passenger cars
Hod Carrier replied to Stefaneris's topic in LEGO Train Tech
They look a lot like longitudinal rain strips, similar to those on British Mk3 and Mk4 coaches. They channel rain water over the ends of the coaches and remove the need for large rain gutters to protect the doors, etc. I’ve got to tip my hat to you for those wonderful coaches. Does the Eurofima roof keep its own shape naturally or is there something inside to keep the curve? -
What a lovely little thing. You know, it's sometimes hard to nail that prototypically slow speed that is often seen on the railways but I think you've gone a bit far down that route. Ha ha!! But that's the consequence of using the worm gear. It does gear the engine down rather a lot.
-
Thank you, gentlemen. @Roadmonkeytj I cannot take any credit for the shape of the excavator itself, as it was reverse-engineered from another MOC (see original post for link and credits). All I've done is adapt it for road-rail use and create some appropriate accessories. @GR4FFIXXZ Sorry I didn't spot your request earlier. Which part of the excavator are you interested to see?
-
[Discussion] European Railway Instructions?
Hod Carrier replied to raised's topic in LEGO Train Tech
@Redimus That’s kind of what I mean. Expressions of interest are one thing, but getting them to actually buy something is another. -
[Discussion] European Railway Instructions?
Hod Carrier replied to raised's topic in LEGO Train Tech
It’s an interesting question. Has the European market been tested to gauge interest? My personal feeling based on no actual research at all is that the American market is much larger. Just looking at the shows that happen over there, the trains theme seems to be more active and therefore more widely accepted. American LUGs are able to field huge displays which doesn’t seem to be mirrored so much in Europe. That said, as I mentioned above, no-one has yet seemed to have tried. -
@ALCO You’re welcome, but the idea is not my own. The compressor switch is balanced by the piston and the spring. The spring holds the switch on while the piston pushes against it to switch it off. As the pressure builds the piston overcomes the spring, but as it falls again the spring takes over. Therefore the compressor runs automatically and maintains a set pressure within the system without the need for operator input. Here is one possible design. You can see the pressure switch in the last photo of the original post. It’s the yellow piston attached to a PF polarity switch acting against a red rubber band.
-
For me, this is the beauty of pneumatics. The piston will only extend a certain amount by design and no further. The ones used by @ALCO have a 2L throw, so you simply design your mechanism accordingly. Once it's reached that extension it can't exert any more pressure on the mechanism. Fair enough. It sounds as though you have a different design brief to the one I had come up with. For an individual installation the cost isn't too bad, but I was envisaging multiple installations. You're right that it's less than the cost of an electric motor, but electric motors would not have suited my intended usage anyway. It would be possible to control the pressure within the system to prevent over-pressure. I've seen quite a few automatic LEGO compressors where the switch for the motor is controlled using a piston acting against a spring or rubber band. As the pressure increases, the piston overcomes the spring and moves the switch to "off". By tweaking the amount of force in the spring you can raise or lower the pressure in your system. And I'd feel fairly confident that a constant moderate pressure would not damage any of the parts.
-
Thank you, gentlemen.
-
1960s Britain has plenty of options. There was still loads of steam engines as well as new diesel and electric locomotive classes, as well as diesel railcars and electric units too. Have a look around at some photos and see what tickles your fancy and then take things from there. Alternatively, let your imagination go wild and design something yourself that fits your vision.
-
What a thing of great beauty. The cost and effort clearly paid off because that's one lovely model. Just brilliant!!
-
Interesting. I had considered using pneumatics also but the cost and availability of parts makes it prohibitive. I hadn't intended to use the solution you've designed but rather to have the cylinder operating the point/switch blades directly instead of operating the standard drive-bar mechanism. This would have given a cleaner installation and given me the option to remove the drive-bar altogether if I wished. Admittedly this idea is untried as I don't have the parts necessary to test it. Have you removed the lugs inside the points/switches that lock the drive-bar in each position? The advantage with pneumatics is that, provided your cylinders are supplied with a constant air pressure in each position, it should hold the point/switch blades in place without any other assistance. It will also make the mechanism easier to drive.
-
@baard Thank you. I'm always happy to share with you all. About the bogies; yes I could make them a little shorter to help with curves, but that would not be quite to scale. I'm happy enough with the performance that I don't think I need to ban R40s completely, even though they do slow the loco down a bit. I shall just have to try some slightly larger curves until I find some that the loco is happy with.
-
It shouldn't do, no. Both motors are electrically connected by the sitting on the same piece of track anyway. Adding a wire only replicates this inside the model.
-
I think I've been mysterious with this for long enough now. I think it's time to show you all what's going on inside. First of all, let me just confirm that this model is motorised and does indeed run, and that it will traverse R40 curves (although it is slowed by them). Below is a little video showing this (click to play). It's actually quite a smooth runner and doesn't mind pulling a tail load. But wait!! What's going on? It's almost as though this train has a mind of it's own!! Well it does, after a fashion. Yes, of course. This loco takes it's power and control from a Mindstorms EV3 intelligent brick. I got the idea after finishing the signalbox lever frame. I enjoyed building it but I wasn't quite sure what it was for once I'd finished it. Ideally it would be a good way to control the movement of trains in exactly the same way as signalboxes do on the real railway. It would be even better if the trains could be automated so that they could interact with the signalling in a realistic way. But how to achieve this? This was when I found @Hanso's work using Mindstorms to control train movements and integrate them into a larger display (click for thread). For this he used coloured tiles to determine the train's location in order for them to be integrated successfully, so surely the same principle could be used to convey instructions to the train using the appropriate programming. However, unlike Hanso, I wanted my trains to be realistic-looking, and for that I needed be able to fully enclose the EV3 brick within the bodywork. This was one of two key criteria that I needed to fulfil before even considering going ahead. The second was the need for whichever loco type I chose to be British, as this would relieve me from the need to learn another country's signalling principles. It took very little thought to realise which way around the EV3 brick would have to go inside the model and that I would need a decent space between the bogies to accommodate it together with the colour sensor. This requirement alone is what brought me to the D800 class diesel, as this type's configuration made it the best candidate for an installation. However, I was not going to be able to employ exactly the same powertrain as Hanso had (EV3 controlled servo operating a PF battery box dial to power conventional PF train motors) as this simply wouldn't fit. This loco would have to work using the medium servo motor or it wouldn't work at all. A huge amount of tiffling about with LDD finally brought me to a design that I felt could work and still look like a real locomotive. Having got that far there was nothing for it but to build the model and see how it would perform. This is a short video of Robotrain v1.0 on test, and already there was a problem. The gearing for this model is 1:1 but, as Hanso discovered, the medium servo motor is not ideal for this application. The prototype had been programmed to accelerate to 100% power, slow to 50% power when it received a yellow signal and then slow to a stop after receiving a red. Testing the prototype suggested that it was always slow to respond to the yellow and did not reduce speed that much, which indicated a problem with the motors. Static testing with the motor disconnected from the drive shows a lovely linear increase in power up to around 70% after which the power output tails off markedly. Reconnecting the motors to the drive showed similar results. Clearly the model would need to be geared-up fairly dramatically to make it run at anything like a realistic speed. On the plus side, the use of servo motors makes the loco very controllable and very precise. Even with the VGAs in tow it could start away with no wheelspin whatsoever and it would always stop in exactly the same place every single time. By altering the variables within the programme the performance of the loco can be fine-tuned to make it do exactly what I want it to do. The quest to gear the loco up initially caused me a bit of a headache due to the internal configuration of the gears and shafts. However, it was at this moment that I made a realisation that would help solve this problem. It was only when looking at renders of the finished loco that I realised I'd made a miscalculation regarding scale. The height and width of the model had been dictated to me by the need to accommodate the EV3 brick, but it suddenly dawned on me that the loco was out of proportion because I had got the length wrong. Suddenly I had an extra six studs to play with that would permit me to move the bogie pivots and vertical shafts nearer to the ends of the motors which would permit me to use a bigger drive gear. This is the final drivetrain configuration. The gearing has been increased from 1:1 to 1:3 which has increased the speed nicely without apparently affecting the loco's pulling power or the ability of the sensor to "see" the colour signals in the track. This has also allowed me to change the programming parameters so that I can avoid the drop-off in power output from the motors. Cosmetically this model is now complete but I'm sure that there will be software tweaks still to come. I have tried to make the loco "think" and "react" to signalling in the way that a real train driver would in order that it will operate realistically. This is just Phase 1 of a fairly ambitious plan to create a layout featuring semi-autonomous trains operating under the supervision of a signalbox, so it is almost certain that there will need to be alterations to ensure that everything runs smoothly and reliably. Consequently there will, as I hinted above, be more to come on this. Now that I have proved that the loco works and that it can "see" track signals the next stage will be to design and construct the signals themselves and provide facilities for them to be remotely controlled.
-
It would help deal with any electrical pick-up problems due to dead spots, etc. Provided that one motor has good electrical connection through the track both motors can still run normally, otherwise you'd have one motor running and the other one stalled.
-
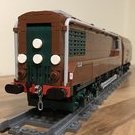
I guess diesels aren't your thing, but thank you for the lovely comment. I'm pleased that it turns heads of steam fans too. Your Dad was a western man? That's fantastic!! That sets the bar very high indeed. I'm very happy to receive your endorsement as someone who has probably seen these locos up close. Appearance wise the Warship is finished. There are one or two technical considerations that I'm still working on, details of which I'll post as they are dealt with. Not specifically, no. I was intending to use 2x2 wedge plates which BL lists as being available in dark green. However, when it came to trying to buy some I discovered that one is rare and the other not available in any store due it only appearing in a one-off limited edition Brickheadz set distributed only at a New York Comicon. I wasn't going to give up on the shape, so sadly the 2x2 tiles had to be mutilated. The studless appearance is just a happy side-effect. Thank you. That's high praise. I guess I just got lucky with the scale which allowed me to use O Scale transfers for the majority of the markings. All I was left to do was the warning panel and the windscreens. I'm glad you like the buffers. I wanted to try and make them oval like the original locos and was lucky that the parts now exist to recreate this. The only downside is that they end up quite thick (2 plates) which does spoil the look from the side a bit, but I'm happier to have that than rectangular buffers.
-
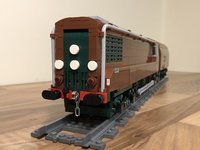
A little treat for everyone for Easter. I've been working away quietly on my first full-size loco, and just this week I completed it. It's a D800 Class "Warship" diesel-hydraulic loco used by the Western Region of British Railways during the 1960s. My model is of D812 Royal Naval Reserve 1859-1959, one of only two members of the class not to carry the name of a Royal Navy warship (see Prototype Notes below). Although the normal convention for British models is 7-wide, I was forced to build this as an 8-wide model which makes it rather large. On the plus side, this model scales at around 1:42 or 13.5 inches per stud, which brings it very close to UK O Scale. The benefit of this scale is that instead of having to create my own graphics I was able to use the excellent range of O Scale waterslide graphics for all markings, crests and numbering. I was even able to lavish this model with etched nameplates and works plates. As far as possible I have tried to keep everything to scale, and this extends to the bogies. They are a tad long to comfortably traverse standard LEGO curves, but they will go round even though the wheels are partially covered. Purists may be disappointed to see that some LEGO was hurt in this area of the model, but I wasn't going to give up on the sloped sideskirt ends. The uncompromising head-on view shows the use of coloured vinyl to recreate the yellow warning panel and the windscreens. Admittedly the screens should be larger and extend to the roofline, but this is one of those compromises you make when you build with LEGO. Silver window frames have been achieved using a metallic silver Sharpie. This is just a taster of the details of this loco as there is more to reveal in the coming months. Prototype Notes: