
Hod Carrier
-
Posts
1,008 -
Joined
-
Last visited
Content Type
Profiles
Forums
Gallery
Everything posted by Hod Carrier
-
You've just floored me with that fact. Wow!! I'm going to have to search now for the K'antus version you mentioned. The music I chose was one of only three suitable tunes in the library, all of which have the same meter and feel. I could have used any of them but, of the three, I chose this one simply because it was the right length. To know that the K'antus song evokes the railroad and rail travel just makes it seem even more appropriate to use it. I do know what you mean about doing things against deadlines, because I'm not terribly well-organised either. I tend to leave things to the last minute and then rush to get things completed on time. But in the case of things I enjoy doing it doesn't seem like so much of a chore. I like OcTRAINber primarily because I don't see myself as a particularly skilled builder. I have a fairly haphazard approach to choosing subjects and build things without any particular idea how they go with each other or anything else. I have a cupboard slowly filling up with Dutch 4-wide scale models, two UK freight wagons, a signalbox interlocking frame and now a Bolivian narrow gauge railbus. I don't have the backing of a LUG or any other contact with the AFOL community at large except through this forum. I just seem to have a knack for putting one brick on top of another and creating things that look not entirely unlike what they're meant to look like. For me, OcTRAINber is a way to get a feel for where my skill level actually sits by having my work judged by some of the best LEGO train builders and being in competition with other skilled builders. And, wouldn't you know it, I even won a prize last year, so I can't be doing too badly!! Ultimately it's just a bit of fun; something to look forward to and join in with. It's great to see all the amazing designs that come out of contests like this one. We get to see some great creations throughout the year but, thanks to the guys at BMR, October now brings the richest outpouring of new MOCs. It would be great to see you involved (and everyone else too) next year if you can spare the time and resources.
-
Vehicle Dynamics Laboratory investigates the Castering Effect
Hod Carrier replied to Hod Carrier's topic in LEGO Train Tech
I'm trying to visualise the arrangement you're suggesting. Perhaps you could post a quick diagram showing your proposal? If the purpose is to try to prevent the phenomenon I referred to as "bunching" when the train is being pushed, the trick is to try to reduce the number of pivots between each vehicle. The trouble is that, out of necessity, these vehicles have too many. There is the pivot for each articulated axle together with the pivot for each magnet, giving a total of four pivots between each vehicle. If you've ever tried pushing something using a hinged bar you will know that it doesn't work because the bar will try and fold up the instant that any of the pivots go over centre. One solution could be to fix the magnets so that they do not articulate, creating a solid connection across the axles between vehicles, and what you would have is a kind of Jacobs bogie. Another could be to force the axles to self-centre, perhaps by using rubber bands to pull them back to the centre. Personally, I found neither solution satisfactory. The quasi-Jacobs bogie simply swapped having a two-axle car of a certain wheelbase for a two-axle bogie of a certain wheelbase, and it was possible that both would have the same problems taking curves. In the case of the vehicles I was testing, tying the axles together in the form of a Jacobs bogie between vehicles would create a fixed wheelbase barely less than that of the wagon itself. Therefore I wouldn't really have solved the problem that I had set out to solve. Through experimentation, I also rejected the idea of forcing the axles to self-centre. Yes it works up to a point, but to eliminate "bunching" entirely the force that would have to be exerted on the axles to centre them would have been great. The real downside I found was that any force acting to centre the axles had to be overcome in order to induce them to steer. I couldn't see any way to tune these forces in order to get the right balance between centring and steering. All you'd end up with was something that would either centre or steer but not both, and that for me was to big a price to pay. I wanted them to steer so that the cars could take curves easily and smoothly, so any force that prevented them from doing so was unwelcome. In the end, and slightly by accident, I discovered that the key was to influence the magnets. Allowing them enough movement to articulate slightly and yet centre again when needed seemed to work brilliantly. I guess what I came up with was a sort of flexible Jacobs bogie that could articulate through curves but would otherwise hold itself straight, even when pushed. If you can replicate this effect by changing the orientation of the magnets in the old-style couplers then that should be your aim. However, given that they freely articulate the same as (if not more than) the new-style couplers, I'm not sure if you can achieve the same effect without somehow inducing the magnets to self-centre. -
@Laura Takayama You're most welcome. I enjoy the challenge set by OcTRAINber to try and design and build something new against the clock like this, and being able to share the process with the community just adds to the enjoyment. It's nice to put other projects aside for a while because you can come back to them fresh later. Maybe you'll join in next year...? I remember that there was a brief vogue for Andean panpipe music back in the 1990s that even reached as far as the UK. I don't recall if any of the more successful groups like K'antus ever visited, but every Saturday there would be an Andean musician dressed in traditional clothes in the town centre playing panpipes to a backing track. I'm afraid that, although the music track for my video may sound like K'antus, it actually came from an online library of copyright-free music. The artist is a very Nordic sounding Magnus Ringblom.
-
Thanks for the kind comments everyone. Yes it does wobble a fair bit. Part of that is no doubt due to it being a bit top heavy but it’s also because the track wasn’t the smoothest. In both respects that probably makes it very much like the prototype.
-
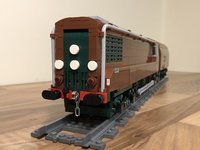
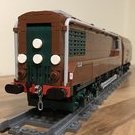
I'm going to say that I'm finished now. Click the picture. It's a video!!
-
Congratulations, Ashi. That's a monster build!! You really set yourself a huge challenge, and now that the tram is complete it's easy to see just how much planning, effort and creativity has gone into your project. I'm sure that with time you will be able to crack the drivetrain issues and have the model running smoothly, but at least you've managed to get it mobile before the competition deadline. Have you considered swapping the LEGO traction bands for something with more grip, like rubber O-rings? If you only have a single powered "axle" you need to maximise the grip available, and I think you've already done about as much as you can by redistributing the weight, etc. Using rubber O-rings really helped my tiny TRAXX loco overcome wheel slip.
-
She's a good looking ship, no question. I think you've done an excellent job capturing the shape and look of the train. I'm glad you were able to find the time amongst your studies to participate and I wish you every success.
-
Why does it always seem that the postal service slows down when you have a deadline looming? I've had a little hiatus while I waited on a few new parts. Firstly, I promised a driver. And I have one!! But, uh-oh. It's Johnny Thunder. I've also had to spoil the look of the bus because I turned up some more recent photos which show signs of accident damage. Poor old 253's shapely curves have been marred by what looks like a minor collision with a road vehicle on a crossing. Consequently there are quite a few areas of rust appearing, and I thought that I should perhaps try to capture this. I've also added stickers.
-
No amount of lifting and packing is going to achieve a smooth ride with that particular length of rail. Good find, though.
-
If you’re going for an Inglenook you might need to adjust the road lengths a bit. From the photo it looks like you’re going for a 3:2:2 puzzle, in which case the headshunt needs to be long enough to accommodate the loco plus two wagons. Other than that it looks like a very promising start.
-
Motor Rail Simplex 40hp tractor "Tin Turtle" WDLR [MOC]
Hod Carrier replied to greg3's topic in LEGO Train Tech
Splendid!! I’m glad your boys have finally got a bit of armour protection. It’s nice that you’ve modelled the open version because we wouldn’t see the interior details if you’d gone for the full metal jacket. I note your observations regarding the exhaust. I imagine that a lot of these locos would have received various modifications as a result of service experience, some of which would have been more official than others, so I would presume that the roof-mounted silencer would have been added to make them less conspicuous close to the front compared to the unsilenced versions. -
[MOC] Darjeeling Class-B 0-4-0 Narrow Gauge Loco
Hod Carrier replied to ProvenceTristram's topic in LEGO Train Tech
Most people who don’t know much about steam railways will equate any small blue engine with Thomas. There doesn’t seem to be any way to avoid this connection. But then it shouldn’t necessarily sway your decision one way or another. You can tell what it should be, and even if people less well versed in railways mistake your engine for some other, you can still take great satisfaction from knowing that you built a good model. I’ll come down and say that if you want it to be prototypically correct it should really be blue. But I do agree with @pirzyk in that this is YOUR model and you can build it in any colour YOU like. -
@Laura Takayama Thank you. That's most kind. I'm actually feeling pretty pleased with it too and agree that it looks better in brick than as a digital render. @ColletArrow I've just tried your suggested parts in LDD, but sadly there is an issue. As you can tell, both the motor and the drive axle are attached directly to the floor using stud-matched parts. Both of the parts you suggest create a half-stud offset between the end of the motor and the vertical shaft which makes attaching the motor less straightforward. Granted, it's not an insurmountable problem and could be remedied, but it's a slightly bigger job than it appears at first glance. I'm inclined to leave it be on the basis that it's not a hugely heavy model that will never have to contend with a tail load and that the current design does capture the shafts and bevel gears acceptably well. The only real threats are if the motor comes adrift from the floor or the gear on the top of the vertical shaft slips down (although there's really only a tiny space for it to do so and it may still remain meshed). But I will keep your suggestions in mind as I may implement them on a future model. Thank you.
-
Thanks for the tip. I did consider using something similar to the parts you recommended, but by that time I had already ordered the parts you see here. When the performance proved to be acceptable I decided to put the idea on the back burner for a while, but I may come back to it. It will need to redesign the floor slightly, but I think the number of parts necessary to make such a modification will be small, so I may tack them onto another order the next time I'm on Bricklink. I think that the interior will be limited to a driver figure and not much more. I have a suitable character on order at the moment who is winging his way to my front door as I speak. Watch this space. I've had another push on building and got the shape and structure of the body pretty much complete. There are still one or two things that still need to be done before I'm ready to submit my entry, but the finish line is now in sight. The PP3 battery in it's little hidey hole. Putting it under the hinged roof rack helps to hold it in place while making access easy. It's also clear of the windows so isn't visible when in place. There are a few more photos on my Flickr page.
-
I hope no-one is getting bored of my updates on this little project. I promise that it won't go on much longer (well, not past 31 October anyway ). I've progressed far enough to be able to show a cutaway of the interior, displaying the internal configuration. Once I'd decided that I was going to hide the battery in the roof, it became clear that there would be more than enough space to install the motor and SBrick. I'm not sure, however, that I'm going to be able to put much (if any) internal details. Staging this shot did highlight a problem with the power lead. I've had to cut back the heat-shrink sheathing to give the cable enough flexibility so that the battery would lay flat in it's recess. One more push and I should have the bus finished.
-
Now that I'm happy with the performance of the chassis it's time to do a little building. I was able to grab a few minutes before work today to make a start. The first part to be completed is the front bogie. It took a few goes to come up with a design that was narrow enough but still had the correct look, but this one not only looks the best but actually uses the fewest parts. Win!! I've also attempted to represent the leaf springs inside the wheel arches. When these buses were converted to rail use it appears that the Bolivians simply ripped out the front axle and steering and fitted a small bogie directly onto the leaf springs where the road axle had been. This leaves a huge gap on the real Ferrobuses which I have been unable to replicate. I also had time to make a start on the body, so I've got the front end done ready to go on the chassis. I thought I would do something a little special and anticipate the question that I knew everyone would be asking. "Does it have chrome?" But asking this is like questioning the Pope's religious convictions, wondering if Luxembourg is small and pondering on whether or not bears take their ease in the woods. It's a 1950s Dodge!! What do you think? And the chrome won't end there. There's still more to come.
-
That seems like a fairly unequivocal vote in favour of the axle. Thanks for the feedback.
-
Thanks guys. I think I’d favour the more prototypically accurate fixed axle also. It has the added advantage of being more sturdy than the bogie too. The only problem I found with the bogie was not actually to do with being weak in construction or any issues with the gears meshing, but that it kept falling out if I picked the model up. The vertical shaft that runs through the floor into the bogie is held in place only by the bevel gears themselves, and the grip was fairly tenuous. I think I may have slightly contaminated it with the silicon grease I’ve used on the small wheels which didn’t help, but once I’d cleaned it up it held well enough if I was very careful with it. I’m hoping to start building the body on to the chassis as the week goes on. There’s something a little special to come.
-
She does look good in black. But she’s such a looker that I think she could easily wear any colour and wouldn’t look out of place on any narrow gauge line, whether industrial, mining, agricultural or passenger.
-
The postman has brought the last of my Bricklink orders and I think I have everything that I need to assemble the Ferrobus. I love the smell of LEGO in the morning. It smells like creativity. I thought that I would at least assemble the chassis and give it a little spin to see how it performs. I'm keen to try out the lightweight power bogie design and see how it performs. I also want to know how well the chassis would perform with only a fixed rear axle, as per the prototype. Here's what happened. (Click for video.) I can't say how pleased I am with the results. I genuinely expected the model to struggle on 4-wide gauge curves, especially with the fixed rear axle, but it seemed to breeze it. I'd even laid an outer oval of dual-gauge track with R40 curves in the full expectation that it wouldn't cope at all, but as things turned out this extra track was only needed briefly, and then only to check if the model accelerated on straight track (it didn't). So now I'm facing decision. I like the power bogie because it is a purer engineering solution, and I'm pleasantly surprised at how well the chassis works with a fixed rear axle. But does the small advantage of the power bogie justify it's use when the prototype does not use one? Thoughts...?
-
@Roadmonkeytj Most welcome. Give me a shout if you have any questions with it.
-
@Roadmonkeytj I've lost patience with Brickshelf and put the file onto Bricksafe instead. Click.
-
I have to be honest and say that I don’t know. It’s been a while since I last used Brickshelf, but it does seem to be unusually slow.
-
I'm really enjoying your models. You've really taken care to find out about your prototypes and to portray them accurately, so I salute your efforts. With the Centenary of the Armistice just around the corner, it's a fitting tribute to a vital, but largely forgotten, side of the war effort.
-
You're most welcome. I need to take a couple of additional photos to show some of the hidden parts, but the .lxf file is now available here. (Or at least, it will be once it’s passed Brickshelf’s moderation.)