
Hod Carrier
-
Posts
1,007 -
Joined
-
Last visited
Content Type
Profiles
Forums
Gallery
Everything posted by Hod Carrier
-
Thanks everyone for the kind words. Yes I believe so. It's 3mm rigid hose bought through Bricklink, so I'm assuming it's an official part. I did have to heat it slightly over a flame to get the 90 degree bend, though.
-
Thank you everyone for the amazing feedback. Wow!! That would be great. I'd love to. Yes, that's the front. Oh wait, hang on. Er... No, the rear. Probably. It is funny you should say that because there was something I forgot to mention. All the images I have found online for this loco seem to show the same side, so I've had to assume that the other side is a mirror image. Like the moon, CC1 has always hidden her "dark side". If anyone knows whether this assumption is incorrect I shall be happy to hear and to make the necessary corrections. The ladder piece is definitely horrible and I'd rather not have to use it at all. The problem is that it's right on the very front of the loco (Or is it? See above), and therefore a fairly prominent feature which I couldn't really delete. The techniques you've shown are certainly much better, but sadly won't work on this build due to the shape and construction of the front. However, I'm interested to know what that part is you've used as a ladder ahead of the bogie on the tender of your S2, as that looks just the job.
-
@Andy Glascott Thank you. I'm happy to have been able to bring a little of the green of home to the forum. She was a pleasure to build and I'm glad to have been able to bring her to a wider audience.
-
@bogieman Thank you so much. I always find that I get myself immersed in the detail of the models I build and end up learning a whole load more about them than is necessary to build them. I think that's why I've just built two alternative fuel locomotives rather than examples from a fleet, because I find their stories more engrossing.
-
@zephyr1934 Ha ha!! I thought you'd appreciate the nickname. Thanks must go to you for the custom rods which really complete the look. @bogieman Modern aviation jets use kerosene, but a gas turbine can run on pretty much anything that will burn. I believe GT3 burnt diesel as that was what most readily available on the railways at that time. The buffers are as close to oval as LEGO will allow, but the dummy three-link coupler is a technique I have seen used elsewhere which I have copied.
-
Thanks guys. She's certainly an unusual loco and a total one-off. As far as I'm aware there were no other purpose-built turf burning locos. @CDM Yes, I'd have liked a smaller and more delicate looking ladder for the front end but nothing suitable was available. @zephyr1934 I had to build her in this livery as dark grey just wouldn't have looked as good. I was lucky that the parts were available.
-
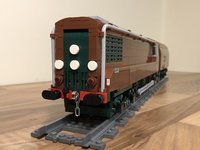
I know it looks like a diesel, but I promise you that it's not. This is Córas Iompair Éireann (CIE) CC1 "Turf Burner". It was a prototype 0-6-6-0T steam locomotive that was designed and built at the Inchicore Works under the directorship of O.V.S. Bulleid. As Ireland has no reserves of suitable coal, Irish railways have always been reliant on imports of Welsh steam coal. However, at times the supply of this fuel has been interrupted, such as during the two world wars. As a consequence, Irish railways have had to be inventive during times of shortage and had already carried out limited experiments on using turf or peat, which Ireland has in abundance, as a locomotive fuel. The use of turf as a fuel more generally saw a huge increase from the 1930s onwards as a means of ensuring energy security, with turf being burned in everything from electrical power stations to domestic hearths. At this point O.V.S. Bulleid joined CIE as Chief Mechanical Engineer having already acted as a consulting engineer on the Milne Report which recommended the rationalisation of the Irish railways locomotive fleet and the creation of a standard class of loco. Following trials with a converted conventional locomotive, plans were laid down for what would become CC1 which would use turf as it's primary fuel. The resulting loco was not terribly attractive and had been likened to two tenders backed up to each other. It had a central boiler with a square cross-section, a water tank at one end and a turf bunker at the other with the cabs sandwiched between. Technically, CC1 shared some features with Bulleid's earlier 0-6-6-0T, the Leader class built for Britain's Southern Railway, most notably the drive arrangements on the bogies. Like the Leader, CC1 used enclosed chains running in oil baths. Testing commenced in 1957 and CC1 was observed to have good steaming characteristics and rode quite well for a large loco. She was returned to Inchicore for modifications including spark arrestors and smoke deflectors and a nice coat of green paint together with white lining and chevrons (CC1 had previously been dark grey), although some issues remained. Judging from photos, another aspect CC1 shared with her English cousin was issues surrounding crew comfort. The cabs must have been hot because every photo I have found shows her with the doors and windows wide open, so I have modeled her in this condition. The test program continued until the end of 1958 when the project was halted following Bulleid's retirement earlier in the year. CC1 was retained at Inchicore until 1965 when she was broken up. The boiler was retained for stationary use and the frames and bogies survived into the mid-1970s. My model is of CC1 in her final configuration. Again, there are probably no particularly interesting building techniques employed except perhaps for the placement of the motors. The vertical orientation of the L-Motors leaves no room inside the body for any gearing, so the 20T bevel gear has had to go into the bogie instead which has necessitated making room for it (if you know what I mean). Due to the retirement of Power Functions, this is probably my last PF model. All future builds will have to use Powered Up.
-
I know it looks like a steam loco but I promise you that it's not. This is the English Electric GT3, a gas turbine prototype locomotive designed, built and tested as a private venture. Unlike earlier gas turbine prototypes running in the UK (the Brown Boveri 18000 and the Metropolitan Vickers 18100) which used gas turbines to generate electrical power for traction motors, GT3 was built as a prototype to explore the use of a mechanical transmission with a gas turbine to provide motive power. The project was overseen by J.O.P. Hughes of the English Electric company and was the culmination of 13 years of testing and development. Everything from the characteristics of the gas turbine to the performance of the auxiliaries was novel and each system required exhaustive testing to ensure that they would perform reliably. The loco appeared initially in semi-complete form during 1958 and underwent trials and testing at British Railways Locomotive Testing Station at Rugby before being returned to English Electric for completion. GT3 then reappeared during 1961 sporting a semi-streamlined body finished in russet brown with Brunswick green frames, wheels, doors and other details. Nicknamed "The Chocolate Zephyr" by rail enthusiasts, GT3 produced 2750hp and could operate at speeds up to 90mph. Mainline testing showed that GT3 was a capable locomotive and could easily match or exceed the performance of the new 2000hp classes of diesel-electric locomotives and the larger steam classes. Although there were some technical difficulties, particularly with the reversing gear, GT3 never failed to complete a test run, even over the most demanding routes and the heaviest loads. In spite of showing good promise, by the end of 1961 British Railways withdrew it's support for the test program and the loco was returned to English Electric. Following recovery of the gas turbine and associated equipment, what remained of GT3 was scrapped in 1965. GT3 never hauled a passenger service. My model is probably fairly conventional in terms of it's construction. About the only aspects of note are the floating middle axle under the tender and the fact that the square section of the loco body means that it can contain the power, control and drive which should help give reasonable adhesion. However, the size does mean that running on R40s would be out of the question. By the way, apologies to anyone clicking through expecting to see some manner of sports car.
-
If anyone is in the mood to share their entries, there is a Brick Train Awards Flickr page to which you can add photos and videos. I should stress that this is not part of the entry process and is entirely optional. Entries must be submitted via e-mail using the official process outlined on the Brick Train Awards website. Entries only posted to Flickr will not be judged unless they have also been e-mailed. The Flickr page is only there as a showcase.
-
Oh, it really is as simple as that? That's good. As I say, I haven't been paying a huge amount of attention to the PU discussions, but I seem to recall that this had been an issue. I guess I must have read it wrong. Many thanks. He's a quick worker. I had a feeling that I should have probably checked there first. So the new L-motor is a tad more powerful than the old PF version but at the cost of lower RPM. Good tip. Many thanks. That parity wasn't evident with the L-motors, though. TLG were shifting the outgoing PF L-motors at @12-15GBP before Christmas (assuming I've remembered the figures correctly) but the new L-motor is @30GBP.
-
Now that it appears that the remaining PF elements have been retired I guess that I shall have to now consider getting with the new tech and adopting PU. Unfortunately this means that I haven't really been paying attention to the discussions so far. Also I just like to build and drive trains and am no engineer, so I'm afraid that a lot of the discussion about Powered Up is way beyond my comprehension. So forgive me if these questions seem a little simplistic or if they've already been answered elsewhere. 1) Did we ever get to the bottom about whether or not Powered Up could handle a twin-motor set-up without having to dismantle or modify any parts? 2) Has anyone else tried using the new Technic motors (e.g. 88013) for loco propulsion? How do these compare with the outgoing PF motors in terms of power and speed (I already know how they compare for price )?
-
Keybrick One / Rechargeable battery pack for Powered Up
Hod Carrier replied to keybrickone's topic in LEGO Train Tech
...and, if you're going to produce a bespoke box top for PF, have the charging socket on the top rather than low down on the side. Maybe also have the option to charge using the 10V wall adapter as well as 5V USB. I have to say that I'm currently going through all of the available options to decide on the power and control for future builds and I'm not hugely impressed with what's currently available to me. The retirement of the PF LiPo is a blow because I was hoping to use this in conjunction with the SBrick. With the exception of Buwizz, all other options still require some form of power supply or, in the case of PUp, you have to compromise on the number of outputs, and all of the power supply options, including Keybrick One, will require some degree of disassembly of the model to facilitate changing/recharging the batteries. I note that there has been some discussion up-thread about some sort of charging umbilical that ends in a "socket brick", but for me this surely is a must-have. As a side-note, given that the supply of PF motors will soon dry up, will the makers of third-party power and control soon be offering their products with PUp sockets? -
Thank you, sir. Yes, I think you might be right about the challenges of living in an old carriage. But then you could just light the stove and it'll be toasty in no time. Oh yes, I don't think I got the best design out of myself for this year's contest. For various reasons I didn't get the time I would have liked to design and build something better. My intention had been to build the MOC onto an irregular base rather than use 32x32 baseplates, but I have learned that the best way to enjoy OcTRAINber is not to be too ambitious and to decide on a design early and stick to it. The time constraints together with some of the consequences of the global pandemic meant that costly mid-build redesigns were out of the question. I did look into angling some of the elements, but doing so would have meant they wouldn't all have fitted onto two baseplates and resulted in dead space in some places and overcrowding in others.
-
Thanks guys. As a first attempt at something scenic I'm happy with the way it's turned out. It's an old-style petrol lawnmower. It's been left by Jack in the middle of the grass while he takes a break. He still has to come back and finish the job of cutting the grass.
-
As would I. Mind you, I don't think there's much space for LEGO in a home like this.
-
For this year's contest I decided to build a railway diorama featuring some sort of train and some sort of track, but without featuring any sort of railway. In doing so, I went from this... ...to this. See more about Home Signal in my OcTRAINber album on Flickr.
-
No, I don't think so. That said, why bother? It's a lot of faff and hassle, and there's no guarantee that you'll get a useable part at the end of the process. From my very limited understanding, the manufacturing tolerances in genuine LEGO parts is very tight, and it's going to be important to get your printed parts as close to this level of accuracy if it's going to work. LEGO models are held together by friction alone so the clutch power of parts is vital, which is why they mold their parts, not print them. To loose and they fall apart, too tight and they don't grip correctly causing stress and distortion. Your design may be spot-on, but variability in the performance of your printer or even the choice of material you use to print can all impact on the accuracy of the final product. As has been mentioned above, you can always fabricate your own baseplate using existing LEGO parts. Most builders do this because it allows you to create whatever characteristics you wish for. You really don't need to use a train baseplate at all.
-
Anyone know if Britain had overnight Pullman trains?
Hod Carrier replied to SteamSewnEmpire's topic in LEGO Train Tech
Happy to help. -
Anyone know if Britain had overnight Pullman trains?
Hod Carrier replied to SteamSewnEmpire's topic in LEGO Train Tech
There were Pullmans and there were sleepers but there wouldn't have been any Pullman Sleepers, at least not during the inter-war period. Pullman's involvement in the UK railways started in the 1870s at the behest of the Midland Railway using rolling stock shipped in flat-pack form from the US in 1874, including three sleeping cars. However, these were of a convertible type based on the open saloon "Palace Cars" and proved unpopular with British travellers who would have been used to more privacy and greater respect for social niceties. Although other companies initially copied the pattern these were not Pullman cars and, in any case, all were superceded in the 1890s by corridor-compartment coaches. The entire Pullman experiment wasn't a huge success in the UK. At the time of their introduction in the 1870s, pricing was by class and mileage, which was a simple and straightforward model, whereas the use of the Pullman required payment of a supplement, which the British were not used to having to do. This particularly caused bad feeling when the Pullman cars were used in place of the regular 1st class offering, prompting furious letters to The Times. Oddly the one place the concept did take off was on the London Brighton & South Coast Railway (LB&SCR) who introduced the first all Pullman service for the London Victoria to Brighton route (journey time 1 hour) in 1881. The other companies were slow to follow but did eventually catch the Pullman bug, with some crack express services using the Pullman brand and some iteration of Pullman stock. The heyday was probably during the inter-war period during which the classic British Pullman stock that everyone associates with the brand was built for the Southern Railway (the successor to the LB&SCR following Grouping). All of these British Pullman services were all day trains rather than sleepers. The main use for them was either as boat trains (e.g. Golden Arrow) or to give business travelers a fast connection to London from various provincial cities (e.g. Tees-Tyne Pullman). That wonderful Class 73 you found did get some use with the Belmond British Pullman on it's travels around the former Southern Region but was withdrawn from service in 2002. It received the livery in 1992 and should have been painted back into a standard scheme, but an agreement was reached to allow it to retain these colours. It would not have been specifically allocated to Pullman duties and could be seen hauling a lot more mundane stuff about too, but I'm sure that if it was free to be allocated it would have been used. -
Just to update the story. As I hinted above, I did drop the guy a message through Bricklink to point out the level of commonality between his model and mine but the message was ignored, so I added a comment below the model to give my own attribution including links in the hope that it would perhaps get his attention. For a while this was enough, but even this was ignored. In the end it still wouldn't sit right with me. The situation was more akin to the Dune Ornithopter than the Architecture style Helms Deep from @ShaydDeGrai's experiences in that the design was more straight copy (even if badly done) than "inspired by", although without the dialogue, polite or otherwise. So I reported it to Bricklink and a few days later both the design and the member were gone. I'm only offering this account to show that while IP on the internet can be a thorny topic this shouldn't stop us from calling-out folk if you feel that they have effectively stolen a design. The Bricklink complaint process was easy and I wasn't required to provide any additional information or justifications beyond the links to photographic evidence that proved the timeline that I'd included in my original complaint. I hadn't expected the member to have been deleted, just the design, but that must have been due to Bricklink's own policies and the terms of membership.
-
Roller-Coaster Track and Narrow Gauge Reloaded
Hod Carrier replied to Hod Carrier's topic in LEGO Train Tech
That sounds like a challenge. Yes of course there would be issues with making rolling stock to fit, but I don't think that it is insurmountable. There have already been some very clever solutions to powered narrow gauge. Maybe the length could be a bit more than 8-9 studs, though. Looking at a lot of real-world prototypes they tend to have a very short wheelbase but a large overhang at one or both ends, so advantage could be taken of that perhaps. -
Roller-Coaster Track and Narrow Gauge Reloaded
Hod Carrier replied to Hod Carrier's topic in LEGO Train Tech
I agree that this track system is certainly limited in it’s usefulness, but I don’t think it should be written off. For light rail applications such as industrial narrow gauge or trams/trolleys it does have some merit. My own conclusion from this quick test is that anything designed to run on 4-wide narrow gauge track can also run on roller coaster track, provided that it has sufficient articulation and a short enough wheelbase (the TRAXX has a 5 stud wheelbase on each bogie). You don’t even have to have the flanges on the outside or the train clipped on to the rail. @Selander I don’t disagree that there are other uses to which roller coaster track can be put, but it can also be used for its intended purpose as track for running trains on. -
When the roller-coaster track was launched a little while ago there was some discussion about it's suitability for use as narrow gauge track. The conclusion drawn at the time was that it was only for limited use and that any powered models using it would need to conform to certain design features. As a 4-wide builder I decided to invest in a small loop of the stuff and see for myself what the limitations might be. Perhaps an early entry for the title of "Most Incongruous Thing Seen In LEGO Trains 2020". Click on the image to run the video. In order to get the TRAXX to run I did have to make a few small modifications in order to permit the necessary degree of bogie articulation. Therefore the side panels have been lost, some extra plates added over the bogies to prevent them fouling and causing derailments and the LBG plates added to the sides are there just to prevent the battery from being flung out. The consensus is that the wheel flanges need to be on the outside of the rail and that the model needs to grip the rails also, as some powered models using this track system do. But here the TRAXX runs perfectly happily with the flanges on the inside. The traction is acceptable even though the track feels very smooth to the touch. Any derailments experienced were down to the bogie articulation which, once fixed, could be easily eliminated. Otherwise derailments only occurred if the track came apart or excessive speed was used. I will just note that the TRAXX was less happy with the powered bogie trailing, but I suspect that this is more to do with the design of the bogie itself. There was some high pitched squeaking from this direction which leads me to believe that it is caused by the bogie being turned against the direction of the motor rotation. I'd like to think that the potential applications for this track system are still to be explored, but it does seem that there is scope for more experimentation and the use of some slightly larger models than have been seen to date.
-
Alternatively you could create something around PF elements (click).
-
@TJJohn12 I imagine that you might be able to replicate something using hybrid curves, but I’ve never tried making any so I’m not sure what’s possible with them. If you’re looking to use 4-wide track to represent narrow gauge you may be able to get away with slightly coarser detailing in terms of sleeper/tie length and spacing, which may make things a little easier. @SteamSewnEmpire That’s certainly another option. I’m not sure if that gives sufficient clearance for the wheel flanges, though (assuming of course that your train uses flanged wheels). I do concede that the rails are rather tall at this scale, but I’ve tried to mitigate that with the placing of the sleepers/ties. @LEGOTrainBuilderSG Do you mean swapping the plastic rails for metal ones, such as 9V? Yes I guess that’s possible.