
woofmcmoose
-
Posts
131 -
Joined
-
Last visited
Content Type
Profiles
Forums
Gallery
Everything posted by woofmcmoose
-
B&M Amesbury had 70708 (24.99), 70709 (39.99), Helms Deep game (12.99) and the 4207 Parking garage (49.99). At least one of everything left after I bought them all yesterday.
-
Ans #1: i've seen some on ebay, not sure if they are 'official'/licensed though. Ans #2: pronounced 'Eve' (at least based on the dialog in the promo video). Nice looking set. I like the green = cadet in the official fluff too. It is also suitable explanation for why they haven't previously appeared in CS, I mean who would normally let cadets out running star ships etc... (I'm looking at you Mr Crusher!).
-
The flightsim 2002 version can be found on simviation.com. I've not tested it in any other versions, but it may well work in 2004 and FSX.
-
First real post of a MOC in the town forum, I present to you "トレイン カレー" or "Train Curry". This a a small restaurant inspired by the real life "Curry Station Niagara" in Yutenji, Tokyo where my girlfriend and I spent an extremely nice evening as the only customesr during the 2nd worst snowstorm to hit Tokyo this year. If you are ever in Tokyo, I highly recommend a visit as the Station Master (yes he really is one) is extremely friendly and your tasty curry is delivered by toy train. More info on the inspiration for this build can be found here: http://www.facebook....station.niagara So time for a tour. The outside Here you see the building from all sides, its a short blocky 2-story affair. It was built on a 16x16 plate, with a 4 stud overhang on the left side for the stairs to the 2nd floor and a 1 stud overhang for the frontage. It will sit into a 16x16 recess on my train layout, hence no street detail around the building in these shots. The reason for all the 1x1 headlight brick holes will become clear shortly. The sign on the front is my best attempt at brick built Katakana (Japanese alphabet used for western words). Really "train" should be "densha" not "to-re-i-n" however that would call for some Kanji (Chinese style characters) that just could not be realised in the space available. I was tempted to just build 'curry' in western script but thought I'd have a go like this first; let me know what you think! A close up of the steam engine front end in the bay window: I wish I had a window piece without the burger on, but I just cant bring myself to use the poleesh remover of naieel. I'm also hoping to find a better sign for the level crossing post. The inside Having never seen the upstairs of the building that served as inspiration, I settled for a generic small flat interior with compact bathroom (shower and toilet) and an open living area: It looks quite spacious as there is no bed (assume there is a futon stashed away somewhere) and no kitchen (but then there is already a restaurant downstairs, perhaps though I should MOC a rice cooker). The robot is there just because. The Restaurant I tried to pack the restaurant full of memorabilia, picking some key features from the real life inspiration such as the ticket machine where you order your meal, the train number plates all over the walls, the ticket window and station clock, and of course the toy train track around the room for curry delivery. Now you see the reason for all the 1x1 headlights; how I wish Pick a Brick sold 1x1 with stud on side in brown. If I ever get hold of some minifig roller-skates I will build a small train for making curry deliveries, but for now the track is empty. The ever happy station master talks to his patrons: Behind the white wall is a small stove for making curry, In reality there is a bathroom here and the building extends back further into a small kitchen. I had no room for such though (my layout has a train running directly behind the building with only 2 stud clearance). I also forgot to re-assemble the top of the wall for this shot! The right hand wall swings away providing a minifig's eye view: A final shot from behind the bar, a spare station master cap sits on the luggage rack for patrons to wear: And finally here it is in my layout: (see http://www.eurobrick...showtopic=95715 for more on the train layout itself) Thanks for taking the time to look at my MOC. Comments and suggestions welcome.
-
A quick update on progress. The line is now high speed certified: In the back of that shot, you may have spotted cloud cuckoo land, well here is a closer look: It was MOC'd by my girlfriend from the Cloud Cuckoo Palace, the 1x6x5 panels from last years delivery truck, the roof of the City Heavy Lift Helicopter , an Explorien's Hover-tron and a few other bits and pieces. We've not yet had any cat on the line incidents (either Unikitty or my actual cat, who mostly seems puzzled by the trains). On the opposite side of the room we have a comparatively boring little station: Meanwhile engineers are busy installing track on the 48x48s on top of the bookshelf, to provide three separate lines: Integrating the 4.5/12V switches did require the minifig to put his circular saw to work on some spare flextrack. Emmet and crew are laying down the foundations for some buildings: Just enough room for two 16x16 modulars with a 3 wide pavement (sidewalk to you Americans) and a 16 wide road (pavement to you Americans?) between that will cross the tracks: First building is up, a condensed modular petshop: The second one is going to be a little more special and train related. And finally some more video action taken during the build: I can see most of the trains and scenery from standing, though do use a box/chair to turn them on and off and get a better view. When running on the 16 wide sections you can easily see from 1/2 way up the wheels even when sat at the desk. Oh, and just because I like the photo! Zoooooooooooom:
-
Nice. I particularly like the Blacktron artillery walker with its classic octagonal cockpit. The other blacktron mech is also cool but is a little more neo-classic with all the curved slopes. The M-tron walker has a brilliant utility look to it. My favourite bit has to be m-cat though; made me LOL.
-

Review: 60036 Arctic Base Camp (A review in 5 parts)
woofmcmoose replied to woofmcmoose's topic in LEGO Town
Thanks for the feedback on the review, I maybe got a bit carried away but it was fun and prolonged the enjoyment of the build. Yep, some small mods could make this a perfect set. Interestingly the 60035 Outpost and the building that come with 60062 Icebreaker do have stepladders to get in and out. No, mine were very consistent, unlike the first horizon express I got which had significant variations. The huskies were the real highlight of the set. I was probably always going to end up with this or the 60034 Helicrane to get some. In the end though I'm glad I got the outpost as it was an unexpectedly good all round set, wheras I'm sure I can throw a very similar helicopter together from my parts bin (though obviously not in orange!). -
Review: 60036 Arctic Base Camp (A review in 5 parts)
woofmcmoose replied to woofmcmoose's topic in LEGO Town
Bag 7 & 8: The Living Quarters and Conclusion About time, do you know how long I've been reading for...! The Instructions This time we get a shot of the living/garage module all on it's own, the tools on the side, you'll have to jump for, unless connected to the science module where they'll sit nicely over the deck. One complaint about the instructions, we get magically appearing stickers (i.e. no sticker symbol and arrow): Otherwise, they're just fine. The Parts Here are the contents of Bag 7, which builds the walls: More orange windows, the big arches could be useful for MOC-ing and we also get a pair of seats in brown, which is an unusual colour. And Bag 8 which builds the roof and comms array: Lots of grey 1x2x2/3 curves, a couple of white girder pieces (though these appeared in great quantity in the previous City station set) and some trans light blue 2x3 with 2 clips. Also the first time I've seen the new mold short antenna which lacks the domed top of the older version. The 1x8 plates with the fat groove I don't see often either. The Minifigs No figs in this bag, but here is a gentle reminder of the full cast of characters in the set: The Build and Model Home sweet home: Part way in we have the walls up, the garage for the snowmobile tiled and the living area done. Whilst being stickered, the TV and family portrait are nice touches, though the TV looks more like my microwave oven than it does my TV (useful for MOC-ing in think). And done: The comms array and solar panels make this a very tall model, but they really look the part. The flag and 2x2 tile on the garage are again stickered, but being a round symbol on a clear background even kiddy (mis)alignment would still look reasonably good. the solar panel stickers are a bit tricksy though and would look poor if not well laid. So lets rate it quickly then sum up the whole set: Scores for Bag 7/8 Parts: 7 - More good pieces if you have plans in orange, a useful amount of bley plates, . Build & Model(s): 8 - Reasonably straightforward but some enjoyable touches in the model (living area mainly) that made me smile as I built. Unfortunately the is a sticker heavy build, but certainly looks the better for it. Playability: 7 - On it's own you can open and shut the doors, er that's it. If you bring the figs and snowmobile in though it becomes fun. THE WHOLE THING Let's take a look at the full set in action: There are almost too many play features to talk about! There are no models which feel like throwaway inclusion like often appear in large faction themed sets. The base looks wonderful with its curved roofs and rugged enough to survive the worst LEGO snowstorms. The snowmobile fits snugly (with rider) in the garage section ready to speed out into action. Here our lab assistant shows the SnowCat driver he doesn't need a giant 550rpm drill for getting into ice blocks! I think the bear has smelt food though, he seems interested in the lab module. Scientist: "Hmm...interesting I'm still not sure what the crystals do but I think I have solved the mystery of my missing lunch." I do wonder if LEGO are planning to release a back story to the crystals or leave it up to kids imaginations what they are for (the latter will happen anyway). The husky sled is also the right size for carting around ice blocks, though they end up slightly off center due to the use of jumper plates. Good doggies! Bad doggies! "Who let the Huskies in the SnowCat?", "I don't care, just drive!!" At the end of a hard days work. "Hmm, maybe I should have packed some different headgear, its a little warm in here!" Just wait til all 7 staff and 4 dogs come home for the night, cosy doesn't even come close! Overall Ratings Parts: 8 - If you like orange, a solid 10! There are plenty of interesting and varied pieces, though don't expect many non-arctic MOCs to suddenly spring from this set. The Figs: 9 - There are so many in this set, the new prints are great as are the huskies, let down only by having a duplicate figure which is forgivable across a theme, but not in a single set these days. Build & Model(s): 8 - Everything looks the part, and has a coherent, well thought out feel. The builds are fun and the modular nature of the build will keep kids from getting bored. Nothing too tricky for the suggested age range though some assistance might be required with the SnowCat and stickering of parts for the youngest kids. Playability: 10 - This set really does have everything; look at the rest of the theme: Snowmobile, check, Heavy equipment & Lab, check, Helicopter & Huskies, check. Until the Supply plane ans Icebreaker are available, you could easily give the other sets a miss and not lose out on play options. Value for Money: 7 - Until this appears on LEGO S@H I'm not convinced £59.99 is the RRP as most toystores are listing £69.99. At £69.99 it feels a little overpriced for the part count but at £59.99 feels like great value given the sheer number of models, features and figs. At the discounted price I paid (£63) I am more than happy. Overall: 9 - A superb set from a superb new theme. Definitely a set deigned for play, but it still looks the part in almost every respect, if you get only one arctic set, make it this one- it has everything! -
Review: 60036 Arctic Base Camp (A review in 5 parts)
woofmcmoose replied to woofmcmoose's topic in LEGO Town
Bag 5 & 6: The Lab Lets science some things! The Instructions The front page shows the lab module attached to the living/garage module which extends off the page. As with the previous booklet, elements not in this build creep in- this time its the video camera from build 2. I wont bother you with the inside, it much as the previous builds and should cause no issues. The Parts Here are the contents of Bag 5, which builds the walls and science gear: We get a few minifig utensils: a magnifying glass, ice axes, binoculars and a coffee cup as well as another crystal. Also two 2x2 tiles with clips in black, which I've only seen in bley before. Everything else is common, but probably not in orange! Bag 6: More orange. I've not seen the 3-wide 2x Technic pin to hinge converter before (below the 2x2 round on the right). Other rare parts are the 4x5 train door and the 2x2 corner tiles. We also get our second pair of snowshoes from this set. The Minifigs New figs: e Some very nice double printed figs come in this build. First a scientist with lab coat over an orange wooly jumper, complete with ID badge, pens in pocket and a mission badge both on the jumper and the back of his coat. second, another orange, jumper-ed guy, but with a blue body-warmer over the top, he also has an ID badge and a mission patch on his back. The scientist comes with beard and glasses print (that is new to me) with slicked back hair. The assistant has the fairly common orange safety specs smiley and a beanie hat. The Build and Model Science things: Here we have a nice brick built microscope and a pair of computer terminals which are stickered 2x2 with clips attached to 1x2 with handles. Why some printed 2x2x1 slopes wouldn't do I don't know but I have to admit these stickers do look good and I guess theme specific printing isn't hugely profitable. And done: The roof goes together quickly as dose the conveyor, both being mostly big parts. I like the curve of the roof, it feels very realistic, perhaps could use some stairs though, unless the door is just show and the science guys ride the conveyor belt to the floor when they want to go out. Doing Science!: The whole side of the building opens up in 2 segments to allow access for play. The scientist is using the microscope whilst his assistant is outside playing with a chainsaw; at least he has safety glasses! Scores for Bag 5/6 Parts: 7 - Some good and interesting stuff, many train fans might be debating whether a brand new black 4x5 is worth $90..... Whilst the selection is good, I cant help but feel the roof pieces will be difficult to find a non-arctic use for. The figs: 9 - Yay, new prints; overall two very well thought out and detailed figures. Build & Model(s): 7 - The builds was pretty simple, though the lab instruments were a nice little surprise. The model is basic when finished but really looks the part , Just a shame about the lack of stairs. Playability: 7 - Science things! move things on a conveyor belt! attack things with a chainsaw or axe! OK on its own its not going to hold attention for a long time, but it does add to the overall set. Note : value for money score will come with an overall score once I get to the end of part 5... -
Review: 60036 Arctic Base Camp (A review in 5 parts)
woofmcmoose replied to woofmcmoose's topic in LEGO Town
Bag 3 & 4: The SnowCat Here comes the heavy equipment! The Instructions The front of the instructions show the SnowCat ready to drill into an ice block, though note there isn't actually a block in this build (remember you got 2 in bag 2). Inside: The instructions are generally clear and easy to follow with good contrast. However, this page had me briefly looking for some 1x4 black tiles, but is actually just a misprint and the yellow drill arms should have studs showing. I must be getting used to LEGO spoiling us with always rotating models for the simplest things, as when confronted with adding an 8L antenna to a clip on the 'blind' side of the model I was puzzled for a few seconds as to where it had appeared from and attached to. The Parts Here are the contents of Bag 3, which builds the chassis and tracks: The majority of this bag is the track links, of which you get 2 spare, and the Technic bits to put them together. I was a bit suprised to see a wheel and tyre, but there are good reasons as I'll show later. Bag 4: Compared to Bag 3 this almost seems empty. Most of the parts are fairly common, though perhaps not in orange. More 1x2x2/3 curved slopes here too and a modern 'clicky' turntable in black. The Minifigs Explorer: We only get the one in this build and although he has the same body prints as the others, we get a new face: clean shaven smiley guy with orange goggles. No cute animals in this one The Build and Model Here is the chassis coming together: The single wheel gets sandwiched between two brick built sections held together by Technic arms. Due to the type of wheel used it ends up slightly off centre, but this doesn't seem to matter. But what's it for?: Here you go, the finished chassis, the wheel acts as a pivot point to make the vehicle turn easily, no need for proper skid steering, which given the two sets of tracks are linked would be impossible anyway. It also means you get a wonderful mechanical noise and vibration from the tracks as you drive along and the vehicle rocks about this point. I would note that this particular build might require parental help for the lower end of the age spectrum but still wasn't what I'd call difficult. Building Bag 4: If you've build any of the city range of 6-wide trucks this will all feel very familiar. We do get opening doors though which is nice and the 1x2x2/3 slopes come out where previously we may have had 1x1 cheese which give a slightly different shape. Connect the two: Almost finished, the cab is on the chassis which completely hides the centre wheel, and in my opinion looks really very cool. I suddenly want to open a LEGO ski resort! I'm happy with the big arctic sticker on the roof too, as its on a clear background its not as alignment critical as on some city sets. Finally: The drill arm goes on, along with 5 stickers (4 on the arm, one for the control panel, which really could have been a printed 1x2 tile rather than 1x2 stickered cheese) and we're done. In action the drill looks much better than I thought it would. However, there is an issue in that there is no way to stow it neatly when your done drilling and want to drive home, this is the best I could do. One more beauty shot: I think even the polar bear would move for this guy! Scores for Bag 4/5 Parts: 7 - Caterpillar tracks, yay! Enough orange to build a decent city truck if you wished, nothing that unique though, and some unnecessary stickered 'interesting' parts when existing printed parts would have done. The figs: 9 - Whilst we have seen the same parts in Bag 1 the score should not diminish as they are the same great bits and we get a new face! Build & Model(s): 8 - The builds was quite fun, even snapping together 44 caterpillar treads. Use of the hidden wheel is a clever touch and the finished model looks mean and purposeful. No complaints about width here- looks well proportioned to the real thing. The only downside is the drill arm when you just want to drive it somewhere the only option is just to hang it out in the breeze. I can see myself converting this to have a passenger/equipment cab on the back instead. Playability: 8 - Big, rugged and you can drive it over anything, despite its aesthetic drawbacks the drill definitely does add play options. Note : value for money score will come with an overall score once I get to the end of part 5... -
Review: 60036 Arctic Base Camp (A review in 5 parts)
woofmcmoose replied to woofmcmoose's topic in LEGO Town
Bag 2: The Helicopter and the Polar Bear Continuing the review with the second part of the build, now our ground team will get some air support. The Instructions The front of the instructions show a researcher having bagged up an ice block for the helo to pick up, apparently unaware of the giant carnivore behind him. That said the bear doesn't look too fussed either. Instructions are easy to follow as with book one, but the colour distinction is better; no bley-white here. The Parts Here are the contents of Bag 2: We get two ice blocks, which I believe are trans-light-blue versions of rock-raiders boulders which recently featured in dark bley in the mining sets. The crystals are a matt aluminium type metallic rather than the chrome that the aquanauts and aquasharks used to so frequently fight over. We also get a 2x2 round with 4 pins in black, a pair of snowshoes in brown, 2x2x1 rounds with ridges in bley, a net and of course a bear! The Minifigs Explorer: The explorer is the exact same guy we saw in bag one; though here is is in video camera snowshoe action mode, filming the polar bear, who unsurprisingly is just very white. I don't have a forest police bear to compare him too, but it looks to me like the same mold. Pilot: The pilot is very nicely done with both front and back printing of an orange parachute worn over a brown puffer jacket. Whilst the head is not unique to this set it does give a good 'cocky' pilot look and the choice of the aviator cap rather than full face helmet is a good one in my opinion. The Build and Model Part way in: You can see we have a single control stick rather than the two that were the staple of town era helicopters (a second one is included if you wanted to go old school). An interesting parts use her is rotor-blades as landing skis. Note this step carefully- attach the winch housing before the drum otherwise you will not be able to push the Technic pin in fully and it will foul the winch. Almost there: The tail gets two stickers and is offset from the centreline, which could easily have been solved with jumper plate, though doesn't look too bad. I left the arrow stickers off the winch drums as round stickers are always tricky and its pretty obvious these bits rotate. I'm not sure if the 1x2x2/3 orange slopes are new, could be; there are 2 more of them to come which hold the tail on. And done: A neat little helo, with a rather big winch ready to pick up one of the two ice blocks. From the front: Matching the fuselage slopes with those of the canopy is a nice touch. It is odd on a modern LEGO helicopter to see rotors for skids and plate for rotors but it seems to work; I doubt he'll be sinking far in the snow with skids that big. From the rear: The winch is perhaps a little outsized for the helicopter, but the big chunky round bricks make it very easy to operate with one hand whilst hovering with the other. Just out of interest the net is just big enough to carry, a probably rather uncomfortable and possibly very angry bear: Though what you would plan to do when you land I don't know: In case you haven't seen a LEGO bear before they are articulated at the neck and hindquarters, so can stand pretty tall and mean. Scores for Bag 2 Parts: 7 - Less interesting bits than Bag 1, but still some good orange slope and cheese action. The figs: 8 - The reuse of the exact same fig as Bag 1 was a bit of a let down, ok I expected all the parka wearers to have the same body and hood, but a different face would have been nice, particularly as I can't easily swap him out with another city fig, unless I want someone downtown in ski goggles. The Pilot makes up for it though and is good all round. The bear is nice, if a bit plain- ok I know, it's a polar bear, they only come in white. Build & Model(s): 7 - The builds was quire fun, though no particularly novel techniques involved and the resulting helicopter is nicely proportioned though not stunning in its looks. Playbility: 9 - Its a helicopter, it can swoosh, it has a winch, there are blocks of ice to pick up, there is a bear to eat people, I'm not sure what else you need! Note : value for money score will come with an overall score once I get to the end of part 5... -
Well, I couldn't resist, my local toy store not only had 10% off, but were just putting the new 2014 sets on the shelves and the big orange white and blue box was shouting "buy me, buy me!" from its shelf. So whithout further ado here is my review of the 60036 Arctic Base Camp. Arctic Base Camp Set #: 60036 Year Released: 2014 Piece Count: 733 Minifigs: 7, plus 4 dogs, 2 fish and 1 bear RRP: $89.99, £59.99 (according to Brickset, but UK retail seems to be £69.99 at the moment). As the set is a collection of models rather than one big construction, I will break the review down per the instruction booklets before giving my overall impressions at the end. So in this post enjoy Part 1: The Box the Snowmobile and the Dogsled (the less popular rip-off of the lion, the witch and the wardrobe!) The Box: Pretty big, as you might expect for a set of this price: The front shows nicely all the models and minifigs packed into the set and everything is in full action mode hinting at the playability of this set. The base is perched at the edge of an ice shelf, with snow covered mountains in the background. Just in case we forgot this was part of the City line the logo looms above the base and there are skyscrapers on the far horizon in the top right. The back has a standard 'hey' guy, but in arctic gear showing us a few of the models and play features of the set., the left side tells us this is a numbered build with pretty much one bag per model. The bottom left corner tells us to go online to play the LEGO City game, though our arctic player is dressed a little warm for downtown; also he appears to be making off with some money being chased by the police- maybe it is only so long before we get arctic police and fire sets!? The top edge shows the 7 minifigs we get with the set along with a couple of the new huskies and polar bear. The Contents We get 8 bags, and a cardboard backed deck of instructions along with a single sticker sheet. Loose in the box is a 16x16 plate (not baseplate) and conveyor belt. Disappointingly we aren't trusted to build a conveyor belt, it comes as a permanently assembled moving POOP. As it is split into mini builds, I'm going to deal with each as it comes as I explained above. Her you can see the DSS and the instructions for build 1; the dog sled and snow-mobile. First page of the instructions gives us the open bags in order comic strip and an advert espousing the virtues of the brick separator. Random instruction shot: The pale white/blue snowscape background shows up the models well and generally colour distinction is good; though occasionally the white parts look a little bley. Despite this, with the bagged nature of the build and clear part callouts, you're pretty unlikely to be confusing parts. There are also quite a number of single part steps, so this should be easy for even the youngest lego fans to put together. The Parts (Bag 1) Already new, or at least interesting, bits everywhere, inverted 1x3 cursed slopes, new skis, 2x2 tiles with studs, the parka hood, husky, handlebar type bits and an orange brick separator. The Minifigs In this bag we get 1 male and 1 female researcher, with male and female specific torsos; note the 'hourglass' shading on the female and different pocket configuration. Both seem to have some kind of GPS, temperature sensor or stopwatch on their person- the girl's reading '4^' the guy's '3^'. The different coloured ski goggles are a nice touch, though unfortunately having printed goggles rather than a goggle piece makes these heads theme specific. Legs have various climbing gear printed on them and the rear torso has a nice mission patch. The Build and Model: Snowmobile Part way in: Here you can see the use of the SNOT tiles and inverted curves to make the model a healthy carpet-runner; an interesting step away from the usual 2x2 round dish pieces you see on most LEGO boats (and in fact on the dog-sled in this set). Bam!: Here we are, finished, and I like it. The front curves come together nicely with clever parts usage and, whilst I missed it in the unbagging, the 2x2x2/3 slope on the front is printed, yes, printed! With a friend: Let us compare him with the 1990's offering; you can see the definite 'up-scaling' from 'town' to 'city' era. Whilst the new model has no obvious drive mechanism (though chainsaws probably weren't the best or safest) the shapes possible with the new parts just make it look so much better. My only criticism of this model is the width- due to the car axle used the thing is 6-wide at the skis. Unfortunately due to how the nose is put together it wouldn't be easy to change, but I cant help but feel this might be better with the skis at 4-wide (dry test example below): The Build and Model: The Dog Sled Part way in: After the snowmobile, this disappoints slightly in being a much more traditional vertical brick-stacking affair, we also come to our first sticker- that 1x2 cheese gets a radar screen and radio handset sticker. Finished the sled: Radar you ask? Why yes, here we are with everything but the dogs and you can see a small radar dish so the driver can see everything that's forward and left of the sleigh I guess. The use of a small boat mast to build the dog harness is an interesting feature and quite inventive use of bricks. The dogs! Yes the doggies! A new mold as you can see compared to the standard City dog on the right. Although the face/ear prints are identical the coat colouring appears to be achieved by mixing plastics which gives a subtle variation between dogs and makes them appear like individuals- a nice touch whether intentional or not. Note the traditional City dog is 1 stud taller- so there can be no Disney style city dog becomes sleigh dog scenarios. Finished: As with the snowmobile the 6-wide feels a little on the large side but otherwise I can't fault it, there are lots of play features packed in with the fishing gear and radar. The dog attachments are surprisingly strong and play-able so a race between dogs and snowmobile wouldn't be a question of who falls apart first. Plus dogs, did i mention the dogs? I like the dogs! Scores for Bag 1 Parts: 9 - very good selection for such small models, Lose a point for disappointing me with a sticker after delighting me with printed parts. The figs: 9 - Very nice printing on both figs and their hoods. I don't really see the need for a feminine torso though- I doubt real arctic explorers cinch their waistbands to show of their hourglass figure (if you are an arctic explorer feel free to tell me I'm wrong). Along with the face prints which are only really good for snowy scenarios this isn't quite a perfect 10. I'm still tempted to give it a 10 just for the huskies, they are simply excellent. Build & Model(s): 8 - The builds are short but sweet, and the curves of the snowmobile were satisfying to put together. The models look good if a little wide from some angles and its a shame the snowmobile has no visible means of propulsion. Playbility: 9 - The snowmobile is pretty swoosh-able, though compared to the dog-sled is a one trick pony. The dog sled has fishing gear, a something detector/radar and dogs as well as swooshing pretty well. The separate instructions and bagging also adds to playability as kids of shorter attention span (or simply wanting to prolong fun) can build, play, pause, build more, play more etc...as I am off to now before I bring you Part 2: The Helicopter! Note : value for money score will come with an overall score once I get to the end of part 5...
-
Spaceship was 79.99 according to the guy stocking the shelves- nothing had prices on yet. Smyths generally seems to stock all the new stuff at RRP; I only asked about the spaceship, the Creator Bike Shop and cafe (£59.99) and the new train station (£49.99). Came away with a modular pet store instead as I can see the other sets being reduced in the future, whereas I've never seen the modulars at reduced price ever.
-
Actually 10% off all bank holiday weekend (so until end of Monday) plus a free £6 voucher (good for June and July on spends over £50). My local Smyths (Salisbury) were also putting the summer wave sets out on the shelves today too- took great restraint not to buy a Spaceship, Spaceship, SPACESHIP!
-
Thanks for the comments! I took a short video last night from minifig's eye view: As you can see the scenery is virtually non-existent currently aside from the bridge and my girlfriends first MOD/MOC of cloud cuckoo land. 48x48 plates are on order, so hopefully I'll start on the station, switch yard and other bits above the bookshelf soon. I can see this taking a long time to finish, but the building is fun so don't want it to be over too quickly. I did float this idea as the original plan was to put the train round the ceiling of our landing (complete with bridge over the stairs), but my suggestion to do both rooms and have a tunnel through the plasterboard between wasn't received with enthusiasm!
-
Hi all, So pleased I have finished refurbishing our 'study' that I wanted to share the results. My girlfriend and I have so many books (mostly hers) and lego (mostly mine ) between us we decided we needed something a bit more fit-for-purpose that the hodgepodge of Ikea furniture we had: Here is the room stripped out, its about 2.5 x 1.9m : Starting on a whole wall, built in desk and shelves: Then the highlight, the train track, which runs at the height of the door frame. Over the window: Over the door: And to add some interest on the wall opposite the desk, over a canyon: Finally joined it all up last weekend, then spent a few evenings this week constructing the canyon and bridge, which is my first real attempt at 'realistic' (or at least interesting) terrain. The view from my normal standing height: From a little higher, so you can see the river: Canyon wall 1: And the other wall, I've now exhausted all my grey bricks!! On the whole I'm pretty happy with how the 'furniture' turned out; woodwork is almost as fun as lego. The shelves are 16 studs wide the whole way round, then 48 studs wide on top of the bookshelf, so there will be plenty more scenery and a station (or two) added in due course. Comments and suggestions welcome.
-
Had a quick go last night, with just the motor and tyres removed, resulting in lots of wheeelspin. Im guessing the weight of the extra bricks in your model adds some traction, but o-rings definately seem like a good idea. Im also puzzling over: I can't really see how to remove the original wheels, and don't fancy just using brute force in case I damage the motor; any hints?
-
Great MOC. The original is nice in my opinion too, reminds me of the 'shorty' models you get in Japan (shortened trains in 'n' gauge for those without much space for track). Also good to see a 6-wide! There are two types of train windscreen: one has the windows moulded in, the other is a separate frame and glass. When I recently bought two of last seasons 'high speed pursuit' sets for exactly this piece I got one of each.
-
Good spot, a copy/paste error from a previous review. 4.99 sounds about right.
-
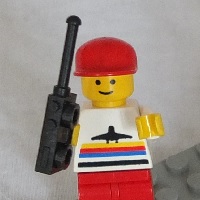
Stunt Copter Set #: 6515 Year Released: 1994 Piece Count: 35 Minifigs: 1 RRP: $3.25 (I think this cost 1.49 or perhaps 1.99GBP of my pocket money). Continuing to sort through my childhood lego, I bring you another classic 90's set. The 6515 Octan Stunt Copter (Not to be confused with the much larger 6357 Stunt 'Copter and Truck). Impulse sets of this size/piece count seem to be less common these days and more usually reserved for promo polybags. The design of this set also has a clear lineage from the 26 piece 1630 helicopter of 1990, which didn't even come with a minifig! The Box Due to storage space at my parents, I don't have the box for this set, it was recycled long ago, however as usual the front print on the instructions matches the front box art, showing the helicopter at a nice angle flying over the sea with the shadow of an oil rig and some cliffs in the background. Perhaps rather than for stunt flying the Octan corporation are actually using it to inspect oil and gas pipelines, though admittedly that's a less exciting prospect for most children. The Minifig We get one classic 90's Octan guy (or girl; it's the 90's - without hair I can't tell, and Octan corp is an equal opportunities employer), with large printed logo on his white torso, green legs and a red helmet with trans light blue visor. Standard yellow hands, so (s)he may get cold frostbite in his fingers from the rotor downdraft: The Parts A standard mix of Octan colours, predominantly white and including all the standard bits you expect for a 90s helicopter (2x2 tile with pin, 4 bladed rotor hub, 2x2 plate with hole, etc). As a sign of things to come the set also had a small sticker sheet, with the two Octan legends for the 1x8 white tile rotor blades (stickers already applied in this pic): The Instructions Standard double sided fold out leaflet with 11 steps in total. The background varies from light blue sky at the top to green grass at the bottom but contrast and colouring is fine for piece identification. The Build and Model The fuselage comes first, then the tail boom. Its all very simple part stacking with no snot. The 1x2 plate with 1 stud serves to position the tail boom on the centreline of the copter rather than offset. Landing gear and rotors next and before you know it it's finished! From the front 1/4 it looks just as smart as on the box art. The levers in the pilot's hands give the sense of simple mechanical controls that you would expect in a basic helicopter and are vastly better than the alternative of a patterned tile. From the side, it looks compact, but the proportions seem right for the LEGO world, if not reality. The aerospace engineer in me is thinking about the noise and possible control issues the pilot will have with the tail rotor being constantly in the main rotor downwash. The open cockpit and having your head inches from bits travelling at a couple of hundred RPM might seem like issues too, but in reality many early helicopters put the pilot in similar conditions. From the rear quarter it still feels 'right', though the shortness of the tail boom is still obvious. I suspect if it was lengthened to even 8 studs though she would become a tail-sitter whenever the pilot got out! This model made enough of an impression on the young me, that during my dark ages, it continued to shine some light through: Whilst I should have been doing homework I was actually modelling this set for use in Microsoft Flight Sim 2002: The Verdict Build& Model: Very simple build, but this set does feel complete, unlike the 1630 from which it clearly owes it's design. Something about it the model just seems 'right' to me: 9 Parts: Has all the basic bits needed for any 90's helicopter: 7 Figure: Simple, yes, but good colour combinations, and can't have too may Octan employees can we?: 7 Playability: Everything that should spin, spins, its reasonably robust to 'wub wub wub wub wub' (helicopter 'swoosh') around, and should you wish to crash it, you won't need to break the instructions out to put it back together: 8 Overall: I may be overly fond of this set due to my own nostalgia, but I can't think of a better 30-40 piece pocket money set from the 90's town range. This is what LEGO should be: 9 But what do you think? Am I right/wrong?
-
Nice! I have two of those old yellow wind ups in my spares bin. I think I'm going to have to have a go myself now. Did you try running them on the standard wheels (without tyres) before replacing them with train wheels?
-
As a little extra, here is a quick engine mod, achieved simply by removing the clip and bar plates. Ok, it would need tweaking to be robust to play, but I think it already looks a bit more in proportion:
-
Police Boat Set #: 30071 Year Released: 2012 Piece Count: 35 Minifigs: 1 RRP: $3.99 (US), Free with the Sun newspaper (UK). Here we have one of the 2012 City Polybag promos, which was available in Walmart in the US, free with a 'news'paper in the UK and part of various other exclusives across Europe. The set is part of the 'forest police' line rather than your regular city cops. The Box Bag Despite being a 'forest police' set the bag art shows our cop speeding through the water in front of silhouetted city skyscrapers and out onto the usual City blue 'L' which contains the LEGO logo, age range and set number. Already you can see the much griped about neck issue with the new style life preserver. The back of the bag is full of multi-language 'small parts' warnings, a small promo for the lego club and gives you a sneak peek at the parts through a transparent strip down the centre seam: The Minifig Here you get a standard forest cop. He has a nice front and back print khaki shirt, with badge over his left pocket and a handheld mic clipped to his right pocket connected to a radio in the back of his waistband. Dark blue legs, a tan 'park ranger' style hat and the smug pilot head complete the figure. The Parts There aren't many, but you get a few interesting bits: two flavours of 4-wide wedge, some trans-blue cheese a 2x1 cheese grill, a black 1x2 brick with two studs on both sides and printed blue 'POLICE' tile. You will end up with a single trans-blue cheese left at the end of the build too. The Instructions Look how cute when folded; almost minifig size! Here they are unfolded, they have a good contrast light blue background and the set colours are sufficiently dissimilar that you won't easily be confused. The steps are simple with only a couple of parts added at a time. The lower half of the back page shows a promo shot of the other 'forest police' sets. You can see their downtown bretheren across the bridge in the background: The Build and Model The build is done in 2 parts, the boat and engine. It starts pretty much as any other 4-wide boat/plane with a combination of plates and wedges: Then, add some more plates and wedges! I think given the size and price of the set the red/green nav lights are a nice little touch by the designer. The stacking of the two wedge angles also gives a more streamlined look to the bow: Finally the engine and it's pretty huge. I think perhaps the older style plate, grille plate and lever/arm with 3 fingers used trhoughout the 90's may have been more suited: And we're done so lets have a look around. First from above; you can see just how big the engine is and how far it sticks out. Whilst the clip-on arrangement gives a minor 'play feature' allowing the engine to be raised/lowered/removed, I can't help but thing it should be closer to the boat: Rear quarter and again you see the giant engine dominates: From the front quarter though she looks good and fast. Though the cop is having a bad neck day. You cant really spot in the photo but there is a 2x2 inverted dish under the bow for riding wave in the carpet without snagging: The Verdict Build & Model: The build was simple yet enjoyable given the small piece count. The nav lights were a nice touch, though insufficient to distract from the likely issues of centre of gravity vs centre of buoyancy are policeman is about to encounter: 6 Parts: A reasonable selection of bits for say, making boats? Might also be good as a parts source for aircraft MOCs or general policey bits. Let down only by the lifejacket: 7 Figure: Very good, I do like the forest cops, I suppose you could want some leg printing, but I'm not sure what. Lifejacket I have scored in parts, so as to not be unkind to the minifig: 9 Playability: It will happily splash (what is the boat equivalent of 'swoosh'?) around your carpet pretty fast. You could say the engine adds playability but that might be stretching it a little. Get another boat or fig and there are plenty of scenarios to play out: 7 Overall: For a promo polybag I think it fulfils it's purpose well. It shows off some good design elements, has a good fig, reasonable playability and would entice kids into the police product line. For AFOLs it's still a nice little impulse set and with slight modding to the engine area I think would look good in most settings: 8
-
Unfortunately yes, at first I assumed cat hair (that stuff gets everywhere) but going to check the model, yes there is a small crack. I've never seen that in such a piece before.
-
Solo Trainer Set #: 6673 Year Released: 1990 Piece Count: 65 Minifigs: 1 RRP: unknown (Edit- probably around 4.99GBP). Searching the review index I spotted that no one had yet given attention to another of the sets I wished for but never had back when I was a kid. So after a little e-baying I give you my take on 1990's Solo Trainer. But... before we start I will raise my one issue with the set: it's name. Apparently the lego town flying school teaches their students by sending them up alone in a twin engined aircraft....though, maybe this is one of the reasons lego town's and city's have such well funded fire departments! Anyway, onward with the review! The Box Unfortunately I don't have a box for this one, however as with all kits of this era, the front print on the instructions matches the front box art, showing the aircraft from perhaps its best aspect (more on that later) against a washed out representation of a runway and airport control tower set against a cloudless blue sky - the weather was always good in 1990's town! Also on the cover in soft focus we see the ground equipment that comes with this set. The Minifig Yep, just the one, well he is training solo. No printing to be found, just a plain blue torso with white sleeves plus red pants and baseball cap. He's not exactly up to the standard of the smug pilot of today's sets: The Parts Here are the bits that go together to make your plane, nothing of particular note, but you do get some nice blue wedges in there which are good for 90's era boat/plane (or dare I say classic space?) MOCs. You also get 4 trans-blue 1x2x1 panels: The Instructions Standard double sided fold out affair split into a very short (2 step) ground equipment build followed by 15 steps of aircraft. Despite the change in background colours from sky to grass, there are no issues with contrast and they are relatively easy to follow with a few mini-build call outs. Our intrepid student might be worried though as he was hoping for some instruction on how to fly the plane, not just build it! The Build and Model The build starts with the ground equipment which includes a simple shell liver fuel drum and hose and a big spanner which our student will need to build his aircraft. Luckily for him there's no particularly novel techniques involved. Here is a shot about a third of the way through: Fuselage is done, onto the wings, which are a separate call-out build: As you see in this next shot the wings and roof are a single assembly which hinges forward to let the pilot in through the roof. The gaps at the back of the cockpit really irk me, particularly as this ugly feature is hidden from view on the box art. Why they did not use plates and tiles, or 1x1x1 cornet panels to fill the gaps I do not know? Im also unsure about the open sides here, it 1x2x2 panels or airplane windows might look better. It is a bit of a struggle for our student to get in! Having finished the plane, it's time for a pre flight walk around. From the side the plane is noticably short and stubby, but does look quite smart if you ignore the cockpit issues. The engines are simple 2x2 with pin pieces and again could perhaps use a little detail: From the front, no complaints: Fueling Up: Our smug modern pilot instructor gives some final words of wisdom: "so there I was, in a 2g inverted dive..." Oh dear, first flight hasn't gone too well! The IP decides its time to make himself scarce: The Verdict Build& Model: Average, nothing novel, but the resulting model is well shaped and reasonably robust for the part count. Just a shame about the 'missing' parts around the cockpit: 7 Parts: Some useful bits in here, nothing unique though: 7 Figure: Pretty plain, and there's only one, this set could use a maintenance guy, or instructor with a walkie talkie to add a bit more appeal: 5 Playability: Its a plane, you can 'swoosh' it! The ground equipment adds a little extra too: 8 Overall: A fairly solid all round set given the part count. Looks good from most angles though some modding of the cockpit and engines would likely improve things. If you want a small civilian aircraft for cheap, then you could do worse than start here: 7