
Teo LEGO Technic
-
Posts
274 -
Joined
-
Last visited
Content Type
Profiles
Forums
Gallery
Everything posted by Teo LEGO Technic
-
 Looks pretty good overall I’d say, I mainly dislike the way the door hinges are designed. Nice tires :)
 -
Those are importantly factors too, definitely. That video was also filmed on a slippery dirt surface, which I haven’t tried the crawler on. I’ll only know for sure when we test it outside in the truck trial, hope the effort I put in makes a difference!
-
Very cool solution! I haven’t seen that idea before, it’s clever ;)
-
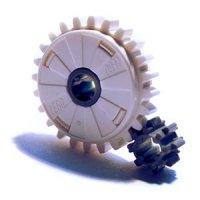
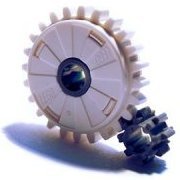
This MOC is amazing, it really went through a lot of iterations, but the functionality and looks of the final model are worth it If I'm understanding your steering setup correctly, the two L motors that drive the track also drive either side of a differential, so if one is spinning faster, this causes the diff to spin, and it is connected to the steering rack, and steers the skis, is that correct? Does the white clutch gear have enough resistance to steer the model, or is it too weak? I guess you are intending it to operate while it drives, and primarily on a more slippery surface like your hardwood floor, so it works great for that purpose? Overall, I love it, can't wait to see the final version! (Although it already looks fairly finalized)
-
It does seem to shut off if I run it in Ludicrous, so I will stick to Normal and Fast. I also added a tiny bit of ramp-up and ramp-down programatically through the BuWizz app for the throttle control, 0.13 seconds, in the hopes that that will reduce bursts of current that could cause it to shut down. Glad you like the geometry! Half lost my mind getting it right haha. I think indeed in general it doesn't matter much for LEGO, but I did notice on my RAM pickup that, with the rear axle angled quite a lot, and therefore the instant center high in the air, on steep inclines the rear axle would keep pushing itself off the ground and lose traction, making it harder to climb. This was bc the buggy motors had enough power to make this matter, check it out here (I linked it with a timestamp for the hill climb): That's what made me put the effort in for the crawler, and in testing, it seems to have paid off - it stays completely planted
-
That sounds promising, how exactly do you mean? On the BuWizz app I can map the same vertical slider for throttle onto multiple BuWizz outputs, so let's say I connect the BuWizz motors on outputs 3,4 and map both of these to the throttle slider, as below (servo is on output 2): I tried for fun to see what would happen if I increase the current limit now on both outputs 3,4 - I tried values slightly larger than the max defaults: It seems to have much better climbing ability now! Is this fair play? To be honest, I'm out of my depth a bit here . Could this cause damage to the BuWizz? I would hope they have a system to shut it down if it overheats before damaging anything? The other good news is the geometry seems to be working well! All the power in climbing appears to be getting transferred properly
-
Update June 27 I took your advice @gyenesvi , and made one more attempt at correcting the geometry, this time using a longer custom steering link. My solution is a semi-triangulated setup, where the bottom links are still slightly angled, but not forming a triangle; it is very similar to the Ryft RC crawler I mentioned earlier. I also added a few more geometric best practices based on some videos I watched about anti-squat requirements for crawlers: The distance on the axle between the top and bottom links should be ~25% of the tire diameter. For my tires, this is 14 studs, so 1/4 * 14 = 3.5. On my setup, the distance is 4 studs, very close. The top link should be ~85% the length of the bottom links. Bc I used the 9L top link, this meant the bottom link should be 9 / 0.85 = 10.6. On my setup, their length is 10, also very close. I also moved the bottom links further outward on the axle for better twisting stability. The final setup looks like pictured below. I added a basic chassis with shock absorbers at the right height, just to test it out; it's only a temporary mounting. As you can see, the instant center is closer to being below the anti-squat line, an improvement from before. Indeed, this is quite realistic geometry for a crawler; the reason I can't get it below the anti-squat line without lowering the ride is that my CG is so low, much lower than a real crawler. I'm satisfied with it at last; the caster is also very nearly 0. There is a tiny bit less than 1 stud of space between the two CV joints - if this causes the axle to fall out, I can shift the FM CV joint going into the axle out by 1/2 stud and add a 1/2 stud spacer, and that will fix it. Now for the bad news ... I tested this mock-up on some inclines to see if the torque holds up, and I wasn't satisfied. It's able to make it up a roughly 45º slope, but it starts to struggle. I think you were right @gyenesvi - the BuWizz 2.0 can drive the 2 buggy motors, but it can't power them quite enough under load. As I see it, I have a couple of options: Reduce the gearing further coming out of the fast buggy output. Currently, it is 1:1. I can replace this with a 12:20 gearing, increasing torque by 67%, but also slowing the model down by the same ratio Purchase another BuWizz 2.0, or a 3.0 - too expensive Power it with some cheaper 3rd party components Of these options, I think I favour option 3. It seems like a shame not to use the full potential of the buggy motors - after all, the whole point of adding servo steering and keeping the build lightweight was to make this crawler fast in addition to powerful. If it's not fast, I might as well use PF XL motors, in which case I've not really improved much in terms of performance or design compared with my Praga truck. The issue is I'm not very knowledgeable about electronics, I just never really took the time to learn. I will start looking into it on my own, but advice is much appreciated!
-
Update: June 26 Moving the buggy motors sideways was fairly straightforward; it required adding a pair of 16-tooth gears, which only very slightly increases friction, so I'm fine with the compromise. Either way, I plan to lubricate the drivetrain with silicone lubricant when I run this thing. This, however, shifted both front and rear driveshaft outputs by a 1/2 stud, so I had to redo the 4-link suspension attachment, again trying to ensure the correct geometry. After a lot of tinkering, I have set it up again as follows: On the rear, I took your advice @gyenesvi and found a solution to ensure the distance between the CV joints never reaches 1 stud, to prevent the axle coming out under torque - this is especially important on the rear axle, where most of the torque goes when climbing. To this end, on the rear axle, I moved the bottom links half a stud inwards and upwards, approximately, using the angled liftarm. Because this made the connection point too close to the top links, I lifted those a bit higher. I also moved it a stud towards the front on the axle itself, so that I can achieve near-0 caster using the connection points on the same liftarm, so I don't have to go crazy creating a new connection point for the top links. Overall, this had the unfortunate effect of changing the geometry such that the instant center is no longer below the 100% anti-squat line, as it was before. While this is unfortunate, I don't see another solution that prevents the driveshaft from slipping out, and I think this is more important. I'm not sure how much of an effect this new geometry will have, but if the drive axle slips out, that's definitely a problem I also tried to find some blueprints to use as reference for the dimensions of the chassis, but couldn't find much. In the end, I created my own using some photos I found online of the "1/10 RBX10 Ryft 4X4 RTR Brushless Rock Bouncer": Overlaying it on some existing blueprints I came up with the following. Since I am not making a proper body for this, to save weight, I will try to follow the general dimensions of the exoskeleton and give it a good look that way, so the chassis also functions as bodywork: The moral of the story is this - setting up 4 link suspension in Technic is a real pain. If you want to have (1) correct caster angle, (2) good travel, (3) correct anti-squat geometry, and (4) make sure the CV joints stay a similar distance apart at all times to prevent axle slippage - basically, you will lose your marbles I will let the options marinate in my head for a bit longer, I think - if anyone has any ideas for improvements, please let me know - and then move on to attaching the shock absorbers and test it all out.
-
Thanks for the tips! Glad that my intuition was correct, and good point about toe angle. The setup does have a very slight negative camber, so it's worth making an effort to not have the caster too far off neutral. Thanks! Yeah, I figure I would go all out while I'm at it I believe all the points should apply at 1:10 scale, looking at scale RC crawlers, they apply all these points as well Sounds good! That's a great point I hadn't considered. What you're saying is that, under torque, if there is 1 stud or more space between the two CV joints - the 3L and 4L - the 4L axle will slide 3 studs into the frictionless 4L CV joint and so come out of the 3L CV joint, am I understanding that right? That's definitely something to consider. For my particular setup, the bottom links are almost in the exact same plane as the driveshaft, so the mounting of the bottom links is the main factor in the distance between the CV joints. I will rework it a bit so that it is closer to ~0.5 stud under normal suspension positioning, so that under flex, there is still enough space for the driveshaft to shorten, but not so much space that the shaft is able to come out of the 3L CV joint. This is a good point, a true crawler has neutral caster, as it is meant to drive slow and the steering mechanism is often something very powerful, like a hydraulic actuator. Rock bouncers, on the other hand, are slightly faster than rock crawlers and have a tiny bit of caster to enable improved steering at higher speed. For my setup I opted to make it a bit more similar to a rock bouncer, adding a very slight caster angle on the front for two reasons. (1) I built this thing to be able to achieve decent speed, at which caster does help keep the wheels centred, and (2) because the servo motor is not as powerful as a linear actuator or a geared down L-motor, I want to give it that tiny extra bit of mechanical assistance. Definitely agree For that reason, the front control arms are nearly parallel. The rear ones are angled a bit more so that the instant center points below the anti-squat line, as per the illustration from before. Thanks for all the feedback guys, much appreciated! Time to implement your advice now @gyenesvi and see what I can do about that driveshaft gap issue.
-
Update: June 25 I have been hard at work to get this done on time. The rear axle is complete; it is robust, and the mounting points are well-positioned, so I'm satisfied with it. I then did some research to determine what the ideal geometry is for a 4-link suspension, particularly on a rock crawler. These are the guidelines I came up with to summarize my findings, mainly taken from this great video I found https://www.youtube.com/watch?v=MTozXC4hq04. The guidelines are as follows: The top 2 beams form a triangle ideally centred on the axle to centre it. The bottom two should be fairly far outward on the body to reduce twisting movement Upper links should be ~85% the length of the bottom links (this, unfortunately, I can't do, I'm stuck with the 9L links) Vertical link separation at axle ~25% of tire size A diagram of the ideal rear link geometry is shown below, which optimizes the force exerted by the wheels Using this information, I built a prototype of the chassis, which was only to figure out how to satisfy the geometry. I will rebuild it afterwards to be more rigid and efficient. On the front axle, I managed a 4-degree caster angle, which is decent - I would have wanted a bit more, perhaps, but I couldn't figure out how to get it just right without using some non-perpendicular link connections, which I didn't really want to venture into. I also had to attach the upper links quite high so that they wouldn't touch the steering components during suspension travel, but this should not be an issue. In addition, the driveshaft is already angled, and adding more caster would further angle it, which I don't want. On the rear axle, I was able to get the geometry almost exactly right, matching the reference above. Here is my current setup: There are a couple of open questions I currently have: Should I increase the ride height, and therefore, the ground clearance? For this, I opted not to for now, because any higher and the geometry is impossible to get right on the rear axle. This is about a realistic ground clearance for a rock crawler, and I think it should be plenty with the massive crawler tires I'm using. Further, keeping the ride lower keeps the COG (Center Of Gravity) lower and enables better climbing. Conclusion: Keep ride height as-is Should I mount the buggy motors on their side to lower COG? As I finished the prototype, it occurred to me that with the vertical buggy motor setup, the heavy part of the motor is sticking out at the top, which is terrible for the COG. A better solution would be to turn the engines on their side. In a quick test I found the crawler currently goes fairly slow, as you anticipated @gyenesvi, which isn't really a problem as I want lots of torque, but it means I think I can turn it on its side and use the faster buggy motor output (~35% faster) and it should still have ample torque and better high speed. This will, however, mean that the driveshaft will be mounted 1 stud higher into the body, which means the geometry for upward suspension travel will involve more lengthening and shortening of the driveshaft, but I think this could be manageable given the long range of motion of the 4L CV joint. Conclusion: Turn the buggy motors on their side for lower COG Is caster angle relevant on the rear axle? This is an open question to the engineers out there. I couldn't find a definitive answer online. My intuition is that it isn't, because there isn't steering, is that correct? I'm asking because my current setup has a very tiny bit of a negative caster on the rear, and I don't want this affecting performance. So the next steps are to (1) turn the buggy motors sideways, (2) shorten the wheelbase slightly, and (3) purchase some original LEGO planetary hubs and CV joints; these AliExpress copies are just not good enough. Questions, suggestions, comments, and funny jokes are welcome as always!
-
I also thought it wouldn't handle it, but it seems to work well enough in Normal and even Fast mode, just not Ludicrous. @Zerobricks told me it was doable and it worked well on my RAM pickup, although I never drove it in low gear under very heavy loads. Yes, I plan to use the BuWizz app as usual. That's good to know, I'll stick to locked diffs then. That's a good point. I think I will be ok since I am using the long 9.5L soft shock absorbers, and if I place them at an angle, it increases the range slightly further still, which I will do. If I find it's still not enough, I can switch it up, but it seems to have worked fine for @PunkTacoNYC's crawler Thanks for the thorough feedback!
-
Good point, in that case, the train remote is best, you're right.
-
Yeah, that's a good point. Alternatively, since I think you will have a physical remote, maybe you can come up with a mechanical solution to lock the lever or dial into place?
-
Thanks, I'm excited to see your new one as well! :) Your Rock Bouncer is awesome! Aptly named, that suspension is very bouncy indeed and great fun to watch. Correct me if I'm wrong, but because I'm using the 12/28 tooth bevel gear combination in place of the differential, whereas you used the 20/28 tooth combination with the differential, is mine geared down further? Controllability is another good point - I think because I am using BuWizz 2.0, I can add a dial to my controller to shift between Slow, Normal, Fast, and Ludicrous, and in Slow I can have lots of control and go slow. If you don't mind, I think I will take some inspiration from your crawler too, it's a gem I just have a few questions: Did the open diffs cause you to lose traction over very uneven terrain, or did the suspension articulation make up for it? I see that you are using longer, custom-built suspension links rather than the 9-long Technic links, which allows you to connect the shock absorbers directly to the suspension links rather than the axle. Do you recommend this? Did it give you greater articulation? Overall, an awesome build I particularly like how you captured all the angles of the exo-skeleton.
-
Simple, elegant solutions, love it! True to form
-
[MOC] Claas Cougar 1400
Teo LEGO Technic replied to Jundis's topic in LEGO Technic, Mindstorms, Model Team and Scale Modeling
So many cool mechanical solutions! And the final thing looks really good too -
Sounds good! Yeah, I like the train idea - it's more elegant than having to hold a stick in a position. Alternatively, maybe it can be done programatically, like how the BuWizz app interface lets you create sliders without return-to-center.
-
Update: June 22 I spent quite a while adding additional bracing to the front axle to get it ready for the heavier rock-crawling tires and to ensure the added two studs of width don't introduce any wobble. This included bracing the steering rack longitudinally to the 5x7 frame to reduce steering play and adding robust mounting points for the 4-link triangulated suspension. This added a little extra weight compared to my previous design, but I think it's worth the added toughness, given that the axle has to handle larger tires and drive at higher speeds than my Praga trial truck, and therefore will absorb greater impacts. I did a quick informal test, and I'm happy with the strength of the steering and its rigidity. I also tested the torque and speed if I mount this axle directly as-is to buggy motors. @lmdesigner42 I think it has enough torque, I don't need to reduce it further. I think there was still lots of torque to spare on the pick-up truck form before with a similar setup, and I don't want to compromise on the speed - this thing won't have massive torque to tow other trucks and such, but it will have more than enough to get up steep hills fairly quickly. I was also considering purchasing an additional BuWizz as I found the single BuWizz struggled to power both buggy motors under load, particularly in Ludicrous mode. However, I did some research, and it appears to me that the torque is still the same in Normal and Fast mode; it's just the speed that is reduced. Therefore, I think, for the sake of my bank account, I will stick to the BuWizz I have. In Normal or Fast mode, it can use its full torque to climb difficult terrain, and in Ludicrous, it can drive over flat surfaces, or where the ground is sandy and speed is needed to get up a hill, although it will not work well under load. Effectively, it will be like having a sort of "gearbox" - Normal/Fast mode is slower but uses full torque, and Ludicrous is faster but cuts out under heavy load and can't use the full torque. To all the electrical engineering buffs out there, if I am wrong in this, please correct me, and I will reconsider buying another BuWizz (though they sure are pricy!). The next step is to build the rear axle. Next, for the chassis, I think I will try to keep the wheelbase as short as possible to minimize weight. It also occurred to me that I can connect the suspension links on the front axle in such a way as to create a positive caster angle, so I will bear that in mind when I come to it. As always, tips and suggestions are much appreciated
-
Loving it! Very ambitious project indeed, but even if it isn't done in time for TC29 it definitely seems worth pursuing. How are you planning to use the servo to operate the three "modes"? If it's the PF servo, will you set it to 90 degrees left for mode 1, center for mode 2, and 90 degrees right for mode 3? If so, how do you maintain it in modes 1 and 3 without allowing it to return to center? Great idea with the actuator to adjust the tension, ingenious!
-
Very fair . Just checked out Dugald's version, very cool as well!
-
That's so cool! Found a great video about it - it not only reduces squat during acceleration, but also improves performance and comfort, working with their Z-shaped anti-roll bar: Would you consider trying to incorporate their unique anti-roll bar into your design?
-
Sounds good, I think I found some documentation that might help - https://buwizz.com/BuWizz_gamepad_instructions.pdf. Again, awesome model!
-
That's a very good point about the tires. I think I will try a quick prototype before I build the final model to see how much torque it has with the current gearing, and adjust from there. I can just hook up two axles with no suspension, add about the amount of weight the final model is expected to have, and see how it does.
-
Between this beautiful build and your Tumbler, I am subscribed, you are going places sir 🫡 I'm wondering why you chose to add the third shock absorber on the rear axle, the one on top parallel to the driveshaft? Is it like that on the real Agera, and if so, what is its purpose in addition to the other two? De acord ;)
-
This is epic! The controls are so smooth and precise. Do you know if there is a PyBricks equivalent for use with BuWizz, do control it through a physical controller like the Xbox controller?