
CamelBoy68
-
Posts
225 -
Joined
-
Last visited
Content Type
Profiles
Forums
Gallery
Everything posted by CamelBoy68
-
Hi rriggs, looking good What about a training tower for the brigade ? That way they will be able to show off their prowess to the nurses next door.....
-
Hi HenrikLego, that looks really cool :thumbup: I was really enjoying your train and rolling stock, but then I saw the decoupler and that looks great. It looks like you are using the Mk2 decoupler, are you experiencing any difficulties with the shorter wheel base stock ? Can't wait to see your vid. Top Stuff CB68
-
very nice dugmence, I definitely going to have a look at this.
-
Hi HenrikLego, Yes I think that is going to be a problem. In the three vids, I tried various lengths/weights of wagon to test this out and I found I needed to reverse slightly and then floor it for some of the wagons.... It also seemed to work best when there was a nice firm connection between the magnets. When I was trying the earlier versions, it worked well on the long wheel-base wagons, as the plates would be pushing against the underneath, rather than attacking the magnet part of the bogie. Which was fine except it only worked in one direction and failed miserably with the smaller wagons... Hi Doug72, Nice job ! The only reason it needed to be raised by two plates, was if you already had track on a baseplate. One plate was note enough to get the tile under it, so two plates made it work. The non baseplate version was only one plate extra, as its assumed you are already on a flat surface (even carpet/ hardwood floor or table). cheers CB68
-
Servo Showdown: Voting Topic! (All Forum Members Welcome to Vote)
CamelBoy68 replied to LegoCityMann's topic in LEGO Town
7. Zed_43 - 3 points 11. greg3 - 1 point 3. rriggs - 1 point -
I also build to music, although I try and match the music to the build. So the Indy sets are the Soundtracks, as are SW. I used The Mummy for Pharaohs Quest and the usual Christmas hits for the Winter Village. i can't think of a good one for trains though....
-
So the estate agent/realtor said to Jim, its a nice cabin in the country with access to a private lake, so you can do some peaceful fishing. Then what happens, the train co build a track round the back.... Nice work ! :thumbup:
-
Some exquisite details, love the doors and the outside wc...
-
Sun LEGO Promotions General Discussion
CamelBoy68 replied to RaincloudDustbin's topic in Buy, Sell, Trade and Finds
I saw somewhere that the promotion actually ended in November and this last one was getting rid of excess stock. Couldn't agree more Legocrazy81 - newspapers are not for children they are for putting your fish & chips in... -
Yes, the freestanding version is raised by a 2 plate height, which means you might want to add a single plate on another track segment before the decoupler, and add a few 2 plates on the track following the decoupler, unless you want the wagons to roll slightly downhill... As for names, I've just been referring to it as The Simple Decoupler Mkl III, snappy isn't it...... oh, thank you Werlu Ulcur as this was your post and without it, I wouldn't have looked at it....
-
Nice one Selander ! Here are two links to the LXF files The baseplate version http://www.mediafire...zxlt9jw2y59t4dn and the freestanding version http://www.mediafire...jwh7xndcqntw2sj don't forget that a bit of track either side should be raised up to form a gentle incline, as a sudden 2 plate jump may be a bit steep. have fun !
-
probably not...
-
Another day, another version of the decoupler. The Mk III supercedes the second version, which although worked perfectly, only did so with low clearance wagons. Close, but no cigar. I think Zephyr1934 noticed this on the original prototype, so hopefully the Mk III has fixed it. Lets run through the changes: The Decoupler This has now grown to a 2 x 10 plate and has some extra parts in the middle. The wedges are now the important part, with the other bricks being addition weight. The Base This has been extended to match the length of the new decoupler and works in a similar way to version 2. Instead of the slider locking the decoupler, it now forces it up when pushed in. The green plate is representing a large baseplate and would not be required in the stand-alone version, as would the tiles under the slider. Here's a pic of it in the closed position, notice that the black shoe slider has gone, as its not required. This one shows the Mk III in the open position, with the slider holding the decoupler in place to stop the wagon/car you want to separate. This clip shows the decoupler in action I am using a small 3 siding layout to run these tests, see the next three clips. Small Wagons Large Wagons Tanker Wagons I included these as they are fairly lightweight, just to see if that would make a difference. I'll post a new parts/guide soon. If you can think of anything else, I'll try and incorporate it. If you do build one, let me know how it goes.
-
Ok, I have pondered and make a slight modification to the decoupler to allow the lock to slide under it with no extra assistance. The red color is just to highlight the changes. Here's a pic, I'll post a clip later.
-
I don't have any 12v myself, but looking at pictures, is there enough room to have a 1 x 6 plate on either side of the centre ? That's right - the decoupler is balanced on the track. The weight of the plates/tiles is what makes it pivot. At the moment you judt need to hold it down to slide it in. I see what you mean, it would be good if the sliding motion was the only thing to do. Let me ponder...
-
There is nothing to this build, a few common parts Three sections make up the decoupler. 1) Track section 2) Decoupler 3) Lock For this to work the track needs to be raised by 2 plates. Although I only show the extra plates around the decoupler, you will need to add extra 2 x 4 or 2 x 6 plates under other parts of the track. In the video clip there is one 2 x 4 plate under the first section of the siding & 2 x (2 x 4) plates under each of the other straights. In this example I am using a baseplate, as many people use them in their layouts. 1) Track Section If you are using a baseplate, then it is up to you where to place these bricks, as long as they match up with the track. 2) Decoupler 3) Lock Part List for baseplate version (does not include track or baseplate) The freestanding version uses less parts, but is built in the same way except as above and should look like this: The tiles are not necessary. Part List for freestanding version (no track) The final version should look like this: Note that the decoupler piece should be in the gap of the track and be laying as low as possible. Slide the lock all the way out and the decoupler should pivot, slide back in to lock in place. The colors are just a guide, you can make them what you like. cheers CB68
-
Hi Werlu Ulcur, Thanks for the feedback. 1) The green baseplate is just showing that it can work with one, as many layouts are built on them. In the clip you should see that one of the sidings is just resting on the carpet (although it still needs to be raised) 2) I'll will be putting parts/guide up shortly. cheers CB68
-
Right, I now have a working decoupler. As I mentioned yesterday, the only brick based solution is to raise the track by two plates to get a sliding lock in place. I decided to put this test in a real world situation, so I now have a basic oval and a couple of sidings. One of the sidings in on carpet, with the other being on a standard baseplate. The baseplate version has addition tiles so it can slide - not a problem on carpet or hard surfaces. The test is to swap the two wagons using the sidings provided. Once again apologies for dodgy phone video. I haven't made any cuts, so you will see a brain malfunction with the points near the end. Full 4 min video at YT As it stands it is a manual version, like the points. It should be beyond the wit of man to add a motor... The colors are only for testing purposes, so it can easily be made in others.
-
I think I have a solution. If I raise the track by two plates, I can slide another one underneath which will block the pivot action. - Slide in to lock and slide out to decouple. I'll post more pics/clips later
-
Yes it is a one way decoupler, so the engine can only reverse onto it before pulling away. As the engines have a lot of undercarriage the plate catches it in the middle, so reversing is the only option. The clip with the two wagons show that it will work going forward, provided there is enough clearance. I tried to come up with something that doesn't use motors, its bad enough you need them for the points . I need to place it better in a layout, as you would only want to use it near sidings or a yard.
-
Thanks Ballast. Yeah, I just wanted a change from the set stairs. As for handrails the minifigs are quite wide which in turn would make the stairs wider. They'll just have to take their chances.... The normal stairs don't have a handrail either....
-
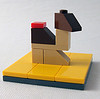
I got to thinking, there must be a simple solution as I too had a Hornby set which had a special track section to decouple items. I don't know if this has been tried before, but I think I have it. A pivot, which when the rear bogie of the engine passes over it, it pushes the pivot into the bogie of the following car and as the train moves away the car remains. The picture below shows the decoupler in place on the track. I then did a few tests to see if it works. Apologies for the dodgy videos, shot on a mobile. The first video clip shows two wagons rolling forward, with the second one separating itself from the first. http://www.flickr.co...y68/8536011799/ The second clip shows a train reversing a wagon over the decoupler, then moving forward to decouple. http://www.flickr.co...y68/8536001341/ What do you think ? Am I missing something, as this seems too simple.....
-
MOC: Metro Station with NXT controlled sliding platform doors
CamelBoy68 replied to Esben Kolind's topic in LEGO Train Tech
really really cool :thumbup: -
Hi jonwil, Without wanting to blow my own trumpet , here is my design for a modular platform including ramps. http://www.eurobrick...showtopic=78279 Its about post 13.
-
There is a 5% discount on the kit - compared to buying individually. (UK price)