

jrathfon
-
Content Count
141 -
Joined
-
Last visited
Posts posted by jrathfon
-
-
Awesome! Lots of great details. Love the lantern box! (is there a way to get custom wheels into studio?)
-
#35 O-rings at the hardware store, plumbing (faucet parts) aisle. That will get you black O-rings. May be able to search #35 (which are 11/16" OD, 9/16" ID, 1/16" thick) silicone o-rings online.
The 1/16" are a little thicker than the standard Lego rings, BUT: These allow you to do 3 wheel "E-type" ("C" in Europe?) trucks with a ring-none-ring configuration (like flanged-blind-flanged) on standard Lego curves/switches. Bonus!
-
"I don't want to be ungrateful but"... [ungrateful statement to follow!].
@BricksMcgee Thanks for all of the hard work and keeping the hobby alive! I'm not participating, but I sure will check out all the buzz and winners!
I love to lurk and be inspired and am super excited about all the progress our niche hobby (lego TRAINS, specifically) is getting these past few years! New vendors, new custom track, new official sets, BMR, BTD. Love the community! My HO train club father loves to show off all the realistic modelling we're doing on the Lego side! Keep up the good work! Didn't know that the FRED existed by BTD, but awesome it's a prize! Just moved, but when I get my layout back up that's first on the list to purchase!
-
Yup! As I model L&N exclusively, I have ordered numerous O and S scale Microtek water-slide decals. They are a bit delicate and they'd be destroyed if the model took a dive off show table. BUT, they've worked great for me. I use Micro-sol to help remove some air bubbles. I went water-slide as I didn't have to do any renders, find original files (didn't really exist for logos I was looking for), or futz with anything. I just ordered and applied. They hold up to handling and moderate use. I go back and slice the joints in case bricks separate.
Endless possibilities here: http://www.microscale.com/Merchant2/merchant.mvc?Screen=SFNT&Store_Code=MD
Anybody have links to inkjet printable "cling" paper or vinyl backer?
-
On 5/11/2020 at 5:23 PM, Electricsteam said:I've been mulling this over for a while.
It shouldn't be hard to make new 9v tracks with the right tools but the major problem is getting new motors for the 9v rails.
The best way would be to run the power from the 9v tracks into Power Functions and Powered Up battery boxes so you have the control of the newer systems without needing to run through a million batteries.
The hardest part is pulling the power from the rails and bringing it to the battery boxes.
You could use spring metal as a brush the run it alone the rail, use a roller like some Lionel trains use to pull power, or machine your own wheels for say the truck bricks or just the stand alone wheels with the axle hole.
New tracks really shouldnt be as hard it just takes a lot of work to make the tooling you need.
I mean the cheapest solution is to use conductive copper tape on the PF track which works really well, hell I've done that for a good chunk of the track I have on hand and it's great.
But for a more advanced option that I've been mulling over is making a sheet metal punch and another die to bend the punched part into shape to just lay on top of the PF track.
Hopefully succeed where the ME rails failed by their realistic but over engineered rail and tie system.
Honestly, if there are pickups integrated into a PF, PUP, BuWizz, or FxBrick controller AND you have a battery, you could just incorporate a few powered straight sections of old 9V rail for charging on the go and parking. No need for new 9V rail and you can save the expense and go with all the new 3rd party plastic options! Since a lot of my straights are 9V my power functions layout had plenty of "charging areas" already built in.
-
Agree with Duq. If we were told how, I'm sure the train user group could easily create more than one Trains banner.
Also, DO we have an active Trains moderator?
-
Very cool. The roller coaster track is an exact match!
-
R120 curved crossovers for the win!
Adding my two cents that if we were talking a 25 even 50% higher price for better quality (and I mean better thought out 3D printed geometries of the same part), I would choose the premium supplier every time. Early on it was pointed out V1 Trixbrix products had poor connectivity, or occasionally an odd geometry (didn't fit the 16 stud grid, etc). In that case I would look at the "premium" 3D printer, who obviously did extensive testing (it's less of a risk). But to pay double for an easy part (4L straight, R88, etc.) is just crazy, not to mention unique items (narrow gauge) and in stock parts.
I feel there is space out there for many suppliers, I will typically choose quality over price any day (after using ME track...). I look forward to premium molded options in the future as well as very custom, unique parts (R40 narrow gauge turnouts).
-
Awesome! That's a great solution. I moved so alas don't have room to build the mountain into my layout complete with it's own narrow gauge loop and tunnel! Always wanted R40 narrow gauge! I had originally asked trixbrix for that dual gauge turnout, but it seems the curve radius is funny and non-constant in the pictures (outside of R24 not working for my steam trucks).
Also, excellent work! Love the steam loco, lots of detail!
-
It's been a bit since my foray into narrow gauge. I saw trixbrix has some inner and outer dual gauge rail for narrow gauge rails. Is that how you are achieving the ~R40 narrow gauge curves? The only thing holding me back from my Tweetsie design was getting wider radius and functional narrow gauge curves. How'd you do it here?
-
Very cool, and just made a purchase for inspiration on my own MOC. Cheers!
-
What zephyr said. I used shupp's truck design for my E7's. Using normal #35 O-rings on the other wheels and omitting o-rings on the middle wheel in each truck allows for good R40 maneuverability. 1:1 is definitely slow!
-
Looking at BMR and PennLUG etc. it seems most are building at 1:48 for a variety of reasons. This generally works out to 8 wide rolling stock with 8 wide NA diesels and 8 wide steam loco bodies (minus rods, handrails, cabs, etc.). 1:48 works decently for minifig height (not width), there's a reduction in parts/cost from 9 or 10 wide or 1:38/1:40, and it's easier to make 1:48/8W function on R40 layouts and switches. 1:48 doesn't look terribly out of scale compared to the tracks either. I personally picked 1:48/~8W as it allows finer detail than 6W, doesn't cripple the wallet, there's a somewhat accepted standard (so instructions/kits/examples are more available), and finally I can "kitbash" O or S scale decals and make them work for my models. I'm working on prototypical ~1950's L&N locos and stock, so AFOL vendors (BMR, etc) haven't gotten around to printing decals for my tastes yet!
-
Or maybe using this as a "skid plate" between truck and frame?
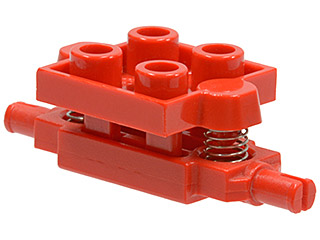
https://www.bricklink.com/v2/catalog/catalogitem.page?P=2484c01#T=C&C=5
-
I remember an old part with a spring that was like the 2x2 tile with pin in the center. My BL search skills aren't amazing, but maybe invert that to push up against the bottom of your drive wheel "skid plates". Hopefully somebody else actually knows this part, I remember it being part of airplane landing gear.
-
Great MOC! Nailed it! Lot's of good techniques here. Love the roof as well. As a side thought, and for others looking for a similar roof, with each side being three wide, you could sub in the minifigure bases for the tiling. Could actually do this on a 4 wide/side design with the 3x4 plates rotated the other direction.
-
Very nice implementation! On my real world 4-6-0 narrow gauge I wound up using "space's" powered trucks of a similar design to yours in the tender. My M motor is in the tender with one powered truck, battery and receiver in an RPO carriage right behind. If you do plan on making this in the real world, I found the tight radius of real lego "IJ" narrow gauge tracks to be very difficult to navigate with a shorter wheelbase leading truck and had to double articulate this link. Also steam cylinders had to be brought out a half stud on each side (7 wide mount) for clearance and rods just don't work with the extreme angles! Cheers!
-
My binding issue was more on the powered two axle bogies (shortest axle separation) coming from my boxcar (to conceal PF battery), but had issue with the lego/IJ narrow curves pushing twin axle bogies (as opposed to pulling) and just a bit of increased drag causing the powered bogies to slip. Also issues with running a Blind-Driver-Driver set of standard train wheels on a 4-6-0 loco, again pushing from behind with a powered box-car.
-
A word on the curve narrow gauge lego track or aftermarket productions. If you make any two axle bogies (for coaches, etc.) you will have clearance/binding issues on the tight (R24?) lego track with the standard lego train wheels (PF or otherwise). Some people have mismatched the old outer individual grey curved rails from the 4.5/12 V era for larger radius narrow gauge. It would be amazing if a 3D printing outfit made a normal radius narrow gauge curve track element!
-
22 hours ago, Tenderlok said:Should be this one:
https://www.flickr.com/photos/95098254@N04/27649207438/While being quite impressive, it's definitely not G-gauge, but about three times as big (G-gauge, 45 mm, means 1:32 scale for standard gauge prototypes).
Good catch! Didn't see the zoomed in pic, the brick built track looked like metal track at first. Truly massive!
-
Didn't see this already posted, but a Lego Flying Scotsman in G-gauge made the BBC!
Do we know the creator?
-
Love it!! It's funny how the nose has to be built different in each livery due to brick availability! More dark blue curved bricks have come out since I built my L&N E7's. I also drew on Nathaniel's design, and Shupp even helped me with the window glass bit. We should have a gather of the E/F 7/8's in all their various livery's! 8 wide of course. I might rework mine with a different nose and also rescale it. This was my first big MOC so I believe I actually scaled to 1/40. I might shrink them a bit and go with 1/48. Cheers!
My L&N E7's:
-
Awesome coaster! Do you have a link to the ball bearings supplier?
-
13 hours ago, Beck said:Thank you both @Hod Carrier as well as @ColletArrow.
I already saw space's design and it looks fantastic; however am trying to build a Stadler Allegra ABe 8/12 in 6 wide so the bogie must be hidden behind plates on either side. I am worried that It would be too wide to pivot in a < 6 wide width. I scaled the train and the bogies would have to be placed 24 studs apart and the carriage length would be 35 studs. Yeesh!
@mtrkustoms What do you mean by old 12v rails? I know that the old lego rails were seperate from the sleepers, but aren't they built for "standard gauge" (4 stud gauge)? I'd love to hear more.
Look up the lego narrow gauge puffing billy here and on flickr. That's a 4 gauge railway using old 12V rails, you have to fudge spacing and use odd 1x2 panels, etc. to correct for off curvature of each rail.
BuWizz and trains
in LEGO Train Tech
Posted
I'll chime in on the iPhone side. The iPhone arbitrarily cuts both wifi and bluetooth connections when you put the phone to sleep. I have constant issues with Google Home connections, Nest, Chromecast, and most annoyingly the wifi on airplanes. The iPhone assumes since I'm on airplane mode the goal is to try to save battery when going to sleep. Not the fact that I'm ON AN AIRPLANE and would like to continue streaming music via wifi with my phone screen asleep and phone in my pocket. I've tried many many settings, but every time iOS updates, I find myself having to toggle these settings (location services for wifi) on/off to maintain connectivity, or having to uninstall/reinstall specific apps with connection issues (Hulu, google home, gboard, etc.). Unfortunately work supplies the iPhone and I'm too cheap to purchase a second phone! I suppose resurrecting an old android and using it without cell service as a stand-alone BuWizz controller would work well!