

Ts__
-
Content Count
190 -
Joined
-
Last visited
Everything posted by Ts__
-
The little cars look great! Perfect! I would also be happy about more pictures of the construction, eg from above or below. The construction of the frame with plates underside to the outside I also use very much. Gives extra detail without building everything full of tiles. And the cloth on top is then the eye-catcher ;-) Thomas
-
I say many thanks.... Both locomotives can be seen next weekend at the Bricking Bavaria 2022 in Fürth / Germany. If who is in the neighborhood ;-) Thomas
-
This HUB/motor combination is usually completely problem-free (except too fast^^) and the train is definitely not a heavyweight. This should work together without any problems and I believe here also a defect. In any case, this is not normal. Most of my locomotives use this HUB and motor. Ps: I mainly use rechargeable batteries, but they are weaker than batteries and that should not be the cause here. Thomas
-
Can we have more information about the technical construction of the moc? I had such problems when I installed a Lego PU City Hub (the small one with 2 sockets) and 2 Legp PU L motors in a moc: Batteries are immediately empty and rechargeable batteries have a very poor performance. The PU L-motor sucks a lot of current and 2 of them immediately overload the City-HUB. Thomas
-
Thx, Somehow I scored an own goal. I could have ordered the red wheels immediately at the start of the project in early September, then they would already be there and I could have done the 2nd conversion already. So I have to wait now just yet, will probably happen in December. I was at the start of the project but also not sure that I get it done in time and that it is also what good. Thomas
-
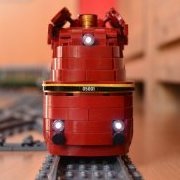
Thank you, that motivates me very much Ok, but I count more like two and a half ;-) and the last half conversion is unfortunately only digital so far. But I have ordered the missing red wheels and after erhalt I want to convert the 003 also to the black / red color scheme. And I'm happy that also a WIP model made it to the frontpage of Eurobricks, thanks! Final sprint: I have created a few more pictures of the technology used: Also, the 1944 version is now "finished": Yesterday and today I used for photo and video creation, have fun: Thomas
-
[OcTRAINber MOC] LMS Articulated Railcar (1938)
Ts__ replied to Hod Carrier's topic in LEGO Train Tech
I simply say: first-class work, and clearly "quality before quantity". Whereby you have built just not little! I can also understand very well the many work of you in the last two months, something you build not on the side. That is already "almost" a full-time job. By the way, I find your prototype very interesting: without background knowledge, one would never assume that the two vehicles have the same origin. And the second plus point: the many explanations about the construction technique wiht lego, that looks mega exciting! Thanks for the worthy contribution to the OcTRAINber and good luck! I see a favorite here! Thomas -
Thx. If it can be done better, it must be done better. Anyway, if you still have time in the OcTRAINber ;-) Also thanks Simon. October is coming to an end and with it, time is running out for the OcTRAINber... Time to briefly tell the story behind BR05-003: And also to add the lighting/interior to the 003 from 1937: Since the 1944 conversion is quite gloomy, I still have the 2nd conversion from 1950 designed in Stud.io. The conversion with Lego bricks will take place only when I also have the red BigBen XXL wheels (are ordered, but before the end of October it will be nothing more): Quick question: what details or building techniques would still be interesting for you, so that I should show it? Thomas
-
BREAKING: The Orient Express Train approved in LEGO Ideas
Ts__ replied to koraldon's topic in LEGO Train Tech
An Ideas Train. I am looking forward to it. Even if the last Hogwarts Express immediately ruins the joy of a Lego train. This Ideas design is also impractically wide and if implemented 10+ studs wide, hardly useful. So let's hope and see how Lego realizes the whole train..... Thomas -
Thx! The short break in construction is over and was used for time with the family and to get parts.But now is time for OcTRAINber: First, the tender was reworked again, I was bothered by the completely smooth tender side panel: The second topic was the installation of lighting in the 1944 locomotive: This almost completes the conversion to the 1944 version. Let's see what other little ideas I have in the next few days.... Thomas
-
[ocTRAINber MOC] St. Boniface Golf Club Foot Bridge
Ts__ replied to Supplement_Creatif's topic in LEGO Train Tech
Cool presentation! Beautiful transformation perfectly staged. Thomas -
I used today's morning and evening to design the last open points of the BR05-003. I have built digitally and real parallel, since the area of the chassis is also affected, also took place again about 1 hour test drive (with interruptions). Today, I have added the chassis paneling of the tender, the design of the interior cabin Lokomotove / tender, the coal supply in the tender and the very front I have pulled the slope further down. With this, the BR05-003 in 1944 condition is "finished" in terms of design. Still missing are the parts procurement in the right color (black ;-) ) and the lettering. Also, I think the locomotive is so gloomy, it needs lights ;-) For the short time (I started at the end of September with the 1944 version) I find the design not bad. Of course there is always something to improve. The 003 from 1944 is very dark in almost complete black. Is also not my desired color, but fits the time pressure and year 1944. I have black wheels and the year 1944 was gloomy.... To also have a bright spot: So the world looks more friendly ;-) Today there were "only" render pictures, but I built the locomotives exactly the same way, only partly with wrong colors of the bricks. The next days I will get the missing bricks and take a break. I have earned it ;-) And after that it goes to the final spurt in the OcTRAINber.... Thomas
-
The "small" 12 has turned out really well, the prototype very nicely captured. I find the image "small vs large" best. There you can literally feel the steam ;-) Thanks also for the video. What a great fleet! Thomas
-
Thanks Sérgio! I also like the 1937 version more now, but mainly because of the color. The completely black 1944 is still quite "boring" For me, this is part of an OcTRAINber. Not only success stories, but also the way there ;-) The 003 with cab forward was an experimental locomotive and a failure. It didn't really work with the coal dust. The conversion to a classic steam locomotive in 1944 was certainly also due to the war. Every steam locomotive was needed there.... But I'm not an expert either, I read here and there and guess a bit ;-) Back to OcTRAINber WiP Story: I put in another night work yesterday and finally had the right idea to build the cylinders stable. Interestingly, they don't even look different from the outside. What a difference a little thinking makes ;-) Then nothing more stood in the way of today's test drives and yes: the cylinders now hold: in about 1h driving (with breaks 2h) nothing fell off. Fits.... And also the traction was quite sufficient and not yet at the end. I just had not fetched more cars from the basement ;-) I can now devote myself to further details quite calmly, the basics fit so far. Enjoy Thomas
-
[MOC] Nature will find the way (Abandoned Locomotive)
Ts__ replied to Sérgio's topic in LEGO Train Tech
Very nice diorama. You can really feel the passage of time. Thomas -
I am also still thinking: brilliant idea or topic missed by OcTRAINber. In my two versions of the same locomotive is hardly a stone in the same place, maybe the coupling on the tender is in the same place ;-) Also, the 1937 version is rather ugly in the prototype, but since the BR05-003 (1954) was my first Lego steam locomotive, I now quite a lot connects with the ugly duck. Thx Thosten and Ivan ;-) It's mid-October, so it's time to get into the details: The first driving test has also happened today: drives, but is still in need of improvement in stability ;-) It was already too dark for a driving video today, I'll try to improve the loco and create a small video in the next days. Thomas
-
October has long begun, time is running.... With this, the backlog at Eurobricks is caught up, from now on I can tell the construction story here live ;-) Currently I'm working on the details of the boiler (it's still so naked^^) and on the missing ladder between locomotive and tender. At the same time, the procurement of the missing parts is in progress. Thomas
-
Thx at all... I agree, the prototype is also already ugly and I tried to recreate it ugly ;-) Please don't put so much pressure on me ;-) I do my best in the short time and then see what was feasible for me. Better always goes.... A friend once said to me: "Hello Thomas, are you bending bricks again?" ;-) After just under a month, BR05-003 in 1937 condition was ready at the end of September: Video at YouTube: So it was time to continue building the 1944 version: Thomas
-
[OcTRAINber MOC] LMS Articulated Railcar (1938)
Ts__ replied to Hod Carrier's topic in LEGO Train Tech
I've been following the topic here as a silent reader since the beginning, but it probably needs to be said: Top! Especially the old version with the pulpit I find really well done. Construction-wise, this is a masterpiece. Thomas -
I thank you both ;-) I decided to use the wheels without flange, because you can hardly see the wheels under the fairing and thus a closed body of the locomotive was more important to me. I think that looks better than when parts of the fairing create a large gap in the curve. The next step was a test build of the entire locomotive: Now one tender was still missing: With the colorful locomotive and tender, I could then perform test runs. Especially the behavior in curves and switches can only be tested and not determined on the computer in Stud.io. Have fun and see you next time. Thomas
-
Definitely. I will also come quite quickly here to the current status, but so 2-3 days this will take ;-) The reason for this is that I was not sure for a long time whether I can build something useful in the short time. I'm not a person who likes to make big announcements and then it becomes nothing. Thx Simon But back to the construction of BR05-003: After I had a "chassis" for the BR05-003 from 1944, I wanted to see how the BR05-003 from 1937 could look like.... First again a chassis design and side panel: I needed longer for the front. Round, angular, perfect for a Lego conversion.... Thomas
-
The TrixBrix double straight fits into the grid with a little more push. Not perfect, but also no problem. In my picture above are tens of these double straight with substructure installed. Thomas
-
I have many tracks/switches from Trixbrix from 3D printer in use and also many tracks/switches from Brick Tracks in injection molding technology and therefore allow me to compare them ;-) Trixbrix 3D printing: + high variety of different radii/switch types. + sleepers for turnouts follow the radius (better optic) - 3D printing surface, clamping force of the studs and counter studs - motorization of turnouts more complex (linear movement), but feasible - Geometry: more different special elements for rail yards needed (R104RC, RC1, RC2) Trixbrix injection molding (only a selection of curves/straights) + Quality better than from Brick Tracks (accuracy of fit) Brick Tracks injection molding: + surface, clamping force of studs and counter studs + Geometry: Brick Tracks gets by with fewer special elements for rail yards, curve R104B and the 1/10 intermediate piece is enough + Motorization with indicator easier (rotary movement) - fit accuracy. You can't build the turnouts and the 1/2 straights completely underneath, in one place a stud doesn't fit from below into the tracks and you have to use tiles there. - sleepers at turnouts do not follow the radius (worse optics) - Turnouts are easily destructible (construction weakness), so handle with care. Especially with motorization Conclusion for me: - I prefer injection molding over 3D printing. - for switches I prefer to use the ones from Brick Tracks (even if they are not perfect). Better surface, direction indicator easier to build - for straight lines/curves I find the injection molded tracks from TrixBrix better Background: 1x Y-Switch from TrixBricks, motorized Foreground: 2x Switch from Brick Tracks, motorized 9x Switch from Brick Tracks, not motorized: I can contribute less to the topic of import tax. In the EU, this is not a problem or issue through TrixBrix from Poland and HA-Bricks from Holland. GB has unfortunately chosen a special path. Regarding the curve radius: in my case, all switches/curves are designed for at least R104. I don't see the point in building switches with R104 and then using R56 curves. The reason for R104 are my long wagons/locomotives in scale approx. 1:45. This looks bad on R40 and not every locomotive of mine can still run on R40. Thomas
-
Because the videos show only successful attempts ;-) I had also tried it first without 2nd clamp. Has often worked, but just not always. Sometimes (maybe in one of ten attempts) the wrong car was uncoupled. Therefore, I have in my hump yard two holding clamps. One is moved away by a carriage and pushes the waggon away, the other remains in position and holds the other waggons. This ensures that I uncouple at the desired point. Thomas
-
Hello Thorsten, I had written the PU program in January 2021 and had no idea that there are ready-made commands for it. I simply programmed a loop for each motor that compares the target and current rotation speed and adjusts the motor accordingly. Since it works, I have not changed it until today. Therefore there are no problems with the PU APP and its bugs. I use a fairly current tablet, which also has a high speed. And you must not forget: the locomotive runs very slowly in automatic mode with 20 RPM at the motors.The locomotive also runs slowly overall, it is a shunting locomotive and a controlled slow speed was important to me.100 RPM is max speed in Hand mode. Here is a screenshot of the motor control part: In the picture: 2x control loop for 2 boost interactive motors in one locomotive v = target rotation speed locomotive p/x = target rotation speed drive 1/2 u/w = current rotation speed drive 1/2 Thx. I haven't presented the marshalling yard here at Eurobricks yet, since I'm still building it. For each exhibition there is an extension or it is what more developed. The whole thing is a long-term project and I've only done maybe half. @Feuer Zug: thanks Thomas