-
Content Count
114 -
Joined
-
Last visited
-

[MOC] 1:8 Aston Martin Vulcan
mihao replied to mihao's topic in LEGO Technic, Mindstorms, Model Team and Scale Modeling
True, some angle is not easy to achieve, so I have to be creative. I'll try posting more often. Thanks! Thanks! Need to minimize the weight so this big thing can actually run with motor. -

[MOC] 1:8 Aston Martin Vulcan
mihao posted a topic in LEGO Technic, Mindstorms, Model Team and Scale Modeling
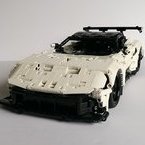
It's been a while since my last post, and this time I bring you my most recent MOC, a 1:8 scale Aston Martin Vulcan. The actual size is 58cm long, 24cm wide, and 13cm tall. This MOC is designed to be a combination of a static version and a dynamic version, meaning dynamic parts (motors, lights, and battery) can be directly mounted to the static version and it can run. In order to achieve this, I designed it in a way that the entire body can be completely detached from the frame. This has been a standard for my recent several 1:8 MOCs. Another significant benefit of this design choice is the ease of fixing issues deep down in the frame without needing to break down the whole body. Given that this car has a V12 engine at the front and is a rear-wheel-drive car, the drivetrain from the rear wheels to the engine has to collide with the HOG handler because both of them will go through the central line of the frame. My solution for this is to use a freewheel (in blue) to cross, as depicted in the following picture. I tried my best to reduce the size of the MOC, but it's still very big and very heavy. In order to make it motorized with changing speed, this is the gearbox I came up with. The orange part can slide to change gear ratio between 0.6 (12/20) to 1.67 (20/12). The pink 1x2 thin lift arms will hold it in position. Two buggy motors will be mounted on both sides of the top-most orange 5x7 frame. I have to use a pair of gear to reduce the speed and increase torque for each buggy motor before connecting into the 5x7 frame. I experimented with different pairs, and the only feasible one is still the 12-tooth and the 20-tooth, which can provide enough torque to kick off the car from a stationary state but not too much to grind the gears. Here is a video about how it runs with the high gear. Here is the full feature list of this MOC: Independent suspension on all wheels. A functioning steering wheel and HOG (Hand of God). An openable hood. Doors that swing open with a spring lock. A working V12 engine. Two-speed gearbox. Detachable body from the frame. And here is the RB link for this project LEGO MOC 1:8 Aston Martin Vulcan Static Version by Lego__Bee | Rebrickable - Build with LEGO I hope you enjoy seeing this project come to life as much as I enjoyed building it. Thanks! -

Early versions of Ldraw all-in-one installer
mihao posted a topic in Digital LEGO: Tools, Techniques, and Projects
Does anyone happen to know where I can find early versions of LDraw all-in-one installer? The recent installer has some issue to generate instructions for my MOC, so I want to revert it back to some old version. Thanks! -

[MOC] 1:8 Ford GT
mihao replied to mihao's topic in LEGO Technic, Mindstorms, Model Team and Scale Modeling
Do you mean this by DLR? -

[MOC] 1:8 Ford GT
mihao replied to mihao's topic in LEGO Technic, Mindstorms, Model Team and Scale Modeling
Feeling myself very ignorant now. Could you point me out what the LEGO approach for DLR is? -

[MOC] 1:8 Ford GT
mihao replied to mihao's topic in LEGO Technic, Mindstorms, Model Team and Scale Modeling
FYI, I just posted the instructions at https://rebrickable.com/mocs/MOC-149456/Lego__Bee/18-lego-technic-ford-gt -

[MOC] 1:8 Ford GT
mihao replied to mihao's topic in LEGO Technic, Mindstorms, Model Team and Scale Modeling
I didn't pay too much attention on the actual scale, and the reason I mentioned it 1:8 is because I use the tire of LEGO Lamborghini, and all the scale starts from the width of the wheel arch opening, which in my case is 11. Here is my blueprint reference. Just did my calculation. the width of the real car is 195cm, and the MOC is about 21cm width, so the scale is more like 1:9, so thanks for pointing this out! BTW, I used to build 1:12 cars, so I believe there are also specific challenges for smaller scale MOCs. -

[MOC] 1:8 Ford GT
mihao replied to mihao's topic in LEGO Technic, Mindstorms, Model Team and Scale Modeling
thought about that and tried, those white line is too thin to do with part, maybe sticker. -

[MOC] 1:8 Ford GT
mihao replied to mihao's topic in LEGO Technic, Mindstorms, Model Team and Scale Modeling
Thanks. the wheel is some after-market product, the molding is same as the wheel of Official Lambo. I am just tired of the gold rim. -

[MOC] 1:8 Ford GT
mihao replied to mihao's topic in LEGO Technic, Mindstorms, Model Team and Scale Modeling
Here is what I end up with improving the headlight. Basically I tried to mimic the double bulbs, and given that only the bottom on has LED, I just added a clear part there. Here are the comparison before and now. What do you think? Before: Now: -

[MOC] 1:8 Ford GT
mihao replied to mihao's topic in LEGO Technic, Mindstorms, Model Team and Scale Modeling
Yes, that's a option. The current choice I want to make is between making the inner light bulb or the outer glass shell. I kinda lean toward the former, but for latter, the windshield from Ducati do have a shot. Thanks for being interested. Instructions haven't been finalized, I think once I uploaded to RB, it should be possible to compare it with 42143, though I have never used that function yet. Thanks for the compliments and suggestion! Yes, this train part does have some similarity to the light bulb, will try to see if they can fit. Can't agree more. Working on it... Thanks! Yes, I am currently trying to use 1x2 tile/plate to create the light bulb. Good to know the 1784 in clear, but it seems to be too curvy for that, isn't it? Here is what I am trying to do to improve the headlight. Just in design now, will try to change my MOC to see how it looks. -

[MOC] 1:8 Ford GT
mihao replied to mihao's topic in LEGO Technic, Mindstorms, Model Team and Scale Modeling
Thanks! Instructions are being tested by my friends right now. If there is no company agree to produce it as a set, the instructions will be published in RB. Thank you. Thank you. I am working on the headlights. The original GT headlight has two bulbs arranged like this: I am still trying to find proper part to mimic that. Because I need to allow the lights to run through, I can only use clear LEGO parts, which applies a big restriction on it. Let me know if you have any suggestion. -
Hi, this is a new MOC I built recently - 1:8 Ford GT. Functions include 1) Independent suspension on all 4 wheels 2) working steering wheel with HOG 3) extendable rear wing 4)butterfly doors 5) 2-speed gear box 6)V6 engine 7) openable front hood and bonnet. This can be built in either manual or RC. For the RC version: 2xL motor for propulsion; 1 x servro for steering; 2 x PF lights for front/back lights. More pictures can be found in my bricksafe folder: https://bricksafe.com/pages/legobee/ford-gt I'd like to hear comments from you guys. Thanks in advance! Update #1: Here is the improved version: More pictures can be found https://bricksafe.com/pages/legobee/ford-gt/v3 Update #2: Instructions is available at https://rebrickable.com/mocs/MOC-149456/Lego__Bee/18-lego-technic-ford-gt now.
-

[MOC] 1:8 Lamborghini Huracan V2
mihao replied to mihao's topic in LEGO Technic, Mindstorms, Model Team and Scale Modeling
Thank for your comments! For rear issue you mentioned, I took some deeper look. The red part does have the correct length from the side view (6 stud), the reason it looks sticking out is because the black part above it. I can try to extrude the black part further out to make the red part not as outstanding as this. For the biggest problem you mentioned, I am still looking for solution, it seems to be hard at the moment if I want to keep the wheel arm simple and sturdy. But I notice that some Lamborghini car does have the wheel inward a bit to the body like the one below. Hope someone with more car knowledge can help to explain a bit here. About the mirror, I did copy what LEGO does for its supercars, I think that it is not a bad choice as a matter of fact, though I'll try some other option as you suggested there. For any further update I will stick to this topic, no plan to create a V3 anyway. -

[MOC] 1:8 Lamborghini Huracan V2
mihao replied to mihao's topic in LEGO Technic, Mindstorms, Model Team and Scale Modeling
Thank you! Thanks! Thanks! Thank you for the comments. Agree with you that the front intake and the headlights can be improved. Lox's Huracan is good, it is just that I don't quite like to use soft axles to shape the body, (nothing wrong with soft axle, just personal preference.) Let me see if there is another way out. Yes, I totally understand. You are right about the offset. Actually, I was struggling with this during designing. The thing is, it is hard (if not impossible) to get a perfect combination of suspension, wheel width and rotation clearance (for the front wheel) at the same time. Sacrificing the wheel width seem to be the optimal approach. If extruding the wheel arm .5 stud, it will be perfectly matching with the body width, but 1) the wheel arm will be super chunky and not sturdy (by combining many smaller parts) 2) as the wheels get closer to the fender, it is much easier for the tire to hit the fender when rotating or being pushed. So in the end, I decided to live with it. :( I'll take some pictures for the inner frame next time when I dismantle it. Thanks! Thank you for your comments! For the tail light, there is no space to move it up further due to the connection hole of the panels, as below. I tried to use a larger panel to avoid the connection hole, but it doesn't fit. Building with LEGO is all about compromise, isn't it? Believe it or not, I did try the 2x3 elliptical when designing the area above the rear wheel arch, but the #3/#4 collides as below, although in the real build, it doesn't really matter, but I didn't do it eventually to keep whole MOC "legal". :) Now, let me see how I can improve the front and report back later. For the scissor doors, I'll keep them no matter what. That's what Lamborghini supposes to have.


-min.thumb.jpg.a7f38dfbbed69863e8b48ba16e21019a.jpg)

