Ferro-Friki Posted July 14, 2023 Posted July 14, 2023 On 7/5/2023 at 5:45 PM, Imanol said: Okay, I have very good news, I´m now able to talk about it. This is only possible thanks to the help of the Talgo Group. This is very important as I´m not able to finance this project on my own and they gave me this amazing opportunity after I posted this train on Twitter. But there is also several users like @Hod Carrier, @Nikonissen and @Ferro-Friki that have helped as much. Those are extremely good news! I’m very happy for you, after all your dedication to Lego trains it’s nice seeing it rewarded. I’m glad I could help. On 7/6/2023 at 5:54 PM, Nikonissen said: Congratulations - a bit (extremely) jealous that Talgo wants to fund the building of the train. Hope that your model will come out nice! I won’t deny that I’m equally jealous, hopefully Talgo will still be hungry for more Lego trains after your S-130. For now, let’s just say that you’ve inspired me to go out there and expose my own trains to a wider audience ;) The new shaping of the front is a great improvement; however, I can’t shake the feeling that it’s a bit too long. Maybe that’s just how I see it. 23 hours ago, Imanol said: Ignore the 9V motor as Stud.io doesn´t have Power Functions or Powered Up motors. The difference in height between the bogies is caused by the different attachments you’ve built for each one. The 9V motor sits 2 plates lower, whereas the bogie to the right sits 2.5 plates lower. As you can see, if you use the same connection for both bogies there is no height difference. Placing the even-numbered-wide bogies in 7-wide trains can be tricky. The one on the left is the method I used for my own S-130 y did way back, it's unnecessarily bulky. Now for my Avlo 112 I’m using the build on the right, which is simpler, although I'm sure it can be made even simpler and stronger. Quote
Imanol Posted July 14, 2023 Author Posted July 14, 2023 36 minutes ago, Ferro-Friki said: Those are extremely good news! I’m very happy for you, after all your dedication to Lego trains it’s nice seeing it rewarded. I’m glad I could help. I won’t deny that I’m equally jealous, hopefully Talgo will still be hungry for more Lego trains after your S-130. For now, let’s just say that you’ve inspired me to go out there and expose my own trains to a wider audience ;) Thanks, as I already say it was the only way I have to build it now. I hope you can catch another investor 36 minutes ago, Ferro-Friki said: The new shaping of the front is a great improvement; however, I can’t shake the feeling that it’s a bit too long. Maybe that’s just how I see it. Maybe, I may try it. It has already been scaled down several times before. 36 minutes ago, Ferro-Friki said: The difference in height between the bogies is caused by the different attachments you’ve built for each one. The 9V motor sits 2 plates lower, whereas the bogie to the right sits 2.5 plates lower. As you can see, if you use the same connection for both bogies there is no height difference. Placing the even-numbered-wide bogies in 7-wide trains can be tricky. The one on the left is the method I used for my own S-130 y did way back, it's unnecessarily bulky. Now for my Avlo 112 I’m using the build on the right, which is simpler, although I'm sure it can be made even simpler and stronger. There is a bigger problem, is not only the power car bogie, the bogies of the rest of the train are at the same height that my first bogie design (the one in the photo below) and they are connected by plates so they can´t be moved up or down. Unión bogie motriz S-130 by Imanol, en Flickr Looking a little bit more I discover that when I first try your bogie design there was the same gap. In this photo there is two bogies, your design and the first prototype that I made which lies at the same height as the one made by @Hod Carrier, You can appreciate the difference between both. Diferencia altura rodales by Imanol, en Flickr Quote
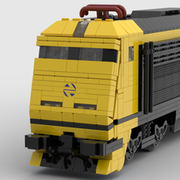
Imanol Posted July 16, 2023 Author Posted July 16, 2023 Okay, @Ferro-Friki you were right, I have removed 1 stud from the front and I think it has improved a lot: motriz S-130 Bogies mejorados y Frontal reducido by Imanol, en Flickr I´m still trying to solve the bogie height misaligned bogie. I´ve come to the conclusion that I can only touch the power car bogie. The reason is that the end car bogie can´t be moved up or down. But I´m (of course) not giving up and I may look again at the possibility of using a normal motor and transferring the movement with gears. Thanks, Imanol Quote
Imanol Posted July 17, 2023 Author Posted July 17, 2023 On 7/14/2023 at 5:09 PM, Ferro-Friki said: The difference in height between the bogies is caused by the different attachments you’ve built for each one. The 9V motor sits 2 plates lower, whereas the bogie to the right sits 2.5 plates lower. Well, I have a very promising prototype. After countless hours tweaking the design I have one that can connect train plates with conventional plates: Conexion bogie motor by Imanol, en Flickr The next step is to make space for the battery box and cable connections Quote
Ferro-Friki Posted July 19, 2023 Posted July 19, 2023 Glad to see everything is going smoothly! The battery box should fit in nicely. Also, just that small change to the front already makes it feel much more accurate. Quote
Imanol Posted July 19, 2023 Author Posted July 19, 2023 You can´t imagine the relief of having a valid bogie prototype, I haven´t checked thoroughly the space for the battery but at least I know it can fit in the allocated area with some small changes to the inside. About the front I´ve using for some time an "scale" that was made using my class 269 as reference and it´s that 13 m equals 60 studs. When you said that the front was longer I checked and it was exactly 1 stud off the scale so for now this scale works perfectly. Quote
Imanol Posted July 20, 2023 Author Posted July 20, 2023 Okay, I finally have installed the motor and the "battery" inside the frame of the power car. But I don´t know if the top part is supported enough as is only attached to the rest by the white pillars. The top part consist of the roof and the slanted gray surfaces as you can see in the next image: Interior motriz by Imanol, en Flickr My personal opinion is that I have more hinged plates to support the sides that what I need: Lateral techo motriz by Imanol, en Flickr But that the top part is undersupported and flimsy as is only attached by 1x2 bricks or plates. So what is your impression? Thanks, Imanol Quote
XG BC Posted July 21, 2023 Posted July 21, 2023 honestly it will be fine as long as the roof has some structural integrity. Quote
Imanol Posted July 21, 2023 Author Posted July 21, 2023 3 hours ago, XG BC said: honestly it will be fine as long as the roof has some structural integrity. Thanks, I ´ve been reinforcing the roof and I think that it will now hold itself. For now I´m going to wait until I build a prototype to change anything on the roof. Quote
Hod Carrier Posted July 29, 2023 Posted July 29, 2023 Sounds like you're getting through all the various challenges of the design. I'm sure that what we're all waiting for now is the appearance of some real bricks. Quote
Imanol Posted July 29, 2023 Author Posted July 29, 2023 1 hour ago, Hod Carrier said: Sounds like you're getting through all the various challenges of the design. I'm sure that what we're all waiting for now is the appearance of some real bricks. Thanks, I can assure you that I´m the first one wanting to have real bricks and start building. Quote
Imanol Posted August 30, 2023 Author Posted August 30, 2023 Hi, It´s been one month since I last posted. Unfortunately the project has not progressed during this time. But don´t worry the project is still ongoing and I´m hoping to soon receive final approval and obviously the funds. In the meantime I ´ve been working on other trains like this Talgo III which was the predecessor of the Renfe S-130. I used the same bogie design for it so it can be built and used in LEGO track but it will remain a render for now. 269 con Talgo III Perspectiva [MOC] by Imanol, en Flickr Waiting to give all of you great news, Imanol Quote
Imanol Posted October 3, 2023 Author Posted October 3, 2023 Hi everyone, yes I´m still waiting for response but I won´t give up. In the meantime I ´ve been busy designing several other trains for example my new Renfe Class 7631 of which I have opened a thread. As you will see the thread is more about my issue detailing bogies so please check it out. Thanks, Imanol Quote
Imanol Posted February 12, 2024 Author Posted February 12, 2024 (edited) Hi, I have a lot of news. During this time I ´ve been working on the final details of the build and now it´s ready. I started building the train, for now I will only build 2 trailers and 1 powercar (see photo below) Current Plan by Imanol, en Flickr In this moment I only have one of the cars as I´m still waiting to receive some pieces. LEGO Renfe S-130 Preferente PMR [MOC] [WIP] by Imanol, en Flickr I´m happy to inform that the @Hod Carrier bogie works perfectly. But I already found several problems but most of them have already been solved, but this is not easy as my personal piece collection is very limited and is several years old. The main problem that I have found is relating the windows which are not stable enough. Renfe S-130 Window 1 by Imanol, en Flickr As you can see the windows have several bricks which attach to the rest of the roof and make them more stable, but this is not enough as the overhang is not secured enough and can be pushed inside. As @Ferro-Friki has proposed I attached the other end with some tiles and it looks way better Renfe S-130 Window 2 by Imanol, en Flickr But there is a problem, I´m currently on the process of preparing another train in order to send the instructions and I have encountered the same problem but with a worse solution. In this other train, the Renfe Class S-449. As you can see the windows are one plate larger so this trick of using modified bricks with studs doesn´t work as they can´t be aligned. The problem with adding a bar between the two sides is that the interior is in between. Here the windows are attached in both sides meeting in the middle but this relies entirely on the pressure made between the two sides but as I´ ve discovered this is not enough. Renfe S-449 Windows by Imanol, en Flickr I already tried to use the Technic brick hole but as this video explained this is an illegal technique which can add stress to the bricks and I´m not willing to do that. So the question is, Is there any "legal" technique which can attach the plates at the end. I´m hoping that you could understand it. Thanks, Imanol Edited February 12, 2024 by Imanol Minor correction Quote
Stereo Posted February 12, 2024 Posted February 12, 2024 (edited) I'm not certain I'm understanding the part you want to modify, but if you use 1x1-1x1 brackets at both ends, they're not attached by studs, but they also can't move separately if they're pressed together. (symmetrical top and bottom, tile-> <-tile <-bracket, and bracket-> tile-> <-tile). Part 4585 is how Lego solved it on the Orient Express, but they're only available in white + dk. blue yet. Edited February 12, 2024 by Stereo Quote
Imanol Posted February 12, 2024 Author Posted February 12, 2024 4 minutes ago, Stereo said: I'm not certain I'm understanding the part you want to modify, but if you use 1x1-1x1 brackets at both ends, they're not attached but they also can't move separately. (symmetrical top and bottom, tile-> <-tile <-bracket, and bracket-> tile-> <-tile). Part 4585 is how Lego solved it on the Orient Express, but they're only available in white + dk. blue yet. Thanks for the idea, as for part 4585 I could try to make it work in the S-130 as it doesn´t have a black "window frame". The 1x1 bracket technique may solve part of the problem but the train has an interior and it will colide with it. I have checked it and the space between the seats doesn´t align with the black bricks in the windows so it won´t work. The perfect solution will be any type of connection at the end that is not an illegal technique as unfortunately the Technic brick is. Quote
Hod Carrier Posted February 13, 2024 Posted February 13, 2024 Part of the joy of designing our own things is that we don't have to stick to the rules and can do things in the way we want. I have made extensive use of stuffing studs into Technic pin holes and have never had a part break or show signs of excessive stress. It's a very effective technique which gets around this problem easily, and it's what I would use for the S-449. Besides, if you're worried about breaking the rules, the diagonal top link in my bogie design is probably illegal too. I appreciate that you want the windows to be as secure as possible, but I'd be inclined not to worry too much. The windows in my railcar are done in long strips that are only secured at the ends, but because I know that makes them fragile I am careful about how I pick the train up and handle it. 9 hours ago, Stereo said: I'm not certain I'm understanding the part you want to modify, but if you use 1x1-1x1 brackets at both ends, they're not attached by studs, but they also can't move separately if they're pressed together. (symmetrical top and bottom, tile-> <-tile <-bracket, and bracket-> tile-> <-tile). Another option for locking parts together without studs that I have found (although not yet tried) is to use 1x1 cheese slopes. Quote
Imanol Posted February 13, 2024 Author Posted February 13, 2024 1 minute ago, Hod Carrier said: Part of the joy of designing our own things is that we don't have to stick to the rules and can do things in the way we want. I have made extensive use of stuffing studs into Technic pin holes and have never had a part break or show signs of excessive stress. It's a very effective technique which gets around this problem easily, and it's what I would use for the S-449. Besides, if you're worried about breaking the rules, the diagonal top link in my bogie design is probably illegal too. I appreciate that you want the windows to be as secure as possible, but I'd be inclined not to worry too much. The windows in my railcar are done in long strips that are only secured at the ends, but because I know that makes them fragile I am careful about how I pick the train up and handle it. Another option for locking parts together without studs that I have found (although not yet tried) is to use 1x1 cheese slopes. Thanks, I will try the cheese slope technique first. The problem with connecting studs to Technic holes is the repetition which was my first idea as the lower part of the window is made of Technic bricks that were supposed to attach to 1x1 studs placed between the tiles in the bottom of the windows. Is not only that the technique is illegal but also the fact that it points slightly upward which worries me due to the fact that the roof is main point of attachment between the different sections of the car. In any case if the cheese slopes fail I will try it. Quote
Imanol Posted February 13, 2024 Author Posted February 13, 2024 (edited) I ´ve tried the cheese slope technique in the S-130 car and it works great. I´m going to made a prototype in the near future in order to test the compatibility with the S-449 windows. Hod Carrier Cheese-Slope Technique by Imanol, en Flickr (I still need to improve my "Photoshop skills") For now I´m still waiting to receive the final pieces of the train and I´m planing to finish the build soon. Then I will be able to check and improve any other minor detail. Thanks, Imanol Edited February 13, 2024 by Imanol Quote
Hod Carrier Posted February 15, 2024 Posted February 15, 2024 On 2/13/2024 at 9:27 PM, Imanol said: I ´ve tried the cheese slope technique in the S-130 car and it works great. Thanks for testing the idea. Quote
Imanol Posted February 15, 2024 Author Posted February 15, 2024 4 hours ago, Hod Carrier said: Thanks for testing the idea. No, thanks to you for coming up with it. It will help a lot in future projects Quote
Imanol Posted April 27, 2024 Author Posted April 27, 2024 (edited) Hi, first I´m sorry but I forgot to update the post until now. The first phase of the train is finished as you can see in the next photos: Side of the Powercar From the back The two cars: And of course one of the interior: But this is only phase 1, phase 2 is already here (although I don´t have any proper photos): But I have a encountered a big problem: last week while working on the train I started to noticed several cracked bricks, see photos below: As you can see is a very extended phenomena that affects all of the cars except the new cafe car. After discussing it with @Hod Carrier we discarded the excessive weight option and the factory error (not all of the pieces were bought from the same seller). The only thing certain is that the pieces are all new Since then I´ve came with an alternate theory that may explain almost every case (but for now the crack in the 1x3 brick is unexplained). I think the problem might be with the fact that they have only one stud connections so the can "swivel" slightly and the might be misaligned with the bottom stud causing the cracks. But this is only a theory that I can´t prove (without permanently damaging more pieces) so I want to know if anyone has another theory. Thanks, Imanol Edited April 27, 2024 by Imanol Error in tag Quote
zephyr1934 Posted April 27, 2024 Posted April 27, 2024 6 hours ago, Imanol said: After discussing it with @Hod Carrier we discarded the excessive weight option and the factory error (not all of the pieces were bought from the same seller). The only thing certain is that the pieces are all new Since then I´ve came with an alternate theory that may explain almost every case (but for now the crack in the 1x3 brick is unexplained). I think the problem might be with the fact that they have only one stud connections so the can "swivel" slightly and the might be misaligned with the bottom stud causing the cracks. But this is only a theory that I can´t prove (without permanently damaging more pieces) so I want to know if anyone has another theory. No, those results are typical. About mid 2000's Lego reduced the cycle time when molding bricks and so the newer bricks have weak spots where the flows come together. I've seen it on 1x bricks, plates, tiles and slopes. Back when I was an Ambassador I complained to the forum about the quality control, here's the example I used in 2011. There was no unusual stress on any of the parts. Quote
Ropefish Posted April 28, 2024 Posted April 28, 2024 9 hours ago, zephyr1934 said: No, those results are typical. About mid 2000's Lego reduced the cycle time when molding bricks and so the newer bricks have weak spots where the flows come together. I've seen it on 1x bricks, plates, tiles and slopes. Back when I was an Ambassador I complained to the forum about the quality control, here's the example I used in 2011. There was no unusual stress on any of the parts. This is still a major issue I run into sometimes especially with reddish brown ( the most cursed color ) wich is a shame as you know it’s a collie that’s in a lot of rolling stock… best thing I’d recommend doing is always buy a bit more then you need, some of them function just fine if you put a facing the other way but the crack will always be there. Quote
Imanol Posted April 28, 2024 Author Posted April 28, 2024 9 hours ago, zephyr1934 said: No, those results are typical. About mid 2000's Lego reduced the cycle time when molding bricks and so the newer bricks have weak spots where the flows come together. I've seen it on 1x bricks, plates, tiles and slopes. Back when I was an Ambassador I complained to the forum about the quality control, here's the example I used in 2011. There was no unusual stress on any of the parts. The problem is that all of the bricks that I used as a child were from 2005 to 2014 and I´ve never seen this phenomena occurring so I don´t understand why it´s happening now. Also I´m not happy to sell instructions for a train whose bricks will develop several cracks. 40 minutes ago, Ropefish said: This is still a major issue I run into sometimes especially with reddish brown ( the most cursed color ) wich is a shame as you know it’s a collie that’s in a lot of rolling stock… best thing I’d recommend doing is always buy a bit more then you need, some of them function just fine if you put a facing the other way but the crack will always be there. I was aware of the issue with reddish brown (although I thought it was solved several years ago) but I never imagined that the problem will be with the rest of the colours. The technique of hiding them works for some but the bricks with side studs can´t be reversed so the cracks will be visible. I was planing to replace these bricks with new ones but only if I can be assured that the cracks won´t happen so for now it will stay as it is. Quote
Recommended Posts
Join the conversation
You can post now and register later. If you have an account, sign in now to post with your account.