Selander
-
Posts
648 -
Joined
-
Last visited
Content Type
Profiles
Forums
Gallery
Everything posted by Selander
-
thanks ACCURATEin. Next step will be to add micro-size PF-motors to run the upper deck remotely TLG just has to invent them first.... Thanks KielDaMan. You are correct about supports for rear technic liftarms, but they are in fact a stable solution. As you say, it's a clean and neat solution, and it was the best design to allow easy folding of upper deck. The other designs I tried (using cross-axles / tubes / pins...etc ) all required too much force which meant that upper deck easily broke to pieces during operation.
-
I already showed this Mercedes Actros Smart transporter before as a WIP-project. After building a number of different designs to manage the raising/lowering of upper deck, I choose the below solution, which has the "sleak" look I wanted, and it is also easy to fold & unfold. As can be seen on one picture, two tiles (1 x 8) are attached to respective deck when cars are loaded. Feel free to comment.
-
I'm not into LDD at ll, but I must admit this is one one best designed trucks in LDD I've ever seen. Living in a snowy cold country, this sight is just too familiar on the roads
-
Thanks Perfectionist. About the scale, I do not see any problem with that. It's just a matter of having a clear strategy and to stick with that. All my trucks and buses etc are 6-wide. All my cars are 4-wide. So scalewise, they fit perfectly togehter. If TLG releases 6-wide cars, I don't buy them, or I could rebuilt them to 4-wide versions to fit my strategy. However if you start mixing scales and sizes, your town will probably look strange and unrealistic, so you have a point there. Bottomline is that it's all about your own consistency.
-
Thanks L@go for your kind words !! Feel free to copy - I just take that as a compliment, and copying is a great way to learn new technics for your own MOC:ing. Thanks Prateek !!! I really appreciate your comments. I assume you mean how to build the Mercedes front... which is more or less quite basic - I think you can see almost everything if studying pictures closely. The "only" special thing there is, is the black grille (with Merc logo-sticker) which is built upside down. A short tutorial follows: One black Technic plate 1 x 4 is placed in the bottom of grille. On top of that you put a tile 1x2 and plate 1x1 (4pcs needed) with studs facing down into the holes of 4263. A plate 1x6 holds the black cheese pieces and via the 1x1 plates and another tile 1x2 in center which "meets" the face of first tile 1 x 2 you are done. Perhaps difficult to undrestand when reading first, but kindly re-study the pictures again, and then I'm sure you follow me. Otherwise - just keep on asking Good luck building your own Mercedes truck !!
-
I've built quite a few Mercedes Actros trucks the last couple of months...so please find below a Mercedes cavalcade...
-
Really impressive stuff - top-notch. "The-off-the-grid-concept" looks so much better that the usual regular square pattern. Also, I like to praise your choice of "natural-looking" colors, which brings a lot of realism to the scenary, I'm just allergic to town scenes in bright yellow, red, blue and green....
-
Thanks Rob ! I have been thinking about magnet "manipulation" too.....but haven't tried in IRL....(yet) One theoretical way that I have been thinking of, could be to replace the normal Lego magnet with an electro-magnet on locomotive. An electro-magnet is only magnetic when a current flows through it (a coil over a iron core), so the magnetic force is possible to turn on/off remotely. But as it consumes continuous power during hauling, I assume that would drain the batteries very quickly, if even technically possible. Generally, I prefer to stick with a solution which is 100% non-modified Lego, as in the design I posted
-
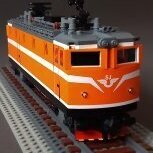
Old 9V + New PF => To combine the best from two worlds ? Background and goals: In the old 12V-system there was a stationary remote controlled, decoupling system. How about recreating something similar with elements available these days? Comparing the pros and cons of a stationary versus a “rolling” decoupling solution, I’d prefer the later because of the obvious advantage of decoupling at any place along the layout. Until recently I have been somewhat reluctant to the new PF train system, and I still think the old 9V system has its advantages, but at the same time, I must admit that using PF elements also opens up many new opportunities. My Swedish Railways RC-locomotives are reasonable copies of the prototype, but they are “simply” equipped with a 9V train motor (ref 5300) and have no other technical functionality. So how about integrating PF elements in the locomotive body, but keeping the 9V motor intact for reliable propulsion? My goal was to add: - working lights in front, plus: -integrate a decoupling system in the locomotive, with a minimum change of the external design. -both features should be realized by remote-controlled battery operated PF-items. -also I wanted to keep the Lego original magnet coupling system to allow using any standard rolling stock with my locomotives. Design phase: Main challenge was to fit all PF-stuff, such as a battery box, IR receiver, PF-motor + racks, lights etc in the relatively small size locomotive 6 x 28 studs (external dimensions). Considering a drivers cab in each end, and sides built from bricks, there was a limited room for all items needed. So which solution could work AND fit? Because of the strong magnetic force in couplings, I needed to create a distance of approx 40mm, (1½”) between locomotive and first wagon, to make the two magnet fields “loose contact” with each other. So my primitive idea was to physically push the wagons away from the locomotive using a 40mm stroke “piston”. To do that I was thinking in three alternative ways: A) Using a linear actuator. B) Using a wheel with a technic beam as “piston”. C) Using a gear rack as a “piston”. After some thinking, trials and consideration of space needed, I decided to go for alternative C, using a 1 x 10 studs long gear rack + a simple gear design. Realization: Locomotive body has been stretched 2 studs, so it now measures 6 x 30 studs externally, (6x28 base + "1 stud" SNOT front & rear) to give a little more internal space. Front has been re-built to fit PF-lights, and the rear has a small hole which allows the 1 x 10 studs gear rack to go in/out. To drive the "piston" I use a PF-motor Medium. I know it is basic and primitive, but it works. Roof is slightly rebuilt so the top of IR-receiver is visible for reliable operation. For remote control I’ve tried both 8879 and 8885, but the later is much better for my application, since gear rack must be run in/out at a minimum speed, and also LED-lights can be switched on permanently at the lowest power ( to save batteries). So…..here are finally some shots and a small video showing the results: -Internal view showing a full locomotive body with PF stuff. -Train front with PF lights which can be lit also when locomotive is “still” (compared to old 9V-lights). -Gear rack pushes wagons to physically separate them from loco magnet. IR reciever can be seen on roof. Short video link: video on my Flickr Conclusion It was possible to combine the best of two worlds for added fun and functionality!!! IF putting more efforts into decoupling issues, I am sure the talented builders of this forum can come up with a better-looking and more smoothly working solution than mine. So I hope you can accept this is a challenge to develop an even better decoupling system. Anyhow, I hope you enjoyed reading/watching, and please feel free to comment.
-
Below my new SCANIA and MAN-trucks with fully functional hooklift and container. I tried to make the hooklift look as realistic as possible, but of course you have to take into account the limited scale I use. Container is built up-side-down to get that smooth rounded shape in the bottom as I wanted. A bonus is that hinge tile for train gate can be mounted on top, to allow a "free flow" when opened. Normally I fit wider rear wheels, but that had to be sacrificed to fit the hooklift mechanism, which demands 4 studs of the width. Mechanism runs on tiles and just over I have plates with door rail so that the movement is controlled in all directions, allowing it only to travel from front to back and vice versa. Any comments are welcome as usual.
-
First I wish you good luck with building your own Mercedes truck, I am sure you'll figure out a nice design. Secondly, given the width of 6wide and considering doors (or panels)the available width internally for minifigs is 4studs. Normally I put the steering wheel + driver on the two studs nearest to the left door, and since a minifig is wider than two studs there is not room for a second minifig. Unless you rip off the drivers right arm, as well as the passengers left arm to form a siamese twins (then two minifigs will fit)
-
Now, that's an intersting input. I was hoping for these kind of constructive proposals. I'll continue to do some thinking, and see if I can come up with more ideas, as well as evaluate your good idea. Thanks for sharing, Ricecracker !!! I am afraid there isn't much of cab interior, except for a steering wheel and an antenna as gear shift. If you study this, and my earlier Mercedes:es, (see links below) I am sure you are able to copy the design, it 's pretty much just what you see, no special tricks...oh I can mention the use of a technic plate 1 x 4 to reverse direction of plates/tiles/slopes in the front grille arrangement.
-
Thanks Ricecracker and all others for positive comments. My original thought was to keep the upper deck in two sections, where the part over cab is static, and the rear upper part is possible to lower so it will be positioned just over the lower deck, enabling cars to easily drive on to it, and after that raise the deck with cars on it. My main problem is to find out what kind of "mechanism" which will look good an still get a reasonable functionality/playability. Once again, if you can come up with something and post here, I'd certainly be most grateful.
-
This is another truck in my Mercedes Actros style, now in Dkred with a small DkTan stripe. It is built for a temporary display in Stockholm Technical Museum next week. Due to limited time (many projects right now...) I had to focus on getting the look and proportions as I wanted, meaning functionality can be much improved. Inspiration comes from the below medium size truck from forwarders Norlens Åkeri in Sweden. For the prototype the whole upper deck is possible to raise and lower at four points, two in rear and two in front, to facilitate loading and unloading of cars. IF possible I like to achieve something similar, BUT without adding a mountain of technic parts. The ideal would be a compact, yet durable and functional solution.....so if anyone has an idea or suggestion, I would be very greatful. For the moment, as presented on pictures, there are hinges in the lower rear part, (just after rear wheels) and another pair of hinges in the front upper part deck. So there is a already a limited functionality. As said, feel free to comment
-
Nice interpretation of this trainset, which I think is a bit tricky to copy in Lego, but you have done a good job,especially when considering the limited scale you have used. Well done Esben.
-
Lovely models Gambort. Very well done indeed.
-
Tan and Smart, an unusual combination. Thanks to a rare find of tan doors on Bricklink and the all new tan cheese slopes, this tan 3177 was possible to build. Here with the complete family, representing all possible color combinations to date. Feel free to comment.
-
Below my latest MOC:s, a truly classic truck,Scania 113 H. These "long nose" trucks tend to be more and more unusual in Europe. Design is 6-wide, as all of my trucks, and I made two of them, since "the more the merrier". Hood design inspired by P Normandin.
-
..ha ha...plastic surgery, that was a good joke for a plastic legofig
-
Thanks, legoist and all others for kind comments. Yes, all vehicles and locomotives are my own designs. Design and colours refelect those of the originals (IRL) but of course with adaptations to what is possible to achieve in minifig scale. More pictures can be found in my flickr or brickshelf accounts - see links below, I also encl one picture of Excavator as you asked partically for that design. Flickr link Brickshelf link
-
Part of a train yard with some of my Swedish style MOC vehicles and locomotives. It’s my contribution to a temporary display, for a Lego event, in a Stockholm technical museum. I know the landscaping is extremely poor, but it’ll do the job since a train yard is typically “flat”, and the emphasis should be on vehicles rather than surroundings. Anyhow I just wanted to share this picture with you. Also, I'm sorry about picture size being slightly “heavy”, but when making it smaller it became super blurry.
-
New pictures added to original post. I didn't know how to change the headline.....
-
Thanks KielDaMan !! You are absolutely correct, it was a challenge to fit 2 “cylinders” and achieve the desired functionality in this relatively small vehicle. It’s basically as small as it can get, unless TLG releases an item with similar function, but smaller than 53586.(which I would welcome !! ) BL link to 53586
-
I think you are 100% correct, because I acknowledge doing the same
-
Thanks Tiger and all others for your kind comments!! As for the Volvo-looking-thing on the rear grill, it is merely a thin grey stripe, with a small square stripe in center. As a general comment on response on EB, I'd say it's really unpredictible. I've spent numerous hours of work on this front loader, but very few commented it. On the other hand I put a 5 minute job into my tan SUV (just adding those doors) and that topic has twice the number of visitors and comments (just as an personal reflexion)