

Selander
-
Posts
648 -
Joined
-
Last visited
Content Type
Profiles
Forums
Gallery
Everything posted by Selander
-
MOC: High Speed European Passenger Trains
Selander replied to lego9vtrainfan's topic in LEGO Train Tech
Really nice designs and videos But I wouldn't dare crashing my favorite trains purposly in front of the videocamera. (too afraid of permanent damages or scrathes...) Those big radius curves....do you just "bend" many straights ? AND very welcome to the forum -
New pictures added in the first post. I didn't know how to change/update the headline....of my first post...
-
My 6-wide Renault Magnum in a harbour environment, with two Lego container ships, the orange is a rebuilt set 7739. White forklift and orange container stacker are Lego original designs but in new colours. Container are simply made from 6 x Panel 1 x 6 x 5 (ref 59349). Any (NEW) comments are welcome. UPDATE: As wished by several viewers, here are some close-up photos and comments. 1. Doors consist of panel 1x2 and panel 1x1 corner. 2. Mirrors from a hinge bar + 2x tiles 1x1 with clip. Assembled to a hinge plate 1x2 w 2 fingers. Apart from that, the upper body is pretty standard using no special things/techniques. All is assembled onto a white plate 6x6. 3. Groove which is quite characteristic detail on truck IRL. An easy solution would be to use a plate 4x4 black, but that makes the groove too deep and unproportial for my taste. So I made a black "plate" 5x5, with use of 4 black tiles and half stud jumpers under. 4. Front wheels. To get that correct "hub" design that front wheels has, I use two std rims turned backwards and connected to a long technic pin (x202) and technic brick 1x2. Furthermore, the assembly is SNOT:ed to get that corrct close position. The design became somewhat difficult and I assume you could make this more simple. To me it works just fine though… 5. Lower side of front has SNOT:ed sides put on 2x2 corner plates which are connected to a brick 1x1 w 1 stud (new item 87087) but an ordinary technic brick 1x1 + pin is also OK, but the one i use brings a little more stability. This way headlights get that characteristic long sleek look still keeping all in 6-studs. Also I think the grill looks fine as it gets surrounded by grey surfaces in all directions. 6. Fuel tanks are half stud offset. 7. Mud flaps from flags 2x2 and a piece of cut black tube Now I have revealed all secrets... More/new comments are welcome.
-
Couldn't agree more.... otherwise it looks good
-
I like this. It is a nice design and colour scheme. A typical european switcher look indeed. My only suggestion is to put in some more details, I think it's just a little bit too many smooth square surfaces. You could use some SNOT:ed parts, doors, "ladders" (4175) or tiles w bottom groove (2412b) or......or....
-
Well why not....I'll consider that adventure comic idea
-
No photoshopping ! It is made of real pieces for sure....
-
To some extent I think it depends on how old you are... When I grew up in the early 70's there was a whole range of 6-wide trucks, such as sets: 372, 376, 377, 381, 382 and 383. (and probably several others I didn't happen to see/remember right now) So for me personally, the early 70's would be the answer for your question.
-
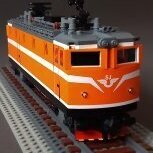
I just posted a review of my favorite lego fright train set 4564, and below follos a few pictures of alternative designs and colours as a tribute to this excellent set. Any comments are appreciated. Locomotive in grey and darkgrey. Complete alternative set. Darkgreen loco with original yellow loco.
-
Lego set 4564 is the second freight train set from the 9V era. Released in 1994 it comes as a complete starter pack with a locomotive, 3 small wagons, an oval track, transformer, speed control, 9v motor, 3 minifigs and a lorry with loading ramp to access the open freight wagon. The yellow locomotive has a typical european diesel shunter style, similar to e.g the Swedish T44 and many other engines. Special pieces of interest are: -Black train windows 2x6x2 which appears for the first, and only, time in this set. -Yellow doors 1x5x4 and 1x2x3. -Black train light prism holders in each end, although the LED and cable is not included. In my opinion 4564 is the best Lego freight train to date. Reason for saying so is that it is a very nicely detailed set. Locomotive has a lovely realistic design, and is full of nice unique parts. Blue box car can be opened with the sliding doors and and unload it's postal packages and letters by turning the wheel connected to a technic parts mechanism. Red hopper also has similar unloading possibilities. And last, the small open freight wagon where a container can be put in place using the loading ramp and that nice 4-wide truck with it's special "hook" which adds a bit of realism when loading/unloading the red and yellow containers. All-in-all verdict: +Nice realistic european look for the locomotive. +Many unique parts included. +Excellent playability due to many functions on locomotive and wagons. +Got me out of my dark ages, when purchased MISB on sale 1996 for (only) EUR 80,- Some things on the negative side: -Truck is only 4-wide, and I do prefer 6-wide trucks. -Wagons are all "short"compared to the locomotive.
-
Simple yet effective modification.
-
Reading my history books I've heard a lot about the red army. (from former Soviet union) But now you presented the environmental friendly "green army"
-
Just bought my first Train set - what next?
Selander replied to Thrawnseg's topic in LEGO Train Tech
With this relatively limited space, I would suggest to just have a big loop around your town, and make a bigger trainyard to the front left where you can have your rolling stock, train shed, cranes etc etc. Inside the big loop you can build a small town with various buildings. Also my general recommendation is to not put too many houses and vehicules in there, but to leave some open space and roads as well. good luck with your lego town. -
I am not very familiar with those automated things....but it looks as you have done a great job. If you could integrate it a little bit better in your city, e.g hiding cables and making it more rigid, it will certainly look even better.
-
Absolutely amazing collection of Lego trains Also I just stared when seeing your home display. It would be nice to see you building some own creations too.
-
Indy finds SUB-TILE message
-
Fully agree....but I must acknowledge you have done a good job with the Trance Am nice playing with words also. But what is that black symbol on the hood ? A Lego equivalent to the "fire bird" on the real Pontiac....or... ???
-
Unbelievably good creation one of the best train stations I have ever seen. I loved your gantry box - in fact that got my vote during TTCE, but this train station is even better.
-
Seeing the yellow freight locomotive was somewhat a disappointment. I was hoping for some new train windows 2 x 6 x 2 in yellow, but this looks exactly like the familiar cab window: Visit Bricklink And the crane looks identical with the former cargo crane 4514: Visit Bricklink
-
I'd love to lay my hands on that new yellow cargo train. As for the red passenger train....I am no too sure....
-
Brillant design Lots of nice details, I like !!!!
-
V-LC-18C Some pitcures of a heavy transport I built. Decal in the rear is from set 7900. EDIT: Front-loader is inspired by similar work by P Normandin and Steven Ashbury (and probably others as well...) Comments are welcome.....
-
Pillage the Village II - WINNERS - Medium Category
Selander replied to SlyOwl's topic in Pirate MOCs
A well deserved winner I must say -
Pillage the Village II - VOTING - Large Category
Selander replied to Erdbeereis's topic in Pirate MOCs
Once again: SO many terrific entries - :pir-skull: My votes after considerable thinking...... Etzel - 3 I scream clone - 2 Infomanic - 2 -
..and I am just back from the beach in sunny Morocco This is truly a great locomotive...but is it possible to run on normal track beeing so long ??? I saw the compettion on Flickr (beeing a member of the same group there) but the due date was then so close I didn't have time to participate, allthough that would have been an interesting challenge. Hope to see more of your designs in the future