Selander
-
Posts
648 -
Joined
-
Last visited
Content Type
Profiles
Forums
Gallery
Everything posted by Selander
-
I was suspecting that as I could see no signs of motors or related stuff. Also considering your design there shouldn't be space enough, but you can never be certain......some guys are experts and have magic tricks up their sleeve.
-
Last time I counted it was approx 20 locomotives, and 40 rolling stock. TLG originals are: 4564 4565 4511 7939 10020 x2 10157 10158 10133 10194 10205 4552 10013 x2 10014 10015 10016 x3 10017 x2 4541 and my MOC:s and MOD:s Swedish class RC locomotives x5 Swedish DA locomotive Swedish T44 locomotive Finnish VR SR1 locomotive German DB103 locomotive + 3 TEE waggons German DB111 locomotive Grey 4564 locomotive Green 4563 locomotive Yellow 4565 locomotive and numerous other MOC rolling stock...
-
Also a very nice design. Same question: How is it powered ?
-
Nice build. How is it powered ? I don't see either battery box or IR-receiver.
-
It seems the title should rather be what is your favorite American looking diesel engine, and I vote for the Santa Fe. I take the opportunity to mention TLG has several other good looking Diesel engines such as those from sets: 4563, 4564, 4565 and 4512, but perhaps those doesn't count as they were never sold separately ? If those were added, I'd vote for the 4564 as the best Diesel ever by TLG
-
These are fantastic. I really like well designed minifig scale construction vehicles. Well done.
-
Henrik: You have made some really outstanding creations. To create an easily recognizible car in "only" 5-wide is amazing. Also, I acknowledge you are smart who copy "old" cars with a lot of characteristic details (unlike modern cars....). May I, as a Swede, suggest you build for example: SAAB 93. Volvo PV 444 (or 544) Volvo Amazon. Which are great examples of models also easily recognizable.
-
Nice work, reinstein. I really like these compact locomotives with all PF incl. I'm not fond of the connecting rods, I think it'd look better without them.
-
Thanks for all nice comments, everyone.
-
I updated my "old" shell tanker truck. See pictures below. Any comment are welcome.
-
Fantastic layout. Nice to see more people building Scandinavian trains, Welcome to the "club".
-
Fully agree that Renault Magnum is a nice truck to copy in lego with it's boxy design. Also agree to the above comment that headlights should be more narrow and a bit inwards. I made a design some time ago with a snot:ed front to allow such lights, also I made the groove less deep by building a black 5 x 5 section (by use of 1/2 stud offset plates), which creates a more realistic (less deep) groove. I could also advice you to put the wheels of truck the other way around, (like I have done for front wheels) becuase the studs sticking out does not look so nice in my opinion.... I just mention this as some tips&tricks that might make your truck look even better. This is a shot of my version. And this is a similar LDD-version by Sam2442:
-
Exacty the kind of scenary which I adore most. Nice building, interiour, highly detialed vehicles, ships etc etc.... Also the natular color scheme is excellent and highly realistic. Very well done indeed
-
Looks like really intresting products for us Lego train nerds Can't wait too see them IRL.
-
In these days with environmental problems - who doesn't want to live a Greener Life ? A Green Life by TLG
-
This is a superb MOC - congrats
-
This is a "reefer" from company Sandgreen's container services Inc. Container has the company's characteristic colour, which later gave name to a lego nuance
-
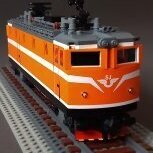
Thanks Richie, To achieve the realistic look I wanted, this loco is absolutely full of more or less advanced SNOT:ing, which for the sides, (with those for BR103 so characteristic rectangular “vent holes”) demands building “deep” inwards. As a consequence the loco body is absolutely full of plates and bricks, and there is no room for any PF-stuff - especially not a PF battery box. => This loco is designed to have one (or two) 9V train motor/-s, which explains the 4-axle design. I am mainly into 9V-trains, but when shooting the above photo in snow, I used the few plastic rails I own, and didn’t bother to fit any 9V motor to the loco (due to moisture environment) However, if going for James Mathis BR103 version (as mentioned in a previous post) I think it would be possible to make a PF version, because that design can be made quite “empty” inside the body to preliminary fit a PF battery box etc. Though even if using James Mathis design, I believe that building a 6-axle PF motorized version would represent quite a challenge. Thanks Peterab, and good luck with building your own BR103, it'll be very exciting to see what you come up with ! Regarding spacing between vents, I acknowledge this is probably the trickiest part to achieve. My design is built from 4 equal brick built modules with a tan plate 4x6 as a bearing element. Over and under that plate 4x6, you find the "vents" (brick 1x2 w grille). Direct inside the "vents", hidden from outside, you place elements like 87087 and attach tan tiles 2x2 vertically. By using technic brick 1x2 w 2holes + suitable plates in between 87087, you can dock each module to the next module. To satisfy the classic 5:2 SNOT ratio, there are 4 modules and 5 rows of tiles 2x2 which results in one big module with a correct even number of studs. (18studs in total) I forgot to mention that on top of each module there are tile 1x4 beacuse otherwise the train roof cannot be attached becuase of stud mis-match. Now, if you are completely lost after this very theoretical explanation (I probably would be..) you can send me a message through EB and let me have your e-mail address, so I can take and forward some close-up pictures for you.
-
Thanks ZueriHB, yes you are right but I made a 4axle version.... Wagons are similar to Emerald night, but longer and with "brickbuilt" baseplate, (and Tan/DkRed). I'll upload more pictures later Thanks Gareth. Instruction that you refer to are indeed for a BR103, but James Mathis version. Mine is quite different, where the whole sides, and part of front +front windows and roof, are redesigned, to look more like the prototype, (which was Tan/DkRed). However if you have the yellow/red wagons of 7740, I appreciate you stay with those colors for your BR103.
-
I updated my German locomotive type BR103, with a new color scheme for the lower part of body, in DkRed which is very near the prototype colors. TLG recently released element 6005 in that color, which made this rebuild possible. Three passengers wagons are also completed in the same Tan/DkRed color scheme. A lonely alpine skier is admiring the set from above More pictures (indoors) to follow, when I have time to set up a photo shoot. Meanwhile, I hope you enjoy watching. Feel free to comment.
-
Fisherman in a hurry
-
Great looking, realistic design - very well done. I also like your green/red "old style" truck - it looks excellent as well.
-
I thik this is a teaser made by TLG for the show only. It will not be an official set. Some of the "new" elements could be just never released pieces that was moulded by TLG during various development of sets that never hit the shelf. This is my own speculation.
-
As Fuzzylegobricks already pointed out and refered to in his post, I made an "In-Loco-Decoupler-Design" using a gear rack and standard PF stuff. I does the job quite well, and you have the advantage of de-coupling at any place along your layout, not necessarily at a particular spot if you have a stationary solution. Please keep us posted about any progress after making your own trials.
-
No problem, mate ! I already took about 15 close-up pictures, for a member of Swebrick who shared your interest. So, if you send me a message (through EB message board) with your e-mail address, I'll send you those pictures ASAP