

jrathfon
-
Posts
141 -
Joined
-
Last visited
Content Type
Profiles
Forums
Gallery
Everything posted by jrathfon
-
As mike_ribeiro just pointed out, if you can't find the train wheels, Big Ben Bricks makes some great after market wheels that would work quite well on an EN replica. http://www.bigbenbricks.com/index.html
-
These are amazing!!! Couple questions: 1. What is the shipping situation to the US, I saw free shipping over 100Euro, what about smaller orders? 2. I think you nailed it with the inside curve R40 pieces, perfect! 3. I would love to see inside studs for ballasting on the straights and cross track. I like the minimal sleepers, as it allows for flexible ballasting, but not having top studs is an issue for me. I ballast everything. 4. I think the turnout is spot on, with one caveat. Much like the lego R40 switch, it limits you to parallel track arrangements. Would it be possible to say do a "half" turn, or "stubby" switch and have two half curves that allow either parallel sidings or true turn-outs? Also, as I mentioned in the other thread and decent two axle bogie or F-B-F wheel arrangement rubs hard on R24. It would be awesome to get the wider radius system going, e.g. R30 or R36 switches/turn-outs. My few cents, awesome job on the concepts!
-
As I mentioned earlier, R24 is very tight. even two minimally spaced "RC train wheels" (the normal lego motor drivers with a technic axle hole in the center) have A LOT of friction in R24. A switch would be the same or worse. If you want to make single axle trucks it would work, but anything else rubs (two axle bogies, steam drivers, etc, etc.). So my vote, in terms of modelling in narrow gauge, would be a large radius as the "base" radius, the one we choose for switches. Let's get an admin to create a poll re: R24, 36, 48 vs. R30, 42, 54. Also, we don't necessarily need to use the "magic radii" for the switch as coaster mentions. You can use a compound curve, or "adapter straight" to get the off radius switch to align to the stud grid, on say an R36 switch.
-
Welp. Went to go make a poll, but you must have 500 posts to create one... so none of us in the thread can create one. I believe it should be called something like "Narrow Gauge System" and have three options: R24, R36, R48, etc; R30, R42, R54, etc; or "other" as write in votes. Thoughts?
-
That, and you can't simply use the same track for "4-width and 6-width tracks", the radii is different for different spacings. Lego already creates loose straights if you would like to make a "4-width" stub switch. I believe we are all mostly in agreement here with 6 stud gaps between sleepers. Sorry, I mis-stated some studs a few posts back. I believe 6 stud gaps would mesh well with the visual of 8 stud gaps on standard gauge. With ballast and overhang, I believe 4 stud gap would be too small. A lot of narrow gauge in the US was/is fairly large engines, and would be modeled 6-wide on "4-wide" gauge, with rods and hand rails overhanging (so ~7 studs). Check out these 2-8-2 beasts: So the main options are: R24, R36, R48, etc: Advantage: fits with Lego IJ R24 narrow gauge track, Disadvantage: R24 useless for Med drivers F-B-F, and bogies with spaced wheels. No "magic radii" switch. OR R30, R42, R54, etc: Adv: R30, R78 magic radii switch, Dis: does not mesh with IJ R24, though R30, and R54 fit inside/outside R40 standard gauge. R30 switch is tight.
-
Hey Coaster, So lets work to nail down a system so we can start to print some narrow gauge track!! The first question is radius (as we've been discussing). A few points we discussed and agreed on: 1. 12 stud intervals for narrow gauge track, this leaves the 8 stud gap between rails as with standard gauge. 2. Narrow gauge straights are covered with Lego stock single piece rail. The adapter piece (already drawn up), will help going back and forth between IJ R24 and straight rail. A one piece narrow gauge straight with Lego track connectors is nice, but not completely necessary. (I can't see this competing on price-point) The BIG question with a few caveats: 1. Rail spacing: IJ R24, R36, R48, R60, etc. to keep IJ R24 relevant? (though R24 is pretty useless in scale) OR R30, R42, R54, R66, etc. to use the "magic" R30 ideal switch? (R30 is still a small radius for "scale") 2. Do we make narrow gauge mesh with R40 standard? I imagine half of users will likely run narrow gauge along-side of standard gauge, but is that important enough for a "narrow gauge system"? Because IJ is 6 studs wide, and R40 standard is 8 studs wide, the "ideal" 8 stud gap leaves a 15 stud spacing, making no choice of "narrow gauge system" ideal to mesh with standard gauge. 3. Switches: We should pick a "standard" radius for the first switch solution (much like how R40 switches are standard). If we are not picking the R30 spacing, what will this be? We will have to use a small adapter track to do cross-overs vs. turn-outs. (I would argue an R30 switch is too small a radius, F-B-F already binds in R24) Nailing down our curve radii will allow for the "complete" straight, curve, switch narrow gauge system and get us up and running. Should we create a poll?
-

Kickstarter: ME Models Tracks for both metal and ABS only track pieces
jrathfon replied to JopieK's topic in LEGO Train Tech
Only option out there currently. -
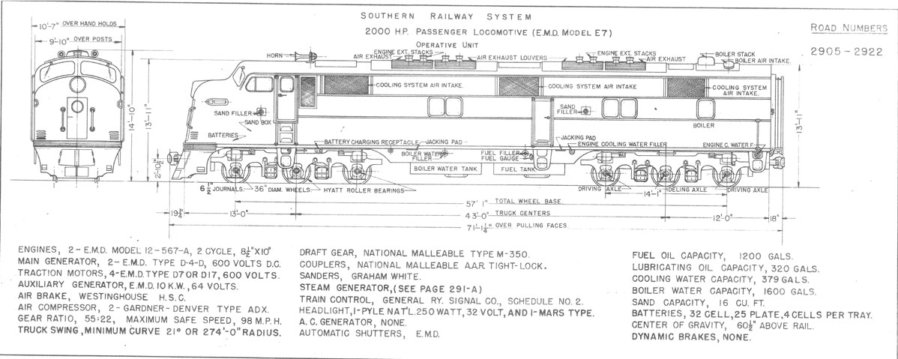
Thank you Shupp!! That means a lot, as you set the mark on the E7 sets! Thank you for the help a few years ago! You definitely deserve a lot of the credit on this build. There were some tweaks for dark blue, but you solved many of the hurdles before me! Using the scale spec diagram up above was also super useful in terms of proportions, windows and vent layouts. If anybody is ever trying to do a scale build I highly recommend finding the engineering diagram! I'll take some better pictures when both units are decaled (water-slided them a few days ago, just have striping left), with better lighting to highlight the tanks and trucks as well.
-
@Jeffinslaw Hey Jeff! These should help! The headlight bricks are sitting on a 4x8 plate with 1x2 jumper plates. So it goes substrate>jumper>headlight>headlight>1x1 plate>1x2 technic brick.
-
@Jeffinslaw I'll take some better pics in a few days of the top. Do you mean the 1x2 grille 61409? There is also SNOT for the two sets of 4 exhaust ports, mainly using headlight bricks underneath and part 3700 to hold the 1x1 round plates for the exhaust tips. It's essentially an 8x8 unit with headlight brick on headlight brick to get the right plate spacing for the 8 stud long 2x8 central SNOT portion. Hope that makes sense. I'll post pics later. Shup's got good detail pics in his E7 Century Limited album linked in my original post above.
-
Thanks all! The decals are "O scale" waterslide decals from "Microscale Decals". I got mine off of ebay because they've been out of print for awhile. I am still playing with sealants for the waterslides as they are a little delicate right now. Currently used "micro sol" to get some of the air bubbles out. Might need to do clear acrylic (nail polish) to seal them. Shup definitely gets a lot of credit on this, especially with the windshield. I wanted to start easy on my first MOC, but bit off a lot with the decals and pinstriping. I have shaky hands so it's hard for me. Due to the availability of dark blue parts, I had to change up the top of the nose slope. This part didn't exist in dark blue when I started, apparently it does now! 6091 I chose these guys because my local Tennessee Central Railway Museum has two F7A's and an F7B in this livery they use to pull tourist trains: And Bowling Green has a restored L&N E8 #796: https://historicrailpark.com/the-story-of-the-e-8-engine/ I do have a full line of Pullman cars LDD modeled after the Bowling Green train seen here (a la a Hummingbord or Georgian): https://historicrailpark.com/the-ln-presidential-car/ This will have to wait a bit though. Got to decal the other E7A, then finish my narrow gauge tweetsie! Then I was also looking at modelling this Dixie 4-8-4!: http://www.ncstl.com/576/576today.htm
-
Thanks guys! I originally had the stripes brick built, but the proportions were off up at the front of the cab with 3 yellow stripes, 6 red stripes and a plate of blue between, so I rebuilt the entire loco and resorted to pinstriping. I'll most more photos when both A units are complete! The windshield build details can be seen in shup's Century limited I linked in the first paragraph. It's super complicated, but I reached out to Shup and he helped me figure it out in the end. Although his solution is purist, I found the windows kept falling apart so I used a little double sided tape to increase "clutch power" of the glass into the 1x2 grills.
-
Hello All, Finally after 3 years in the making I am presenting my first MOC. I wanted to start out with something easy and something local. This is obviously based off of Shup's great E7 NYC set, and shup helped a lot with some details a few years ago including the windshield design. I had a few tweaks of my own as I was trying to model this as close to 1:48 scale as possible. I hate doing decals, so this sat on my desk for 2 years gathering dust. Now she's all polished up and all that's left to do is decal her fully built sister! Without much further ado, some background and some pics: History of the L&N Spec drawing I went off of: And here's the MOC! All the photos.
-
So another thought. Coaster: If say we pick R24, R36, R48 (keeping IJ lego track relevant), when making switches, instead of making "weird length straights", we didn't keep the curve radius perfectly constant. If R30 adheres to the grid, could we make R48 switches and using a "golden spiral" or logarithmic curve to "fudge" the R48 switches to conform to the grid? Or would making a 0.67 stud straight adapter (or lengthening the switch pieces equally) be easier?
-
Lots of posts! Hopefully that means lots of interest! I think we are all mostly in agreement on a number of points (no pun intended): 12 stud spacing for narrow gauge maintains the 8 stud visual gap between tracks. I get the idea on switches, but picking a 12 stud interval and going with it would likely be best. Would R24 (IJ current lego track), R36, R48 be the natural choice? Any interval you pick, the narrow gauge curves will not nest perfectly 8 studs away from lego standard gauge spacings because 1/2 of the 6 wide track is 3, so 12 studs center-to-center (or any spacing for a narrow gauge system) will never work with the standard gauge 16 stud center-to-center. Yes, I was talking about dual gauge as |.|..| This does add a chiral "handed-ness" to turnouts and switches. As was mentioned, using loose straight rail already allows straight pieces to be added to lego standard straights to make dual gauge. I was thinking simple in my mind and sticking to say (.(..( curves and dual gauge turnouts vs. going deep in and making dual gauge switches (headache). A simple dual gauge turnout with narrow gauge turning out of a standard straight could be a passive piece (no moving switch parts) done with frogs/wheel guides. I know this all starts to get complex, but as I mentioned before I feel that there will be two types of narrow gauge layouts: 1) alongside standard lego trains and 2) stand-alone narrow gauge layouts (like puffing billy). Starting simple with the inlaid curve rail piece (.(..(, and two "inside" turnouts, would allow for an almost complete dual gauge solution (allowing narrow gauge to come into standard gauge stations). My overarching point and vision on the start of narrow gauge, we need: 1. Straights (already covered with loose lego rail) - adapter from lego square rail ends to IJ lego narrow gauge track would be nice 2. Wider curves - R24, R36, R48? or R30, R42, R54? (R30 and R54 could mesh with R40 standard? drawing?) 3. Switch - start with one (KISS), so R30 to keep on the stud plain? 4. WOULD BE REALLY NICE BUT NOT INITIALLY NECESSARY!! Dual gauge curve piece (.(..( and simple passive inside turnout (2 handednesses). The hardest part I think is the curve standard. Coaster brings up good points with sticking to the stud grid, but I fear R30 turns and switches will still be prohibitive when modelling steamers with F-B-F, F-B-F-B etc. drivers.
-
Hi Tweetsie 12, I saw your standard gauge Tweetsie model in the past, looks great! Mine has actually been built in the flesh for 2 years now, but needs tweaking and this is due to not having good track options. Right now with R24 lego track, the driver flanges bind a bit, and the leading bogie interferes with the drivers. Having a Flange-Blind-Flange arrangement with R24 track is tough. Because of this small binding, the motorized tender (with Space's bogie design) tends to slip and spin (it works great on straights!). I bought up a bunch of loose 12V curve rail, but just haven't been motivated to build a full layout and mess with track spacing, much like how the Puffing Billy layout was pulled off. As for the smokebox spacings, you are correct. The above rendering is of my poor LDD skills. In my real life model that radar dish sits back 1 stud further and flush with the smokebox (so it looks like how you describe). I scaled the model from an engineering drawing and it's as close to proportions as possible. What's left to do is finalize track, so I can finalize the driver linkage, so I can finalize the model and DECAL. I have gold striping, etc. to finish her out. Check out the other two narrow gauge track threads for updates on track solutions!
-
Coaster, what I think you are saying is that since the R40, R56, R72 paradigm is based on 40 stud center radius, and the narrow gauge track is 6 studs instead of 8 studs wide, the stock lego R24 would look odd, not having the 8 studs between track spacing that standard gauge has? If you were to inset narrow gauge inside of standard gauge and maintain the 8 stud separation, wouldn't you use R25? Which would also be odd. Even for narrow gauge to be "at scale" (another discussion in and of itself), I feel R40 would be about as small as you want to go. Currently to go larger radius in lego narrow gauge, like on the Puffing Billy, we use 12V loose curve rail and hodge podge it together. I understand the 8 stud argument with the track interval then being 12 studs (R28, R40, R52, etc). Where are you getting R78 and R150? By nominal you mean "at scale" compared to real world examples? I would vote for a narrow gauge "standard" that works alongside the lego standard gauge. I think there would be two types of AFOL modelers: 1) making an entire narrow gauge layout or 2) making a layout like in the alps with standard and narrow gauges being side-by-side. I think both will be as popular as most (if not all) of the "lego gauge" modelers have the standard gauge lego equipment. Thus, making a system that looks good along side standard gauge should be considered. This is why I proposed R40 as the basis of narrow gauge switches and system (inside an R56 loop), but you are correct, nesting any size narrow gauge track inside of standard gauge track will have spacing issues as R40, R56 R72 with R24, R36, R48, R60 (or whichever narrow gauge spacing we chose) will never mesh exactly. jrathfon, king of run-on sentences.
-
I have almost every official train (even the weird looking ones) dating back to the Load N' Haul, plus a few MOCs. I would say since I missed the first holiday train, YES buy this one. It's a great little xmas display train, it's cute, and I'm not unhappy I bought it. Ten years from now when there is no holiday train update, you'll be wishing you dropped the $99 for this one, even though it's slightly lack luster. I just have it sitting on a mantle. It'll probably see the light of day for 1 month every year, but I feel it has more xmas appeal to non-lego peopel (my wife) than my other trains I used to run around the tree. My wife likes this set on display and used to complain about the other trains around the tree.
-
That's a good question and idea, a complete "narrow gauge concept". First, the easiest answer: I would say for switch/turnouts, pick one radius and stick with it at first. Having multiple radii switches is just overly complex. Maybe multiple radii switches would be good in the future, but one realistic working switch would be just fine! In terms of a complete system, I'd start with the basics: Straights: full, 1/2 (already available with an adapter and lose straights from Lego) Curves: the current radius is two tight for even a basic 4-6-0, with "Medium" drivers, a Flange-Blind-Flange (BBB blind medium) rubs in the curve and binds. Thus, I would vote the "standard" narrow gauge curve would be an R40. I believe (haven't set it up in a bit) the Lego 4W curve sits inside a 6W standard R40 curve (so the Lego 4W is I believe R24). With R56 track out now for 6W, a happy narrow gauge curve could be an R40. This would fit with the scale of narrow gauge railways having tighter radii than standard gauge and would fit in the standard/narrow gauge overall ecosystem. Switches: Pick a radii and stick with it. 4W R24 makes steam trucks bind (F-B-F). I'd vote R40 switch/turnouts to start. Dual gauge turnout: This would allow for real modelling like in Zellamsee/Salzburg where a standard gauge railway meets a mountain railway. This is just one piece that would allow for a mountain railway to meet at the same train station as a standard gauge train. Cross track/stub switches/etc: I feel these are mainly a novelty and will not be used on a large scale. Nice to have, but not the first steps in a complete system. My 3 pennies.
-
Man! I step away for two weeks and my prayers have been answered! My first wish for a narrow gauge system was the 4-wide track adapter to use lose rails and make a complete narrow gauge system! I have a working and motorized narrow gauge train, ala Tweetsie, that I have been messing with. My biggest issues were a) lack of straights (problem solved!) and b) too tight turn radius. My two big requests for a complete narrow gauge system would be: 1. Wider turns! 2. Dual gauge turn out (as I posted on JaceK's thread: Dual gauge turnout: turnout with a rail guide on the standard gauge track instead of a moving frog as pictured). This could be a passive piece of track (with rail guides/frogs) that would enable integration of a dual gauge layout. I'm looking forward to buying some 4W straight adapters, wider narrow gauge turns, and turnouts!
-
I think straight tracks would be redundant with the adapter and the availability of loose rail from lego. Wider 4-wide curves and a dual gauge turnout would be the most useful and crossings would be cool. Dual gauge turnout with the 3rd (center) rail just having a flat end would allow connection to normal lego 6-wide track with loose straight rail placed in the middle for dual gauge track. Hope that makes sense. The nice thing about a dual gauge turnout is that it can be made passively with no moving parts (for an inside turn). This piece is what I keep referring to as loose rail: 3228c Dual gauge turnout: turnout with a rail guide on the standard gauge track instead of a moving frog as pictured
-
Awesome Jacek! That's perfect, and the lack of sleepers will actually aid with track ballasting! The 4-wide lego track has the same connector (minus two studs) that the regular track has, so you should be good to go. This adapter may also be useful to tie in lego 12V curves as well. I can't remember exactly, but the puffing billy AFOL guy was using all inner 12V curve rails (or possibly all outer) to make less acute narrow gauge curves, but you then have to deal with spacings and gaps. This adapter will tie 12V straight (loose) rail right into the existing lego 4-wide curves! Once you test a few out, post some pics. I'll definitely order! I'm making a layout for my tweetsie engine:
-
I'd disagree. There are a number of people who have modeled and want to model in narrow gauge (4-gauge). We currently have a hodge podge of a system and with a few key elements we could have an entire new gauge to model in! Currently we just have 12V straight rail, 4-wide ramps (useless for modelling), 4-wide tight radius curves, and 12V curve rails which can be used awkwardly to form gentle curves. To start, what we lack to make a complete system is straight rails. An adapter piece, identical to your 12V adapter at 4 wide, would allow us to use loose straight rails with the 4-wide lego curves. To 3D model all you have to do is cut out the center 16mm (2 studs) of your current model. Boom! Done. That single piece would allow a hodge podge narrow gauge system to be a complete system with continuous rails. Now if you want to get fancy... gentler 4W curves, points, and a dual gauge turn-out would be excellent! I'd do with just the 4W 12V adapter!
-
BrickTracks: different curves, PF/9V compatible
jrathfon replied to JopieK's topic in LEGO Train Tech
I agree with Phoxtane and M_slug as well. I would be willing to back for more "exotic" track geometries not available yet (R104 switches for example). Specifically though, I'd be interested in: Dual gauge turnout: narrow gauge sharing a rail and turning out of standard gauge Narrow gauge curves at larger radius (i have narrow gauge engines that struggle on the tight current radius with wheel flange rubbing) Narrow gauge switch Wye-switches Curved turnouts 3-way switch Double slip switch The first three would be all that are needed (*wouldn't even need new curves, but would be nice) to make a complete narrow gauge system using the standard single straight rail that is already available. I know it's niche, but having a reliable narrow gauge standard would open up another whole side to L-gauge modelling. The main point here is offering track not already available to drive us toward your project. -
FYI, for striping, this stuff works great: https://amzn.com/B001BHK3SU It's easy to use with an x-acto knife. Lay on brick and trim.