
Lego Tom
-
Posts
369 -
Joined
-
Last visited
Content Type
Profiles
Forums
Gallery
Everything posted by Lego Tom
-
[GBC] Industry 4.0
Lego Tom replied to Mr Jos's topic in LEGO Technic, Mindstorms, Model Team and Scale Modeling
I can't help with programming but to help with physically debugging the system, set up video camera(s) to record the whole operation. You can then go back and look at the video to see what you missed. -
[MOC] Crawler Crane
Lego Tom replied to m00se's topic in LEGO Technic, Mindstorms, Model Team and Scale Modeling
Nice build! Looks like you used a heck of a lot of pins! -
[MOC] Steven Spielberg Masterpieces: Vignette Series
Lego Tom replied to Justus's topic in LEGO Licensed
https://www.bricklink.com/v2/catalog/catalogitem.page?P=2851#T=S&C=110&O={"color":110,"iconly":0} -
I'm a Technic guy but I have to say, this is pretty dang amazing. Creativity and artistic talent combined to make a really unique piece of Lego art! Incredible.
-
The ship alone is amazing but your placement and use of the various figures brought a hearty laugh. Most excellent!
-
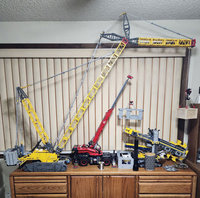
Got to playing around yesterday. Removed one section from the jib and stuck it in the crane lift arm. It kind of makes the prospective better without incurring an extra expense. I did have to add a couple 6632 pieces but that was all. Before After I am contemplating doing something similar with the boom, removing one section and sticking it on the lift arm. (Hope I'm using the proper terminology!)
-
My first set. What can I say? D-11
-
At 73, I guess I qualify...
-
The real winners are us folks who got to see the creative works of others. Everyone who entered gave that to us, no matter what their score. Thanks to all!
-
42146 - Liebherr LR13000
Lego Tom replied to Ngoc Nguyen's topic in LEGO Technic, Mindstorms, Model Team and Scale Modeling
Or you could buy the one some idiot is asking $1400 for on ebay! Someone has a listing on ebay for 10 sets, each set containing the 4 sections needed to make one section of boom - for $69.99 per set or $17.50 per section. -
42146 - Liebherr LR13000
Lego Tom replied to Ngoc Nguyen's topic in LEGO Technic, Mindstorms, Model Team and Scale Modeling
Doubling the size would require 10 more truss blocks, each block being 4 parts so 40 more parts. At $5 (probably a low figure), that's $200 and doesn't include the other necessary parts or cables. $300 may be a close estimate to total costs, especially since added weights will also be needed to offset the extra weight of the trusses. At that point, buying a second set might be a more viable option, especially if retail price comes down. -
42146 - Liebherr LR13000
Lego Tom replied to Ngoc Nguyen's topic in LEGO Technic, Mindstorms, Model Team and Scale Modeling
I have no doubt the parts will become available but I'm afraid to see the price, given what one supplier is asking for the weight pieces. -
That is an amazing build! 2GodBDGlory knocked this one out of the park and the system could easily be adopted/adapted to other builds such as the new skidder. Vegetable oil or silicone oil may mitigate any deterioration issues as well as help against leaks due the thicker viscosity.
-
But...but...but... you hate stickers!
-
I was wondering about the possibility of using 8t in steps 11 and 40t in step 73.
-
Total immersion might not be a good idea but a spray bottle and micro fiber towels or canned air/air compressor set on low pressure shouldn't hurt anything.
-
Is anyone contemplating re-gearing the turntable to slow it down to a more realistic speed?
-
42146 - Liebherr LR13000
Lego Tom replied to Ngoc Nguyen's topic in LEGO Technic, Mindstorms, Model Team and Scale Modeling
Interesting and decent solution except I don't have the bricks. As for fastidiousness, I come from several collecting fields where maintaining stock appearance is tantamount. I don't always adhere to that philosophy however, but do tend to make any changes reversible. -
The build is very well done! As for speed, people tend to forget that cranes operate slowly in the real world. Speed creates momentum, something that is undesirable and unsafe in the lifting world. It's one of the faults I have with the Liebherr LR13000 crane rotation - it is way too fast!
-
[HELP] Generic Building Help Topic
Lego Tom replied to Jim's topic in LEGO Technic, Mindstorms, Model Team and Scale Modeling
I've not built it but that doesn't sound right. Might take a look at this thread: https://www.eurobricks.com/forum/index.php?/forums/topic/158657-42083-bugatti-chiron/&tab=comments#comment-2917739 -
42146 - Liebherr LR13000
Lego Tom replied to Ngoc Nguyen's topic in LEGO Technic, Mindstorms, Model Team and Scale Modeling
I have been doing some numbers on the counterbalance. Sorry, all numbers except where noted are in English measures. One stack of 12 weights weighs 7,589.7 grains, which equals 1.084243 pounds or .491804 kg. It seems obvious Lego was shooting for a total of 1 kg counterbalance in the weight kit's counterbalance stack. I looked at the possibility of casting the weights in pewter, both as individual units and as a stack of 12. Obviously, doing 2 stacks would be quicker than 24 individual units, but doing individual units would provide much more flexibility. Then I looked into the cost of pewter. Ouch!!! 1 pound of pewter is $28 at today's price. I've not done volume analysis on the individual pieces but my brain is saying casting them out of pewter will be expensive and that doesn't include the cost of the mold material. I could do lead, as I already have several pounds in my possession, however lead would require better (read more expensive) molds. Realistically, weights of similar design to the Lego units made of lead would, if a similar sized stack was used, be a bit much and overtax the structure. Buying additional pieces at the price quoted in my previous post would result in an expenditure of $114.72 (US) for 24 additional pieces, not counting shipping or additional tax. Some of the possibilities I have considered: Machining new counterweights out of steel, aluminum or other materials. I have a machinist background and access to a mill, so this is a possibility. A block of steel the same size as a stack of 12 Lego weights would weigh considerably more. Aluminum would weigh closer to the Lego units, so would likely need weight added with lead or steel inserts. The same would apply to most other materials including wood or plastic/nylon blocks. Machining individual weights would be too involved, at least for me. Casting resin with or without weight added is another possibility, though matching color would be an issue if one wishes to use them with the original blocks. Resin may be an attractive alternative if casting stacks of multiple blocks, say 3 or 4. To clarify, making a mold of a 3 or 4 block stack and casting it as one unit. That would still maintain some flexibility in making stacks while reducing the number of castings needed to be made. In other words, 3 casting of a 4 stack pile would result in a stack appearing to contain 12 individual pieces even though it actually only contains 3 parts. I hope that makes sense and people can grasp what I am saying. A possibility I am seriously considering is taking a stack of some of the weights and either machining a pocket into them or drilling holes in them to add additional weight. With the top and bottom blocks in place, you would never see the modified blocks. Yes, I know many look at this as sacrilegious, but I'm trying to explore all possible resolutions. Or I could just say "screw it" and leave it as is. LOL -
42146 - Liebherr LR13000
Lego Tom replied to Ngoc Nguyen's topic in LEGO Technic, Mindstorms, Model Team and Scale Modeling
At $4.78 a piece! Ugh!!! -
You might look into hot air soldering, used on surface mount electronics.
-
42146 - Liebherr LR13000
Lego Tom replied to Ngoc Nguyen's topic in LEGO Technic, Mindstorms, Model Team and Scale Modeling
They are indeed small parts. Such as an extra clear and red lens, and a variety of pins and bushings. I've had a couple left overs with other kits but this one had 44, with nearly half of them being black pins (always handy to have!). Perhaps because of the self test unit does, starting with both spools empty. While the unit could count the number of motor revolutions from empty spool to the hook reaching the limit, how the thread places on the spool will vary, depending on how evenly it stacks onto the spool, so I'm not sure if that's what the app uses to determine travel or not. I wonder if you determined how much extra thread was used, divided that amount by 2 and wound that amount on each spool, then did the calibration again if it would fool the app? -
42146 - Liebherr LR13000
Lego Tom replied to Ngoc Nguyen's topic in LEGO Technic, Mindstorms, Model Team and Scale Modeling
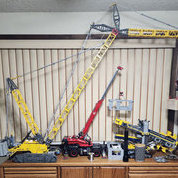
Finished my initial build. My observations: the instructions are good but fall short of great. There are a few instances of failure to clearly show positioning of parts, and as noted in an earlier post, they lack Lego's older method of including a template on each page of the sizes of beams used. There were also several small parts left over, which is better than being shorted parts but still indicates quality issues in packaging. The build is easy and there were no problems. Again, as someone mentioned stringing the line for the hook is a bit fiddly, and the first time I did the set up with the app, something went awry and it resulted in uneven winding on one spool, requiring a re-do. Two areas I was not pleased with: the operators cabin is pretty funky when compared to other Lego sets and the grid plates over the crane motors are uneven and look bad, IMHO. It's one area I plan to re-do in the future. Operating with the app works great though I agree the crane turns way too fast for a machine of this nature. I did not try it on carpet, but it ran OK on a large area rug. While I would have liked to have the boom a bit longer in length, I'm not losing any sleep over the matter. Same thing for the width of the tracks - wider would have been more appropriate but I can live with it as is.