
evancelt
-
Posts
2,325 -
Joined
-
Last visited
Content Type
Profiles
Forums
Gallery
Everything posted by evancelt
-
After returning from a reconnaissance mission across eastern Terraversa with Colonel Allcock, Major Brickford oversees a group of 47th Foot as they use machetes, hatchets, axes, and chains to clear and expand the single tracks that crisscross the interior. If the Corlander Army needs to bring field artillery north, they'll be ready!
-
Yeah 1x2 and 1x1 plates can be expensive to purchase initially. I've found it's cheapest to buy them in bulk from a single BL store. Most 1x2 plates can be found for less than $0.05 each and most 1x1 plates can be found for less than $0.12 - funny that 1x1s cost more than 1x2s! Olive green tends to be much more expensive than more common colors like light bley. Tiles are more expensive than plates for some reason, so I have fewer of those (still a bunch though). You could probably reproduce what I have here with $100 to $200 in bulk buys. It ends up costing that much because few BL sellers have all of the colors in bulk, so then you have to pay for multiple shipping fees, etc. I think I have 13 different colors in bulk (>100, tan, dark tan, dark bley, light bley, reddish brown, olive green, medium nougat, dark orange, sand green, lime green, white, dark red, green), and then smaller amounts for rarer colors (e.g., trans clear, coral, aqua, yellow, blues, dark brown, etc) These small plate and tile elements are super versatile, though, so I'm sure you'd get your money's worth out of them. They are now the workhorse of my collection.
-
The coral helps with that
-
Love the straight horizontal lines used in the stonework throughout with various profile bricks. The sturdy-looking flagpole is pretty neat. Nice orderly armory interior inside. The cobbles on the path look great as well. All of that coupled with the vibrant colors and great minifig combos make this an awesome build!
-
The area of the clean slate base was roughly 50 x 40 studs = 2000 studs. I think I used ~100 olive green 1x2 plates, ~100 dark tan 1x2 plates, ~50 medium nougat 1x2 plates, ~50 light bley 1x2 plates, and a mix of about 75 1x1 plates and tiles. There were 8 or so 4x8 plates in the top as filler too. So maybe 400 pieces? The base below itself used a whole bunch more.
-
That bluecoat looks harmed! Nice build @Bregir!
-
As a follow up to my earlier MOC SNOT-edge base tutorial, I thought I’d show these phases of building out ground terrain complexity. In this case I’m building a path through some sandy grass Starting with a dark tan plate blank slate! First up I added some olive green 1x2 plates to the surface. I covered up any visible joints between the underlying dark tan plates with the olive green. Also tried to create some random-looking patterns of connected green plates to represent vegetation. I put more of the olive green plates toward the front of the base since that would be closer to the camera. Also added some 1x2 dark tan tiles near the edge of the base to help ease into the second layer of plates. Left some blank studs nearest to the edge of the base to make that relief rise even more gradual. Next up I added some 2x2 dark tan tiles to the middle to represent walked-on areas of ground, and then scattered 1x2 and 4x8 dark tan tiles to start filling in large areas of ground. I tried to leave little 1x1 holes in the ground covering. Next up I dropped some 1x2 light bley plates into the ground to represent some rocks Next up was some 1x2 medium nougat plates Then I started to fill in those empty 1x1 holes with dark bley plates, coral plates, and dark tan tiles. The tiles help make the ground look more walked on, and the coral was meant to add some color! Finally, I added some round plates and tiles to the path area of the MOC. These were meant to represent pebbles on the path. The finished product. A lot of it ended up getting covered up with figs/tents. I was glad for the pops of coral color, as the whole thing looks a bit dark tan heavy! The dark tan helps the white of the tents pop more. For a future rendition, making the sunken road a different color (regular tan?) would have added some nice contrast. Anyway, hopefully this was helpful for someone starting out with building ground complexity!
-
They have a variant of them on AE - it has a stud on the back though so I wouldn't recommend I picked a few of those up for my kids - works well for them! I don't like the stud though, as it would protrude from a cape. Could be cool for attaching a tricorn or something. I think they are $2.50 for a pack of 5 Luckily lots of the legit TLG ones in the US
-
The rubber band looks good! I like it better than the shoulder satchel bags some use. For the Pamu builds both Spud and Montoya should have brown scabbards, and I only have one! Montoya ended up with a satchel bag. I've picked up a bunch of the white ones to outfit imperial officers and hussars, but the brown one always felt too pirate-y for me
-
The launching of the soulful hound
evancelt replied to Count Vroskri's topic in Brethren of the Brick Seas
Me either - shoot me a PM @Count Vroskri if you need some image hosting -
Hey @Ayrlego - Does Allcock have a BrickArms pistol here? Hard to tell from the angle. What's the white shoulder/belt sash on him? Is it a scabbard with the bottom broken off?
-
Interesting stream effect - the clear plates fade into the white! Minifigs look awesome. What torsos do the two Terraversans have? Thanks for the process pic!
-
[COR-FB] Corlander Army Camp, Westface
evancelt replied to evancelt's topic in Brethren of the Brick Seas
Thanks! I thought about tying some TLG string to the tents like guy lines, but that failed miserably Cleaned up the images to remove some blurriness and shadows in backgrounds -
Thanks! Those rug tiles are featured more prominently in this build
-
[COR-FB] Corlander Army Camp, Westface
evancelt replied to evancelt's topic in Brethren of the Brick Seas
Just remembered that I tried putting little gold ink holders next to the tents to (maybe?) look like tent stakes. Did that come across? -
Thanks @Capt Wolf! I didn't have many of the torsos you used in your build but used artistic license to reimagine them as best I could! The room build is 24x24 - originally started with 16x16, but with that many figs it needed to be quite large! Compared to my last Pamu build, I was able to give Lord Spud ( @Spud The Viking ) the correct torso and some tartan pants this time. For Montoya, I changed out his sharpied head with an official TLG one. Nice story, @Bregir! Interested to see where this leads
-
[COR-FB] Corlander Army Camp, Westface
evancelt replied to evancelt's topic in Brethren of the Brick Seas
Thanks! The cannon was fun to build Thanks! Definitely some inspiration from Sharpe and Hornblower! Thanks! Initially tried cramming twice as many minifigs in and it just looked crowded. Reduced the number of figs and you can see the camp better but still have some activity Thanks! Thanks! I've featured the tents in some of my earlier builds, but had to make 4 additional ones to fill our the large camp scene. The base was fun to do! I posted about the base in a tutorial if you want to see more pics. Thanks! Added the coral colored 1x1 plates to spice up the earth tones in the base. Yeah, the tree is not normal looking, that's for sure! One thing I've learned about trees IRL is that they are super weird and many look ugly For a pretty build (like the Mayor's house), I would try to make the tree more symmetrical and leafed out -
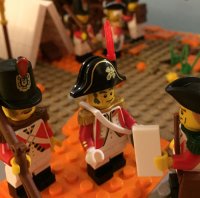
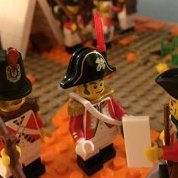
A company of 26th Foot pass by the pickets to enter camp after patrolling the surrounding area, while a group of 18th Hussars heads out to reconnoiter Oleon positions. Soldiers of the Elizabethville Militia and 47th Foot look on.
-
Nice angles in the fort walls @Bodi! Fun SNOT water
-
[COR-FB] Keeping the peace in Fatu Hiva
evancelt replied to Brickwolf's topic in Brethren of the Brick Seas
I stand corrected! Thanks @Brickwolf! Still getting up to speed on the geography of the Brick Seas! -
[COR-FB] Keeping the peace in Fatu Hiva
evancelt replied to Brickwolf's topic in Brethren of the Brick Seas
Yay Corrington red! I think he renamed the island that Fatu Hiva is on to Soup Island. Not suggesting anyone actually make a new settlement page for Fatu Hiva, just wanted to revisit the renaming of the island -
[COR-FB] Keeping the peace in Fatu Hiva
evancelt replied to Brickwolf's topic in Brethren of the Brick Seas
Nice build. Glad we have some order in Fatu Hiva! The color scheme looks Merrymas-y Does @Mesabi need to make a new Settlement page for Soup Vent? -
Nice tile work @NOD!
-
[OL-FB-Sistership] HRS Ville de Granoleon II
evancelt replied to CapOnBOBS's topic in Brethren of the Brick Seas
Hilarious story Nice build @CapOnBOBS! The tile planking looks great -
Nice treasure room!