
Frostbricks
-
Posts
46 -
Joined
-
Last visited
Content Type
Profiles
Forums
Gallery
Everything posted by Frostbricks
-
Gorgeous work mate. We absolutely need more photos.
-
It's worth saying one thing for those looking to make their own coasters. This set is the only set so far to have the straight steep risers included. (under the chain lift section) Meaning it's not yet possible to make that kind of steep incline in L.Bley yet, and a must for those looking to MOC their own coaster.
-

[MOC] Food Stand Diners (One for the Rollercoaster fans)
Frostbricks replied to Frostbricks's topic in LEGO Town
Honestly I've never played the game. And would much rather build one with bricks. But there's obviously a lot of big fans of the game out there, and they keep telling me "this would go perfectly with a rollercoaster", well, the rollercoaster is here, and that many voices can't be wrong, so... -
[MOC] Food Stand Diners (One for the Rollercoaster fans)
Frostbricks replied to Frostbricks's topic in LEGO Town
No, you're not missing anything. It's actually two of the half circle parts (3x6) with that little 'wedge' out in the middle (so a 2x2 plate in the middle as well) I know, I need to do the build video fro the Burger. Was going to tweak the roof to be easier to remove first though (those shots above are from the middle of my adjusting it) -
[MOC] Food Stand Diners (One for the Rollercoaster fans)
Frostbricks replied to Frostbricks's topic in LEGO Town
Oh, um, that'd be the bricks coming away from the sides because I took the top of for pictures, yeah, next time I won't do that in a hurry... -
[MOC] Food Stand Diners (One for the Rollercoaster fans)
Frostbricks replied to Frostbricks's topic in LEGO Town
It uses the 2x2 plate with studs on side, and the brackets you can see there (bonus is they make the interior look grey, not multicoloured) The Burger was actually the easiest because of how much room there is to work with. -
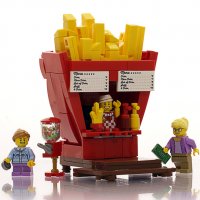
The fabulous Fernando Brothers are known for their fine cuisine; and their fun food shacks are the perfect place for a family party. These three food stands started as a simple idea; to make something that looked like life-size food, and that fit into a minifig scale diorama. I've shared it on LEGO Ideas ( https://ideas.lego.com/projects/2fae905f-71cb-450a-a4ef-827ad96fb574 ) Where the number one piece of feedback was they looked like they were from Rollercoaster Tycoon, and that they wanted to add it to their themeparks, so, with the Rollercoaster dropping for VIPs this week, I wanted to share something for people who are looking to build their own theme parks and looking for ideas. The Fries stand was the first I built. Here's an alternate shot, never mind the dust, The Burger came next. Here's a shot with the front of to show the interior (They all have kitchens inside, I wanted them to be functional) And the Shake was last, as well as the trickiest because of the shape. And how to make it look full of liquid, but I think this works pretty well (This was before before the ship in the bottle release) The next step for me will be integrating them into my own themepark. (I've never played Rollercoaster Tycoon, but love the idea of a full themepark display) And I'd love for it to be inspiration for others; what do you think? And there's a little bit more of it up on LEGO Ideas, including a basic how-to-build video. And if you like it, hit the support button, perhaps you'll be able to pick up your own soon - https://ideas.lego.com/projects/2fae905f-71cb-450a-a4ef-827ad96fb574
-
There's a lot of options. Pythagorean triples have already been mentioned. But as it sounds like you're also aiming for something the size of Jangs, it becomes pretty easy. Size is your friend, the flex, and space of the brick will help accomodate things, and you don't nescessarily have to attach it to the base (instead using tiles and terrain features to just 'slot' it in) Worth saying that Jang's example uses a 45degree angle for the third side, And that won't work with LEGO dimensions, not strictly anyway. Again, size gives you wriggle room with the gaps, and he's used hinges to connect that third corner, so very easy to hide a small gap, (like I said, size is your friend) you'll get just enough 'give' to make it work. use hinges on the right angle corner, and you end up with what he has. Alternatively, Clips and bars will help you keep things straight and can likewise be used to hide connecting gaps (A few official sets have used that technique now) But yeah, with straight sides and big, it's super easy.
-
My Son used to love watching TrainGuy 659 videos on Youtube. Endlessly, And he's really not that concerned with keeping the trains together. He has plenty of outtake videos of them getting broken, and has regularly set up bridges across his pool and deliberately crashed them on it (Which can't be good for the motors and battery packs) But yeah, he's definitely one to watch for the tips, and seems like it's very easy to setup after a trip to the hardware store.
-
It's gorgeous, but perhaps a little high on the part count. And as someone who's a little stud-phobic it should be a smooth surface for the table. Still would love this to be released as something that matched modular standard.
-
The two bricksuits. I love so many of the new accessories, and that cake is going to be in the middle of so many dinner parties. But those Brick suits are such fun suits.
-
Where to get RC parts?
Frostbricks replied to Mantarri's topic in LEGO Technic, Mindstorms, Model Team and Scale Modeling
That's in there too (silly me should of listed it) but yeah, 9398 would be good if you can find it. The Servo motors are very useful and having the right steering hubs/portals is awesome for taking the weight of the Axles. Not sure if any current set has the Servo motor in it, But pretty sure the new Rally Car (42077) has both the wheel hubs and suspension springs. (no motors though) and prolly a lot easier to find. -
Future Marvel Superheroes Rumors & Speculation
Frostbricks replied to Sir Gareth's topic in LEGO Licensed
I hope so. They're really fun little sets. Just hoping we get a wider variety of figs with them (I've got enough Batman's, but having Nightwing and Brainiac was awesome for instance) -
Where to get RC parts?
Frostbricks replied to Mantarri's topic in LEGO Technic, Mindstorms, Model Team and Scale Modeling
I highly recommend set 42065 (The RC racer) It includes 2 M motors, battery pack and a remote. Comparing the price to the Power Functions box (8293) makes it pretty attractive for those parts alone, even if you don't use the other stuff in the box. -
How did you come out of your Dark Ages?
Frostbricks replied to LegoModularFan's topic in General LEGO Discussion
About 5 years ago my son was born 6 weeks early. Ended up in the NICU, full of tubes, humidicrib, the whole bit. He's fine and healthy now, but at the time, well, not every baby makes it out of the NICU. Anyway, prior to that, some LEGO had crept back into the house. Had an X-wing over my desk, a few other small sets built and displayed here and there. But I certainly wouldn't have described myself as an AFOL But on the second or third night, I got home and, pulled out the LEGO I had, might have even bought a set on the way home, and just sat down on the lounge room floor and built. It was just a way of working through all of the stuff was going on, and it slowly snowballed from there. But that was it, that was the catalyst. And even now I still often just sit down and 'work stuff out' through building. (And I gotta admit, it's great sharing the hobby with the kids) -
That is beautiful mate. Especially love the SNOTing with the 'brick' bricks on the upper floors. Nice touch.
-
It's looking awesome mate. For the flywheel contraption to speed up the cars you mention - the official set uses something similar at the top, so just use that as the jumping off point. You'll be limited in how much 'push' they can give you, mostly at it'll catch on the car behind each time, but, like the official set, you can alway use a few of them in sequence, and it's really just a matter of spacing them right on either side, so they don't add to much friction (have a look at how the Ferris Wheel works as well, similar mechanism) A basic mechanism shouldn't be too hard once you get started. And can't wait to see the finished product, good luck mate.
-
This is what has worked for me - That's printed at my local print shop, on standard printer paper, then cut to size using a scapel and metal ruler (perfectly straight) and attached using a glue stick. I know, incredibly lo-fi, but easy, repeatable, and cheap. But, the trick is all in the setup of the file. The art was done in Illustrator, colours matched to the LEGO (CMYK) palette using the peeron list. And of course, sized right. Now yes, you could certainly do far more, and no, that's not going to stand up to play, but it'll absolutely get you started for the basics. And again, I can't understate how useful http://www.peeron.com/inv/colors is for matching the colours, and how important that is.
-
Gearboxes
Frostbricks replied to aminnich's topic in LEGO Technic, Mindstorms, Model Team and Scale Modeling
You don't want to 'gear up', the trade off is always between speed and torque (pulling power) And, if you've ever plugged in a motor for direct drive, you'll know you never get the full speed under load anyway, so how to get the best out of the motors? Well, the different size LEGO motors have different speeds, and, importantly, different torque. An M motor is around 320rpm, and the XL is around 240rpm (from memory) but the XL does have significantly more torque. That's the first thing. Now, you can pair motors (or more) to add power, and because of how they work, give each motor it's own battery. (sharing the power between motors does roughly half their power, conversely replacing batteries inside the boxs with aluminium is a easy way to slow them down) And, speaking of pairing motors, either make sure they both run the same speed (you will see variance between even the same motor type) and there's always the option of using differentials. So that'll give you extra power. Then, second, is reducing as much load as you can along the way. avoid using technic pins to connect the gears, even the 'non-friction' ones give more friction that desirable, and it quickly builds up (as you've discovered) Use technic beams wherever possible, and support them on both sides so they turn smoother. And importantly, when it comes to transfering that power to drive trains, take the pressure of them by using the 'Universal Joint 3L' to connect the technic beams, and for the wheel axles, support them with 'Steering Portal Axle' or similar. That'll let you gear down without problem, because you don't always want top speed. And yeah, there really is an art to getting them to run smooth, and every little step along the way should be considered, but hopefully that helps a bit. -
MOC: Le Fleuron, 1729 third rate French ship of the line.
Frostbricks replied to Captain Green Hair's topic in Pirate MOCs
Mate, this is gorgeous. Love it. Gotta ask though, what did you use for the sails?