
Hod Carrier
-
Posts
1,007 -
Joined
-
Last visited
Content Type
Profiles
Forums
Gallery
Everything posted by Hod Carrier
-
You, sir, have built a Kof II to be proud of and set a new benchmark. That's a fantastic build full of clever techniques that I certainly would never have thought of. Very many congratulations!!
-
[MOC] Octrainber 2021 - FIAT 500 "Draisina"
Hod Carrier replied to Paperinik77pk's topic in LEGO Train Tech
LOL!! Laughing a lot at Giovanni and Giorgio having to push their beloved FIAT, and the oil spots that it's leaving in the track as it goes along. That's comedy gold right there. Did you know that in the UK "FIAT" is an acronym? It means "Fix it again tomorrow". I also watched your video presentation on Flickr. I couldn't help but think how much like a real FIAT it was. There was lots of noise but nothing came into view for what felt like a very long time, and then your little van came wheezing slowly into view and crawled around the curve at a very sedate speed. Great build, brilliant presentation and lots more to love besides. It's a wonderful wonderful project that you should be very proud of. You've squeezed so much character into a really tiny package. Congratulations!! -
[MOC] OcTRAINber 2021: Coke Quenching Locomotive in 1/33
Hod Carrier replied to Sven J's topic in LEGO Train Tech
That's fantastic!! Thanks for finding all that extra detail to put your excellent build into it's context. Given how short the process is, you are in that rare position of being able to build an entire railway system and operate it. I think maybe you should consider modelling the wagon also, as it's quite an interesting prototype in it's own right. But I respect your decision if you choose not to. "Workin' in a coal mine Goin' down, down, down Workin' in a coal mine Oops, about to slip down Workin' in a coal mine..." -
Thank you, sir. Yes I definitely agree that having the entire train is way better than just one or two vehicles. @ColletArrow I think the wobbles are due to the axles being supported only in the middle and not at each end, and are caused by inconsistencies in the track. I've had it doing more laps and the wobbles always seem to strike at exactly the same places each time. I've also had it running back and forth across the floor without any track and it seems fairly smooth until it crosses the joints between one laminate tile and the next. I've had another good look at the design and I don't think there's enough space to get anything between the wheels and the inside of the coach sides to support the axle ends, so it might be just one of those things that I'll have to put up with. Alternatively I might have to look into ways of making the other cars wobble equally so that it doesn't stand out so much. I mean, the ride quality on the real train can't be that smooth after all.
-
You're kidding!!! Ha ha!! Now that is some weird timing. I did notice that this was a very common occurrence from the photos I'd been studying, but I put that down to them probably having been taken during warmer weather. I probably could model it with open doors on the two unpowered coaches, but not on the motor coach. I presume you mean the motor coach...? Yes it is a wee bit wobbly, although I'm unsure exactly why. It's the heaviest car of the train and yet it's the only one that wobbles. Whether that's something to do with having motors onboard, the fixed wheelbase or whether it's meeting resistance through having to push/pull the rest of the train I shall have to try and find out. There may be some scope for adding weight but not much. It looks like I might have to now. Ha ha!!
-
It certainly is still operating. I believe it has the title of the oldest electrically operated pier railway according to Guinness World Records, although I don’t think it’s a very large field with much competition in it. The trip is stated to be 2100 feet / 640 metres.
-
Entries assembled.
-
Thank you gentlemen. Yes, those 3 wide windows really came to my rescue with this build. Without them the design would not have been right.
-
LEGO Malayan Railway 20 Class - Narrow Gauge Train MOC
Hod Carrier replied to LEGOTrainBuilderSG's topic in LEGO Train Tech
What can I add that hasn’t already been said? That’s a fantastic loco even without the added features, but the light and sound effects just give it that extra. Congratulations on a fabulous build. -
[MOC] SOB Stadler Traverso (FLIRT4)
Hod Carrier replied to Ashi Valkoinen's topic in LEGO Train Tech
Oh boy, have we got some great MOCs to enjoy this weekend. This shows your usual high standard of build and finish. Getting the front of these trains right must have been a real pain, but it looks like you nailed it as usual. Building in dark orange also must have made things really difficult in terms of part selection. Congratulations on a fantastic build and for getting onto the front page too. -
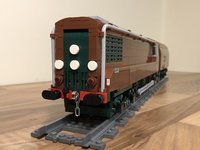
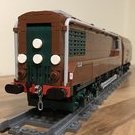
I thought that, because it doesn't really fit in with the topic of OcTRAINber, I would start a new thread for this model rather than diluting the OcTRAINber thread with any discussion of it. You may know that I had decided to build a model of the Hythe Pier Railway locomotive as an entry for the OcTRAINber contest. Well, that project didn't end there as I went on to build the entire train. The railway runs the length of Hythe Pier in Hampshire and connects the ferry terminal at it's head with the shore and the town of Hythe. It has been in existence since 1909 when it began using hand-propelled trolleys. The line was electrified in 1922 and has been in continuous operation ever since. HythePierTramway-Hythe-081005 by Michael Wadman, on Flickr Hythe Pier Tramway by Roger Marks, on Flickr I have chosen to model the entire three coach train together with the locomotive and baggage trolley, as these renders show. The build of this train ran in parallel with my OcTRAINber contest builds. This is the control trailer car which is always at the seaward end of the train. For simplicity the railway operates on a push-pull basis, so there has to be a control car at the opposite end to remotely control the locomotive. The pier railway actually has two of these to permit maintenance. The coaches have sliding doors on one side only, as the platforms are always on the same side of the train and, because of the layout of the pier, there is no chance of the coaches being turned accidentally. This also has a safety benefit, as the seaward side of the train is where the electrified 3rd rail is found. The cab of the control car. Visible through the large offset windscreen is the brake wheel. This is the standard coach used by the railway showing the external sliding doors. This coach, like the control car, has a full seated interior. In this case, it is divided into three bays. This is the motor car. It is to the same external design as the other coach but inside is very different. Instead of an interior there is a Circuit Cubes bluetooth hub and a pair of motors mounted vertically. Access is by removing sections of the side and roof, as shown here. The underside of the car showing the transmission. While the other cars have bogies, this car has fixed axles because I could not find a way to create power bogies within the space available. I have made sure to keep the level of this car the same as the others and ensure that the distance between the axles is the same as the distance between the bogie centres to ensure that it blends into the train as much as possible. This is the baggage trolley that carries large items of luggage brought by passengers off the ferry. This was to have been a competition entry, but I decided that it wasn't really of high enough standard so I put that idea aside. A little video of the pier train doing loops around my kitchen floor. The train runs very smoothly and prototypically slowly too. The only downside is the racket coming from the motor coach. Man, it's loud!! This is the technique I used for the external sliding doors. The problem that I had was that I needed the doors to protrude from the coach sides by one plate but I needed whatever technique I used to be compact enough that it wouldn't intrude into the motor coach and prevent fitting of the power and control equipment. This is the view from the inside of the coach. This is the same technique viewed from the outside of the coach showing the attachment and the offset. For a build that looks so straightforward there were quite a few challenges to overcome, most notably working out how to include the powertrain and make sure that the supporting structure for the doors was not too bulky. That said, I did enjoy the challenge and found a good use for the Circuit Cubes kit that I've been holding on to for a while. I hope you like it too.
-
Thanks, Benn. I wanted to try and get a compact pivot arrangement for the body and this really was the only part for the job. It looks pretty good too. It's a shame that it will all be hidden. There is also a roll of paper on the third wall, but including that would have made photographing it quite hard. Thank you so much. Strictly speaking, the Honey Bucket is standard gauge and the Trevithick doesn't run on compatible track, but I'll see what sort of cavalcade I can sort out. Thank you, sir. Yes it's quite a mixed collection of different types, none of which would ever have been seen together in the same space. --------------------------------------------------------------------------------------------------------- It's getting tight to the deadline now, but the final issue left outstanding has been dealt with. Luckily the postman brought me the parts needed to correct the problem I'd discovered with the tipper mounting point. If they hadn't come today I would have been sunk. The tipper body is still supported on the handrails as before, but the handrails themselves are attached differently to the chassis. Rather than being attached to the sides they are now attached to the ends and are a bit closer together than before. With the geometry now corrected, everything lines up as it ought without stress or parts being out of line. With the tipper body now in place the build is complete!! My WIP journey is now complete. All the builds are finished and just need to be properly photographed so that they can be entered. As always, I've had a real blast with OcTRAINber and, after an unpromising start, things have accelerated towards the finish. I've loved researching unusual prototypes so that I could bring you something different to see and have thoroughly enjoyed all the excellent feedback that the builds have generated. I may not have stuck very close to the "quality over quantity" mantra and haven't produced models to the same high standard as many others being entered, but I have had a blast and enjoyed myself hugely. For me it's been about participating and just having fun. I hope you've enjoyed the journey as much as I have and if anything I've done has made you smile then I will have achieved my aims. Best of luck to all competitors in all categories. It's been a classic year this year and I hope next year will be just as good.
-
Lastly but not leastly, it's the turn of the rail tractor. As with the other builds, I started with the chassis and build upwards. It's a fairly vanilla concoction of plates and tiles as usual. Building up from the chassis there is a layer of jumper plates to give an offset for the cab and bonnet. There's also a wooden deck at the back for work equipment. Just to prove that there actually is a tractor underneath everything, a quick shot or two before the detailing and other greebles go on. From the opposite side. It does show how basic the conversion was for these rail tractors that so much of it's former identity is still on show. And now with greebles. An enclosed chain drive takes power from the tractor's existing gearbox and rear axle down to the rail chassis. Plenty of work equipment stowed on the back for when the need arises as well as a tool chest up at the front. The design of the tractor took a bit of tweaking to get right. There were aspects like the position of the axles and the height at which the body needed to be mounted that took a while to nail down before arriving at this design. However, a lot of the other aspects of the design were dictated simply by the parts available to me. Once I'd got the cab sorted out everything else had to scale to that.
-
Time at last for the design that probably got the biggest reaction on Flickr. A very simple plates and tiles chassis for the Honey Bucket. These rolling out-houses are very lightly constructed as they don't have to carry much weight (usually), so it was important to keep the chassis as slim as possible. The trans-clear plates in the middle are the attachment point for the Honey Bucket itself, as there is often a clear gap between the chassis and the base which needed to be replicated. The interior of the Honey Bucket has not been forgotten. All mod-cons have been included. There's a nice comfy seat with a lid, a dispenser for hand sanitiser and even a loo brush for, erm, debugging the system. The completed cubicle on it's chassis. Plates with door rails were used at the corners to hide the gaps between the plates and to give some continuity to the external shape. This design is actually v1.1. The original version stood on a 4x4 plate with sides 8 studs high, but it quickly became apparent that this was going to be way too large to scale correctly. The answer was to make it 3/4 size on a 3x3 plate with sides 6 studs high. This seems to work a lot better. No prizes for spotting the mistake at this stage of the build. Yup, I put the cubicle on the chassis the wrong way round so that the door was at the opposite side to the step. Doh!! Step now on the correct side and the cage built up. The cage is not there for any safety reasons but to provide a lifting point so that the vehicle can be attached to a crane and lifted. Presumably these conveniences are taken to the worksite access point on the back of a truck along with any other road-rail equipment and then hauled to the worksite itself by some other piece of self-propelled MOW equipment. The reverse side of the cage. Not sure what the orange cone is for, but they all seem to have one. Any ideas...? This has been a really fun build which I enjoyed immensely. I didn't want to build anything too serious, and this suited that brief perfectly.
-
Next up is a lot of people's favourite. The bobber caboose. The very basic chassis for the Kiso Forest Railway logging caboose. Jumper plates are used on top to give the offset for the cabin which keeps the whole model nice and short. The chassis is built up with the base for the cabin, the chassis sides and steps. Not all the components for the cabin can be fixed in the conventional stud-to-stud manner. These side pieces have to slot in between the central sections and be held in place by the rest of the construction. The two halves have plates with lamp holders and are joined using a 1x2 tile before slotting into place. Quite a pretty face, don't you think? The profile bricks give a hint of wood panelling. I was unsure which colour to use as, like many defunct prototypes, there are few if any colour photos. These cabooses are frequently modelled in various scales by narrow gauge enthusiasts who generally paint them in a shade similar to reddish brown, but I wanted something a little more classy and, having checked availability of parts, opted for dark red. Roof on and handrails added, and the tiny bobber caboose is just about done. This particular build has been an absolute joy and I'm thrilled with the model I have ended up with. There was a minor amount of head-scratching needed during the design process to make sure that everything looked as it should, but it actually turned out to be a very straightforward process in the end which lead to a simple and satisfying build. So that's two down, two left to go.
-
Construction of the Guinness tipper wagon has started. The first place to start, as with many builds, is the chassis. This needs to be as flat as possible so that the tipper body doesn't sit too high and smooth enough so that there are no obstructions to it tipping. The underside of the chassis is reinforced to deal with the weight of the tipper body being carried on the handrails, which are in turn attached to the chassis sides. With the handrails now attached it's clear to see why the reinforcement is needed. The tipper body coming together well. The ends and sides are quite sturdily built. One half of the support structure for the lid is also shown here. The completed tipper body awaiting lid and small details. I did wonder whether or not to make the lid hinged but I decided against it on the basis that I am unsure whether or not the original wagons had hinged lids. I decided that they probably didn't because there are photos showing wagons running without lids, which made construction of the model a bit easier. The completed tipper body with lid ready for mating to the chassis. Ah. Oops!! I seem to have got my design wrong. The geometry of the mounting isn't right, which is something that I failed to spot when designing the wagon. I think it's time for a speedy redesign. I just hope that the additional parts I shall need won't take too long to arrive. Next up: Well, wait and see.
-
Not sure how I missed this build, but it's really good. That's a lot of functionality squeezed into a small package. Congratulations and best of luck in the competition.
-
Things are about to get a bit busy on this thread as the deadline approaches. There was a bit of a delay due to an incomplete order, but I've had the last of my Bricklink orders arrive and I'm ready now to tackle the Great OcTRAINber Polybag Challenge. Four bags - four builds. Which one should I tackle first?
-
Octrainber 2021 | Vollert Robot DER 100 "Leonhard Weiss"
Hod Carrier replied to HoMa's topic in LEGO Train Tech
That's a fantastic presentation and a great demonstration of your model's capabilities. Congratulations on squeezing a quart into a pint pot and getting the detailing right too. -
LOL!! Go Katy, go!!! Who sir, me sir?? I'm a strictly 90 degrees kinda guy. Everything I build is square. I've a looooong way to go before I become a Jedi Master.
-
As predicted, that's one helluva Kof II. You've got to be happy with the results of all your hard work. It's clear that you're not prepared to settle for just "good enough" but keep pushing for those alterations to make it right. Congratulations!!
-
[MOC] OcTRAINber 2021: Coke Quenching Locomotive in 1/33
Hod Carrier replied to Sven J's topic in LEGO Train Tech
That's some great progress there, Sven. She's looking realistically massive and ungainly. I hear what you're saying about colour variation. I guess it's unavoidable but it is a pain in the neck if you're trying to get a uniform finish. Some colours do seem to be worse for it than others, but I'm surprised that regular blue seems to be made up so many shades. -
I don't think you need any more convincing, but I'll also add my vote for dark red with dark green as a close second.
-
Thanks for the encouragement. The tractor I've designed is a bit of an amalgam of various different examples, none of which are entirely the same. The photo I linked was not the one I was working from primarily and shows a very "clean" design without extras, used presumably primarily for haulage rather than any additional duties.
-
That's a very clever technique to get a perfectly curved roof with overhang. So simple and yet effective. I think sometimes we fixate so much on getting studs to line up and making a secure physical connection between all parts of a build that we can be blind to these elegant solutions. Kudos to you, sir (cash value $0.00001). Your example has set us free.