
ludov
-
Posts
686 -
Joined
-
Last visited
Content Type
Profiles
Forums
Gallery
Everything posted by ludov
-
 Love your dedication! I hope you finish on time, the tractor looks really good.
 -
What @howitzer said. I think the contest was awesome: the small scale made it both challenging, feasible (in time, for me at least) and affordable. For me it's a success in any case, I had a lot of fun!
-
[TC25] Air Tech Claw Rig 8868
ludov replied to ludov's topic in LEGO Technic, Mindstorms, Model Team and Scale Modeling
Thanks @Akassin! The boom took me way more effort than expected, even though it’s only a handful of pieces. The original is already quite slender and to be accurate the shrunken version should only be one module wide, but that is not feasible. But even only 2 wide was a challenge, especially the mounting point for the second pneumatic cilinder was difficult to get right. And then the hoses… -
42159 Yamaha MT-10 SP
ludov replied to Ngoc Nguyen's topic in LEGO Technic, Mindstorms, Model Team and Scale Modeling
As it engages with a towball, I’m seeing possible applications for GBC and kinetic sculptures. Don’t underestimate people’s creativity. -
Solenoid engine
ludov replied to Davidz90's topic in LEGO Technic, Mindstorms, Model Team and Scale Modeling
Cool project. Reminds me of a electro kit I had a as kid. It also included building a motor with some magnets and coils, I thought it was amazing. -
[TC25] Air Tech Claw Rig 8868
ludov replied to ludov's topic in LEGO Technic, Mindstorms, Model Team and Scale Modeling
Finally. Parts arrived, rebuilding done, photo's, video. So much work ;-) But I'm happy with the end result: If anyone is interested, I made instructions as a stepped .io file. Pneumatic hoses not included. I prepared a Rebrickable MOC with some additional info (click), but you can also find the .io model here (link to .io file). In my Bricksafe you can find some photo's to help with the routing of the hoses, if needed. There are also high-res photos. I made some comparison renders too - I forgot from whom I go t the idea to make the original "trans clear" as a substitute for wire frame, but it looks cool. Thanks for the idea! -
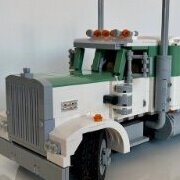
8868 Air Tech Claw Rig One of my childhood favourites, shrunken from 16 wide to 9 wide (56%). At this small scale, I was only able to keep two of of the four pneumatic functions and maintain the overall looks at the same time. Also the motorized pump is replaced by a manual one. Functions Manual functions: HOG steering via the beacon light on the roof (same as in the original model) V6 engine driven by rear axles (same as in the original model, except no differentials due to space constraints) Pneumatic pump (motorized with 9V electrical motor in original model) Crane rotation (pneumatically actuated in original model) Gripper (pneumatically actuated in original model) Pneumatic functions: Crane lower arm Crane upper arm Original model Pictures Click here for high-resolution version Click here for high-resolution version Click here for high-resolution version More photo's, renders and WIP on my Bricksafe. Instructions on Rebrickable. Video Discussion topic
-
I'm really liking the tractor! The crane is less convincing in my opinion. It seems out of proportion... Admittedly, the original wasn't great either, so maybe you rendition is accurate after all ;-)
-
Lets "fix" powered up!
ludov replied to allanp's topic in LEGO Technic, Mindstorms, Model Team and Scale Modeling
I think this is the bottom line. PoweredUp is quite a good system, but the possibilities are not well worked out and/or advertised by LEGO. The system has so much potential that is now hidden and only comes out by "3rd party" efforts. I'm circling back to what I said earlier (I didn't read all of the intermediate 4+ pages of text walls and gave up somewhere around page 2 - I admire @Lok24's perseverance): there's no satisfying everyone, but PUP is a good step forward for the majority. -
[TC25] 42082 Rough terrain crane
ludov replied to Akassin's topic in LEGO Technic, Mindstorms, Model Team and Scale Modeling
This contest is producing a lot of awesome entries with very high density builds, but indeed this one is particularly complex. Amazing how much you manage to fit in there! -
I was thinking about a setup where one end of the coupling would be "free" and somehow lock into the part connected to the pneumatic switches. If the motor assembly were to be a bit off alignment (e.g. on a long belt drive), the coupling would be able to absorb that. But admittedly, this was more of a brain fart than a well thought out idea ;-). Thinking more, I think even that even there was some misalignment in the current setup, the slack in the belt may be enough to absorb that: the tilting would force the motor to be aligned if it wasn't.
-
75c## are rigid hoses, not pneumatic...? Really cool solution for switching. I'm wondering if something like a Oldham or Schmidt coupling can help with misalignment?
-
I don't understand this argument. The LEGO PoweredUp App supports also the Technic Hub and motors. And that app lets you control the motors in pretty much any way you want. So how does that block you from reusing a set's electronics for MOCs? Perhaps the issue is in that Control+ is seen as a different thing, whereas it is just a thin layer on top of PoweredUp? I never bought a Control+ set, so I'm not sure how it is explained in the manuals, but I think it is unfair to consider the entire electronics part of a set as "single purpose", while in fact it is just the app (Control+ profile) that is single-purpose. Also: 1992.
-
Lets "fix" powered up!
ludov replied to allanp's topic in LEGO Technic, Mindstorms, Model Team and Scale Modeling
I appreciate all the enthusiasm displayed here, but I think many (all) of the ideas here are not feasible. I just got my very first C+ hub and motors and I think it's fine. I got the motors to move using my phone via the official LEGO app faster than it took me to get batteries from the store. I'm betting this is enough for 90+% of the market. I'll be playing around with Pybricks over the weekend to see what the options are, but I'm sure that PyBricks and similar 3rd party solutions cover the needs for another 90+% of the "advanced" users. The remaining <1% is a very small market (and note that Technic is already a relatively small market) which would then have to cover all the development costs of the advanced components (Control Center +, rotary sensors, relays...). Prices for such components would be high (high development cost, small market), and I'm sure people will complain about that in the same way as they are at the prices for C+ sets (and note that the actual component costs are only a fraction of the total cost). And we saw in the late 90s, early 2000s what happens when LEGO puts a lot of fancy parts into their models below cost price. So instead, I'm going to argue another way forward: promote and enable 3rd party compatibility. SBrick, Pybricks, and many other enthusiast initiatives have show what is possible. For a sustainable future for Control+ and future systems, I'd hope for LEGO - for every electrical system - to: Make public the electrical interface specification (pinouts and signal requirements) Make public the communication protocol (I think this was done at some point for C+, but I can't find it back) In this way a healthy, complimentary, 3rd party ecosystem can emerge - without reverse engineering - alongside the sets being released. This ecosystem can serve the needs of power users, shielding LEGO from having to carry the development and production costs for those niche products (including all associated regulations across the globe). That being said, I see some improvements for C+: removable wiring (like in the old 9V system), to allow different lengths a smaller (micro) size motor The latter may still come - the former unlikely. -
[TC25] Air Tech Claw Rig 8868
ludov replied to ludov's topic in LEGO Technic, Mindstorms, Model Team and Scale Modeling
Thanks @vascolp! I started with white, as you may see in the first post. At some point I changed my mind, but maybe it is more faithful to the original indeed: Still waiting for parts to come in... Hope everything arrives on time. -
We could also comment on the excellent progress and interesting build I’m looking forward to more progress.
-
[TC25] Air Tech Claw Rig 8868
ludov replied to ludov's topic in LEGO Technic, Mindstorms, Model Team and Scale Modeling
Final tinkering. I didn't manage to make the hood shorter in a way that was satisfactory, so I'm going to keep it like this: I'm not convinced I am going to keep the trans-orange cone for steering, but I guess that it represents best the original. While I wait for parts to come in, I'm building 8868. I don't have all the parts anymore (with space constraints one has to make choices...), so it is a virtual build... Don't they look good together? -
Unrelated question @Jim: any particular requirements for the entry posts? The first entries are in and usually there are some guidelines in the entry topic. Just checking.
-
[TC25]Rebel Wrecker 8858
ludov replied to piterx's topic in LEGO Technic, Mindstorms, Model Team and Scale Modeling
I like how you made it a pull back, but I think you should give it a try to make it a functional vehicle (steering plus working fake engine). The looks are spot on, and it would be great if there were two implementation options underneath. For me (and this is my opinion) a functional version would fit better in the spirit of the contest, also because I have fond memories of playing with this set, driving it over cushions etc. -
[TC25]Rebel Wrecker 8858
ludov replied to piterx's topic in LEGO Technic, Mindstorms, Model Team and Scale Modeling
Looks good! That fake engine is just aesthetics ? -
[TC25] 8868 Airtech Claw Rig
ludov replied to howitzer's topic in LEGO Technic, Mindstorms, Model Team and Scale Modeling
Looking good, nice progress! The hoses from 8868 era are much more flexible than the new ones, And a bit smaller in diameter too. -
[TC25] Air Tech Claw Rig 8868
ludov replied to ludov's topic in LEGO Technic, Mindstorms, Model Team and Scale Modeling
Thanks! The grabber is just a 2x4 L-beam. On the “short leg” are the two axles with the grabber (3x3 thin lift arm), synchronized with 8z gears. Just above it is a third 8z on a friction pin to keep it open. The12z is a knob to operate it. I doubt it will hold much weight, but the small pneumatic actuators can’t lift much anyway. I’ll make a “log” to test it. -
[TC25] Air Tech Claw Rig 8868
ludov replied to ludov's topic in LEGO Technic, Mindstorms, Model Team and Scale Modeling
Thanks! i agree that the hood is a bit long. Probably should be one stud shorter. But the front bumper can’t move any closer to the wheel or it would rub against it, so not sure how to achieve a shorter hood without an awkward gap between the hood and bumper. I still have time, I’ll think about it. -
[TC25] Air Tech Claw Rig 8868
ludov replied to ludov's topic in LEGO Technic, Mindstorms, Model Team and Scale Modeling
Done? What do you think? -
Scaling in LEGO is not an exact science Add a stud here, lose one there. As long as the whole looks right!