
ludov
-
Posts
686 -
Joined
-
Last visited
Content Type
Profiles
Forums
Gallery
Everything posted by ludov
-
 Wow, looks great! Can’t believe you managed to fit all that! I think you should also raise the walls of the bed a bit. The bed now looks too low relative to the cab and crane. Probably the cab is too big relative to the wheels, so don’t make the bed too big either. Maybe one or two layers of plates.
 -
[MOC] Spaceshuttle
ludov replied to Jeroen Ottens's topic in LEGO Technic, Mindstorms, Model Team and Scale Modeling
I remember there was a WIP thread on this project some time ago - long time ago actually, it seems. It turned out great, glad you managed to finish it! It's a cool modern take on one of my favourite childhood sets. I (still) think the tail fin looks a bit odd being open like this and can use some surface. The original model also has it open like that, but as that isn't panelled up, it doesn't stand out as much. But I understand the shape makes that difficult, I'm sure you tried. Having the battery box/hub inside is good for playability. Is it swoosh-able? The SBrickPro app is a nice touch. What does the unlabelled up-down lever on the left of the "arm control" joystick do? Is it for unfolding of the satellite solar panels? -
[TC25] Air Tech Claw Rig 8868
ludov replied to ludov's topic in LEGO Technic, Mindstorms, Model Team and Scale Modeling
Solved exhaust issue. The HoG I'm still undecided, but for now I'm going with the "standard" 12z double bevel gear. Actual build, in all its rainbow warrior glory, is also done: I'm really happy with where this is going. Now the crane! -
[TC25] Air Tech Claw Rig 8868
ludov replied to ludov's topic in LEGO Technic, Mindstorms, Model Team and Scale Modeling
Quick virtual update: I redesigned the chassis entirely in order to fit in the drive shaft, routing of pneumatic hoses and improve general sturdiness. Also fixed some impossible builds. To do this weekend is to build it for real and see if it works out as intended. I'm not too happy with the white connectors above the chairs holding the "exhaust": they're too obvious. Also undecided on what to do for HoG steering control: the 2x2 beacon is too big, but I don't yet have a good alternative. Suggestions welcome! -
[TC25] 8868 Airtech Claw Rig
ludov replied to howitzer's topic in LEGO Technic, Mindstorms, Model Team and Scale Modeling
If I count correctly, the original is 17 studs high from bottom of chassis to top of battery box. At 70% that is 11.9 studs. I think the new (blue) manual pump is 11 studs, so if you mount it at the bottom of the chassis it should fit upright. Just 1 stud to spare for the drive shaft to go under the pump. -
[TC25] 42082 Rough terrain crane
ludov replied to Akassin's topic in LEGO Technic, Mindstorms, Model Team and Scale Modeling
Ah ok, I see. I was worried you did the scaling based on 62.4 and then build with 49.5, but I didn’t realize you scaled the image. Carry on ;-) -
[TC25] 42082 Rough terrain crane
ludov replied to Akassin's topic in LEGO Technic, Mindstorms, Model Team and Scale Modeling
The first picture has different wheels than the second? Looks like 62.4x20. -
[TC25] 8868 Airtech Claw Rig
ludov replied to howitzer's topic in LEGO Technic, Mindstorms, Model Team and Scale Modeling
The real model measures 50 studs bumper to bumper, 52 if you count the bull bar. I think the 58 includes the arm plus gripper sticking out of the back. -
[TC25] 8868 Airtech Claw Rig
ludov replied to howitzer's topic in LEGO Technic, Mindstorms, Model Team and Scale Modeling
Has your 8868 been assembled since 1992? The rest section looks familiar, very similar to the original. Is the half-pin in the plate with gear rack in system? It seems it wouldn’t align with the piston, but I might be wrong. -
[TC25] Air Tech Claw Rig 8868
ludov replied to ludov's topic in LEGO Technic, Mindstorms, Model Team and Scale Modeling
Final progress after a weekend of building: I've started also a digital model. I was trying to avoid it as my day job involves already too much screen time, but my fingers started to hurt ;-) This is where I'm going to: For @SaperPL: here is the underside, showing the steering mechanism. Was this what you were asking for? There's a pin that slides the construction with the thin liftarms left and right, which transfers to the steering arm. The blue pin that is barely showing in the steering arm slides in and out of the DBG pinhole-with-two-axle-connector to account for the parallelogram motion. Larger versions of all images are on Bricksafe. -
[SMF] 1928 Renault NN
ludov replied to Sim_Camat's topic in LEGO Technic, Mindstorms, Model Team and Scale Modeling
Very nice, I like how you did the wheel arches. Did you already build it? The pictures are all rendered, right? -
[TC25] Air Tech Claw Rig 8868
ludov replied to ludov's topic in LEGO Technic, Mindstorms, Model Team and Scale Modeling
I’ll try, but maybe it’ll be easier if I make a quick stud.io model. -
[TC25] 8109 Flatbed Truck
ludov replied to SaperPL's topic in LEGO Technic, Mindstorms, Model Team and Scale Modeling
I also never realized this set had such interesting mechanisms hidden inside. Good progress so far, impressive hope you managed to replicate it at such small scale! This contest is producing all kinds of interesting mechanisms! -
[TC25] Air Tech Claw Rig 8868
ludov replied to ludov's topic in LEGO Technic, Mindstorms, Model Team and Scale Modeling
More progress: It was a pain to connect the fake engine to the rear, and have the HOG steering in the same general area, but I managed. Rims, front bumper, etc. need to be white. I'm not going to fit differentials and I think I will only make the two arm actuators pneumatic: I doubt I will get the slewing to fit inside the space I have, plus there'll be so many hoses... However, if @2GodBDGlory can manage it in the Arocs, then I need to step up my game too ;-) -
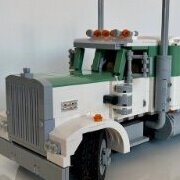
This was my all time favourite set as a kid (still is, maybe), so when TC25 was announced, I was determined to shrink this set. I was worried that someone else would choose this famous set as well, but when I started last night to plan the build, I was convinced there was no other build yet. I overlooked @howitzer's topic. I'm looking forward to see their build and see how our builds compare. Mine is sized about 56% of the original Progress so far:
-
[TC25] 8868 Airtech Claw Rig
ludov replied to howitzer's topic in LEGO Technic, Mindstorms, Model Team and Scale Modeling
Crud. When I saw the contest announcement I immediately thought: I need to do 8868, my childhood favorite. Checked the topic list and must have overlooked this post. Oh well, I guess there will be two. I’m building a bit smaller, will try to post a WIP sometime this weekend. You’re off to a good start, I’ll be following with interest! -
Can you put a single 1x1 round plate with the stud into the end of the gear rack, or does that catch on the drive axle of the other outrigger?
-
This is a different app than the “LEGO DUPLO Connected Train” app that is in the App Store?
-
My opinion is that it’s very nicely done! Looks simple, but you have some nice stalls in there. Well done, thanks for sharing!
-
Akiyuki Mangle rack clock
ludov replied to GerritvdG's topic in LEGO Technic, Mindstorms, Model Team and Scale Modeling
wow, amazing work! I second the call for more pictures. How many parts are in there, approximately? I missed this originally, so thanks also for bringing it back in the spotlight! -
While I support the sentiment, isn’t this readily solved by the tagging? If we had a fixed set of tags instead of the freely chosen tags, then topics would be easily found. Creating new tags could be limited to mods or “high rep” users, similar add to how it works (well, in my opinion) on the various stackexchange.com sites.
-
I’m not familiar with what functions are available in LEGO Technic app, but if basic arithmetic (+,-,x,/) is available, then you can approximate any trigonometric function by series expansion. It’s a bit elaborate, but definitely doable and arbitrarily accurate. They landed the Apollo missions on the moon with this approach.
-
[MOC] Jeep Grand Wagoneer 1991
ludov replied to syzygy87's topic in LEGO Technic, Mindstorms, Model Team and Scale Modeling
Nicely done, I like the color scheme, particularly the tan lines across the sides. The engine bay is a bit too cluttered I think (also noticed it in the F100), but that's literally the only thing I can comment on ;-) -
Absolutely amazing.
-
That’s amazing. I can’t believe this all runs off of just one L-motor. Really nice. I’ll read up on those mechanisms!