
EWay
-
Content Count
37 -
Joined
-
Last visited
Everything posted by EWay
-
What a brilliant selection of different and innovative roof techniques! Great build, well done.
-
Presenting the IFI ammonia train, as operated by Irish Rail until the collapse of IFI in the early 2000s. This was a pretty massive undertaking, as it consists of six separate models: a locomotive, three ammonia tankers and two barrier wagons. The diesel is powered by two Circuit Cubes motors, although as yet they're untested because I barely have enough track to hold this lot. I'd been wanting for a while to design an Irish Rail diesel of some sort, in the old orange livery. I considered a few options: The 001, old 201, 113 and 121 classes, which I quickly dismissed as they're so old I've never seen them The 141 and 181 class, with distinctive narrow mid-sections - too narrow for a battery box The GM 201 class, still in service, but with 6 wheels on each bogie instead of 4, making them very difficult to work with for train motors and difficult to scale to a length short enough to navigate standard Lego curves I settled on a 141 class, using circuit cubes to get around the space issue - I figured worst case if it doesn't work out I can buy an old 9v train motor and electrify my plastic track with copper tape. It wasn't possible to get the thin upper white stripe to continue along between the windows unfortunately, due to the use of some SNOT techniques, and I decided not to tackle the challenge of a brick built CIE logo - it's been done before but I think it would be impossible to do right without severely plagiarising! Having settled on a diesel, the cargo of ammonia seemed fitting. I owe my Irishness to IFI, as my parents moved here in 1990 when my dad took a job at Marino Point. This highly recognisable and sometimes controversial train transported ammonia between IFI's three factories at Marino Point, Arklow, and Belfast. Here's a closer look at everything individually: For the ammonia tankers, it was the first time I've ever found the Lego colour "bright light orange" useful - it looks just right for the stripe. Supposedly the chassis was dark green but these things were constantly so dirty that it's hard to verify that from photos. And here's a barrier wagon - these carried water which acted as a defence against spillages of the highly flammable ammonia in the event of a derailment. These were also rarely clean enough to look green in photos, but it looks nice so I decided to persevere with the colour despite the more limited part availability! There are more photos on flickr - the photos above are linked. This is my last train for the foreseeable future - now it's time to focus on city building and having somewhere to actually run the trains!
-
Looks fantastic! So many great details, I especially love the corner columns and the detailing under the balconies!
-
My second train MOC, completed about a month ago, and my first attempt at a steam locomotive. I present to you Great Western Railway locomotive 5972 “Olton Hall”, otherwise known as Hogwarts Railways locomotive “Hogwarts Castle” - the loco which pulls the Hogwarts Express. It's a subject that's been MOC'd many times before, but I've always loved the look of Hall, Castle and Manor class GWR locomotives so my first attempt at steam was always going to be one of those, and I figured if I'd be bringing it to shows from time to time, a familiar locomotive would have the most appeal. That being said, now it's built (it's quite fragile) I'm terrified to take it out of the house... so it remains to be seen whether it will ever actually go to a show! Purists look away now. This uses BigBenBricks XL driving wheels and a Circuit Cubes motor and bluetooth battery hub. It's my first experience with these third party products and I'm delighted with them both. The motor sits inside the firebox of the locomotive. It’s connected by a wire to the tender – lift up the coal section and the battery hub is sitting inside. The app to control it leaves a little bit to be desired, and documentation is almost non-existent, but at least in theory apps can be updated and, last time I checked, supposedly more documentation was due to be released in “spring 2022”. This was a challenging build at every stage. Designing a steam engine in stud.io means you can’t test its running ability, and it turns out that significant tweaks were required. Various parts of the MOC were just plain difficult to put together. The driving wheels are connected by gears, but the gears have to be lined up with exactly the right teeth so that the holes on the wheels line up to connect the connecting rods. The boiler is flimsily attached and difficult to put back together if it comes off, often requiring major surgery. Even sourcing parts was tricky – two half-cylinders in dark red, which have only ever been released in one set, a dark red 1x2 1x4 bracket released in two sets (but one is a polybag, and the other one is a special edition 200 piece bucket so rare that there’s only 1 listed on Bricklink!), dark red windows which have only appeared in two sets… these were among a dozen or so parts with 400 sellers or fewer on Bricklink. I also experienced three part breakages, which I can’t ever remember happening to me before, due to brittle dark red. The worst instance was one of those rare dark red windows, which broke across the bottom as soon as it looked at another piece. Fortunately I was able to glue that one back together (I recommend Loctite All Plastics Super Glue) – you can barely see the crack and it’s got perfect clutch. Once I’d built the tender, I discovered it wouldn’t go round Lego curved track – I didn’t think it was long enough to matter originally. Thankfully it wasn’t too hard to modify it to have the back two axles on a turntable. It’s not even that noticeable when it’s running that they’re slightly articulated. Getting the front bogie to turn without hitting the cylinders was much more difficult and I had to experiment with several different configurations before I got it working. The cylinders are possibly my favourite part of the model. It took a bit of ingenuity to attach them at this angle, especially since they are studs out at both ends, but I think these pieces capture the shape of Olton Hall’s cylinders perfectly. I won’t say too much about the boiler since I borrowed very heavily from BritishBricks (and also Andrew Harvey, who I believe deserves credit for the original sloped boiler idea). At least the section behind the dome is my own work – getting a section 2 studs long to replicate the curve of a half cylinder on its side is very tricky, and it’s the part of the model I’m least happy with, but I don’t think it’s any worse than the alternative, which would be to use cheese slopes to approximate the curve. Unfortunately SNOT macaroni bricks aren’t an option, because you’d also need 2x2 macaroni plates to get the right height (or a 2x4 semi-circular plate), and such a thing doesn’t exist. Another feature I’m particularly pleased with is the coupling between the engine and the tender. Getting it to navigate R40 curves (quite a feat in itself) means that if I used a simple pivot between engine and tender (e.g. train magnets or a couple of 3176 Plates, Modified 2 x 3 with Hole connected with a pin), the tender would collide with the cab unless there was a huge gap between them. I spent ages trying to come up with a method whereby there would be a short coupling that would naturally extend when going around corners to avoid collisions, and in the end what I came up with was extremely simple. I’m now going to vainly christen my solution the Eastaway Coupling :D It’s easier to explain with an image so here it is: Inertia does the work of pulling the linkage to the side when needed. Unfortunately this doesn't work when driving in reverse (at least I assume, I haven't actually tried it). In reality the pin isn't fully inserted into the axle+pin connector - I needed an extra half stud of room to allow for handlebars at the front of the tender. Before anyone asks if the connection is strong enough to pull carriages being just an axle in an axle hole, I believe it is, but only because I tested 20+ different 2L axles in 20+ different axle+pin connectors to find the ones with the strongest grip. It's handy to have an extensive Technic collection! The deviation from pure Lego has been a strange experience. I used some questionable building techniques – the top of the boiler is attached by fitting a half-cylinder over the studs of a bracket at a slight angle, the pipes that come down from the sides of the smokebox aren’t actually attached to anything, the connecting rods of the pistons are bent outwards very slightly (but well within the tolerances of a Technic half-liftarm pin connection). The purist in me is slightly uncomfortable, and I can see it’s a slippery slope, but I've set myself some ground rules, (e.g. I'll only use custom parts where there's no possible brick-built alternative) to keep myself (pardon the pun...) on track.
-
WIP Portland's Union Station (Or)(will be 2 year project)
EWay replied to Barduck's topic in LEGO Train Tech
Really looking forward to following the progress on this, it looks great so far! Love the marbling too :) Best of luck with the research! -
It certainly would help, but where there's a purist Lego solution I prefer to use it!
-
Just completed it, hope I wasn't too late! Best of luck!
-
Thanks! I don't have any carriages yet so pulling power is yet to be determined... might have to add a second motor somewhere one day. I was struggling to find any other motor options tbh, as I wanted to try out the coupling and it wouldn't have worked if it was powered through the tender! Here's a bit of cab interior detail: Also there's a video of it running here: https://flic.kr/p/2nhtn9N
-
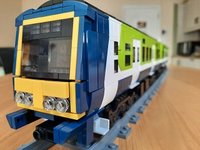
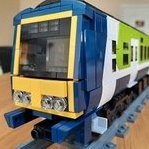
Thanks everyone :) Actually there was one done many years ago in 6 wide, with blue at the bottom before dark blue was readily available. Originally I wanted to build this in the newer green/dark green commuter livery so as not to step on any toes, but then I tried out the lime/white/dark blue in stud.io just to see how it looked, and it looks so much better I had to stick with it :)
-
I'm Tom from Ireland. I'm kind of a new member, I've had an account for a while but never used it. My main interest is town MOCs - I have a few buildings and am in the process of creating a town layout. Also have a bit of an interest in trains, you'll see one MOC already in my post history with a couple more to come soon. And thirdly I'm into Technic... I haven't built a proper Technic MOC in many years but I've made a couple of set mods recently and have been on-and-off trying to design a motorised hook-lift truck over the last couple of years - I just keep getting pulled back into town stuff and the truck goes on the long finger!
-
Practise Posting Here!
EWay replied to Pandora's topic in New Member Section - PLEASE READ BEFORE STARTING!
Testing... do we use bbcode to insert images from flickr? Edit: yes :) -
Hi Train Tech! I'm Tom from Ireland. I'm new to eurobricks, I've lurked very occasionally for years but I'm more active in my local lugs and on flickr. Never had Lego trains as a kid but I always wanted them. I took the plunge in the summer of 2020 when Argos had a sale on 60197, just to get started with a few parts. I'm not really into collecting sets for the most part, just MOC-building. Now I've got two train MOCs and a third one in the works which I hope to complete in the next couple of weeks. I'm also getting started building a city in the spare bedroom, but it'll be a long time before I get a chance to lay any track as the plan is for it all to be elevated which obviously is quite part-intensive.
-
[MOD] 42112 Concrete Truck improvement/modification
EWay replied to anyUser's topic in LEGO Technic, Mindstorms, Model Team and Scale Modeling
Even by Technic standards I was appalled by the turning circle of this truck, so I modded it with drastically improved steering angle, lowered the engine so it's not coming right up between the seats and gave it a tilting cab. Admittedly the tilting cab doesn't really look like any tilting cab I've ever seen, but at least you can see in underneath now :) Free instructions on rebrickable if anyone wants them: https://rebrickable.com/mocs/MOC-54480/eastawat/42112-concrete-mixer-mods/#details