

HRU_Bricks
-
Content Count
159 -
Joined
-
Last visited
About HRU_Bricks

-
[GBC] Ball Cleaning Machine Project (inspired by Akiyuki)
HRU_Bricks replied to HRU_Bricks's topic in LEGO Technic, Mindstorms, Model Team and Scale Modeling
@Lego_GBC_NL Really nice addition to the notes on this build! I think you will need to experiment and note down which side goes on what outlet. As you build the match you will be able to test the air flows as you go (label the hoses if you can, it will make your life easier). Can I recommend for the pneumatic schematic using closed and opened symbols to make it a little clearer? (changing out the red "x"). One is caped and one is open To answer question 13. Yes that is how it works. The pressure is relived saving the equipment and it could also reduce the pressure to the point were machine shuts down (light sensor and cylinder with shock absorber). make sure the pressure going is regulated to between 1.5-2 bar should do it. most over that will result in the rams moving too quickly. -
[GBC] Ball Cleaning Machine Project (inspired by Akiyuki)
HRU_Bricks replied to HRU_Bricks's topic in LEGO Technic, Mindstorms, Model Team and Scale Modeling
@Lego_GBC_NL A few more answers for you. Keep us posted as you go! -
[GBC] Ball Cleaning Machine Project (inspired by Akiyuki)
HRU_Bricks replied to HRU_Bricks's topic in LEGO Technic, Mindstorms, Model Team and Scale Modeling
Thanks for the reply @Lego_GBC_NL. I decided not to complete instructions for my module because of the complexity of the valve bank. A gear could be out by 1 or 2 teeth and it will not run properly. It doesn't need boost, the boost module just turns the machine on an off when there is not balls, it has no control over the functions of the machine. To answer your questions: 2. There is no hose that would be 1m but you will be surprised how quickly you consume the hose when installing it. You will easy use 5m up. I bought 10m and used about 7ish. Can you send a link as for the store you are talking about, I need to get more and the store I bought mine from is gone. 3. The pictures you have posted are the "Over Pressure Relief Value". As the linear actuator is wound (the red ball) it pushes (F1) on the lift arm which pivots and pushes the suspension up putting pressure on the black antenna which seals the air system. When the pressure builds up (above the pressure applied to spring) it opens and releases the pressure. Note you have to put a small amount of hose on the end of the connector (circled). The second picture is the pressure switch which tells the program that tells the system that there is enough air pressure to start. If this is not there and the machine starts it could damage the machine. As air enters the cylinder it pushes against the shock absorber and the sensor goes form seeing black to white. I'll answer the other questions tomorrow. If you can think of more let me know. As to your previous question 11. about the EV3 1m cables, you will use them as the cable runs are not that direct and it is better for cable management. -
[GBC] Ball Cleaning Machine Project (inspired by Akiyuki)
HRU_Bricks replied to HRU_Bricks's topic in LEGO Technic, Mindstorms, Model Team and Scale Modeling
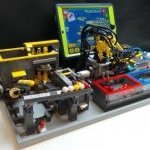
Hi @Lego_GBC_NL I can start by answering a a few of your questions. For reference I built the cleaning machine then decided to build a fully mechanical version that did not use Mindstorms and instead use a motor driven valve bank. Some answers to the questions: 1. Air compressor. The Lego compressors may run it but you will need at least 32 and they will stop working after about an hour. The compressor you mention is overkill but will work. You will need to regulate the output pressure down to between 1.5-2bar (max) otherwise hoses with blow off and you could damage the parts. I use a small air brush compressor that I bought off ebay and it works a treat (see photo below) 2. It will work with the standard hoses but the Lego hoses will not be long enough for the machine. You will also be using a lot of hose 13. Regulate the air pressure BEFORE it gets to the module and have a Lego air tank in the module as a reservoir . The built in regulator in the module is there to tell the program that the air is on and dose not regulate the air pressure. My build running at a Brictober -
42146 - Liebherr LR13000
HRU_Bricks replied to Ngoc Nguyen's topic in LEGO Technic, Mindstorms, Model Team and Scale Modeling
@Timorzelorzworz I agree, there would be a decent amount of designs coming to ReBricable. That design you have shared, is that available anywhere? It is one of the best I have seen for a while and might build it. -
42146 - Liebherr LR13000
HRU_Bricks replied to Ngoc Nguyen's topic in LEGO Technic, Mindstorms, Model Team and Scale Modeling
So my 2 cents Not so good things 1. Over priced. 2. it does look to be unfinished and rushed. Could even be in a MOC category. 3. Does not have the feel of the real crane. 4. New parts reducing the complexity of the builds/designs. Parts like the new open frames, jib sections, even direct drive motors for the spools. These parts may make the designs easier but "back in my day" we had to think when we designed . Good things 1. playability and functions look on point for what it is supposed to do. 2. Lifting capacity is actually good for the counter weight and design. m*d=F. the further away a load is the more force. All cranes have lower capacity at a distance. What the crane needs is an extra boon section of the rear boom and a second counter weight. 3. Mod ability. This has almost all of the part you will need to build a really good crane. The back section needs a total redesign and those ball rollers need to go. Add an extra section on the rear boom and a second floating counter weight. The cab also needs redesign. I have built many heavy lift cranes and the largest had a lift capacity of 4kg, this set is a good set to Mod and build your own. My problem is do I redesign my heavy lift with some of the new parts or just buy this one....The 42042 is still the the best crawler crane Lego has put out and the 42009 mobile is the best crane to date (happy I have both). So I will more than likely buy this set and Mod the heck out of it because I have all of the others. Thanks again for the reviews -
42146 - Liebherr LR13000
HRU_Bricks replied to Ngoc Nguyen's topic in LEGO Technic, Mindstorms, Model Team and Scale Modeling
(6389) LEGO 42146: Liebherr Crawler Crane LR 13000 - HANDS-ON REVIEW - YouTube Seriel review -
42146 - Liebherr LR13000
HRU_Bricks replied to Ngoc Nguyen's topic in LEGO Technic, Mindstorms, Model Team and Scale Modeling
I was about to post that -
42146 - Liebherr LR13000
HRU_Bricks replied to Ngoc Nguyen's topic in LEGO Technic, Mindstorms, Model Team and Scale Modeling
That is a good model of the part. I would be keen to print some, would you be able to share it? Thanks H -
[GBC] The Akiyuki Project (2010 - 2020)
HRU_Bricks replied to Blakbird's topic in LEGO Technic, Mindstorms, Model Team and Scale Modeling
Thanks!!!! -
[GBC] The Akiyuki Project (2010 - 2020)
HRU_Bricks replied to Blakbird's topic in LEGO Technic, Mindstorms, Model Team and Scale Modeling
Thanks for the reply. I am moreboth would be great as I though that that was the first model and then Akiyuki's module was the second. -
[GBC] The Akiyuki Project (2010 - 2020)
HRU_Bricks replied to Blakbird's topic in LEGO Technic, Mindstorms, Model Team and Scale Modeling
Really great modules! I am interested in more details about the feeder module, are you able to upload some more photos to Bricksafe? I am keen to look at it closer and maybe build it. Thanks -
[GBC] The Akiyuki Project (2010 - 2020)
HRU_Bricks replied to Blakbird's topic in LEGO Technic, Mindstorms, Model Team and Scale Modeling
@Fyredog @9v system did some instructions and parts list and posted it on Re-Brickable https://rebrickable.com/mocs/MOC-80659/9vsystem/gbc-akiyuki-ball-cleaner/#details -
[GBC] The Akiyuki Project (2010 - 2020)
HRU_Bricks replied to Blakbird's topic in LEGO Technic, Mindstorms, Model Team and Scale Modeling
Does anyone have any more information or know who the builder of these modules are (I would be keen to build them): -
[GBC] Akiyuki Train System: Type 2 mods and improvements
HRU_Bricks replied to doug72's topic in LEGO Technic, Mindstorms, Model Team and Scale Modeling
@OverlandSailor I now use official Lego robber bands only. I find they do not really degrade over time as they are actually silicon not rubber. I use the white ones for my train switching unit