
woody64
-
Content Count
871 -
Joined
-
Last visited
Everything posted by woody64
-
They are available to the public via 3d printing. http://www.sculpteo.com/en/print/10-x-ww1-collection-1/giGpt9TQ?uuid=0F8rAYeOMmbQk7iX0PVGkb
-
Oncemore the Ulan shako in new grey pWSF and with a decal from LegoVasa
-
Povray render with custom items and decals
woody64 posted a topic in Digital LEGO: Tools, Techniques, and Projects
-
Recently I was contacted by cash.lego on flickr presenting this Lego film: Woody64
-
Now Waterloo ...
-
Help! Looking for Pad Printer
woody64 replied to SandMirror38's topic in Minifig Customisation Workshop
http://www.steindrucker.com/ but depends what you define as cheap ... -
The attempt to include the torsos in the library was stopped since there could be a much better result achieved later on in the rendering process without infringing the LDD Eula. Since this discussion was also done in the digital designer section of Eurobricks and stopped I've deleted the initial picture. Here's oncemore the starting picture to create later on an enhanced render in povray with additional custom items)
-
And here some renders of 20th century related Minifgs
-
Unfortunately my computer is under service so the project evolves slowly ... Some British Grenadiers: And some pictures made for my custom shakos/helmets shop (by the way also a nice reference in some decals of the torso lib done by Mosana or me):
-
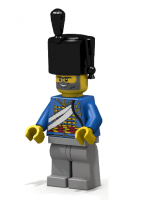
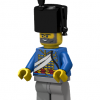
No, in principle I'm using these picture as front picture for my shop items. Beside that it should give the user an idea/reference which torsos and decals he should use ... At the end there may be a lot of reference pictures available for Army builders covering some major units of the Napoleonic area (French, Austrian, Russian, Prussian, British) Although I know how to build these scenes now it's very time consuming to set-up a scene (half up to one hour of work and afterwards 3-4h of rendering) Here are some characters/types of uniforms also used in Master and Commander. Most of the decals used in these scenes are derived from the pirate torso lib and are based on Mosana's principle design with many variations or adaptations from my side.
-
British Artillery Austrian Infantry Officer British Scottish Infantry British Infantry Officer (Men at Arms) French Cuirassier French Infantry Russian Infantry Prussian Infantry
-
The current process only creates an initial scene via LDD without changing any LDD configuration. All the customs were added later on during rendering in povray, so it should now be complete without infringement of any end user agreement of LDD. Here's the final scene.
-
Currently that are only decals with original parts. Here you find a render with a custom parts. The custom items were merged in povray directly via stl2pov and some experiments I have done during the last hours. But at least ít's possible to add my own items. Let's see if that works out for the whole group.
-
Povray render done via ldd2povray tooling ... (the custom decals were now added later on in the rendering process) - Hungarian Grenadier - Hungarian Infantry - German Grenadier - German Infantry - Officer - Husar - Cuirassier - Ulan - Landwehr - Artilery
-
I followed this: http://www.rockraidersunited.org/topic/3764-lego-digital-designer-lif-extractor/
-
Yes the film was done by cash.lego
-
Maybe these decals can help: http://www.brickshelf.com/cgi-bin/gallery.cgi?f=417822
-
WWI has his 100 year anniversary this year. For that two book tips, which impressed me a lot .... Barbara Tuchmann: August 1914 Remarque: All quiet on the western front By the way: Since I'm currently out of time I'm searching for an experienced minifig builder/photographer who can build and photograph scenes with my items (parts will be delivered for free). Give me a PM if you are interested ...
-
None of these is real ABS. The closest one would be white detailed, transparent detailed or frosted detailed. Below you see white detailed and frosted detailed
-
Interesting idea. Means having two stamps i.e. one for the black and one for the brown details, you can make a multi color torso. Would be interesting to follow on ... Woody64
-
Recently I git this pictures from Vegaban using some of my items. He makes some highly customized Minifigs often in a small diorama .... You will finde more on his side: http://vegaban.blogspot.com.es/ Woody64
-
Here's a link to the complete blog with some additional pictures http://vegaban.blogspot.com.es/2013/08/lego-custom-minifigsoficial-ruso.html
-
MinfigCustomsIn3d - New Pictures / Non Napoleonic
woody64 posted a topic in Minifig Customisation Workshop
Recently I've updated my picture set. Here are the non Napoleonic ones (they others can be found in the Pirate Forum) Enjoy Woody64 Modern Soldiers - modern soldier with Mich helmet - Russian sniper with ushanka and K98k - Austrian WWI soldier - Field cap - M1 Pot on an US soldier - German paratrooper helmet - Russian Pilotka - German WWI Ulan - GErman Field Cap - English Brodie - M1 Pot - Russian Winter Cap - German Ulan Parade - German WWII helmet - MKIII Turtle - beret - Adrian helmet Fantasy - Lobster - Medieval - Straw - Shield and Mace, Helmet from BrickTW SciFi - Cap - Pauldron - SciFi Helmet G Others - Bowler - Bobby - Scooncap, Baker Rifle -
MinfigCustomsIn3d - New Pictures / Non Napoleonic
woody64 replied to woody64's topic in Minifig Customisation Workshop
New WW1 figures with LegoVasa's decals and helmets already printed in color: -
MinifigCustomsIn3d - Material & Post processing Tips
woody64 posted a topic in Minifig Customisation Workshop
During the last months I've seen some more people working with 3d printing. Additionally I got a couple of questions about materials and colours. Therefore I've collected my first series of printing and post processing tips. Building Tip 1: White & Flexible - Glossy Surface This picture shows a White and Flexible French Hat, sprayed black. Afterwards I've applied a coat of gloss varnish.The bigger part of the picture shows the achievable result of the surface, whereas the smaller part gives an impression how that would look like in real Minifig size. French Shako White & Flexible: http://www.shapeways...o_1809__s_.html Tamiya spray black Eberhard Faber gloss varnish White & Flexible is the standard material I order my items the first time. It's very flexible and durable. Although it looks a little bit fuzzy. Especially if you take a larger photo from nearby. Therefore I've searched for a solution to give the items the correct colour and more gloss. The best results achieved so far were reached with Tamiya colour sprays and a coat of gloss varnish. On the bigger pictures you still see the porosity of the material. But if you take a look on the screen in a size comparable to the size of a Minifig the result is rather good. Building Tip 2: Black & Flexible - glossy surface In this photo you see on the left side a Bavarian Helmet ordered in Black & Flexible. I've only added a coat of varnish gloss. Bavarian Helmet in Black & Flexible: http://www.shapeways...ian_helmet.html Eberhard Farber glossy varnish: http://www.tamico.de...oss/TA85006.jpg Whereas White and Flexible is the standard material there' s also the option of coloring this material. Black seems to be a very demanded color therefor Shapeways didn't change it so far. If you take a look on the results you get the impression of a smoother surface compared to the original white. That's true for all colors and seems to be a result of the penetrating colour process. As I have seen so far they use the same process (RIT colours) as also described in Brickjournal02 from fineclonier. The colour itself is matt and not as intensive as the spray used in tip 1. You can compare that with the 2nd Minifig on the right side of the picture. At the end I've also added some gloss varnish. For all people who won't do coloring themselves it's a great option for all black parts. Since coloring also results in an additional fee per piece I've started to provide packs cosisting of 10 pieces for a lot of my items. That reduces the price a lot. I wish that shapeways would offer more colours ... References: Brickjournal 2/2/2008/p.61ff: http://www.finecloni...ements_-_Paints,_Dyes,_&_More.pdf Building Tip 3: Brodie in Transparent detailed - glossy Surface In this picture you see a Bonnie helmet in transparent Detailed, sprayed in gray and coated with glossy varnish. Brodie helmet in transarent detailed: http://www.shapeways.../brodie_wd.html Tamiya spray grey Eberhard Faber glossy varnish Since many user demanded a material with smoother surface I started tu try the detailed material. For that I had to change several designs since the detailed material has a minimal wall size of 1mm. The transparent material already results in a much smoother surface. This can be seen on my flickr page. In the next step I sprayed it grey and added a varnish gloss. References: Flickr: Brodies in transparent: http://farm5.static...._246ae60373.jpg Flickr: Brodies sprayed grey: http://farm5.static...._47bd0252eb.jpg ---------------------- I will publish some further hints on my facebook account and add some more pictures about the steps here. Woody64