Search the Community
Showing results for tags 'Railway'.
Found 13 results
-
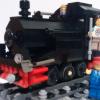
<http://imgur.com/zrHfANm> <http://imgur.com/fKuqmvK> <http://imgur.com/1ACtwEu> <http://imgur.com/pxYSecM> Just a little bit of history: The Great Western Railway's 517 class (first introduced 1868) had seen over 60 years of service and, in 1932, they were in need of replacing. The 4800 class was based on the 517 class, in fact, you could see how they looked like 517 class. The 2800 class locomotives were modified for oil firing and they were renamed the 4800s and the 4800s were renamed 1400 and there were 74 locomotives of the 1400s class (#1400-#1474). The 1400s were withdrawn from 1963 though 1965 and only four are preserved today; 1420, 1442, 1450, 1466. The 1400s are my favorite class. They were small and reliable. As for my build of it, its not the best but I like it. Though it originally had a powered chassis, The Drive Wheels are now connected using 3 36-teethed gears.
-
 0-6-0 steam heavy-duty switcher This model is an Americanized version of Scotnick's Thomas & friends model "Stanley" (link to that engine on Flickr: https://www.flickr.c...N07/8732762280/ ) with some new running gear provided by Hunter Dobbs from his model of the Thomas & Friends engine "Lady". (link to that engine on Flickr: https://www.flickr.c...02/16562999581/ ) The engine features a new headlight on top of the smokebox and is a little longer than the last version by about four studs. The pistons (hopefully) will work in real life, as I messed with and extended Hunter Dobbs design to include a third axle. The engine is going to be numbered 4990, with the number going on the saddle tank and the letters BRS going on the rear of the locomotive, right between the two red stripes on the coal bunker. NOTE: This model requires custom Big Ben Bricks small steam engine drivers, as in 4 flanged and 2 blind. The gears seen here are placeholders and will NOT work on track! (Link to Big Ben Bricks: http://www.bigbenbricks.com/ ) The rear of the locomotive. Background: Built in 1922 by H.K. Porter, this steam locomotive is of a saddle tank design, (that means it carries the water over-the-top of the boiler in tanks, kinda like a saddle on a horse) as part of an order for 25 engines by Brick Railway Systems, numbered 4975 to 5000. The class was built for yard work, though some were sent out onto the main lines to haul commuter trains when the need arose. This engine class features red stripes on the sides and over the tanks on top of the boiler. I will be purchasing this engine after the parts for locomotive shed I posted on February 15th. LDD file: http://www.mocpages.com/user_images/80135/1428605637m.lxf 0-4-0 steam dockyard switcher This was originally set 3740, Small Locomotive from the My Own Train series. I revamped the 2001 set, adding Big Ben Brick medium wheels and working pistons courtesy of Hunter Dobbs. NOTE: All four of the wheels are removed from them LDD model. The proper parts are available at the Big Ben Bricks website, and are not in LDD. (You need four of the "Medium Flanged Drivers")The number of the engine (3007) goes on the side of the boiler, while the letters "BRS" go on the side of the cab. Fictional background: Built in 1923 by Baldwin Locomotive Works for Brick Railway Systems (BRS), engine 3007 was part of a 250 strong class of switchers made for the tight industrial & dockyard trackage of Brick Railway Systems. The class spread from number 3000 to 3250. They were painted in classic BRS black with a red stripe along the base. LDD file: http://www.mocpages.com/user_images/80135/1428604656m.lxf Thought, Comments, and questions are all welcome! (EDIT 9-15-2015: Fixed the LDD file and pictures, plus I added a another switcher to the first post.)
 -
So I've been steadily increasing my collection of steam era 7 wide wagons over the last few months. Most of them came out remarkably well and remarkably quickly and needed little or no modifications to the original design, others (well the brakevan) needed a little work but didn't take too long all the same. Then there's the van conundrum. I just can't get these right, and it continues to bug me that the most simple shape a railway wagon can be is causing me the most issues. The original design took a lot of time to perfect, and in LDD looked pretty good, but it turned out to be less than solid in the bricks, and whilst it basically looks really good, it's also a bit too short compared to the other rolling stock I have and am designing. After a fair bit of faffing, I was still not altogether happy, so I decided to pad around the net for other people's ideas, and I stumbled across H.A.Brick's PF battery van kit. It arrived, and I enjoyed building it (there's an extra instruction book and some extra pieces to build it without the sensor hole), but it only served to highlight the problems with my existing design (too short, not sturdy enough). Never the less, it gave me some ideas, such as using some black Lego to represent the frames the van is sat on to bulk up it's height, so after slightly modifying the (upper part of the) build to closer fit my needs, I set upon one of my existing vans to have a look at the idea with my standard truck chassis design. The height was good, but the bufferbeam was terrible, in order to line up with the rest of my rolling stock, it needed to be lower than the 'frames' which just doesn't look right at all. The current line up, L-R: modified H.A.Bricks van, modified version of my cattlevan MOC (with some random colours and random gaps), my original standard van MOC. The modified H.A.Bricks design. Internally strengthened and black plate/rail removed from between the body and the roof to bring down to my preferred height. (See also the rather ugly bufferbeam of the truck next to it.) Modified version of my cattle van. Although now the correct hight, I really don't like the fact the bufferbeam isn't inline with the 'frames'. Original design. See the less than perfect panel alignment due to less than perfect internal structure plus old and chewed bricks. ----------------------------------------------------------------------------------------------------------------------------------------------------- Still not exactly happy with any of the designs, I went back to LDD. First I married the H.A.Bricks design with my own frames, and it wasn't bad but I was still not sure it was right for my preferred style and level of detail. Another thought I had was to add an extra plank to my existing design (and drastically redesign it internally). I've come up with several variations, none of which feels like a complete winner to me. H.A.Bricks inspired vans, both short and long bodied (whichever style I settle on, I will eventually produce long and short bodied versions). Several variations on the 7 high version of my van and cattle van. At the moment, my preferred normal van is the one with the 1x8 tiles running down the side and preferred cattle van will probably be a long bodied version of the one with the 1x8 tiles hanging down the side (although I can't decide on plain doors (middle version) or slatted doors (other two). ----------------------------------------------------------------------------------------------------------------------------------------------------- Any ideas or suggestions are very welcome, also if anybody wants the LDD files to play with (complete with engine and brakevan), feel free to PM me.
-
Hey guys, I have found a cool way to use the minifigure style head piece to go inside boilers. I just used that and an upside down 1x1 to give it some depth. Lego train Boiler by Railco1, on Flickr Lego train Boiler by Railco1, on Flickr I think it adds a small touch to the boiler and I hope you like it! -Rail Co [How you can use it for cars!]: http://www.eurobrick...howtopic=105602
-
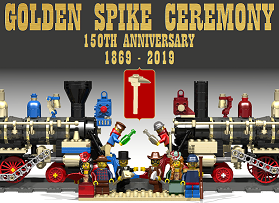
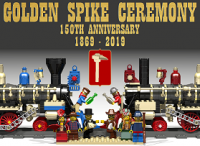
I'd like your input on this set I made recently: https://ideas.lego.com/projects/95531 It's based on a very famous event in US history in 1869, when the rail networks of the East and West coasts were symbolically connected for the first time with the driving of a final golden railroad spike with a silver hammer. To the best of my knowledge, this would be the first non-fictional Wild West Lego train set. The 150th anniversary of this event is only a few years away, so I figure now is as good a time as ever for Lego to release something like this.
-
Hello All, I've been working on a town layout in my lair for a long time, and today i achieved a milestone in the construcion of the railway station. it is 3x Baseplates wide here is the design i was working on in LDD and as of tonight, after 5 Bricklink orders i have achieved building the main structure: plans are to develop a bus stop, some small stores such as newspaper stand etc, and add higher level detail... will pave the entire area, and I am looking into learning the artform of making my own decals/stickers. will keep you posted.
-
So, one of my cats (Schrödinger) finally got over the noise of the railway and decided to inspect further. After merely observing for a while, then following behind, he decided it was time to try to actively effect this new and strange beast. I'm sure you can all imagine what happened next, and sure enough, one round trip after the photograph... Let's just say that red van didn't take well to it's swift trip to the floor, nor did the cat who got somewhat deluged in a shower of Lego fright wagons!
-
Here is my Victorian-inspired train station and signal tower. If I made a topic about the station before, I am sorry. I'm reposting it as I couldn't find it. First up is the station: Background info: This station was built between the East & West Barrett's Tunnels in 1893 by the Missouri Pacific Railroad. It was used until 1944, when the war-time traffic became too much, and the two single track tunnels were bypassed by a double track cut-through built right next door. The Station and the West tunnel were preserved, while the East tunnel was covered up and buried under a road, which was eventually named Barrett's Station Road. The site of the station was turned into a museum known as the Museum of Transportation. Builder's notes: This station was originally the Toy Shop from the Winter Village series of LEGO sets. In real life, the story I just told you is 100% true. However, the Barret's station was not made in 1893, and looks nothing like the one seen here. The inspiration for the station came from the real-life Kirkwood Railroad Station which was built in 1893, is still used by Amtrak and is located a short distance up the track from the Museum of Transportation. Their are supposed to be printed 1x1 tiles spelling out BARRETTS on the sign on the front on the station. The other version I uploaded yesterday of this station will not work with my budget, so I went back to the drawing board and looked at my original station made from set 10199. I then combined the best of both stations into this model. This station is the fourth station I have made from 10199, and uses mostly parts from the second version from 2013. Here we see the station separated into it's modular components: - left platform - right platform - station building with access ramp (lower level) - station building and roof (upper floor) - station building tower roof The inside of the station features the following on the first floor: inside seating, stone fireplace, and a old-fashioned cash register for ticket sales. (This piece: http://www.bricklink....asp?P=3039pb26 ) The second floor (tower) is a employees-only area and houses some machinery. Here is the brand new street side of the station. This side includes an overhang that protects passengers from the rain.\ Next is the tower: Fictional History: This tower was built in 1893 at the same time as Barrett's Station, to control the single track mainline. The tower was updated in 1928 with modern controls and bypassed in 1944 by a double-track cutoff to avoid the bottleneck of the two single-track Barrett's Tunnels. The tower was preserved by the Museum of Transportation and has been recently turned into a public lookout point for the busy Brick Railway Systems mainline. Builder's Notes: This is a Signal tower that matches the color scheme and design features of my Barrett's Station model. This Victorian-era tower features a signal bridge, a spiral staircase to connect the two floors and a signal / switch computer from more modern times. The story on Barrett's Station is inspired by real life, but the real station was a one story affair and had no tower accompanying it. The Museum of Transportation does exist, however, and there is an elevated platform (at the way back of the property) to watch Union Pacific trains go by every fifteen minutes or so. The first floor features the spiral staircase. The signal arm disconnects from the first floor, and is attached to the second floor. The signal arm is a modified version of the one at the L Gauge website. (Link: http://lgauge.com/ ) The second floor features the control panel for the lights, and a desk for dispatching orders to the train crews, or in this case, holding a newspaper. The (updated) LDD file for the station is here: http://www.mocpages....1428338100m.lxf The LDD file for the tower is here: http://www.mocpages....1419790555m.lxf This model was inspired by set 10199, Winter Village toy Shop. The model is up for a remodel into a double sided version with a bigger interior, so I though I'd take some pictures while it's still together in this form. The platform splits off into three parts: left side (which is about three tracks in length) right side, (which is about one track long) and the building itself. (which is two tracks in length) The building is open backed, and features a desk on the top floor and ticket counter with cash register on the first floor. Comments welcome!
-
This model was inspired by Scotnick1 and his Maithwaite Station model from "The Railway Series", also known as "Thomas and Friends". Here is a album of his with the original station in it: https://www.flickr.c...157639900227095 The station features a five track long platform, which can be retracted to a minimum of three tracks by removing the two side segments. More sections can be added to increase the length to whatever you need, with removable end-caps at either left / right side. All of these platforms are held together by Technic pins. Inside the station proper is a help / ticket desk with cash register, and off to the left side is a employees-only area with stairs to the second floor office. This office features a desk with chair and fireplace. The second floor roof, the second floor proper and first floor roof are removable. Also, the two clocks on the second floor roof are supposed to have this print: http://www.bricklink...asp?P=3960pb024 (This print is not currently available in LDD.) The street side features a short staircase to the front entryway. The studs above these doors and the same on the opposite side are supposed to spell out the station name. I haven't decided on a name for this one yet, but am leaning towards the name "Imperial". Here we see the individual components of the station. This includes: - first floor / main platform (1) - second floor (1) - roof of first floor (1) - roof of second floor / clock tower (1) - end-caps for platform (1 left and 1 right version) - identical platform extenders (2) Here is the LDD file: http://www.mocpages.com/user_images/80135/1430322575m.lxf This station will replace Barretts station on my layout (some parts of Barretts will be reused on this model), as this station is larger that the other, and has a street side, whereas Barretts does not. Comments are always welcome!
-
Here are a bunch of my models in one post than in six different topics. First, here is my Western Railroad Tunnel - Version 2 I have revamped my Modular Western tunnel by combining it with my father's older stand-alone tunnel design. This design makes the interior walls more realistic, while still preserving the rough rock-work outside. The modular bit comes in when you disconnect the tunnel into it's three components, 2 identical end-caps and 1 middle section. This is for ease of transport and making the tunnel shorter or longer depending on your needs. As an added bonus, the flat roof lets you put a small Native American village or a small US Cavalry outpost. If you are not into Wild West models, the tunnel easily recolors with the Dark Tan to dark bluish gray and the regular tan to light bluish gray via the LDD file below. (It's not that hard to recolor it in the program, so only the tan version of the tunnel is included.) Two of these are missing from this model: http://www.bricklink...asp?P=14309pb01 The inside looks like this. It connects the the other sections via the four Technic pins. tunnel LDD file: http://www.mocpages....1412007044m.lxf Next up is two refueling towers: My father built the Water Tower way back in the 1990's, back when 9V was king. Fast forward 15+ years, and I realize that it needed a companion coaling tower. I made my first attempt at a much larger size than this using pictures from LGauge.com, a website of older Lego train models. Please note, some parts are of the tower have been modified in the digital realm, (such as the water spout) so it's not "entirely" accurate. The corner walls also are printed with the part seen here: http://www.bricklink....asp?P=2345pb06 Here is the rear view. LDD file: http://www.mocpages....1411953429m.lxf The next two models are locomotive sheds: First the Classic Brick Railway Systems shed, This model was built by my father around 2005 / 2006 for an old-style MOC steam engine we built together based off set 7722. Anyway, the years roll by, and my engines get bigger and bigger. I realized in late 2013 that I needed to enlarge the shed to fit more than just that one engine type. I haven't done it real life yet, but here is what it will look like. I have added one track's length of shed and one more smoke vent on the roof. Here are the statistics for the shed when it's finished: Building type: single track locomotive shed Track length: 3 ½ tracks (60 studs) Maximum side clearance: 10 studs total Maximum height clearance: 12 bricks total The rear view of the shed. The trans light blue windows were some of the first things my father bought off BrickLink, and as such they are staying on there... even though trans-black might looks better. LDD file: http://www.mocpages....1411655710m.lxf The final model is this Modern Locomotive Shed This model (in red instead of black and white instead of tan) was originally designed back in the late 1990's by my Father for his 9V locomotives. After completion, It sat in the Basement alongside his other custom models including his tunnel, grain elevator, bridge, and water tower. Fast Forward a decade to 2006. I had played with his models all my childhood, using them for my own trains until he built me my own smaller single track version in black & red around 2006. I longed to figure out how to build my own, and in in 2005, I discovered Bricklink & LEGO Digital Designer. I didn't really use them together until 2010, when the first version of my dad's shed was built. It wasn't very good, but it led to this model back in 2012. (Link to that mess: http://www.mocpages.com/moc.php/335344 ) From there I made the roof removable, and then I added newer windows, and a less expensive color scheme. By mid 2013, it was compete, at least in digital format. I remains to be seen if I will build it in real life. By the way,the roof is removable. A base-plate will need to be cut If I build this, as it's four studs longer than two XL base-plates. LDD file: http://www.mocpages....1411407373m.lxf Western Caboose This caboose was originally from set 79111, Constitution Train Chase, a part of The Lone Ranger theme. At first it was a prison car, but I turned it into a caboose. I added a regular door and roof top cupola for the conductor while retaining the side doors and exploding back wall. I don't know if there is any real world prototype with a design like this caboose. (minus the exploding wall of course!) Here we see the rear of the caboose, with two red lanterns and the exploding back wall with dynamite attached. This is the first MOC in a long time that I built in real life before building it in LDD. The only changes from real to digital are that I have a 1x4 Technic brick on the back wall with three printed 1x1 letters spelling out BRS. LDD file: http://www.mocpages....1412105087m.lxf The LDD file groups the 79111 stock parts together, with remaining bricks being extra ones not found in the set. Official-Style Freight cars (Part 1) The first car is an automobile carrier like the one in set 2126. ( http://www.bricklink...em.asp?S=2126-1 )It carries two modern re-imagined versions of the Classic cars from that set. The second and third cars are Boxcars, slightly modified from set 3677. ( http://www.bricklink...em.asp?S=3677-1 ) Next up is the fourth car is a water tanker, while the fifth is a tree carrier, and the sixth car is a rock gondola. They are all inspired by set 2126. (The link to that set is above) The seventh car is a modified version of set 3225's general freight car. ( http://www.bricklink...em.asp?S=3225-1 ) Finally, the eighth car is a caboose inspired by set 10014. ( http://www.bricklink...m.asp?S=10014-1 ) All of these cars are modifed to bring them almost 100% in line with modern parts and colors, the only exception being the yellow tipper parts on the gondola. (Those parts were last used in 2000.) LDD file: http://www.mocpages....1411686540m.lxf Notes: Personally, I have the original cars from set 2126, and made the two boxcars from my parts bins. The brown cargo car and caboose are not needed, as I already have a general flatcar and the Western Caboose from post #6 above. Official-Style Freight cars (Part 2) These train cars are inspired by official sets & techniques used by LEGO. The first car is a depressed center flatcar, and it carries a re-imagined and updated set 5920 Island Racer from the Adventurers "Dino Island" Theme. ( http://www.bricklink...em.asp?S=5920-1 ) The second car is a gondola carrying three huge boulders. It was inspired by set 4434, Tipper Truck. ( http://www.bricklink...em.asp?S=4434-1 ) The third car is a gasoline / oil tanker in OCTAN colors. The tanker was inspired by set 7939, Cargo Train. ( http://www.bricklink...em.asp?S=7939-1 ) This model also needs two printed 1x4 tile pieces like this: http://www.bricklink...m.asp?P=2431px9 LDD file: http://www.mocpages....1413560515m.lxf By the way, here is the front of the green automobile: Lego City Passenger Station This station was designed first by LEGO as set 2150, Train Station. It was recreated by someone on Eurobricks, but had an added "street side", that was almost identical as the track side. I downloaded and added: a expanded platform, made a clock with sign for both sides, and made the sections removable. (Yes, the roof for both levels come off.) I modernized the look of the station by adding a pizza oven with opening door like in set 7641, (City Corner) and adding a safe on the second floor for the station master. Street side of the station. The studs on the wall beside of the clock on both sides of the station are supposed to spell LEGO CITY in printed 1x1 tiles. The first floor features the ticket counter, pizzeria with bar seating and the oven taken from City Corner, while the second floor features the Station master's office, with three chairs, a desk, open-able safe, rotary telephone and several cabinets with drawers. This floor and the roof above it are held on by just a few studs, making them 100% removable, while the platform is a attached via Technic pins. LDD file: http://www.mocpages....1412010310m.lxf Grain Elevator Built originally by my father in 1999, this elevator was never completed. As my Dad did not discover Bricklink until 2006, it lacked several crucial parts, and remains uncompleted to this day... just another thing on the to-do list! I have faithfully recreated the elevator and added some parts that did not exist in '99, such as the red windscreens used a funnel, and a conveyor belt with handle. I also did some major goofs, such as making the building one stud too thin, (it should be 16 studs wide at the base), but I hope I compensated enough by making the funnel tall enough to let the tallest official train car I could think of go through without problems. This view shows the conveyor and handle. LDD file for the grain elevator: http://www.mocpages....1398708090m.lxf Modern Truss Bridge Designed using 24 of these parts, ( http://www.bricklink...tem.asp?P=15706 ) this bridge fits even my tallest trains. It can fit up to 10-stud-wide locomotives, leaving 1 stud on each side for clearance. It also can fit 12 2/3 bricks tall train cars, but only barely: the clearance is less that a third of a brick in difference. The tallest train car I own is this one: a caboose based on the prison car from the Lone Ranger "Constitution Train Chase". (set 79111). This car fits the bridge by a hair less than a third of a brick. LDD file (bridge only): http://www.mocpages....1414539136m.lxf Signal Tower 22 Inspired by Whoward69's signal tower, (link: https://www.flickr.c...s-55973205@N08/ ) this enlarged version features two removable sections (the roof and second floor) and a staircase to the second floor. There are studs on the front of the building to spell out TOWER 22 (Or whatever two digit number you want to.) using printed 1x1 tiles. The tower also has two computers on the second floor for train signal / switch direction control, while the first floor is empty. (except for the staircase) LDD file: http://www.mocpages....1417547843m.lxf Wide Vision Caboose This model was originally Model number 30 from the 2007 set "Hobby Train". I redid the whole model from the ground up, replacing old windows and updating the style. The caboose features removable cupola and cupola roof, along with the two regular roof sections. The Inside features a bed, stove, table and two chairs, while the cupola features two more chairs. I'm going to use this piece ( http://www.bricklink...sp?P=87079pb006 ) for the sides of the caboose, and one of these ( http://www.bricklink....asp?P=3039px20 ) for the bed for the conductor. Here is the LDD file:http://www.mocpages....1418063886m.lxf All comments are welcome, and more MOCs / MODs are coming!
-
So, I'm going to have to dismantle my 3rd attempt at a semi-permanent Lego railway due to it being situated under a building site. Also, I have bought some more appropriate tables which will allow it to bw properly level, and allow me some extra space to extend it and add another loop (on the station side), so now seemed like a good time to photograph it for prosperity. Overview The Rolling Stock I also have a couple of modded HE sets (ie one full TGV), but due to space and it being the most awkward to operate, it's currently sat on my dad's far from complete 00 layout. Sections -The yard and MPD. The Lone Ranger's escape! Substitute Knights and Pirates for Settlers of Catan. Dalek attack on the Bako Signal Box Successful Police sting (or is this too many officers and too much equipment to capture one man who is on foot?). -The bridge and container yard. -Town Center and Station ATM robbery. Station Kiosk. Near miss! The final battle of a crap film... -Angel Park and Firestation. More detailed image of Angel Park. Maintenance on the footbridge. The firestation. Fin
-
Fictional background: This 4-4-0 (also known as an American type) was built by Rodgers Locomotive & Machine Works for Brick Railway Systems (BRS) in 1870, and features a bright red-yellow-&-black paint scheme. Number 11 pulled passenger trains for 15 years before being reassigned to Freight duties in 1885. By 1890, the engine was worn out, and sent to a scrapper, who sold the engine to a museum for $100. Eventually, the museum was reorganized as the Imperial Rail Museum, where the engine rests today in non-operable condition. There were plans to get number 11 in working order for the US Bicentennial in 1976, but nothing ever came it, and the engine has remained cold and silent to this day. (This engine is the oldest surviving BRS loco in existence.) The model and color scheme was inspired by the steam engine from LEGO Toy Story set #7597 "Western Train Chase" (Link to Bricklink: http://www.bricklink...em.asp?S=7597-1 ) Here is the original model from the stock set. I've tried three times to get this engine right (working pistons and can go around curves + switches) and, twice I've failed. Let's hope the third time's the charm! The rear of the locomotive. Here is a better view of the side rods and wheels. The letters BRS go on the sides of the tender while the number 11 should go on the cab sides. One of these goes on the firebox door in the cab (Bricklink link: http://www.bricklink...asp?P=4150pb086 ) Other than that those parts, everything is where it should be. Here are the car's it's going to pull: (As a side note, the chains on the car ends have a glitch and refused to bend. They are supposed to sit on the 1x1 clip plates, and not the handrail / bar itself.) I was inspired by HunterDobbs and his red train cars to build my own versions. I think he got the idea from set 10173, Holiday Train. (link: http://www.bricklink...m.asp?S=10173-1 ) but his red versions look so much better than the plain white originals. I intened on using these with my 4-4-0 steam engine... once I build I get around to building it! (Here is a link to HunterDobbs' Flickr photostream: https://www.flickr.c.../117260213@N02/ ) Here is the train with 4-4-0. I think it looks like a contrast to my dark green 2-6-0 and matching train. Here is the other train for comparison. The LDD file (for the 4-4-0 engine only) is here, if anyone wants it: http://www.mocpages....1428585286m.lxf The LDD file (for the 4-4-0 & it's train) is here, if anyone wants it: http://www.mocpages....1428593703m.lxf Comments, Questions, and complaints are always welcome!
-
Inspired by Locomotive Annie's recent 'Steam Electric Locomotive' topic and Electrosteam's 'Bag of Ideas' topic, I threw together this little MOD. Car #168 is the end result of a secret program started by the CIA in 1964. The previous 167 cars all met a grisly demise on the test track, incurring the loss of numerous personnel. The work was so hazardous that hardened criminals who were offered reduced sentences were about the only people willing to work on it. Haircut (pictured here with his guard) was one of the few to survive. The engine was designed to air-lift itself behind enemy lines where it could wreck havoc in it's own unique way. Most of the interior of the car contained various weapons including large calibre machine guns and missle launchers under the retractable roof. There was also room to store the rotors when not in use as, obviously, they would cause a bit of a problem with bridge and tunnel clearances. This prototype - the first to successfully complete trials - was launched from an aircraft carrier when it suddenly developed engine problems and presently it rests at the bottom of the Gulf of Tonkin. The crew was able to paracute to safety however the general in charge of the program was secretly shot for embezzling funds and for being so daft as to think this was a viable project in the first place! Due to lack of funds the program was discontinued soon afterwards. Oh, what's this? The Atlantis team has stumbled upon the wreck! What are they doing in S.E. Asia? Aren't they supposed to be in the Atlantic or Mediterranean somewhere and what are the Fish-men doing at the wreck? There are rumors of rolling stock that were being developed as well but no photographs have ever surfaced. There are several researchers digging through the files, who knows what they might find...? Ok, hope you got a laugh out of it. I don't have much in the way of space, time or bricks...did the best I could. The 'Atlantis' shot probably would've been more successful from a higher angle, live and learn. Joe