trekman
-
Posts
276 -
Joined
-
Last visited
Content Type
Profiles
Forums
Gallery
Everything posted by trekman
-

Telehandler
trekman replied to Zerobricks's topic in LEGO Technic, Mindstorms, Model Team and Scale Modeling
Good functions, but I am not sure that the linkage to the bucket would ever become an industry standard. -
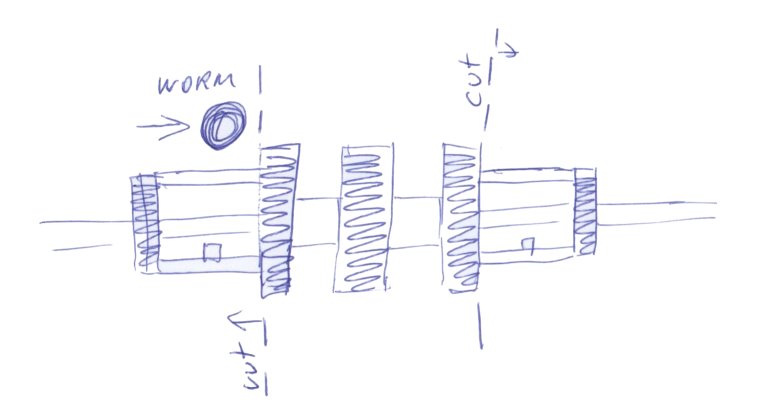
I'm working on a project where I hope to have a worm gear sliding on a track and then connecting with 3 24T gears. (This will provide me with an NXT motor shuttling between three functions.) The middle gear will be an actual 24T gear, But the other two, spaced 1L on other side are presently 24T-16T 4L diff casings. This is because I need the 24T diff as a clutch style gear, which would rotate freely on the axle of the middle 24T gear. Should I do the unthinkable and cut the diffs down? It would mean that I could reduce the size of my gear box down by 6studs. It would appear to be an easy cut down, and give me some useful 24T clutch gears?
-
Our young chap was given this set from my aunt. The tubing had never been cut, and so the Air Claw Tech Rig had never been built. I would say cutting the piping to the right length is very important. Getting the tubing fed through the turntable, and in the right positions was a headache - even for an adult. if you cut the tubing right, then you will have a nice supply of spare stuff, unlike the pre cut cost cutting measures of today. Also the B model had an interesting operating sequence, where it grabbed, lifted, opened and then lowered the arms to the front again. This was some sort of pneumatic loop. It was an interesting model and worthy of being built.
-
The 9396 Helicopter also has the new mini turntable, which was one of the influencing parts which prompted my purchase. I also purchase, partly for the model, but with the parts mainly in mind.
-
4.5v battery box help
trekman replied to Antonio's topic in LEGO Technic, Mindstorms, Model Team and Scale Modeling
I have one of them. They are very limited in their use. The two pin connector wire is different and not compatible with the newer 9v system. This means it will not connect, even with the power function adaptor wires. if you really wanted something neat, buy one of the smaller 9v boxes that take the single 9v battery. -
Well I think this place is great. I have learned a lot from the people here. It is great when you hear about the up and coming sets, because you can plan for them well in advance. There are a lot of good people here who put in alot of time and effort in assisting others. That is what it is all about. I have been to other forums and felt very dissappointed that people don't reply to postings. At least here there is a readership and that you are very much aware that you are online with others. Whilst we have only a very small influence in what a toy company produces, when we look back over the past ten years or so, we have received many of the wishes sent to our "Fairy Godmother". To all who are responsible, keep up the great work!
-
Is this new tan 4L axel the shape of things to come? At the point where the clutch gear is in contact with it, there must be reduced friction thereby allowing the rotors to run more efficiently. On heavy wear points surely these will be useful where axles intersect into studless beams or for clutch gears which permit a through drive to another function. I have built this helicopter and have been impressed with the build. The battery box can be a bit of a nuisance, but TLG have covered themselves well with the rubber tipped blades, and the rachet mechanism.
-
S.I.,With the exception of the offroader, I see that you don't put the stickers on. Is that because of fading or peeling? I generally don't put them on, but only because the parts could be used for another model, where they could look wrong.
-
For myself I got the Technic Helicopter 9396. I am sort of working at it, but haven't really got a good chance as I was giving assistance to my son, who was building the Technic Backhoe 8069. And then today I had to put the stickers on my daughter's Friends "Olivia's house" 3315. We were in the middle of building it when we discovered about 20 pages missing in the second book. Hopefully we should get a replacement in the post. The house was finished with the online instructions. Back to the Helicopter, there is a nice piece assortment, so it will be built up now, but the pieces are ultimately for the parts bins. Happy Christmas to all readers and builders
-
If your loader is based on a JCB 310, then does the extra pneumatics (nearer the pivot of the boom) act as a sway control for the boom, and if you removed them, would it make any difference? Also I think you have too much headstock, causing the boom to remain too level at it's lowest point. The challenge is that you end up cutting into the area for the front axle. I made a 310 and faced similar problems. But a good model and well done with the pneumatics.
-
Small TECHNIC forklift project
trekman replied to TheQ's topic in LEGO Technic, Mindstorms, Model Team and Scale Modeling
Recently I was working on a three wheel forktruck, where the angle of the rear wheel determined the rotation speed of the two front wheels. This allowed the front wheels to drive and differing speeds and directions. The only way to get this working properly (in my opinion) was to use the NXT. Two nxt motors drove the front wheels, and then a buggy motor drove the rear wheel. A colour sensor picked up different colour zones which were located just above the rear wheel, and sent different speeds and directions to all three wheels. This then mimicked the actual working of a three wheel drive Mounty style forktruck that you would see on the rear of a lorry. Whilst the concept worked very well, I then ran into problems packing the NXT brick and bulky motors into a tiny foot print. I ended up forgetting about the NXT version and opting for a system where the two front wheels are driven from motors through a switching gearbox. The rear wheel is now a trailing castor. (ala shopping trolley) The downside is that the rear wheel trails out further than the rear of the vehicle. But at least now the model works and was built within reasonable proportions. The moral of the story is that sometimes things are difficult to exactly implement as in the real thing. What you have done is very good, and I too would be blown away if you could get it working really well. -
Greetings
trekman replied to Lakop's topic in LEGO Technic, Mindstorms, Model Team and Scale Modeling
Great to have you on board. Many of us here have experienced some period of "dark Ages" in our lives as well. We are looking forward to viewing some of your creations. -
Yep, He was given a 8868 set which never had the pnuematic tubing cut - says a lot!! I also gave him a 8062 multi set. But I guess he is spoiled with my range of pieces.
-
If that's the case, then I'd better stock up on the old studded technic beams!
-
Despite purchasing some of the new studless sets of technic lego for my son, he still builds mine! In the new studless sets, he will build the models which he has instructions for, but that will be it. Then he will come back to all my stuff, with the mix of old and new pieces, and will build from his head, mainly with studded beams, supplemented by studless technic parts. He is nine years old. Are the lego company missing something here? I believe that the jump from City or Creator to technic is too great for a child to able to build "freestyle", without instructions. As I have experienced myself, the studless system requires more forward planning, which a 9 or ten yearold mind cannot prepare for. His current studless lego technic present is waiting at the ready. But I still reckon, that he will be back to the studded beams.
-
This was my third technic set. I bought it myself when I was 16. I remember being embarrassed walking home with this set under my arm, in case anyone that I knew seeing me with it. The test car got some serious driving around on the kitchen tiles. I loved the suspension. I remember wondering if the track width was a bit long, as the wheels stuck out from the frame. Looking at the comparisions now, I think that would be the case. But I suppose you cannot have independant suspesion in those days, unless you are using todays more specialised parts. Thanks for the review. Ohhh the smell of brand new 24x43 tyres... now that's nostalgia........
-
Flashing Lights
trekman replied to Tacker's topic in LEGO Technic, Mindstorms, Model Team and Scale Modeling
If you use the older style pole reverser switch (6551), this would do it. You can use a motor to turn the internal axle hole. This creates an intermitant signal from the output. You could then use a power functions adaptor cable to connect to your PF lights. Obviously the speed of the driveshaft turning the internals of the pole reverser would determine the speed of the flashing. If any thing, I thought that this type of pole reverser is better than the newer PF one, Due to the variety of ways which it can be used. -
I have it and at first I made a mistake in building. it is one of those unforgiving models, where a mistake will cause a complete stripdown and rebuild. My set was used, and the code pilot did not work well through battery corrosion. But there was a lot of interesting features in the model and was a very challenging build. Best of all it was green, and added to my few green sets.
-
We were able to make our spreader scatter pony beads across the floor. But you had to make sure that the beads did not jam anywhere. Also if you were using your spreader, all of the load of the spreading substance would be upon the feed belt. Sometimes what they do is have a cover over the drive belt, so that the material can enter in from the sides. The cover takes the load, instead of the belt. Also we used the rubber tracks used on the NXT set. They have built in grips which move the material along quite well. Nice hopper though, with the orange panels.
-
After the work involved in getting the 4WD fitted and it not moving as well as expected I ended up dismantling it. But it would be great to see you RC'ing and it working well. I do think that it is a very nice model, especially with the modular build.
-
I built the 8448 up from spares which I had, and then added 4wd and a mid diff. Maybe it was due to the 4WD, but I found that the gear ratios were such that I did not drive well even from the XL motor. Fitting the XL was easy, when you kept the engine in the front, as there was space in the rear, but I found that there was a lot of crunching as it crawled along. It is a nice build. It is the transition stage before full studless came in.
-
You should look at the pneumatic slew on the 8868, which was very good for its time. Although a gear driven slew will be more accurate. dhc6twinotter, you are very brave tackling that model. I would love to see the rotating cab working in sync with the grab.
-
Mixing sets
trekman replied to keef30's topic in LEGO Technic, Mindstorms, Model Team and Scale Modeling
My young son has four technic sets. They were all dismantled and kept in their tatty boxes. We encouraged him to mix them and sort out the pieces. It has given him a lot more scope in building. If your stuff is new there is no problem, but I have put all my studded beams together by colour. It is now very hard to find the yellow beams which were used on the 8275 bulldozer among all the older, but still perfectly yellow ones. My nice sharp 8466 black beams are now lost in four tubs of studded beams of varying sizes. Basically to rebuild the Lego models with the original beams is well nigh impossible for me. You just have to weigh up what is important. My dilemma: When the time comes to dismantle my awesome, loved and well used unimog, do I mix it all in, or keep it separated? -
Simple Robotic arm on tracks
trekman replied to 3nslav3's topic in LEGO Technic, Mindstorms, Model Team and Scale Modeling
3nslav3, do you find that the gripper loosens during rotation, or is it minimal. The reason I ask is that I have a gantry type robot on NXT motors, but I had to change the gripper mechanisim. Because I was feeding a worm drive through the turntable, which was connected to a fixed motor, it dropped its cargo as it rotated the gripper. We had to change it so that the gripper motor rotated with the gripper. Is this the case with yours? -
Stanley do a nice range of hobby/parts cases of which I have used quite a few. Stanley Organiser Organiser Large B & Q also do a similar line. I use these sort of cases for small pins, bushes, small gears etc. When parts get bulky or too many for the small divisions, then the parts are evicted to a 500g margarine tub in the drawer of my desk. 15L studless beams will fit nicely in a margarine tub. The tubs are generally the same shape and size, and can sit nicely in a drawer. They also stack when empty. When things get REALLY bulky, then they are moved to the 1L or 2L ice cream tub. Most of the angled plates, 2 stud wide plates, Black studded beams, yellow studded beams all are contained in the Tesco value ice cream tubs. I find that my parts inventory is fluid. It is always increasing but can vary depending on what is currently built. I am now low on 6L axles and black pins, but i have a big spare box. It is good to have various sizes of tubs. We found that it is better to have a tub or container that you can tip out and look for the correct colour, instead of the organiser where you have to finger through the parts, as this can be fiddly with small light brick, bushings etc. Hope this helps