

gerger
-
Posts
64 -
Joined
-
Last visited
Content Type
Profiles
Forums
Gallery
Everything posted by gerger
-
 Thanks ALL for your appreciation!! I love the front cabin the most too and everything start from that as well. For those who have the ultimate 42009, it will be relatively easier to mount this yellow panel cabin into the ultimate 42009 chassis, double the front axle and it will become another gmk6400 mod. I can give it a try if another one can send me a lxf file of the ultimate 42009. Thanks for the kind offer, Alex Too bad that I'm not familiar with Ldraw, mainly due to the fact that it lack DirectX or OpenGL support such that it's not very responsive to camera orbit and refresh every time the camera move (that's quite important during the design process to review the appearance) I have some progress images just to record the module add on and see if it's helpful. Snipe, a clever update that I missed, good job
 -
Update2: the LXFfile is here :) happy building!! As you can see with the file, the chassis is grouped into several modules and i simply save each group into a single file and swing the camera / hide bricks to follow. Yet the order of some pieces may need attention because they may be interlocking or blocking one other. that's the down side without instruction.. There are also some dummy pieces which LDD doesn't include. I group/color them together so that it should be very straight forward to replace with. One final words is that although the crane can drive and steer with all wheel independent suspension, the performance is average or less playful than I expect (mainly due to weight). I will prefer a more simple setup without independent suspension so that the drive can be faster and steering can be smooth. It's a good experience to understand the limits of PF so that my next project can be much better prepared.
-
update: here you are the final 6 axles grove 6400 with the extended boom sit on top, making this crane heavier than i expected and much difficult to drive, and caused me some time to fix the gearing for drive and steer. I'm happy with it now :)
-
It depends on the parts I own and the parts I want... In most cases, go for the flagship every half year , eg 9398, 42000, 42009, 42025, 42030 etc will give me the best shot for quantitative values; but once I have built up my part library up to 8-10set or 10,000 parts, things get repeated and I would rather start looking for more specific, rare or new parts even it's from smaller set, eg 42021. Some rule of thumb I will keep in mind when adding new sets for parts: - I use software (brickutils, rebrickable, brickset) to record my set/part inventory, and found that I can always build 75-80% those set that I don't have. in other words, I will go for a set if I can only build less than that. (ie more parts I don't have) - space is limited. do not repeat a set as it doesn't help expanding my library in a healthy way (unless I am opening a brick shop..) - at least deduce the number of 2L and 3L pins from the total number of piece as they are everywhere, too many of them! (eg. there are 700 pins out of 2600 pieces in #42009, so I roughly know I can have 1900 OK pieces only..) - no rush, it's always cheaper in the 2nd or 3rd batch of stock for new items. (but don't wait for the last minute when set usually phase out in 2.5-3yrs)
-
I am more than welcome if there will be instructions of this MOC so that more crane can be built! There are about 2400 pieces for the chassis itself and another 1000 pieces for boom and extended arm which instructions are available already. The chassis is divided into 8 modules, with similar setup at front, middle and end suspension, same outrigger modules as in 42009, etc so that instructions won't be as challenging as in Wing Truck by Madoca ;) I'm still fixing some issues on the drive and steer to make sure it's more playable. The original driving gears are some 8 teeth gears which are so fragile that I replaced a few time and decided to change to 12 & 20 teeth double bevel gear. The steering are shaky and I am extending the rack gears to minimize wobble.. That's something I'm picking up and that software cannot tell, then update into LXF file before I can share. I also used a few bushes in black color for better looking of the cabinet but found that it's very rare item (and expensive) . My way of black bush MOC :)
-
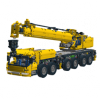
I think I have made enough progress to show my mod then moc based on 42009. The project start in August 2013 when I bought 42009 and decided to change to exterior based on Grove 6400 mobile crane, which look cool for me! Things on hold until recently I have the courage when sharing the drawings with friends and the time to finish the design in LDD. The result is a 12x12 mobile crane, with all wheel drive and independent suspension + steering. The boom and extended arm are simply Jurgens & afol1969 creation and the proportion works just great (many thanks you guys) Since I haven't build 42009 and I can only compare it in drawing. The most challenging part is to pack all 3 functions (independent suspension+drive+steering) together within 17 stud wide as in 42009. The solution is to place a differential vertically along the driving shaft, which I have posted in the other thread for more details. The build started in March and the progress are so far so good :) The back outrigger haven't build yet but the overall impression is there. The chassis is stiff but the steering is wobble. I am wondering if I have to take out the independent suspension and adopt similar steering mechanism as in 42009. Also the double XL motors have just enough power to drive all 12 wheels.. ( and smashed a few 8 teeth gears during tests!) It's my first moc in this scale, and there are still a lot to improve, eg wobble steering, better gear ratio, etc but I think the fun is there. I have a video link but don't know how to embed here.. Right now I am waiting more parts from bricklink to finish the boom and hopefully I can post the finish model soon.
-
nice mod. i have been doing the same thing for some time, but starting from the exterior as the original set doesn't look good, then all wheels drive, suspension, steering and so on that it becomes a total different chassis. the boom by Jurgens and extended arm by afol1969 are so good that i have no excuse not using them (and thx) right now the design is completed in LDD and i will have some post later when the build is done just to make sure everything work.
-
Axle Collection Thread
gerger replied to efferman's topic in LEGO Technic, Mindstorms, Model Team and Scale Modeling
I tested my own setup and the result is not perfectly smooth... the ring differential gear can turn but up to a point where its cage side wall hit the bevel gear.. Here is an updated version, which the differential is placed 1 stud lower and everything seem solved :) Pink for drive; Black for differential; red for transmission to wheel hubs; blue for steering; green to represent new 5L steering arm. I will try to build it this weekend to see how it works. LXF here. -
Axle Collection Thread
gerger replied to efferman's topic in LEGO Technic, Mindstorms, Model Team and Scale Modeling
it's should be the middle pinion axle driving the ring gear, but i found another problem that the left bevel gear is touching the ring gear , but LDD somehow allow the build.. -
Axle Collection Thread
gerger replied to efferman's topic in LEGO Technic, Mindstorms, Model Team and Scale Modeling
Igor, i came into similar question when i am moc-ing my 42009 into all wheels drive + independent suspension+ steering , which the model is 17studs wide wheel to wheel. Here's what I come up with by placing the differential vertically. I haven't test it out yet and hopefully it works ok. LXF file here. just replace the 4 red 1x3 beams with new 5L steering links (part #15459) -
Clone Racers (Copycat Lego)
gerger replied to RohanBeckett's topic in LEGO Technic, Mindstorms, Model Team and Scale Modeling
it may look ok 'from a distance' but the tolerance is horrible. review said parts are either over loose / tight; color varies; strong tires smell ( unknown/unsafe abs plastic sources?); model will just fall apart by itself, etc we understand that lego is "WYPIWYG" (what you pay is what you get)... however, the quoted ebay price for 70euo is almost 10 times higher than those fake china il-lego.. -
I created a LDD file to document my earlier MOCs (post #165) when i was disassembling my own version of 8043 with some minor changes, see if that's helpful. https://dl.dropbox.com/s/bozgxon1g7d508z/8043-rt.lxf
-
This MOC is superb and Thanks to Madoca, I learn a lot by working steps by steps in LDD while I don't have enough bricks to build one yet... Still I'm much appreciated the collaboration works here to make this MOC more than perfect with every possible contribution. So here are some of my additional add-on. I have saved the steps while I was messing around with LDD and I'm not sure if this help to facilitate the Ldraw/LPub stepping process. I will continue on the chassis and here are the first 50steps .lxf files. Updates: Here you are the complete chassis without container. the lxf files are now more organized with grouping and stepping. The only missing parts that are not available in LDD are: - x873c01 / x872 Steering Gear with 4 Ball Joints, x4 (or replace with 32186 Steering Gear with 3 Ball Joints will also work fine) - 88003 PF L Motor x 2 - 88004 PF sevro motor x 1 - 8870 PF light x 3 - 8869 PF control switch x 1 - 8886 PF extension wire 8" (20cm) x 5 - 8871 PF extension wire 20" (50cm) x 6 http://www.dropbox.c...vsjix2/_lxf.rar
-
Sorry for my poor english as I am non-english speaker. I built my 8043 set in early 2011 and had been putting it onto shelf, until I found recently that the two actuators supporting the boom were getting very weak even with new batteries installed. Inspired by the MOC from this post but without too many extra parts from my own, eg, the expensive 8878 rechargeable battery, I tried to pack the default AA batteries box with 6 motors plus some extra work around for more space to align the IR receivers, etc.. it's a great set to play with and her are some overview. upper Large motors x2 (for arm, boom) to give spaces to accommodate three IR receivers on the right ( XL motor in the middle may also fit for the boom but it's slow..) lower motors x 4(for L+R travel, swing and bucket) to fully utilize the chassis width swing gears set relocate from right to the left; AA battery box at the back right side mainly for cables *images links are fixed.