
Steinkopf
-
Posts
224 -
Joined
-
Last visited
Content Type
Profiles
Forums
Gallery
Everything posted by Steinkopf
-
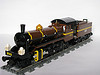
Beautiful work there LT12V, you have done a great job of maintaining the nice smooth lines of this train, I really like how you have been able to blend the PF components into the build without them impeding on the looks of the locomotive.
-
Thanks, the main idea was to maintain the overall look of the train but in a much refined version akin to polishing a rough diamond. The main thing that bugged me other than the coach length was the profile of the roof, given that the model is supposed to be of a High Speed Train you would expect nice clean lines, I chewed through quite a number of these http://www.bricklink.com/catalogPG.asp?P=2875&colorID=1 to get the nice clean lines that I desired. I also lifted the nose up by one plate which helps lift the window panels up to a point where the passengers eyes can look straight out, this is an issue I noticed with the original design and the Horizon Express, by extending the bottom band using Dark Bley plates its maintained the continuity of the livery and made a substantial change look very subtle. Switching her over to 9v was also a big must on the to do list, the battery box and receiver spoiled the look of the train as well as taking up space for passenger in the power car, I will eventually use the PF gear in a model but it will be one where all of those components can be well disguised within the build. Thanks, despite the arguments about the nose I really like it, I have several copies of 4511 which were scrapped for parts and my son has a copy of 7897 so I am pretty familiar with the past offerings, yes there are some things that could have been done better with it, but when compared to past offerings the new nose wins hands down. With the pantograph shoes I use these http://www.bricklink.com/catalogPG.asp?P=42013&colorID=66 , I use a mix of 3 mm Rigid Hose and minifig hands as well as a number of other parts to finish it off. Thanks everyone else for your kind comments.
-
Hello Everyone A while back when pictures were leaked of the new High Speed Passenger Train 60051 I looked at it and thought of the possibility of a modified version gracing the rails of the LBB. I had wanted to build a High Speed Train earlier on but I was rather disappointed with the nose of 7897 and with 4511 the cab was too futuristic looking, with 60051 however I could see the potential for a nice looking train straight away. The original design is quite nice but there were a number of things that I wasn't happy with, I wanted to see what could be done to improve the overall design. These included the number of cars in the train, the length of the coaches, interior detail, lack of defined doors on the coaches as well as the profile of the roof and the pantographs. I then set about on a program of deciding what parts to use and then collecting them from Bricklink while I waited for the set to be released, then finally when the set became available it was off to work, now to the backstory. In 2001 the LBB made the decision to provide high speed passenger trains for use on the cross border inter city services between Legodtenstein and San Antonio, they embarked on a program that saw the introduction of five 4 Car trains into service on the LBB network. The RABDe 4/16 consist of a 1st Class Power Car, 1st Class Coach, 2nd Class Coach and 2nd Class Power Car, the whole consist is capable of reaching speeds of up to 200km/h. Shot of the overall length of the train View of the 2nd Class Power Car and Coach View of the 1st Class Coach Interior of 1st Class Coach Rooftop detail showing the Pantograph Trackside shot
-
With the chimney I have used a Black Palm Tree Trunk piece http://www.bricklink.com/catalogItemIn.asp?P=2536&colorID=11&in=A on a couple of my steam locos and it looks very effective, there are still a decent number left on Bricklink and they are relatively inexpensive.
-
It would have been even better if the wheelsets and buffers were Dark Bley, there are a large number of railways worldwide that use a similar colour for their underframes and running gear and it would have been a nice change from the standard black ones that have been used since the dawn of time.
-
Thanks everyone for the comments. Thanks Benn and Ronald When building my trains I try to present a "what if" situation where if LEGO had continued on with the 9v range that the designs and construction of them had matured into more detailed models, not to say that this has not happened already as seen by the Horizon Express and the Maersk Train albeit in PF. The idea is in many respects make it look like it could be an official set, yet at the same time make it look like it could be based on a real life design.
-
Unfortunately the tight curvature of the track has always been an issue resulting in the wide swing of the nose with most of the LEGO Train designs, especially the High Speed Trains the last two designs 4511 & 7897 swung out a similar distance to the new train. Also placing structures such as platforms close to the end of a curve or set of points has always been a big no no due to the issue with clearances. Many years ago when my friend Mr P and myself were working out the specifications for clearances and the loading gauge for a train club we had started, we found that you had to have a 5 stud clearance on the outer section of curved track. With LEGO Trains sets you have to consider that they are quintessentially Toy Train sets and are designed more for being a toy than a model, even then you only have to look back at model railways and see that up until about 20 years ago the curvature of tracks was quite tight. Before then there was what is known as No 1 Radius and No 2 Radius Curves, these tracks were designed to be used on boards up to 120cm/4 feet in width, in the late 1970s we saw the introduction of flexi track that gave the ability to make larger radius curves and then in the 1990s manufactures started to bring out No 3 Radius and No 4 Radius curves. This was also brought about by the fact that a lot of the Ready To Run locomotives had become far more accurate in scale and detail compared to their predecessors, the wheelsets and drive gear such as pistons on the older trains were far more simplistic and had more slop compared to the tolerances required for the new finely detailed models. Another point of note is that up until the late 1970s most pieces of model railway equipment was designed to give the style and look of a particular prototype and were more a compromise of selective compression to capture the essence of a design rather than being a highly accurate representation of the real thing.
-
Hello Everyone Over the years of building models for my LBB I have had a number of projects that have sat on the backburner for several years, this happens for a number of reasons that range from availability of parts in a certain colour to waiting around for a whole new part to be released that will open up new building opportunities. This model falls into the latter category, I had always wanted to build a modern styled 3 Car Electric Multiple Unit for several years but struggled to find a design for the cab that I was happy with, for me I like a nice clean build as I have an aversion to unsightly gaps and bumps that in reality should be a smooth transition. Recently my wish came true with the introduction of the part ref 11477 Curved Slope 2 x 1 http://www.bricklink.com/catalogItemIn.asp?P=11477&colorID=5&in=A that compliments the part ref 88930 2 x 4 Bow Plate http://www.bricklink.com/catalogItemIn.asp?P=88930&colorID=5&in=A , this gave me the ability to make a 6 wide cab with a rounded bottom section and I am pretty happy with the results, anyway now lets get to the backstory. During the mid 1990s it became apparent to the LBB operating division that the ABe 4/12 class of 3 Car EMUs were becoming somewhat tired and increasingly harder and more expensive to retain. The ABe 4/12 units had been in service from the mid 1960s and the decision was made to dispose of the whole fleet and replace them with a more modern design, a total of 12 ABe 4/12 II units were purchased between 1998 and 2003 to facilitate that. The ABe 4/12 have little in common with their predecessors other than the wheel arrangement and 3 Car format, the new design boasts more powerful traction motors as well as air conditioning which provides a far more comfortable and efficient ride for it's passengers. This model has been inspired by a number of modern EMU designs including the DB Class 423 and Class 425 units. LBB ABe 4/12 II by Das Steinkopf, on Flickr LBB ABe 4/12 II by Das Steinkopf, on Flickr LBB ABe 4/12 II by Das Steinkopf, on Flickr
-
I for one actually quite like the nose as it has a nice sleek modern look to it, I can't fathom the logic of some people regarding brick built solutions in all honesty they are generally far more heavier and parts intensive compared to moulded nose pieces. The brick built solutions also cannot give us the smooth and graceful lines that a specially moulded part gives, they instead look chunky and are normally full of awful gaps that detract from the level of realism that they are supposed attain. I will definitely be purchasing a copy of the High Speed Passenger Train and using it as the basis for a more highly detailed model, the only negative I can say about this set is the centre coach is too short, but that doesn't matter as I have already purchased some Dark Bley 6 x 28 Train Bases to make new coaches.
-
When it comes to talent it's something that develops over a period of time, I look back at how I built trains when I got into it in 2003 and see a vast difference in quality and style when compared to what I build these days, have a good look at the Flickr LEGO Trains Techniques group http://www.flickr.co...ps/1353660@N21/ for building ideas, also the Flickr LEGO Trains group https://www.flickr.c...ups/legotrains/ is a great place for inspiration.
-
If you want more trains and accessories why not try building MOC's thats what I did, don't waste your money on 'Clone Bricks' your better off Bricklinking parts and making your own train stuff at least that way its still LEGO.
-
I look forward to seeing the new batch of trains for 2014. I know a lot of people are being quite negative about the nose piece on the high speed train but I for one like it, to try and replicate that style of nose in brick form would be quite parts intensive and nowhere near as smooth, the nose does remind me of the ICE 3 train and is a vast improvement on the nose pieces used in 7897 and 4511. I have personal experience with both as my son owns a 7897 and I have multiples of the 4511 set, mind you I don't use any of the nose pieces as the LBB does not operate any high speed Inter City Express trains so those parts are surplus to requirement. The only negative I can see with the passenger train is the distinct lack of doors on the train cars, this has also been the case with a number of passenger train sets including 4511, 7897 and 7938. It would be nice to see what else is coming out with the freight train, I am curious as to what the rolling stock that comes with it looks like, the locomotive itself looks like it is loosely based on a US style Diesel Electric. It's also nice too see a new version of the older style train front, I dare say this newer version will be a very welcome element to the train community, the fact that it's a new molding does give hope that we will see element come out in a number of train sets in a variety of colours in the future, the new version also looks like it will be more versatile compared to the earlier version.
-
Nice work Adamskii, you have done a pretty good job with catching the look and style of this "Maid of all work" class of locomotive, I like the solutions you have come up with and I am with you about the lack of 1x2x2 widows in Green, it drives me nuts as well and there are some projects I want to work on that need them. My only suggestion at the moment in regards to the locomotive is to maybe replace the the cone that you are using for the exhaust funnel with a part ref 60481 2x1x2 Slope, I am very familiar with the 830s sister class the NSWGR 48 Class and the cone looks a bit to big to use for the funnel, alternatively you could make her into a Tasmanian version and have the funnel cut off. Out of curiousity do you have a copy of Motive Power July/August 2013, it has a quite lengthy article on the 830 Class and follows the classes history from SAR and AN (including their deployment to the Tassie division) to the current day where they are used by a number of operators, there is also a large number of photos in all the different liveries.
-
Beautiful work there Adamskii, the level of detail that you have put into this model is fantastic and captures the look and style of this locomotive so well, I am quite familiar with the NR Class as I have seen them at work many a time and your model is an excellent representation of the class. I also quite like your 830 Class Co-Co and again I will say you have done an excellent job in capturing the look of that class, unfortunately I have never got to see the 830 Class in action but I have seen many of its sister class the NSWGR 48 Class at work in a wide variety of liveries including that of the dreaded Pacific National.
-
Hello JopieK The part ref 2432 http://www.bricklink.com/catalogItem.asp?P=2432 is used as a step, due to the LBB having low lying platforms similar to those used on a lot of European railways there is a need for steps to be fitted for passengers and crew to climb aboard the train.
-
Thanks everyone for the comments The van is not fitted with any form of mail collection gear like a TPO van (Travelling Post Office) as it is purely for carrying mail between stations similar to the Postwagens used in Germany and Switzerland, I am not sure which white part you are talking about it could be either the signal paddle used by the train guard which is stored above the ducket or it could be the coffee pot that is on the small stove . The bags are held up by the part ref 48729 1L Bar with Claw http://www.bricklink...tem.asp?P=48729, 2 of those claws are connected to a part ref 4735 Robot Arm http://www.bricklink...Item.asp?P=4735 which is then connected to the ceiling, I have a total of 8 of those assemblies fitted to the roof which gives the van the ability to carry 16 mailbags suspended from the ceiling.
-
Hello Everyone About 5 years ago I built a PBV (Parcels Brake Van) for use as a mail van for my trains, this MOC had been an on again off again project as I dabbled with ideas on how to fit out the interior detailing, a few days ago I decided to finally bite the bullet and finish this MOC off once and for all. I have made some subtle changes to the exterior as I didn't really want to change the overall look of the van outside as I wanted to maintain it's overall character, I did however fill the vast void of space insde that had been left empty for many years. The interior is fitted with a small mail sorting area as well as ample storage space for mail bags, there is a guards area with a brake for the train and side duckets for the guard to look along the length of the train, also there is a small stove and kitchen area for the staff to prepare light meals. The van is crewed by an LBB Train guard as well as staff member from the LBP (Legodtenstein Bundes Post), with the mail bags they are suspended from the roof of the van so there is ample space on the floor to store heavier items such as parcels. The LBB purchased a total of 8 Z6 Postwagens between 1938 till 1946, they are used widely over the LBB network for the cartage of bulk mail. The Z6 are fitted with a brake compartment for the train guard as well as a mail sorting and storage area. The vast bulk of the mail is presorted before it is put on the train, there is however a small sorting area that does allow for late sorting to be done if required.
-
Beautiful work there Helos, just like all your previous models the attention to detail that you have poured into it you have crafted a truly superb model.
-
It's a beautiful little station you have made there Esben, I also like the lovely little railbus that you have serving it the two models complement each other so well.
-
Thanks everyone for the comments. Hello dr_spock, I didn't try the 1x4x3 transclear panels as they would have not looked appropriate in the size and style for the era of train I was modelling, mind you they look good when used for modern stock.
-
Thanks Urbain Erwin, the pictures are on my Flickr stream I will put the links for you to see.
-
JK: I just merged your two identical topics Steinkopf
-
Hello Everyone It's been a while since I have posted as I had not been building for some time,recently I decided to pullout some of my LBB MOC's and give them a bit of a makeover using some newer parts as well as different elements. The first one to recieve this treatment was the vintage Push-Pull Set consisting of the BDe 4/4 Triebwagen and the ABt Steurwagen, in the original models I had used trans clear 1x2x2 Panels for the passengers windows, I was never happy with the panels and I had wanted to use some 1x4x3 Windows of some description but sadly back the there was none in Green at the time. Ideally I wanted to use the part ref 6556 Train Windows in these designs but I had also pondered using the part ref 60594 Windows without Shutter Tabs, after seeing Carls (Bricktrix) beautiful Class 116 DMU using the part ref 60594 Windows I was convince that I should give it a try, the results speak for themselves as I have now achieved the results I wanted when I originally start building these models. The next model to recieve the makeover treatment is the KLS/LBB 48 CLass 0-4-4-0 Mallet. When I first built this model I used 1x8 Technic Plates for the Drive Rods, this unfortunately meant the cylinders were placed more forward than I wanted which in turnlead to having to have the bogies set further apart as well as having a larger footplate area at the front of the locomotive. I initially didn't want to use 1x7 Half Width Technic Liftarms due to the holes in that part, but eventually I got over my aversiuon to this part and decided to use them, this has now helped me reduce the lngth of the locomotive by 3 studs as well as bringing the bogies closer together. The locomotive has now acquired a more squat and powerful look compared to the original build, the look that I now have achieved is a lot closer to the KPEV G9 0-4-4-0 that had served as my inspiration to build a Mallet style locomotive.
-
It's great to see a number of parts in colours that they have not been produced in before, the Dirt Bike fairing in Black and the frame in Flat Silver or Light Bluish Grey as well as the train cab windscreen part ref 6567 in White.
-
Hello Joe The US equivalent to a Guard's Van is a Caboose, the larger versions that were used on passenger services also acted as baggage car.