
Steinkopf
-
Posts
224 -
Joined
-
Last visited
Content Type
Profiles
Forums
Gallery
Everything posted by Steinkopf
-
Firstly I do some research looking at photos of real life prototypes that are similar in style to the piece of rolling stock I would like to build, this site http://www.railfaneurope.net/ in particular is a great source of inspiration for the type of trains I like to build, after looking at a variety of designs I decide what features from those designs I would like to incorporate into my models. I don't use any form of digital building as I prefer to hold the item I am working on in my hand and view it from a number of angles to see if it looks right, call me old school but I like having the hands on approach from beginning to end . With locomotives I first work on a key area of the design and work out the rest of the proportions from there, Diesel and Electric locos I start from the cab area and then work on the body, Steam locos I have to tackle two areas working on the chassis and the boiler at the same time. Passenger stock I generally stick to 32 studs in length with some stock going to 36 studs from there I have to work out the placement of windows and seats as these will dictate the amount of minifigs I can fit into a design, after I have that sorted I then look at how much room I have to fit other details such as baggage storage areas. I tend to apply some pretty strict guidelines to my builds such as all seats must be capable of seating a minifig in a comfortable pose, I also like to have opening doors on my stock, the only exception is for designs where an opening door is not suitable for the style or wont fit in the space available, the LBB 2nd Class Clerestory coaches are a prime example in this case. Freight stock follows similar principals to real life examples such as common length underframes/chassis, 4 wheeled wagons are all built to 18 studs in length whilst bogie stock differs, vans are 32 studs in length, flatcars, gondolas and container flats are built to 28 studs in length. I tend to play around with the fittings until I am happy with the proportions and placement of them. With my van stock they all have opening doors and the interiors are uncluttered so I can fit loads inside them I find this an important feature as I like to be able to create scenes where they are being loaded or unloaded.
-
My thoughts exactly considering in my part of the world it's the 1st of April, nice try roamingstudio the main giveaway was this part http://www.bricklink.com/catalogItem.asp?P=3069bpx6 it was not released until 1996 which is well past the retirement of the 12v Train range .
-
Hello BorgShadow The Tangara is not mine, it was built by my friend Darrell, he has built a number of New South Wales trains including K Set Double Deck EMU, CPH Railmotor, Tangara and Expolorer DMU just to name a few here is a link to some of his work http://www.flickr.com/photos/17661082@N04/page8/ .
-
Hello Everyone I thought I would make a change from posting work I have done on rolling stock and instead focus on a bit of lineside structure instead. This model is of a traction substation which is used to supply power to the catenary for electric trains to run on the LBB, the model is designed to represent a yard that converts 66kV 16.7Hz AC to a 15kV 16.7Hz AC supply for the overhead wiring. The model is of a typical modern open yard design which features 2 step down transformers, busbars, earthing cabinets, isolating switches as well as voltage and current transformers, there is also a switchroom which has a fully detailed interior including circuit breakers as well as control and monitoring equipment. View of the yard on the SLGG's award winning Brickston Valley layout at the AMRA 49th Sydney Model Railway Exhibition. General views of the yard. Inside the switchroom including showing one of the LBB electricians doing some maintenance on one of the Vacuum Operated Circuit Breakers.
-
Thanks again Elroy for putting together another great issue of Railbricks, your work goes along way to supporting and promoting our hobby. Regards Dave Hello LT12V the Traction Substation is my work which I will post on here soon, I also wrote the article "Keeping The Juice Flowing", I hope you enjoy the great work that Elroy and the team have put into this issue as well as every other issue of Railbricks.
-
The front wheelset is articulated and has got a very good range of traverse, the loco is able to negotiate points, curves and reverse curves with ease traveling in forward and reverse, the loco is able to do this when running light or with rolling stock coupled to it. When I build my trains I always set up a test track with points and reverse curves to test out how they run as a chassis first and as a complete loco later on at a wide range of speeds, I test them running on their own as well as pulling and pushing rolling stock in both direction to ensure that there are no issues with how the locomotive performs. Here are some photos to show you the setup, the design is about 4 years old now and has worked perfectly it is quite simple to build yet it is very effective in operation.
-
Eventually I would like to fit some detail in that area but I would still like to have a decent amount of daylight under the boiler, there are quite a number of classes from the late 1800s till the end of steam that featured a fair bit of daylight under the boiler including the Midland 4MT 0-6-0, NZR Q Class 4-6-2 and the BR 9F 2-10-0.
-
The curvature on the points is the same as normal curves the problem is that it's a reverse curve, negotiating that section at high speed you can get a whiplash effect in the couplings that can cause the stock to derail. I noticed with your loco you have the coupling attatched to a draw bar which gives the coupling a far greater range of travel compared to the standard buffer arrangement, that feature is very useful when negotiating curves, where my concerns are is if you are using the standard buffer couplings on all the stock the pivot points have a far lesser range of traverse. With the coaches you may need some form of drawbar arrangement to couple them together, that way you would remove any potential problems.
-
Looking at the video I suspect you may have some issues with the buffer beams and couplings when they are connected to other stock, my advice would be to make a second chassis and test them behind a loco, the main area for concern is when your train is travelling through points given the curvature of track that the train will have to negotiate.
-
Very nice work there LT12V you have captured the look of a typical German railway "Bekohlungsanlage" (Coaling Stage) really well, I also like your coal wagons they remind me a lot of ones made by Brickshelf user Grunneger http://www.brickshelf.com/cgi-bin/gallery.cgi?i=3374350 but yours have nicer ends with the tile cladding emulating planking as well as a spot for the shovel. Out of curiosity is this going to be part of a larger scene with a locomotive depot or will it be a stand alone model.
-
That's what my thoughts were originally but given the coaches are 8 wide I think it will make the centre section of the roof too flat as there is a fairly pronounced curve in the real life version, if the coaches were to be made 6 or 7 wide the 6005 arches would be perfect.
-
If you wanted to take the non purist approach you could use Green 61487 slopes and put Dark Bley vinyl/sticker over the top surface and cap the studded section with tiles, looking at the roof profile that would follow a very similar shape, also you would be able to retain the green ends like the original. With the inverted slopes you don't need that many as they are stiffening ribs that go from the underframe to the coach sides, if you have a good look at the photos you will notice that as well as the other fitting such as brake cylinders and battery boxes etc, black is the right colour to use for that.
-
Train Tech Spotlight Builder: Steinkopf
Steinkopf replied to WesternOutlaw's topic in LEGO Train Tech
Hello Gents Unfortunately due to issues at work I don't think I will be able to commit to the SBS, trying to get time off is near impossible due to shortages in the management team, I will however be displaying at the AMRA Sydney Model Railway Exhibition during the October long weekend. Also thanks to everyone else especially TheBrickster for giving me the opportunity to share my experiences with the community, I would like to see the Builders Spotlight become a regular feature of the forum as there are a lot of great builders out there and it would be good to get an insight as to their view of the hobby. -
Hello Everyone Here are some photos of a shunter that I have built for my LBB, I recently did a slight redesign of the short nose section as I was not happy with the original approach I took when building her. The design is a Freelance build and captures a lot of elements typically found in these small locomotives, I was inspired by a number of designs including the OBB 1067 Class http://www.railfaneurope.net/pix/at/diesel/shunter/2067/red-white/083-111/2067-096-mt.jpg , BOB Tm 2/2 http://www.railfaneurope.net/pix/ch/narrow_gauge/BOB-group/BOB/locomotive/BOB1io2.jpg , and the RhB Gm 3/3 http://www.railfaneurope.net/pix/ch/narrow_gauge/RhB/diesel/Gm3_3/RHB-GM3-3-231.jpg, Tm 2/2 http://www.railfaneurope.net/pix/ch/narrow_gauge/RhB/diesel/Tm2_2/111-120/RhB_112.jpg classes. I wanted to make a compact little locomotive that could be used anywhere from station pilot duties to shunting freight yards, industrial and harbour lines, the locomotive is similar in size to a 4 wheel freight wagon. Here is the backstory about the locomotive. The LBB purchased a total of 5 Tm 3/3 Shunters between 1968 till 1974 and they are the smallest locomotives in the LBB fleet, they have a rating of 250hp and a top speed of 40km/h. These small but handy locos can be found at a variety of locations on the LBB network shunting trains in freight yards or industrial sidings. Seen here with a G6 Ventilated Van for a size comparison.
-
Thanks Tearloch With the 1x1 plate modified its more of a matter of coming across them at the right time, I have a lot of rare parts in my collection that I have sourced from BL, sometimes I have waited for at least 2 to 3 years to get my hands on some parts.
-
Thanks Everyone for the comments. Thanks Tony I know you always have a soft spot for Green and Black livery just like that of the TSR , I still have to get you to build a small boilered loco using half cylinders one of these days .
-
Hello Everyone Following on from the 19 Class 2-4-0 locomotive I would like to share pictures of some of the passenger coaches that she hauls behind her, I have built a 1st Class 4 wheeled coach a Luggage/Parcels Brake Van and two 2nd class Bogie Clerestory Coaches for use on LBB vintage passenger services. 1st Class 4 wheel Coach This model seats 4 minifigs in comfort (1880s style that is) Parcels Brake Van This model has a full interior which includes luggage storage racks as well as ample space for parcels and bicycles. The guards area has the brake standard a small stove and other gear, there is also a cupola that the guard can climb up into to view the train from end to end. 2nd Class Clerestory Coaches These coaches can easily seat 8 minifigs and have overhead luggage racks for storing suitcases.
-
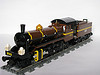
Hello Everyone I would like to share some photos of a locomotive I built a few years ago originally for the Flickr Lego Trains MOC's 2-4-0 competition, since then the locomotive has gone through a number of progressive rebuilds to the state she is in today, the design is a freelanced build and is inspired by a number of designs used by a variety of German railways from around the 1880s, the main influence is from the Saxon IIIB http://www.worldrailfans.info/Articles/Europe/GermanSteamImages/Saxon/IIIb.jpg and the Wurttemberg AC http://www.worldrailfans.info/Articles/Europe/GermanSteamImages/Wurttemberg/Ac.jpg class locomotives. Here is the Backstory about the locomotive Built in 1885 the 19 Class was the last 2-4-0 type to be built for the Kaiserlich Legodtenstein Staatsbahnen, a total of 8 were built of which 194 is the last example left. The class were used on express services till 1904 with the introduction of the 85 Class 4-4-2 Atlantics, from then on they were employed as a mixed traffic loco on branchline services until the 1950s when the scrapping of the steam fleet began.
-
Very nice work there Solta with using the IR base, they are not the most build friendly of elements to use but you have done a really good job with creating such a nice looking locomotive.
-
Beautiful work there, I love the myriad of colours and textures that you have been able to work into this model, the level of detail is fantastic.
-
MOC: WD 42 'Overlord' 0-4-0 Diesel
Steinkopf replied to LEGO Train 12 Volts's topic in LEGO Train Tech
Nice work on building such a compact sized loco, in particular I like how you have done the flywheel arangement for the coupling rods. -
Hello roamingstudio With my locomotives they are not exact copies of real life ones, I practice what is known in the model railway world as "freelancing" this is where you draw inspiration from something in real life and then apply your own interpretation of it. The inspiration for this locomotive in particular came from the OBB 1063 Class which I wanted to capture elements that I liked in the real life locomotive, these include the inverted slope of the windscreen the long low hoods and centre cab arrangement.
-
Hello Everyone here is the next locomotive I would like to show the Be 4//4II, this locomotive is mainly used for freight haulage on the LBB network, the design was inspired heavily by the OBB 1063 Class locomotive from Austria.
-
Beautiful work there Carl you have captured the spirit of this locomotive so well, the level of detail you have lavished on this model is superb and would equally match any O gauge model for detail, the BR standards are probably the hardest to model due to the large number of external fittings compared to the usually clean lines of British locomotives . When you do get to take her to PW's can you take a camera as I would like to see a picture of his jaw dropping when you show him .
-
Hello Everyone I would like to share some photos of one of my most favourite locomotives in my collection, back in 2003 when I first got into 9v trains I would look through the back catalogue of 9v sets and always had one favourite the iconic Crocodile 4551. In 1992 when I was helping my uncle on my grandparents farm I went to the local toy store and saw a 4551 sitting on the shelves at a price of $90.00 AUD, I looked at it and thought that looks cool, at the time I was modelling OO Gauge Model Railways and could not justify buying it. Wind the clock 11 years into the future and here I was kicking myself that I didn't buy it back then especially when the MISB price was $450.00 US. Then in 2006 the IR Freight train was released and even better the cab front and other pieces were in green I thought immediately this was my opportunity to finally have a Crocodile of my own, but when I bought the set instead of building a copy of 4551 I thought I will do my own take of one of these beauties, the locomotive was inspired by the RhB Ge 6/6, SBB Be 6/8 and the OBB 1189 classes of locomotives. This locomotive has had a number of progressive rebuilds over the years as better/new parts become available or ideas of how to improve it's looks and finally after 6 years I can happily say that she is completed.